Operation Manual
Page 4
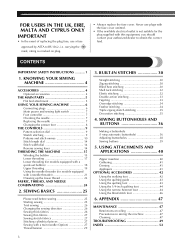
... BUTTONS 36 Making a buttonhole (1-step automatic buttonhole 36 Adjusting buttonholes 38 Sewing buttons 39 5. FOR USERS IN THE UK, EIRE, MALTA AND CYPRUS ONLY IMPORTANT • In the event of replacing the plug fuse, use ...
... BUTTONS 36 Making a buttonhole (1-step automatic buttonhole 36 Adjusting buttonholes 38 Sewing buttons 39 5. FOR USERS IN THE UK, EIRE, MALTA AND CYPRUS ONLY IMPORTANT • In the event of replacing the plug fuse, use ...
Operation Manual
Page 5
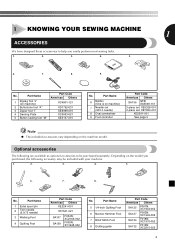
... SA156 SFB: XA5539-151 3-piece set: XE5328-001 2-piece set: XE7064-001 XE5241-001 See page 5 Note ● The included accessories vary depending on machine) 2 Buttonhole foot "A" 3 Zipper foot "I" 4 Darning Plate 5 Button sewing foot "M" Part Code Americas Others XC4901-121 XD1792-031 XE9369-001 XC6063-021 XE2137-001 No. Part Name...
... SA156 SFB: XA5539-151 3-piece set: XE5328-001 2-piece set: XE7064-001 XE5241-001 See page 5 Note ● The included accessories vary depending on machine) 2 Buttonhole foot "A" 3 Zipper foot "I" 4 Darning Plate 5 Button sewing foot "M" Part Code Americas Others XC4901-121 XD1792-031 XE9369-001 XC6063-021 XE2137-001 No. Part Name...
Operation Manual
Page 6
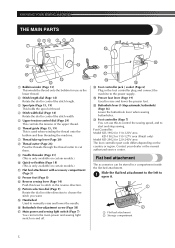
...Reverse sewing lever (Page 14) Push this to control the sewing speed, and to the power supply. J Buttonhole lever (1-Step automatic buttonhole) (Page 36) Lower the buttonhole lever when sewing buttonholes. E Handwheel Used to 1 open it. 1 2 1 Flat bed attachment 2 Storage compartment 5 Foot Controller...winder (Page 15) This winds the thread onto the bobbin for 220-240V area The foot controller part code differs depending on and off. F Buttonhole fine-adjustment screw (Page 38) G Main power and sewing light switch (Page 7) You can turn the main power and sewing light switch on...
...Reverse sewing lever (Page 14) Push this to control the sewing speed, and to the power supply. J Buttonhole lever (1-Step automatic buttonhole) (Page 36) Lower the buttonhole lever when sewing buttonholes. E Handwheel Used to 1 open it. 1 2 1 Flat bed attachment 2 Storage compartment 5 Foot Controller...winder (Page 15) This winds the thread onto the bobbin for 220-240V area The foot controller part code differs depending on and off. F Buttonhole fine-adjustment screw (Page 38) G Main power and sewing light switch (Page 7) You can turn the main power and sewing light switch on...
Operation Manual
Page 11
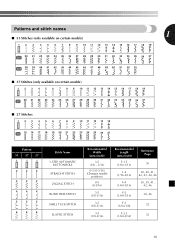
... 11 12 13 14 15 16 17 18 19 20 21 22 23 24 25 26 27 Pattern 53 37 27 1 1 1 2 2 2 3 3 3 4 4 4 5 5 5 6 6 6 Stitch Name 1-STEP AUTOMATIC BUTTONHOLE STRAIGHT STITCH ZIGZAG STITCH BLIND HEM STITCH SHELL TUCK STITCH ELASTIC STITCH Recommended Width (mm (inch)) 3-5 (1/8 - 3/16) 0-5 (0-3/16) (Changes needle position) 0-5 (0-3/16) 3-5 (1/8-3/16) 3-5 (1/8-3/16) 3-5 (1/8-3/16...
... 11 12 13 14 15 16 17 18 19 20 21 22 23 24 25 26 27 Pattern 53 37 27 1 1 1 2 2 2 3 3 3 4 4 4 5 5 5 6 6 6 Stitch Name 1-STEP AUTOMATIC BUTTONHOLE STRAIGHT STITCH ZIGZAG STITCH BLIND HEM STITCH SHELL TUCK STITCH ELASTIC STITCH Recommended Width (mm (inch)) 3-5 (1/8 - 3/16) 0-5 (0-3/16) (Changes needle position) 0-5 (0-3/16) 3-5 (1/8-3/16) 3-5 (1/8-3/16) 3-5 (1/8-3/16...
Operation Manual
Page 15
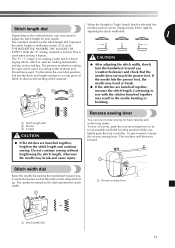
... the reverse sewing lever. When the Straight or Triple Stretch Stitch is selected, the Stitch length dial needle position can use reverse sewing for making buttonholes and decorative stitches. Do not continue sewing without lengthening the stitch length, otherwise the needle may bend or break. 1 2 3 ● If the stitches are bunched...
... the reverse sewing lever. When the Straight or Triple Stretch Stitch is selected, the Stitch length dial needle position can use reverse sewing for making buttonholes and decorative stitches. Do not continue sewing without lengthening the stitch length, otherwise the needle may bend or break. 1 2 3 ● If the stitches are bunched...
Operation Manual
Page 31
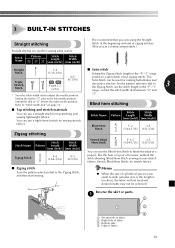
... dial to 3 the Zigzag Stitch, set the stitch length in the "F"-"1" range 0-5* produces a satin stitch (close zigzag stitch). You can use a straight stitch for making buttonholes and decorative stitches. Stitch Name Blind Hem Stitch Stitch Stitch Pattern Length Width [mm (inch)] [mm (inch)] 4 F-2 3-5 (1/64-1/16) (1/8-3/16) Zigzag stitching Stitch Name Stitch...
... dial to 3 the Zigzag Stitch, set the stitch length in the "F"-"1" range 0-5* produces a satin stitch (close zigzag stitch). You can use a straight stitch for making buttonholes and decorative stitches. Stitch Name Blind Hem Stitch Stitch Stitch Pattern Length Width [mm (inch)] [mm (inch)] 4 F-2 3-5 (1/64-1/16) (1/8-3/16) Zigzag stitching Stitch Name Stitch...
Operation Manual
Page 37
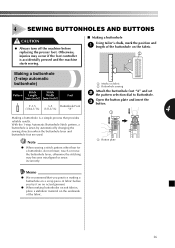
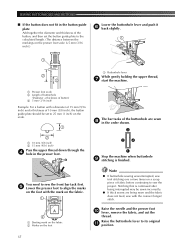
... automatically changing the sewing direction when the buttonhole lever and buttonhole foot are used. With the 1-step Automatic Buttonhole Stitch pattern, a buttonhole is accidentally pressed and the machine starts sewing. ■ Making a buttonhole Using tailor's chalk, mark the position and 1 length of the buttonhole on the fabric. 2 1 Making a buttonhole (1-step automatic buttonhole) 1 Marks on the underside of fabric...
... automatically changing the sewing direction when the buttonhole lever and buttonhole foot are used. With the 1-step Automatic Buttonhole Stitch pattern, a buttonhole is accidentally pressed and the machine starts sewing. ■ Making a buttonhole Using tailor's chalk, mark the position and 1 length of the buttonhole on the fabric. 2 1 Making a buttonhole (1-step automatic buttonhole) 1 Marks on the underside of fabric...
Operation Manual
Page 38
... to align the marks on the foot with the mark on the fabric. 1 2 1 Starting mark on the fabric 2 Marks on the foot Note ● If buttonhole sewing was interrupted, sew trial stitching one or two times on the scale. 1 2 1 10 mm (3/8 inch) 2 15 mm (9/16 inch) Pass the upper thread down... through the 4 hole in the order shown. 3 24 1 Stop the machine when buttonhole 9 stitching is finished. Stitching that is continued after being interrupted may be set to 25 mm (1 inch) on a scrap piece of the...
... to align the marks on the foot with the mark on the fabric. 1 2 1 Starting mark on the fabric 2 Marks on the foot Note ● If buttonhole sewing was interrupted, sew trial stitching one or two times on the scale. 1 2 1 10 mm (3/8 inch) 2 15 mm (9/16 inch) Pass the upper thread down... through the 4 hole in the order shown. 3 24 1 Stop the machine when buttonhole 9 stitching is finished. Stitching that is continued after being interrupted may be set to 25 mm (1 inch) on a scrap piece of the...
Operation Manual
Page 39
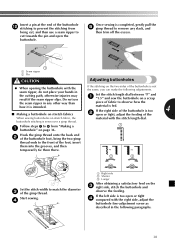
...insert them into the grooves, and then temporarily tie them there. 2 3 Set the stitch width to match the diameter 3 of the When sewing buttonholes on stretch fabric, the material with the stitch length dial. Start sewing. 4 1 Right side 2 Shorter 3 Longer After obtaining a satisfactory feed ...ripper in any slack, and then trim off the excess. 1 1 Seam ripper 2 Pin CAUTION Adjusting buttonholes ● When opening the buttonhole with the right side, adjust the buttonhole fine-adjustment screw as described in the cutting path, otherwise injuries may result if the seam ripper slips....
...insert them into the grooves, and then temporarily tie them there. 2 3 Set the stitch width to match the diameter 3 of the When sewing buttonholes on stretch fabric, the material with the stitch length dial. Start sewing. 4 1 Right side 2 Shorter 3 Longer After obtaining a satisfactory feed ...ripper in any slack, and then trim off the excess. 1 1 Seam ripper 2 Pin CAUTION Adjusting buttonholes ● When opening the buttonhole with the right side, adjust the buttonhole fine-adjustment screw as described in the cutting path, otherwise injuries may result if the seam ripper slips....
Operation Manual
Page 40
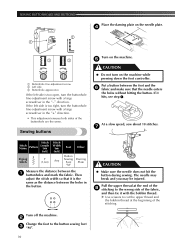
...of the 8 stitching to the button sewing foot 3 "M". 39 If the left side is too open, turn the buttonhole fine-adjustment screw with a large screwdriver in the button. Put a button between the 1 buttonholes and mark the fabric. At a slow speed, sew about 10 stitches. 7 Stitch Stitch Name Pattern Length [mm...during sewing. The needle may break and you may be injured. Sewing buttons Turn on the machine. 5 CAUTION ● Do not turn the buttonhole fine-adjustment screw with the bobbin thread. Then adjust the stitch width so that the needle enters the holes without hitting the button.
...of the 8 stitching to the button sewing foot 3 "M". 39 If the left side is too open, turn the buttonhole fine-adjustment screw with a large screwdriver in the button. Put a button between the 1 buttonholes and mark the fabric. At a slow speed, sew about 10 stitches. 7 Stitch Stitch Name Pattern Length [mm...during sewing. The needle may break and you may be injured. Sewing buttons Turn on the machine. 5 CAUTION ● Do not turn the buttonhole fine-adjustment screw with the bobbin thread. Then adjust the stitch width so that the needle enters the holes without hitting the button.
Operation Manual
Page 53
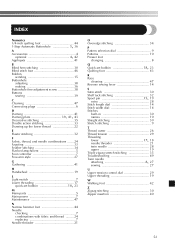
... A , Accessories 4 optional 4 42 Appliqués 41 B Blind hem stitching 30 Blind stitch foot 46 Bobbin winding 15 Buttonhole adjusting 38 making 36 Buttonhole fine-adjustment screw 38 Buttons sewing 39 C Cleaning 47 Connecting plugs 6 D , , Darning 41 Darning plate 39 41 43 Decorative stitching 35 Double action stitching 33 ...
... A , Accessories 4 optional 4 42 Appliqués 41 B Blind hem stitching 30 Blind stitch foot 46 Bobbin winding 15 Buttonhole adjusting 38 making 36 Buttonhole fine-adjustment screw 38 Buttons sewing 39 C Cleaning 47 Connecting plugs 6 D , , Darning 41 Darning plate 39 41 43 Decorative stitching 35 Double action stitching 33 ...


