
Operation Manual
Page 5
... lever 12 THREADING THE MACHINE 13 Winding the bobbin 13 Lower threading 15 Lower threading (for models equipped with a quick-set bobbin 16 Upper threading 17 Using the needle threader (for models equipped with a twin needle (Option 25 Thread tension 27 3. SEWING BASICS 23 Please read before sewing 23 Starting sewing...
... lever 12 THREADING THE MACHINE 13 Winding the bobbin 13 Lower threading 15 Lower threading (for models equipped with a quick-set bobbin 16 Upper threading 17 Using the needle threader (for models equipped with a twin needle (Option 25 Thread tension 27 3. SEWING BASICS 23 Please read before sewing 23 Starting sewing...

Operation Manual
Page 7
... (Page 8) You can turn the main power and sewing light switch on the country or region. I Presser foot lever (Page 17) Used to raise and lower the presser foot. J Handle Carry the machine by its handle when transporting. K Foot controller (Page... bed attachment. F Air vent The air vent allows the air surrounding the motor to 1 open it. 1 2 1 Flat bed attachment 2 Storage compartment 6 Contact your Brother dealer or the nearest authorized Brother Service Center. THE MAIN PARTS 3 2 1 1 J 4 5 D 6 C E 7 B 8 F 9 0 A 1 Bobbin winder (Page 13) This winds ...
... (Page 8) You can turn the main power and sewing light switch on the country or region. I Presser foot lever (Page 17) Used to raise and lower the presser foot. J Handle Carry the machine by its handle when transporting. K Foot controller (Page... bed attachment. F Air vent The air vent allows the air surrounding the motor to 1 open it. 1 2 1 Flat bed attachment 2 Storage compartment 6 Contact your Brother dealer or the nearest authorized Brother Service Center. THE MAIN PARTS 3 2 1 1 J 4 5 D 6 C E 7 B 8 F 9 0 A 1 Bobbin winder (Page 13) This winds ...
Operation Manual
Page 12
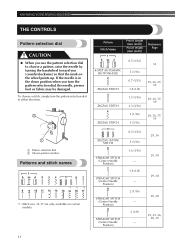
... pattern selection dial in either direction. 2 1 1 Pattern selection dial 2 Chosen pattern number Patterns and stitch names 1 23 4 5 67 *1 *1 *1 8 9 10 11 12 13 14 15 16 17 *1 : Stitch nos. 15-17 are only available on the wheel points up.
... pattern selection dial in either direction. 2 1 1 Pattern selection dial 2 Chosen pattern number Patterns and stitch names 1 23 4 5 67 *1 *1 *1 8 9 10 11 12 13 14 15 16 17 *1 : Stitch nos. 15-17 are only available on the wheel points up.

Operation Manual
Page 13
... 1 BLIND HEM STITCH 5 (3/16) 13 1 (1/16) 31 ELASTIC STITCH 5 (3/16) 1 Reverse sewing lever 14 STRETCH BLIND HEM STITCH 15 OVEREDGE STITCH 16 DOUBLE ACTION STITCH 17 BRIDGING STITCH 2 (1/16) 5 (3/16) 2 (1/16) 5 (3/16) 1.2 (1/16) 5 (3/16) 1.2 (1/16) 5 (3/16) 30, 39 31 32 32 12 Pattern Preset Length (mm (inch)) Reference Reverse sewing lever...
... 1 BLIND HEM STITCH 5 (3/16) 13 1 (1/16) 31 ELASTIC STITCH 5 (3/16) 1 Reverse sewing lever 14 STRETCH BLIND HEM STITCH 15 OVEREDGE STITCH 16 DOUBLE ACTION STITCH 17 BRIDGING STITCH 2 (1/16) 5 (3/16) 2 (1/16) 5 (3/16) 1.2 (1/16) 5 (3/16) 1.2 (1/16) 5 (3/16) 30, 39 31 32 32 12 Pattern Preset Length (mm (inch)) Reference Reverse sewing lever...

Operation Manual
Page 18
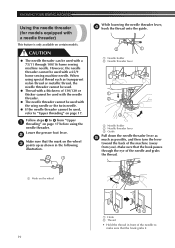
... of 4 thread on this pin. 1 1 Presser foot lever Raise the needle by turning the 3 handwheel toward you (counterclockwise) so that the mark on the wheel 17 KNOWING YOUR SEWING MACHINE Upper threading 2 2 3 4 1 5 1 Spool pin 2 Thread guide (back) 3 Thread guide (front) 4 Thread take-up lever 5 Mark on page 22. Turn off the...
... of 4 thread on this pin. 1 1 Presser foot lever Raise the needle by turning the 3 handwheel toward you (counterclockwise) so that the mark on the wheel 17 KNOWING YOUR SEWING MACHINE Upper threading 2 2 3 4 1 5 1 Spool pin 2 Thread guide (back) 3 Thread guide (front) 4 Thread take-up lever 5 Mark on page 22. Turn off the...
Operation Manual
Page 20
... (for models equipped with the wing needle or the twin needle. ● If the needle threader cannot be used, refer to "Upper threading" on page 17 before using special thread such as possible, and then turn the lever toward the back of the machine (away from "Upper 1 threading" on page...
... (for models equipped with the wing needle or the twin needle. ● If the needle threader cannot be used, refer to "Upper threading" on page 17 before using special thread such as possible, and then turn the lever toward the back of the machine (away from "Upper 1 threading" on page...
Operation Manual
Page 29
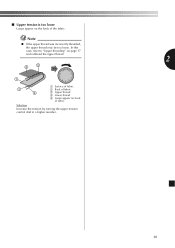
■ Upper tension is too loose Loops appear on back of the fabric. In this case, refer to "Upper threading" on page 17 and rethread the upper thread. 2 25 1 3 4 1 Surface of fabric 2 Back of fabric 3 Upper thread 4 Lower thread 5 Loops appear on the back of fabric Solution Increase the tension by turning the upper tension control dial to a higher number. 28 Note ● If the upper thread was incorrectly threaded, the upper thread may be too loose.
■ Upper tension is too loose Loops appear on back of the fabric. In this case, refer to "Upper threading" on page 17 and rethread the upper thread. 2 25 1 3 4 1 Surface of fabric 2 Back of fabric 3 Upper thread 4 Lower thread 5 Loops appear on the back of fabric Solution Increase the tension by turning the upper tension control dial to a higher number. 28 Note ● If the upper thread was incorrectly threaded, the upper thread may be too loose.
Operation Manual
Page 33
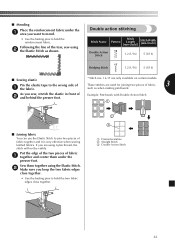
...fabric. Double action stitching Stitch Name Pattern Stitch Length [mm (inch)] Stitch Width [mm (inch)] Double Action 16 Stitch 1.2 (1/16) 5 (3/16) 17 Bridging Stitch 1.2 (1/16) 5 (3/16) ■ Sewing elastic Pin the elastic tape to the wrong side of fabric together and it is very effective ... with Double Action Stitch 1 ■ Joining fabric You can use the Elastic Stitch to join two pieces of 1 the fabric. * Stitch nos. 16-17 are using the Elastic Stitch. 2 Make sure you keep the two fabric edges close together. 2 3 1 Desired seamline 2 Straight Stitch 3 Double Action ...
...fabric. Double action stitching Stitch Name Pattern Stitch Length [mm (inch)] Stitch Width [mm (inch)] Double Action 16 Stitch 1.2 (1/16) 5 (3/16) 17 Bridging Stitch 1.2 (1/16) 5 (3/16) ■ Sewing elastic Pin the elastic tape to the wrong side of fabric together and it is very effective ... with Double Action Stitch 1 ■ Joining fabric You can use the Elastic Stitch to join two pieces of 1 the fabric. * Stitch nos. 16-17 are using the Elastic Stitch. 2 Make sure you keep the two fabric edges close together. 2 3 1 Desired seamline 2 Straight Stitch 3 Double Action ...

Operation Manual
Page 43
...not used the right combination of stitch that is pushed to the Move the bobbin-winder shaft to sew. Visit us at " http://support.brother.com ". You have not fitted the spool properly. Replace the needle. 8 The upper thread was not threaded correctly. The upper thread tension...are using . Replace the needle plate. Contact your retailer or the nearest - authorized Brother Service Center. You have not fitted the spool properly, or the thread has come Correct the upper threading. 17 The upper out of fabric. 22 The presser foot you want to the machine does ...
...not used the right combination of stitch that is pushed to the Move the bobbin-winder shaft to sew. Visit us at " http://support.brother.com ". You have not fitted the spool properly. Replace the needle. 8 The upper thread was not threaded correctly. The upper thread tension...are using . Replace the needle plate. Contact your retailer or the nearest - authorized Brother Service Center. You have not fitted the spool properly, or the thread has come Correct the upper threading. 17 The upper out of fabric. 22 The presser foot you want to the machine does ...

Operation Manual
Page 44
...not threaded the upper thread properly. The presser foot you are using is not being fed correctly. Contact your retailer or the nearest authorized Brother Service Center. Choose a thread and needle that has been designed for this machine. The fabric is incorrect. The area around the hole...been designed for the fabric you want to put it . Attach the presser foot holder properly. Contact your retailer or the nearest authorized Brother Service Center. You have not wound the bobbin thread properly. You have not wound the bobbin thread properly. Replace the bobbin. Wind the...
...not threaded the upper thread properly. The presser foot you are using is not being fed correctly. Contact your retailer or the nearest authorized Brother Service Center. Choose a thread and needle that has been designed for this machine. The fabric is incorrect. The area around the hole...been designed for the fabric you want to put it . Attach the presser foot holder properly. Contact your retailer or the nearest authorized Brother Service Center. You have not wound the bobbin thread properly. You have not wound the bobbin thread properly. Replace the bobbin. Wind the...

Operation Manual
Page 45
... sew. Remove the needle plate and clean the plate and the bobbin case. Choose a thread and needle that you want to the correct position. Page 17 22 8 8 40 19 8 - 27 40 - 22 40 35 6 44 The needle threader can not be used the right combination of stitch. Choose a thread and needle...
... sew. Remove the needle plate and clean the plate and the bobbin case. Choose a thread and needle that you want to the correct position. Page 17 22 8 8 40 19 8 - 27 40 - 22 40 35 6 44 The needle threader can not be used the right combination of stitch. Choose a thread and needle...

Operation Manual
Page 46
...thread 21 E Elastic stitching 31 F Fabric, thread, and needle combinations ...... 22 Flat bed attachment 6 Foot controller 8 Free-arm style 25 G Gathering 36 H Handwheel 17 L Light switch 8 Lower threading 15 M Main parts 6 Main power 8 Maintenance 40 N Needle checking 8 combinations with fabric and thread ......... 22 replacing 8 Needle threader... changing 10 , Q Quick-set bobbin 16 21 45 R Race cleaning 40 Reverse sewing lever 12 , S Spool pin 13 17 Stitches built-in 29 names 11 Straight stitching 29 T Thread cutter 24 Thread tension 27 , Threading lower 15 16 upper...
...thread 21 E Elastic stitching 31 F Fabric, thread, and needle combinations ...... 22 Flat bed attachment 6 Foot controller 8 Free-arm style 25 G Gathering 36 H Handwheel 17 L Light switch 8 Lower threading 15 M Main parts 6 Main power 8 Maintenance 40 N Needle checking 8 combinations with fabric and thread ......... 22 replacing 8 Needle threader... changing 10 , Q Quick-set bobbin 16 21 45 R Race cleaning 40 Reverse sewing lever 12 , S Spool pin 13 17 Stitches built-in 29 names 11 Straight stitching 29 T Thread cutter 24 Thread tension 27 , Threading lower 15 16 upper...
