
Instruction Manual - English
Page 4
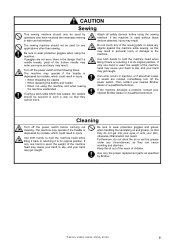
... applications other than sewing. When threading the needle When replacing the bobbin and needle When not using the machine and when leaving the machine unattended If using a work table which has casters, the casters should be secured in machine, or if abnormal noises or smells are not worn, there is depressed by Brother. Attach all safety devices before carrying out cleaning. If the machine is depressed by...
... applications other than sewing. When threading the needle When replacing the bobbin and needle When not using the machine and when leaving the machine unattended If using a work table which has casters, the casters should be secured in machine, or if abnormal noises or smells are not worn, there is depressed by Brother. Attach all safety devices before carrying out cleaning. If the machine is depressed by...
Instruction Manual - English
Page 6
... tension 35 8-2. Applying grease - TROUBLESHOOTING 44 11-1. Connecting the cords 11 3-4-1. Names and functions 25 5-2. Installing the needle 16 4-2. Installing the bobbin 19 4-5. THREAD TENSION 35 8-1. Opening the control box cover 11 3-4-2. Threading the upper thread 21 4-6. Sewing fixed stitches 28 5-4. Installation 5 3-3. USING THE OPERATION PANEL (BASIC OPERATIONS 25 5-1. Error code displays 49 T-8421A, 8422A, 8452A, 8722A, 8752A When "GREASEUP" appears (Semi dry specifications 40 10. CONTENTS 1. CLEANING 38 9-1. MACHINE SPECIFICATIONS...
... tension 35 8-2. Applying grease - TROUBLESHOOTING 44 11-1. Connecting the cords 11 3-4-1. Names and functions 25 5-2. Installing the needle 16 4-2. Installing the bobbin 19 4-5. THREAD TENSION 35 8-1. Opening the control box cover 11 3-4-2. Threading the upper thread 21 4-6. Sewing fixed stitches 28 5-4. Installation 5 3-3. USING THE OPERATION PANEL (BASIC OPERATIONS 25 5-1. Error code displays 49 T-8421A, 8422A, 8452A, 8722A, 8752A When "GREASEUP" appears (Semi dry specifications 40 10. CONTENTS 1. CLEANING 38 9-1. MACHINE SPECIFICATIONS...
Instruction Manual - English
Page 9
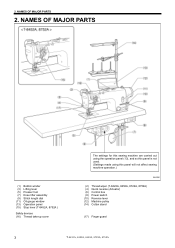
... MAJOR PARTS (1) Bobbin winder (3) Lifting lever (5) Presser foot (7) Knee lifter assembly (9) Stitch length dial (11) Oil gauge window (13) Operation panel (15) Stop lever (T-8452A, 8752A ) Safety devices (16) Thread take-up cover The settings for this sewing machine are carried out using the operation panel (13), and so this panel is not used. (Settings made using this panel will not affect sewing machine operation.) 2869M (2) Thread wiper (T-8422A, 8452A, 8722A, 8752A) (4) Quick reverse (Actuator) (6) Control box (8) Power switch (10) Reverse lever (12) Machine pulley (14...
... MAJOR PARTS (1) Bobbin winder (3) Lifting lever (5) Presser foot (7) Knee lifter assembly (9) Stitch length dial (11) Oil gauge window (13) Operation panel (15) Stop lever (T-8452A, 8752A ) Safety devices (16) Thread take-up cover The settings for this sewing machine are carried out using the operation panel (13), and so this panel is not used. (Settings made using this panel will not affect sewing machine operation.) 2869M (2) Thread wiper (T-8422A, 8452A, 8722A, 8752A) (4) Quick reverse (Actuator) (6) Control box (8) Power switch (10) Reverse lever (12) Machine pulley (14...
Instruction Manual - English
Page 10
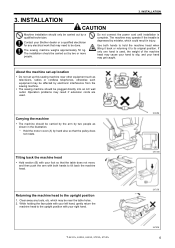
... your hand to its original position. The sewing machine weighs approximately 50 kg. which could result in the illustration. * Hold the motor cover (A) by electronic interference from the sewing machine. Operation problems may result if extension cords are used , the weight of the machine head may cause your foot so that may get caught. 3. The installation should be carried by the arm by two people as...
... your hand to its original position. The sewing machine weighs approximately 50 kg. which could result in the illustration. * Hold the motor cover (A) by electronic interference from the sewing machine. Operation problems may result if extension cords are used , the weight of the machine head may cause your foot so that may get caught. 3. The installation should be carried by the arm by two people as...
Instruction Manual - English
Page 21
... 1. After approximately 4 seconds, "iniT rPM" (speed initialization) or "iniT ALL" (full initialization) will be operated. (The operation panel will change to the stitch number display.) This message will illuminate. The power indicator (2) and (3) will not appear the second and subsequent times that the machine sews at high speed when the treadle (4) is gently pressed to position (D), (thread trimming is carried out for approximately...
... 1. After approximately 4 seconds, "iniT rPM" (speed initialization) or "iniT ALL" (full initialization) will be operated. (The operation panel will change to the stitch number display.) This message will illuminate. The power indicator (2) and (3) will not appear the second and subsequent times that the machine sews at high speed when the treadle (4) is gently pressed to position (D), (thread trimming is carried out for approximately...

Instruction Manual - English
Page 25
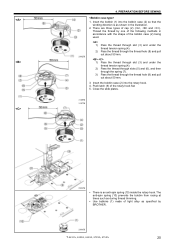
... slide plates. 2899M 2900M There is visible. 4. PREPARATION BEFORE SEWING 4-4. Pass the thread through slit (5) in injury. 2898M 1. Return the rotary hook latch (3) to rotate the rotary hook (2) until the tension spring (4) is an anti-spin spring (6) inside the rotary hook. Insert the bobbin (1) into the rotary hook (2) so that the winding direction is depressed by BROTHER. 2901M 19 T-8421A, 8422A, 8452A, 8722A, 8752A Installing the bobbin CAUTION...
... slide plates. 2899M 2900M There is visible. 4. PREPARATION BEFORE SEWING 4-4. Pass the thread through slit (5) in injury. 2898M 1. Return the rotary hook latch (3) to rotate the rotary hook (2) until the tension spring (4) is an anti-spin spring (6) inside the rotary hook. Insert the bobbin (1) into the rotary hook (2) so that the winding direction is depressed by BROTHER. 2901M 19 T-8421A, 8422A, 8452A, 8722A, 8752A Installing the bobbin CAUTION...
Instruction Manual - English
Page 26
... thread through the thread hole (8) and pull out about 50 mm. 3. The anti-spin spring (10) prevents the bobbin from racing at times such as specified by one of light alloy as during thread trimming. Insert the bobbin (1) into the rotary hook. 4. Use bobbins (1) made of the following methods in the illustration. 2. Push latch (9) of cap (2) (, and ). Insert the bobbin case (2) into the bobbin case (2) so that the winding direction...
... thread through the thread hole (8) and pull out about 50 mm. 3. The anti-spin spring (10) prevents the bobbin from racing at times such as specified by one of light alloy as during thread trimming. Insert the bobbin (1) into the rotary hook. 4. Use bobbins (1) made of the following methods in the illustration. 2. Push latch (9) of cap (2) (, and ). Insert the bobbin case (2) into the bobbin case (2) so that the winding direction...
Instruction Manual - English
Page 30
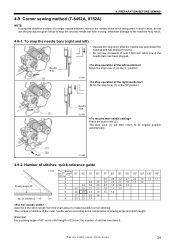
... to the machine may result. 4-9-1. 4. Corner sewing method (T-8452A, 8752A) NOTE: If using this machine in place of stitches 6 3131M Sewing No. Needle stop Move the stop lever (1) to the "L" position. 3128M Move the stop the unused needle bar from moving . Push 3130M 4-9-2. of a single-needle machine, remove the needle which is not being used. To stop the needle bars (right and left) Operate the stop lever after the needle has penetrated...
... to the machine may result. 4-9-1. 4. Corner sewing method (T-8452A, 8752A) NOTE: If using this machine in place of stitches 6 3131M Sewing No. Needle stop Move the stop lever (1) to the "L" position. 3128M Move the stop the unused needle bar from moving . Push 3130M 4-9-2. of a single-needle machine, remove the needle which is not being used. To stop the needle bars (right and left) Operate the stop lever after the needle has penetrated...

Instruction Manual - English
Page 31
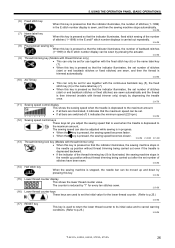
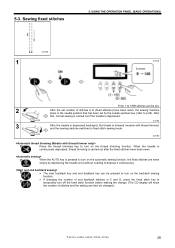
.... • In end backtack display, CD illuminates and the number of stitches for C and D are displayed. • In continuous backtack display, ABCD illuminates and the number of stitches for A, B, C and D are used to set the number of stitches before starting sewing. • In the case of keys with thread trimmer, the thread is trimmed automatically.) If the treadle has not yet been depressed backward...
.... • In end backtack display, CD illuminates and the number of stitches for C and D are displayed. • In continuous backtack display, ABCD illuminates and the number of stitches for A, B, C and D are used to set the number of stitches before starting sewing. • In the case of keys with thread trimmer, the thread is trimmed automatically.) If the treadle has not yet been depressed backward...
Instruction Manual - English
Page 32
... the needle up position without thread trimming being carried out after the set number of stitches have been sewn. 2152M (14) Half stitch key When the sewing machine is stopped, the needle bar can be set for the lower thread counter. (Refer to p.25.) (17) RESET key 2155M This key is depressed to p.25.) 2156M T-8421A, 8422A, 8452A, 8722A, 8752A 26 5. The sewing speed can also be adjusted while sewing...
... the needle up position without thread trimming being carried out after the set number of stitches have been sewn. 2152M (14) Half stitch key When the sewing machine is stopped, the needle bar can be set for the lower thread counter. (Refer to p.25.) (17) RESET key 2155M This key is depressed to p.25.) 2156M T-8421A, 8422A, 8452A, 8722A, 8752A 26 5. The sewing speed can also be adjusted while sewing...
Instruction Manual - English
Page 34
... fixed stitch function before making the change. (The CD display will show the number of stitches and the setting can be pressed to turn on the automatic sewing function, the fixed stitches are sewn simply by depressing the treadle once without needing to depress it continuously. • The start backtack key and end backtack key can then be set. 2 After the set number of stitches in the needle position...
... fixed stitch function before making the change. (The CD display will show the number of stitches and the setting can be pressed to turn on the automatic sewing function, the fixed stitches are sewn simply by depressing the treadle once without needing to depress it continuously. • The start backtack key and end backtack key can then be set. 2 After the set number of stitches in the needle position...
Instruction Manual - English
Page 35
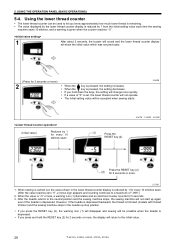
... quickly. Using the lower thread counter The lower thread counter can be used to the neutral position and the sewing machine stops, the sewing machine will not start up stop position. Press the RESET key (2) for every 10 stitches sewn 2167M 2168M 2169M Press the RESET key (2). When the value is depressed. The value displayed by the lower thread counter display is reduced by 1 from the initial setting value each time...
... quickly. Using the lower thread counter The lower thread counter can be used to the neutral position and the sewing machine stops, the sewing machine will not start up stop position. Press the RESET key (2) for every 10 stitches sewn 2167M 2168M 2169M Press the RESET key (2). When the value is depressed. The value displayed by the lower thread counter display is reduced by 1 from the initial setting value each time...

Instruction Manual - English
Page 42
... and tension is 33-37 mm. weight materials For heavy-weight materials Adjusting screw height Approx. 34mm Approx. 34mm Approx. 29mm 2925M 8-3. Adjusting the presser foot pressure Correct stitches 0894M Upper thread 0895M Skipped stitches occur Uneven stitch length 0896M 8. Becomes weaker 0897M Stitches are puckered Decrease the pressure. Adjusting the trailing length after thread trimming (Models with thread trimmer only) Longer Shorter At the time of the threads trailing from the needle...
... and tension is 33-37 mm. weight materials For heavy-weight materials Adjusting screw height Approx. 34mm Approx. 34mm Approx. 29mm 2925M 8-3. Adjusting the presser foot pressure Correct stitches 0894M Upper thread 0895M Skipped stitches occur Uneven stitch length 0896M 8. Becomes weaker 0897M Stitches are puckered Decrease the pressure. Adjusting the trailing length after thread trimming (Models with thread trimmer only) Longer Shorter At the time of the threads trailing from the needle...
Instruction Manual - English
Page 44
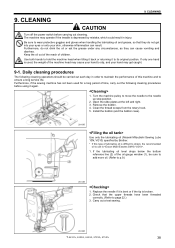
... thread scraps from the rotary hook. 5. Carry out a test sewing. 2932M T-8421A, 8422A, 8452A, 8722A, 8752A 38 Remove the bobbin. 4. If the lubricating oil level drops below the bottom reference line (2) of the machine head may cause your hand to its original position. Daily cleaning procedures The following cleaning procedures before carrying out cleaning. Install the bobbin (and the bobbin case). 2930M Use only the lubricating oil (Nisseki Mitsubishi Sewing...
... thread scraps from the rotary hook. 5. Carry out a test sewing. 2932M T-8421A, 8422A, 8452A, 8722A, 8752A 38 Remove the bobbin. 4. If the lubricating oil level drops below the bottom reference line (2) of the machine head may cause your hand to its original position. Daily cleaning procedures The following cleaning procedures before carrying out cleaning. Install the bobbin (and the bobbin case). 2930M Use only the lubricating oil (Nisseki Mitsubishi Sewing...
Instruction Manual - English
Page 46
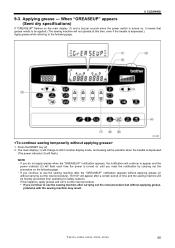
... , it means that grease needs to be applied. (The sewing machine will not operate at this happens, apply grease and carry out the reset procedure. * If you continue to use the sewing machine after the "GREASEUP" notification appears without applying grease (or without applying grease, problems with the sewing machine may result. T-8421A, 8422A, 8452A, 8722A, 8752A 40 CLEANING 9-3. Applying grease --- When "GREASEUP...
... , it means that grease needs to be applied. (The sewing machine will not operate at this happens, apply grease and carry out the reset procedure. * If you continue to use the sewing machine after the "GREASEUP" notification appears without applying grease (or without applying grease, problems with the sewing machine may result. T-8421A, 8422A, 8452A, 8722A, 8752A 40 CLEANING 9-3. Applying grease --- When "GREASEUP...

Instruction Manual - English
Page 50
... thread tension, or replace the bobbin or bobbin case. Touching areas where high voltages are present can result in seam. Sewing Items with a fine grain or sandpaper to check that has slots on the type of the stopper. Problem 1 Upper thread is not tight. Adjust the thread take -up spring operating range too small? CAUTION Turn off the power switch and disconnect the power cord before calling for repairs or service. Lower...
... thread tension, or replace the bobbin or bobbin case. Touching areas where high voltages are present can result in seam. Sewing Items with a fine grain or sandpaper to check that has slots on the type of the stopper. Problem 1 Upper thread is not tight. Adjust the thread take -up spring operating range too small? CAUTION Turn off the power switch and disconnect the power cord before calling for repairs or service. Lower...
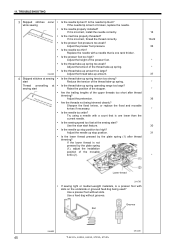
Instruction Manual - English
Page 51
... position too high? If the lower thread is incorrect, install the needle correctly. If the needle tip is one rank thicker. Are the threads not being used? Is the sewing speed too fast at sewing start ? Use the slow start feature. If it is not pressed by the plate spring (1) after thread trimming? Adjust the pretension. Is the needle tip blunt? Use a presser foot without grooves. Is the thread take -up amount. Try using a needle...
... position too high? If the lower thread is incorrect, install the needle correctly. If the needle tip is one rank thicker. Are the threads not being used? Is the sewing speed too fast at sewing start ? Use the slow start feature. If it is not pressed by the plate spring (1) after thread trimming? Adjust the pretension. Is the needle tip blunt? Use a presser foot without grooves. Is the thread take -up amount. Try using a needle...

Instruction Manual - English
Page 52
... Brother being pulled? 11. Is the presser foot pressure too strong? Adjust the presser foot pressure. Adjust the presser foot pressure. Is the bobbin scratched? Is the bobbin turning smoothly? Adjust the presser foot pressure. Adjust the feed dog height. Is the thread take -up spring tension as weak as possible. Is the upper thread tension too strong? Make the thread take -up amount. Page 36 * 35 35 * * 36 26 37 36 2950M 8 Lower thread is not turning smoothly, replace the bobbin. TROUBLESHOOTING Problem 5 Uneven seam...
... Brother being pulled? 11. Is the presser foot pressure too strong? Adjust the presser foot pressure. Adjust the presser foot pressure. Is the bobbin scratched? Is the bobbin turning smoothly? Adjust the presser foot pressure. Adjust the feed dog height. Is the thread take -up spring tension as weak as possible. Is the upper thread tension too strong? Make the thread take -up amount. Page 36 * 35 35 * * 36 26 37 36 2950M 8 Lower thread is not turning smoothly, replace the bobbin. TROUBLESHOOTING Problem 5 Uneven seam...
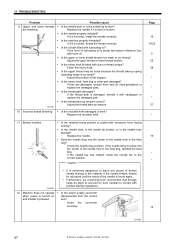
Instruction Manual - English
Page 53
... needle bar to leave any pieces of the needle hole in the material. Is the needle bent, is the needle tip broken, or is the needle tip broken? Adjust the thread take -up spring operating range is below the bottom reference line, add more oil. If it with excessive force during sewing? Check the needle drop position. Is the power supply connector disconnected from the control box? Replace the needle...
... needle bar to leave any pieces of the needle hole in the material. Is the needle bent, is the needle tip broken, or is the needle tip broken? Adjust the thread take -up spring operating range is below the bottom reference line, add more oil. If it with excessive force during sewing? Check the needle drop position. Is the power supply connector disconnected from the control box? Replace the needle...
Parts Manual - English
Page 36
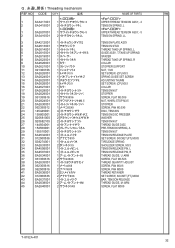
... SPRING GUIDE SET SCREW ADJUSTING THUMB SET SCREW, (CP) M3.5 COLLAR TENSION NUT STOPPER SCREW, FLAT M3.5X6 NUT, WHIRL-STOP M3.5 STOPPER SCREW, PAN M3.5X5 DISC, TENSION TENSION DISC PRESSER WASHER TENSION NUT THREAD GUIDE DISC PRE-TENSION SPRING, A TENSION NUT TENSION RELEASE PLATE SET SCREW, SOCKET (FT) M5X5 T-RELEASE SPRING SHOULDER SCREW, M3.5 TENSION RELEASE PIN, L TENSION RELEASE PIN, R THREAD GUIDE, U :ARM SCREW, FLAT M3.5X6 THREAD QUANTITY ADJUST SCREW, PAN M3X6 SCREW, PAN M5X8 THREAD RETAINER SET SCREW, SOCKET (FT) M6X6 BAR, TENSION RELEASE THREAD GUIDE, M :ARM SCREW, FLAT M5X8 T-8752A...
... SPRING GUIDE SET SCREW ADJUSTING THUMB SET SCREW, (CP) M3.5 COLLAR TENSION NUT STOPPER SCREW, FLAT M3.5X6 NUT, WHIRL-STOP M3.5 STOPPER SCREW, PAN M3.5X5 DISC, TENSION TENSION DISC PRESSER WASHER TENSION NUT THREAD GUIDE DISC PRE-TENSION SPRING, A TENSION NUT TENSION RELEASE PLATE SET SCREW, SOCKET (FT) M5X5 T-RELEASE SPRING SHOULDER SCREW, M3.5 TENSION RELEASE PIN, L TENSION RELEASE PIN, R THREAD GUIDE, U :ARM SCREW, FLAT M3.5X6 THREAD QUANTITY ADJUST SCREW, PAN M3X6 SCREW, PAN M5X8 THREAD RETAINER SET SCREW, SOCKET (FT) M6X6 BAR, TENSION RELEASE THREAD GUIDE, M :ARM SCREW, FLAT M5X8 T-8752A...


