
User Guide
Page 2
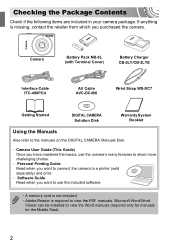
... be installed to view the PDF manuals. Camera Battery Pack NB-6L (with Terminal Cover) Battery Charger CB-2LY/CB-2LYE Interface Cable IFC-400PCU AV Cable AVC-DC400 Wrist Strap WS-DC7 Getting Started DIGITAL CAMERA Solution Disk Warranty System Booklet Using the Manuals Also refer to the manuals on the DIGITAL CAMERA Manuals Disk. • Camera User Guide (This Guide) Once you have mastered the basics, use the camera's many features to shoot more challenging photos. • Personal Printing Guide...
... be installed to view the PDF manuals. Camera Battery Pack NB-6L (with Terminal Cover) Battery Charger CB-2LY/CB-2LYE Interface Cable IFC-400PCU AV Cable AVC-DC400 Wrist Strap WS-DC7 Getting Started DIGITAL CAMERA Solution Disk Warranty System Booklet Using the Manuals Also refer to the manuals on the DIGITAL CAMERA Manuals Disk. • Camera User Guide (This Guide) Once you have mastered the basics, use the camera's many features to shoot more challenging photos. • Personal Printing Guide...
User Guide
Page 4
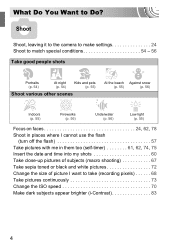
...) Low light (p. 55) Focus on faces 24, 62, 78 Shoot in places where I cannot use the flash (turn off the flash 57 Take pictures with me in them too (self-timer 61, 62, 74, 75 Insert the date and time into my shots 60 Take close-up pictures of subjects (macro shooting 67 Take sepia toned or black and white pictures 72 Change the size of picture I want to take (recording pixels 68 Take pictures continuously 73 Change the ISO speed 70 Make dark...
...) Low light (p. 55) Focus on faces 24, 62, 78 Shoot in places where I cannot use the flash (turn off the flash 57 Take pictures with me in them too (self-timer 61, 62, 74, 75 Insert the date and time into my shots 60 Take close-up pictures of subjects (macro shooting 67 Take sepia toned or black and white pictures 72 Change the size of picture I want to take (recording pixels 68 Take pictures continuously 73 Change the ISO speed 70 Make dark...

User Guide
Page 6
... Sound Settings ..........48 Changing the Screen Brightness .....49 Returning the Camera to Do 4 Conventions Used in Program AE 64 Adjusting the Brightness (Exposure Compensation 65 Turning the Flash On 66 Shooting Far Away Subjects (Infinity 66 Shooting Close-ups (Macro 67 Changing the Recording Pixel Setting (Image Size 68 Changing the Compression Ratio (Image Quality 68 Changing the ISO Speed 70 Adjusting the White Balance 71 Changing the Tone of this Guide ........8 Safety Precautions 9 1 Getting Started 13 Charging the Battery 14 Compatible Memory Cards...
... Sound Settings ..........48 Changing the Screen Brightness .....49 Returning the Camera to Do 4 Conventions Used in Program AE 64 Adjusting the Brightness (Exposure Compensation 65 Turning the Flash On 66 Shooting Far Away Subjects (Infinity 66 Shooting Close-ups (Macro 67 Changing the Recording Pixel Setting (Image Size 68 Changing the Compression Ratio (Image Quality 68 Changing the ISO Speed 70 Adjusting the White Balance 71 Changing the Tone of this Guide ........8 Safety Precautions 9 1 Getting Started 13 Charging the Battery 14 Compatible Memory Cards...
User Guide
Page 7
... 98 Viewing Images on a TV 99 Protecting Images 100 Table of Contents Erasing All Images 101 Rotating Images 102 Resizing Images 103 Correcting the Brightness (i-Contrast 104 Correcting the Red-Eye Effect....... 105 8 Printing 107 Printing Images 108 Choosing Images for Printing (DPOF 110 9 Customizing Camera Settings 113 Changing Camera Settings 114 Changing Shooting Function Settings 117 Changing Playback Function Settings 120 10 Useful Information......121 Using Household Power 122 Troubleshooting 123 List of Messages That Appear on the Screen 126 Information Displayed on...
... 98 Viewing Images on a TV 99 Protecting Images 100 Table of Contents Erasing All Images 101 Rotating Images 102 Resizing Images 103 Correcting the Brightness (i-Contrast 104 Correcting the Red-Eye Effect....... 105 8 Printing 107 Printing Images 108 Choosing Images for Printing (DPOF 110 9 Customizing Camera Settings 113 Changing Camera Settings 114 Changing Shooting Function Settings 117 Changing Playback Function Settings 120 10 Useful Information......121 Using Household Power 122 Troubleshooting 123 List of Messages That Appear on the Screen 126 Information Displayed on...
User Guide
Page 19
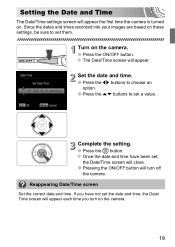
... Date and Time The Date/Time settings screen will appear. Set the date and time. ● Press the qr buttons to choose an option. ● Press the op buttons to set a value. X The Date/Time screen will appear the first time the camera is turned on the camera. 19 Complete the setting. ● Press the m button. Since the dates and times recorded into your images are based on the camera. ● Press the ON/OFF button. Reappearing Date/Time screen Set...
... Date and Time The Date/Time settings screen will appear. Set the date and time. ● Press the qr buttons to choose an option. ● Press the op buttons to set a value. X The Date/Time screen will appear the first time the camera is turned on the camera. 19 Complete the setting. ● Press the m button. Since the dates and times recorded into your images are based on the camera. ● Press the ON/OFF button. Reappearing Date/Time screen Set...

User Guide
Page 33
...-in USB ports. v10.6) The above OS should be pre-installed on computers with the camera to transfer images you are already using ZoomBrowser EX/ImageBrowser, install the software from the included CD-ROM, overwriting your computer's capabilities. Transferring Images to a Computer for Viewing You can use the included software to a computer for viewing. System Requirements Windows OS Computer model CPU RAM Interface Free Hard Disk Space Display Windows 7 Windows Vista (including Service...
...-in USB ports. v10.6) The above OS should be pre-installed on computers with the camera to transfer images you are already using ZoomBrowser EX/ImageBrowser, install the software from the included CD-ROM, overwriting your computer's capabilities. Transferring Images to a Computer for Viewing You can use the included software to a computer for viewing. System Requirements Windows OS Computer model CPU RAM Interface Free Hard Disk Space Display Windows 7 Windows Vista (including Service...

User Guide
Page 36
... position. • Protection settings for Viewing For Windows 7, use the following limitations. • After connecting to the camera, it may take a few minutes until you can transfer images without installing the included software by date and saved in separate folders in use , the file size, or the software in the Pictures folder. ● When [Image import complete.] appears, click [OK], then click [X] to close CameraWindow. ● Turn off the camera and unplug the cable. ● For...
... position. • Protection settings for Viewing For Windows 7, use the following limitations. • After connecting to the camera, it may take a few minutes until you can transfer images without installing the included software by date and saved in separate folders in use , the file size, or the software in the Pictures folder. ● When [Image import complete.] appears, click [OK], then click [X] to close CameraWindow. ● Turn off the camera and unplug the cable. ● For...
User Guide
Page 43
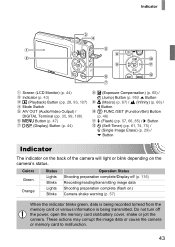
...) Recording/reading/transmitting image data Shooting preparation complete (flash on the camera's status. Colors Green Orange Status Lights Blinks Lights Blinks Operation Status Shooting preparation complete/Display off the power, open the memory card slot/battery cover, shake or jolt the camera. Indicator Screen (LCD Monitor) (p. 44) Indicator (p. 43) 1 (Playback) Button (pp. 28, 93, 107) Mode Switch A/V OUT (Audio/Video Output) / DIGITAL Terminal (pp. 35, 99, 108) n Button (p. 47) l (Display) Button (p. 44) b (Exposure Compensation) (p. 65) / d (Jump) Button (p. 95)/ o Button e (Macro...
...) Recording/reading/transmitting image data Shooting preparation complete (flash on the camera's status. Colors Green Orange Status Lights Blinks Lights Blinks Operation Status Shooting preparation complete/Display off the power, open the memory card slot/battery cover, shake or jolt the camera. Indicator Screen (LCD Monitor) (p. 44) Indicator (p. 43) 1 (Playback) Button (pp. 28, 93, 107) Mode Switch A/V OUT (Audio/Video Output) / DIGITAL Terminal (pp. 35, 99, 108) n Button (p. 47) l (Display) Button (p. 44) b (Exposure Compensation) (p. 65) / d (Jump) Button (p. 95)/ o Button e (Macro...
User Guide
Page 52
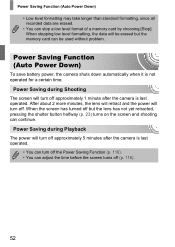
... [Stop]. After about 2 more minutes, the lens will retract and the power will be used without problem. When stopping low level formatting, the data will turn off . Power Saving Function (Auto Power Down) • Low level formatting may take longer than standard formatting, since all recorded data are erased. • You can continue. When the screen has turned off (p. 116). 52 Power Saving Function (Auto Power Down) To save battery power, the camera shuts down automatically when it is last operated.
... [Stop]. After about 2 more minutes, the lens will retract and the power will be used without problem. When stopping low level formatting, the data will turn off . Power Saving Function (Auto Power Down) • Low level formatting may take longer than standard formatting, since all recorded data are erased. • You can continue. When the screen has turned off (p. 116). 52 Power Saving Function (Auto Power Down) To save battery power, the camera shuts down automatically when it is last operated.
User Guide
Page 59
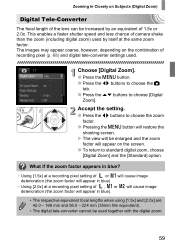
... the setting. ● Press the qr buttons to choose the zoom factor. ● Pressing the n button will appear on the screen. ● To return to choose [Digital Zoom]. Zooming in Closely on Subjects (Digital Zoom) Digital Tele-Converter The focal length of the lens can be increased by itself at a recording pixel setting of camera shake than the zoom (including digital zoom) used together with the digital zoom. 59 The images may...
... the setting. ● Press the qr buttons to choose the zoom factor. ● Pressing the n button will appear on the screen. ● To return to choose [Digital Zoom]. Zooming in Closely on Subjects (Digital Zoom) Digital Tele-Converter The focal length of the lens can be increased by itself at a recording pixel setting of camera shake than the zoom (including digital zoom) used together with the digital zoom. 59 The images may...
User Guide
Page 115
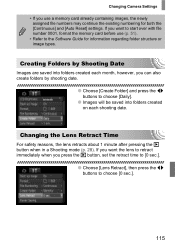
... a Shooting mode (p. 28). If you want to start over with file number 0001, format the memory card before use a memory card already containing images, the newly assigned file numbers may continue the existing numbering for information regarding folder structure or image types. Changing Camera Settings • If you use (p. 51). • Refer to the Software Guide for both the [Continuous] and [Auto Reset] settings. If you want the lens to retract immediately when you can also create folders by Shooting Date Images are saved...
... a Shooting mode (p. 28). If you want to start over with file number 0001, format the memory card before use a memory card already containing images, the newly assigned file numbers may continue the existing numbering for information regarding folder structure or image types. Changing Camera Settings • If you use (p. 51). • Refer to the Software Guide for both the [Continuous] and [Auto Reset] settings. If you want the lens to retract immediately when you can also create folders by Shooting Date Images are saved...
User Guide
Page 116
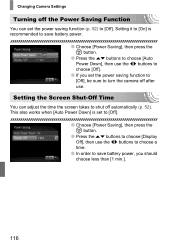
... [Auto Power Down], then use . This also works when [Auto Power Down] is recommended to save battery power, you set the power saving function (p. 52) to choose [Off]. ● If you should choose less than [1 min.]. 116 Setting the Screen Shut-Off Time You can adjust the time the screen takes to shut off the Power Saving Function You can set the power saving function to [Off], be sure to turn the camera off after use the qr buttons to [Off]. Changing Camera Settings Turning...
... [Auto Power Down], then use . This also works when [Auto Power Down] is recommended to save battery power, you set the power saving function (p. 52) to choose [Off]. ● If you should choose less than [1 min.]. 116 Setting the Screen Shut-Off Time You can adjust the time the screen takes to shut off the Power Saving Function You can set the power saving function to [Off], be sure to turn the camera off after use the qr buttons to [Off]. Changing Camera Settings Turning...
User Guide
Page 117
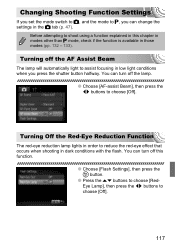
Changing Shooting Function Settings If you set the mode switch to 4, and the mode to G, you press the shutter button halfway. You can change the settings in the 4 tab (p. 47). Turning Off the Red-Eye Reduction Function The red-eye reduction lamp lights in low light conditions when you can turn off the lamp. ● Choose [AF-assist Beam], then press the qr buttons to choose [Off]. Turning off the AF Assist Beam The lamp will...
Changing Shooting Function Settings If you set the mode switch to 4, and the mode to G, you press the shutter button halfway. You can change the settings in the 4 tab (p. 47). Turning Off the Red-Eye Reduction Function The red-eye reduction lamp lights in low light conditions when you can turn off the lamp. ● Choose [AF-assist Beam], then press the qr buttons to choose [Off]. Turning off the AF Assist Beam The lamp will...
User Guide
Page 123
... Lens will not retract. • Do not open the memory card/battery cover while the power is securely closed (p. 17). • If the battery terminals are dirty, battery performance will be taken even though the shutter button was pressed halfway (p. 57) • Set the [IS mode] to [Continuous] (p. 119). • Set the flash to h (p. 66). • Increase the ISO speed (p. 70). • Attach the camera to powerful light sources, the display...
... Lens will not retract. • Do not open the memory card/battery cover while the power is securely closed (p. 17). • If the battery terminals are dirty, battery performance will be taken even though the shutter button was pressed halfway (p. 57) • Set the [IS mode] to [Continuous] (p. 119). • Set the flash to h (p. 66). • Increase the ISO speed (p. 70). • Attach the camera to powerful light sources, the display...
User Guide
Page 125
... Software Guide for shooting functions or FUNC. It may be possible to solve the problem when the camera is changed on a computer, you may cut out. Shooting movies Correct shooting time does not display, or stops. • Format the memory card in the camera, or use the digital zoom while recording, but not the optical zoom (p. 90). Even when the shooting time does not display properly, the recorded video will be made differ depending on the shooting mode. Troubleshooting Recording images...
... Software Guide for shooting functions or FUNC. It may be possible to solve the problem when the camera is changed on a computer, you may cut out. Shooting movies Correct shooting time does not display, or stops. • Format the memory card in the camera, or use the digital zoom while recording, but not the optical zoom (p. 90). Even when the shooting time does not display properly, the recorded video will be made differ depending on the shooting mode. Troubleshooting Recording images...
User Guide
Page 129
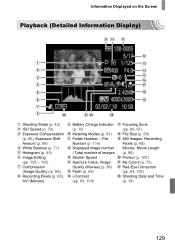
...(p. 89) White Balance (p. 71) Histogram (p. 45) Image Editing (pp. 103 - 105) Compression (Image Quality) (p. 68), Recording Pixels (p. 68), AVI (Movies) Battery Charge Indicator (p. 15) Metering Modes (p. 81) Folder Number - File Number (p. 114) Displayed image number / Total number of images Shutter Speed Aperture Value, Image Quality (Movies) (p. 88) Flash (p. 66) i-Contrast (pp. 83, 104) Focusing Zone (pp. 66, 67) File Size (p. 69) Still Images: Recording Pixels (p. 68) Movies: Movie Length (p. 88) Protect (p. 100) My Colors (p. 72) Red-Eye Correction (pp. 84, 105) Shooting Date and Time...
...(p. 89) White Balance (p. 71) Histogram (p. 45) Image Editing (pp. 103 - 105) Compression (Image Quality) (p. 68), Recording Pixels (p. 68), AVI (Movies) Battery Charge Indicator (p. 15) Metering Modes (p. 81) Folder Number - File Number (p. 114) Displayed image number / Total number of images Shutter Speed Aperture Value, Image Quality (Movies) (p. 88) Flash (p. 66) i-Contrast (pp. 83, 104) Focusing Zone (pp. 66, 67) File Size (p. 69) Still Images: Recording Pixels (p. 68) Movies: Movie Length (p. 88) Protect (p. 100) My Colors (p. 72) Red-Eye Correction (pp. 84, 105) Shooting Date and Time...
User Guide
Page 132
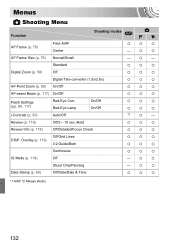
...) Red-Eye Lamp On/Off { i-Contrast (p. 83) Auto/Off *2 Review (p. 118) Off/2 - 10 sec./Hold { Review Info (p. 118) Off/Detailed/Focus Check { Off/Grid Lines { DISP. AF Frame Size (p. 79) Normal/Small - Overlay (p. 119) 3:2 Guide/Both { Continuous { IS Mode (p. 119) Off - Standard { Digital Zoom (p. 58) Off { Digital Tele-converter (1.5x/2.0x) { AF-Point Zoom (p. 80) On/Off { AF-assist Beam (p. 117) On/Off { Flash Settings Red-Eye Corr. Menus 4 Shooting Menu Function Shooting modes...
...) Red-Eye Lamp On/Off { i-Contrast (p. 83) Auto/Off *2 Review (p. 118) Off/2 - 10 sec./Hold { Review Info (p. 118) Off/Detailed/Focus Check { Off/Grid Lines { DISP. AF Frame Size (p. 79) Normal/Small - Overlay (p. 119) 3:2 Guide/Both { Continuous { IS Mode (p. 119) Off - Standard { Digital Zoom (p. 58) Off { Digital Tele-converter (1.5x/2.0x) { AF-Point Zoom (p. 80) On/Off { AF-assist Beam (p. 117) On/Off { Flash Settings Red-Eye Corr. Menus 4 Shooting Menu Function Shooting modes...
User Guide
Page 134
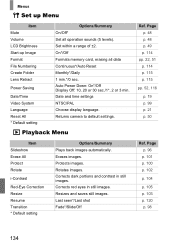
...;2. Date and time settings NTSC/PAL Choose display language. Rotates images. On*/Off Formats memory card, erasing all operation sounds (5 levels). Corrects red eyes in still images. Erases images. Menus 3 Set up Menu Item Mute Volume LCD Brightness Start-up Image Format File Numbering Create Folder Lens Retract Power Saving Date/Time Video System Language Reset All * Default setting Options/Summary On/Off* Set all data Continuous*/Auto Reset Monthly*/Daily 1 min.*/0 sec. Auto Power Down: On*/Off Display Off: 10, 20 or 30 sec./1*, 2 or 3 min. Last seen*/Last shot Fade...
...;2. Date and time settings NTSC/PAL Choose display language. Rotates images. On*/Off Formats memory card, erasing all operation sounds (5 levels). Corrects red eyes in still images. Erases images. Menus 3 Set up Menu Item Mute Volume LCD Brightness Start-up Image Format File Numbering Create Folder Lens Retract Power Saving Date/Time Video System Language Reset All * Default setting Options/Summary On/Off* Set all data Continuous*/Auto Reset Monthly*/Daily 1 min.*/0 sec. Auto Power Down: On*/Off Display Off: 10, 20 or 30 sec./1*, 2 or 3 min. Last seen*/Last shot Fade...
User Guide
Page 139
...82, 89 AF Frames 25 AF Lock 81 AV Cable 2 B Battery Battery and Charger Kit 38 Battery Charger 2, 14 Charge Indicator 15 Date/Time battery 20 Power Saving 52, 116 Recharge 14 Battery Charger 14 Beach (Scene Mode 55 Black and White Images 72 C Camera Shake 57, 119 Center 79 Components Guide 42 Continuous Shooting 73 D Date and Time Adding to Image 60 Changing 20 Setting 19 Settings 19 Date and Time J Date/Time Default Settings 50 Deleting J Erasing DIGITAL CAMERA Solution Disk 2 Digital Tele-Converter 59 Digital Zoom 58 Display Language 21 Display Overlay 119 DPOF 110...
...82, 89 AF Frames 25 AF Lock 81 AV Cable 2 B Battery Battery and Charger Kit 38 Battery Charger 2, 14 Charge Indicator 15 Date/Time battery 20 Power Saving 52, 116 Recharge 14 Battery Charger 14 Beach (Scene Mode 55 Black and White Images 72 C Camera Shake 57, 119 Center 79 Components Guide 42 Continuous Shooting 73 D Date and Time Adding to Image 60 Changing 20 Setting 19 Settings 19 Date and Time J Date/Time Default Settings 50 Deleting J Erasing DIGITAL CAMERA Solution Disk 2 Digital Tele-Converter 59 Digital Zoom 58 Display Language 21 Display Overlay 119 DPOF 110...
User Guide
Page 141
S Screen Display Language 21 Switching the Display 44 SD/SDHC/SDXC Memory Card J Memory Card Self-Timer 10 second Self-Timer 61 Changing Delay and Number of Shots 75 Face Self-Timer 62 Two Second Self-Timer 74 Sepia Tones 72 Shooting Date and Time J Date/Time Shooting Using a TV 76 Shutter Button 23 Slideshow 96 Snow (Scene Mode 56 Software DIGITAL CAMERA Solution Disk 2 Software Guide 2 Transferring Images to a Computer ....... 33 Sound Settings 48 T Terminal 35, 99, 108 Tone (White Balance 71 Troubleshooting 123 U Underwater (Scene Mode 56 Index V Video J Movies Viewing (...
S Screen Display Language 21 Switching the Display 44 SD/SDHC/SDXC Memory Card J Memory Card Self-Timer 10 second Self-Timer 61 Changing Delay and Number of Shots 75 Face Self-Timer 62 Two Second Self-Timer 74 Sepia Tones 72 Shooting Date and Time J Date/Time Shooting Using a TV 76 Shutter Button 23 Slideshow 96 Snow (Scene Mode 56 Software DIGITAL CAMERA Solution Disk 2 Software Guide 2 Transferring Images to a Computer ....... 33 Sound Settings 48 T Terminal 35, 99, 108 Tone (White Balance 71 Troubleshooting 123 U Underwater (Scene Mode 56 Index V Video J Movies Viewing (...


