
User Guide
Page 1
Camera User Guide Photo of IXUS 105 ENGLISH • Make sure you read this guide before using the camera. • Store this guide safely so that you can use it in the future.
Camera User Guide Photo of IXUS 105 ENGLISH • Make sure you read this guide before using the camera. • Store this guide safely so that you can use it in the future.
User Guide
Page 2
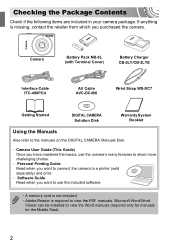
...included software. • A memory card is not included. • Adobe Reader is missing, contact the retailer from which you purchased the camera. Camera Battery Pack NB-6L (with Terminal Cover) Battery Charger CB-2LY/CB-2LYE Interface Cable IFC-400PCU AV Cable AVC-DC400 Wrist Strap WS-DC7... Getting Started DIGITAL CAMERA Solution Disk Warranty System Booklet Using the Manuals Also refer to the manuals on the DIGITAL CAMERA Manuals Disk. • Camera User Guide (This Guide) Once you have mastered the basics, use the...
...included software. • A memory card is not included. • Adobe Reader is missing, contact the retailer from which you purchased the camera. Camera Battery Pack NB-6L (with Terminal Cover) Battery Charger CB-2LY/CB-2LYE Interface Cable IFC-400PCU AV Cable AVC-DC400 Wrist Strap WS-DC7... Getting Started DIGITAL CAMERA Solution Disk Warranty System Booklet Using the Manuals Also refer to the manuals on the DIGITAL CAMERA Manuals Disk. • Camera User Guide (This Guide) Once you have mastered the basics, use the...
User Guide
Page 3
...for personal use . This is produced with your camera's warranty, please refer to be recorded or to the Canon Warranty System Booklet supplied with extremely high-precision manufacturing techniques. Do not record images that Canon Inc., its subsidiaries and affiliates, and its ...image to be recorded in the failure of the copyright holder. For Canon Customer Support contacts, please see the Warranty System Booklet. Camera Body Temperature Please take care when operating the camera for any consequential damages arising from performances, exhibitions, or commercial properties...
...for personal use . This is produced with your camera's warranty, please refer to be recorded or to the Canon Warranty System Booklet supplied with extremely high-precision manufacturing techniques. Do not record images that Canon Inc., its subsidiaries and affiliates, and its ...image to be recorded in the failure of the copyright holder. For Canon Customer Support contacts, please see the Warranty System Booklet. Camera Body Temperature Please take care when operating the camera for any consequential damages arising from performances, exhibitions, or commercial properties...
User Guide
Page 4
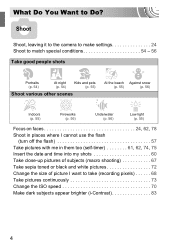
What Do You Want to Do? 4 Shoot Shoot, leaving it to the camera to make settings 24 Shoot to match special conditions 54 - 56 Take good people shots I FV Portraits (p. 54) At night (p. 54) Kids and pets (p. 55) ...
What Do You Want to Do? 4 Shoot Shoot, leaving it to the camera to make settings 24 Shoot to match special conditions 54 - 56 Take good people shots I FV Portraits (p. 54) At night (p. 54) Kids and pets (p. 55) ...
User Guide
Page 5
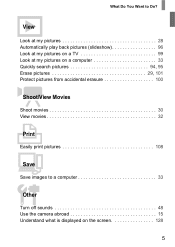
What Do You Want to Do? 1View Look at my pictures 28 Automatically play back pictures (slideshow 96 Look at my pictures on a TV 99 Look at my pictures on a computer 33 Quickly search pictures 94, 95 Erase pictures 29, 101 Protect pictures from accidental erasure 100 EShoot/View Movies Shoot movies 30 View movies 32 2Print Easily print pictures 108 Save Save images to a computer 33 3Other Turn off sounds 48 Use the camera abroad 15 Understand what is displayed on the screen 128 5
What Do You Want to Do? 1View Look at my pictures 28 Automatically play back pictures (slideshow 96 Look at my pictures on a TV 99 Look at my pictures on a computer 33 Quickly search pictures 94, 95 Erase pictures 29, 101 Protect pictures from accidental erasure 100 EShoot/View Movies Shoot movies 30 View movies 32 2Print Easily print pictures 108 Save Save images to a computer 33 3Other Turn off sounds 48 Use the camera abroad 15 Understand what is displayed on the screen 128 5

User Guide
Page 6
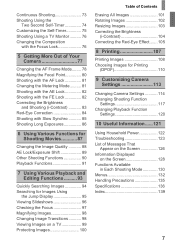
... and frequently used functions of an Image (My Colors 72 6 Basic Operations 47 Changing the Sound Settings ..........48 Changing the Screen Brightness .....49 Returning the Camera to Default Settings 50 Low Level Memory Card Formatting 51 Power Saving Function (Auto Power Down 52 3 Shooting in Special Conditions and Commonly Used Functions... 58 Inserting the Date and Time 60 Using the Self-Timer 61 Using the Face Self-Timer 62 4 Choosing Settings Yourself 63 Shooting in this camera. Menu -
... and frequently used functions of an Image (My Colors 72 6 Basic Operations 47 Changing the Sound Settings ..........48 Changing the Screen Brightness .....49 Returning the Camera to Default Settings 50 Low Level Memory Card Formatting 51 Power Saving Function (Auto Power Down 52 3 Shooting in Special Conditions and Commonly Used Functions... 58 Inserting the Date and Time 60 Using the Self-Timer 61 Using the Face Self-Timer 62 4 Choosing Settings Yourself 63 Shooting in this camera. Menu -
User Guide
Page 7
... 75 Shooting Using a TV Monitor .......... 76 Changing the Composition with the Focus Lock 76 5 Getting More Out of Your Camera 77 Changing the AF Frame Mode........ 78 Magnifying the Focal Point 80 Shooting with the AF Lock 81 Changing the Metering Mode...Correcting the Red-Eye Effect....... 105 8 Printing 107 Printing Images 108 Choosing Images for Printing (DPOF 110 9 Customizing Camera Settings 113 Changing Camera Settings 114 Changing Shooting Function Settings 117 Changing Playback Function Settings 120 10 Useful Information......121 Using Household Power 122 Troubleshooting...
... 75 Shooting Using a TV Monitor .......... 76 Changing the Composition with the Focus Lock 76 5 Getting More Out of Your Camera 77 Changing the AF Frame Mode........ 78 Magnifying the Focal Point 80 Shooting with the AF Lock 81 Changing the Metering Mode...Correcting the Red-Eye Effect....... 105 8 Printing 107 Printing Images 108 Choosing Images for Printing (DPOF 110 9 Customizing Camera Settings 113 Changing Camera Settings 114 Changing Shooting Function Settings 117 Changing Playback Function Settings 120 10 Useful Information......121 Using Household Power 122 Troubleshooting...
User Guide
Page 8
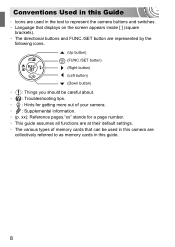
... guide assumes all functions are at their default settings. • The various types of memory cards that can be used in this camera are collectively referred to represent the camera buttons and switches. • Language that displays on the screen appears inside [ ] (square brackets). • The directional buttons and FUNC./SET button... button) (Right button) (Left button) (Down button) • : Things you should be careful about. • : Troubleshooting tips. • : Hints for getting more out of your camera. • : Supplemental information. • (p.
... guide assumes all functions are at their default settings. • The various types of memory cards that can be used in this camera are collectively referred to represent the camera buttons and switches. • Language that displays on the screen appears inside [ ] (square brackets). • The directional buttons and FUNC./SET button... button) (Right button) (Left button) (Down button) • : Things you should be careful about. • : Troubleshooting tips. • : Hints for getting more out of your camera. • : Supplemental information. • (p.

User Guide
Page 9
...shock. 9 Exposure to the equipment. In particular, remain at least one meter (39 inches) away from infants when using the camera, please ensure that the camera is operated correctly. • The safety precautions noted on the following pages are intended to prevent injuries to yourself and other ...into contact with any part of the equipment unless expressly indicated to do not touch the interior of the camera if it has been dropped or otherwise damaged. • Stop operating the camera immediately if it emits smoke, a strange smell, or otherwise behaves abnormally. • Do not use ...
...shock. 9 Exposure to the equipment. In particular, remain at least one meter (39 inches) away from infants when using the camera, please ensure that the camera is operated correctly. • The safety precautions noted on the following pages are intended to prevent injuries to yourself and other ...into contact with any part of the equipment unless expressly indicated to do not touch the interior of the camera if it has been dropped or otherwise damaged. • Stop operating the camera immediately if it emits smoke, a strange smell, or otherwise behaves abnormally. • Do not use ...
User Guide
Page 10
... outlet or wiring accessories. Humid or dusty areas. It is also possible to suffer hearing loss from the outlet and consult your camera distributor or the closest Canon Customer Support Help Desk. • Use only the specified battery charger to charge the battery. • Unplug the power cord ...periodically and wipe away any CD player that exceeds the rated capacity of the casing. 10 These could damage the camera or lead to strong ...
... outlet or wiring accessories. Humid or dusty areas. It is also possible to suffer hearing loss from the outlet and consult your camera distributor or the closest Canon Customer Support Help Desk. • Use only the specified battery charger to charge the battery. • Unplug the power cord ...periodically and wipe away any CD player that exceeds the rated capacity of the casing. 10 These could damage the camera or lead to strong ...

User Guide
Page 11
... power outlet after recharging is charging. This could cause leakage, overheating or explosion, resulting in fire or injuries. • Do not sit down with the camera in for a long period of the flash burning dust and foreign materials stuck to the unit. • Unplug the battery charger from the flash to... light sources (the sun, etc.). Leaving the unit plugged in your fingers or clothing. Doing so may occur. • Before you are not using the camera. Safety Precautions • When using the flash, be careful not to cover it with your pocket. This may cause the...
... power outlet after recharging is charging. This could cause leakage, overheating or explosion, resulting in fire or injuries. • Do not sit down with the camera in for a long period of the flash burning dust and foreign materials stuck to the unit. • Unplug the battery charger from the flash to... light sources (the sun, etc.). Leaving the unit plugged in your fingers or clothing. Doing so may occur. • Before you are not using the camera. Safety Precautions • When using the flash, be careful not to cover it with your pocket. This may cause the...
User Guide
Page 13
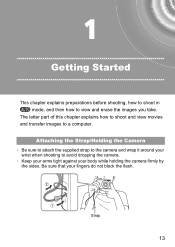
The latter part of this chapter explains how to shoot and view movies and transfer images to view and erase the images you take. Be sure that your body while holding the camera firmly by the sides. 1 Getting Started This chapter explains preparations before shooting, how to shoot in A mode, and then how to a computer. Attaching the Strap/Holding the Camera • Be sure to attach the supplied strap to the camera and wrap it around your wrist when shooting to avoid dropping the camera. • Keep your arms tight against your fingers do not block the flash. Strap 13
The latter part of this chapter explains how to shoot and view movies and transfer images to view and erase the images you take. Be sure that your body while holding the camera firmly by the sides. 1 Getting Started This chapter explains preparations before shooting, how to shoot in A mode, and then how to a computer. Attaching the Strap/Holding the Camera • Be sure to attach the supplied strap to the camera and wrap it around your wrist when shooting to avoid dropping the camera. • Keep your arms tight against your fingers do not block the flash. Strap 13

User Guide
Page 15
... the battery. If the plug does not fit the outlet, use electrical transformers for long periods: Deplete and remove the battery from the camera. Using the battery and charger effectively • Charge the battery on the day, or the day before, it has reached the end ...its performance. • The battery charger can also be used. Battery Charge Indicator An icon or message will no longer fit into the camera, please contact a Canon Customer Support Help Desk. • If the battery is quickly depleted even after charging, it will cause damage. • The battery ...
... the battery. If the plug does not fit the outlet, use electrical transformers for long periods: Deplete and remove the battery from the camera. Using the battery and charger effectively • Charge the battery on the day, or the day before, it has reached the end ...its performance. • The battery charger can also be used. Battery Charge Indicator An icon or message will no longer fit into the camera, please contact a Canon Customer Support Help Desk. • If the battery is quickly depleted even after charging, it will cause damage. • The battery ...
User Guide
Page 17
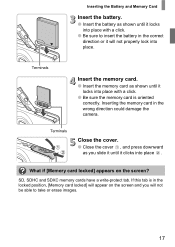
... the memory card. ● Insert the memory card as you will not be able to insert the battery in the wrong direction could damage the camera. Inserting the memory card in the correct direction or it will appear on the screen? If this tab is oriented correctly. Terminals Close the cover...
... the memory card. ● Insert the memory card as you will not be able to insert the battery in the wrong direction could damage the camera. Inserting the memory card in the correct direction or it will appear on the screen? If this tab is oriented correctly. Terminals Close the cover...
User Guide
Page 18
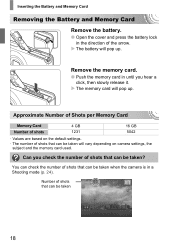
... of Shots per Memory Card Memory Card Number of shots that can be taken when the camera is in a Shooting mode (p. 24). Number of shots 4 GB 1231 16 GB 5042 • Values are based on camera settings, the subject and the memory card used. You can check the number of shots that...
... of Shots per Memory Card Memory Card Number of shots that can be taken when the camera is in a Shooting mode (p. 24). Number of shots 4 GB 1231 16 GB 5042 • Values are based on camera settings, the subject and the memory card used. You can check the number of shots that...
User Guide
Page 19
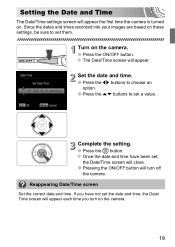
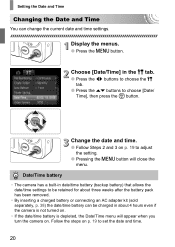
... correct date and time. Turn on these settings, be sure to set them. X The Date/Time screen will appear the first time the camera is turned on the camera. 19 Set the date and time. ● Press the qr buttons to choose an option. ● Press the op buttons to set a value... been set the date and time, the Date/ Time screen will turn on . Complete the setting. ● Press the m button. If you turn off the camera. Since the dates and times recorded into your images are based on the...
... correct date and time. Turn on these settings, be sure to set them. X The Date/Time screen will appear the first time the camera is turned on the camera. 19 Set the date and time. ● Press the qr buttons to choose an option. ● Press the op buttons to set a value... been set the date and time, the Date/ Time screen will turn on . Complete the setting. ● Press the m button. If you turn off the camera. Since the dates and times recorded into your images are based on the...
User Guide
Page 20
... qr buttons to choose the 3 tab. ● Press the op buttons to adjust the setting. ● Pressing the n button will appear when you turn the camera on. Change the date and time. ● Follow Steps 2 and 3 on . • If the date/time battery is depleted, the Date/Time menu will close... the menu. Display the menus. ● Press the n button. Date/Time battery • The camera has a built-in about 4 hours even if the camera is not turned on p. 19 to choose [Date/ Time], then press the m button. Follow the steps on p. 19 to be retained...
... qr buttons to choose the 3 tab. ● Press the op buttons to adjust the setting. ● Pressing the n button will appear when you turn the camera on. Change the date and time. ● Follow Steps 2 and 3 on . • If the date/time battery is depleted, the Date/Time menu will close... the menu. Display the menus. ● Press the n button. Date/Time battery • The camera has a built-in about 4 hours even if the camera is not turned on p. 19 to choose [Date/ Time], then press the m button. Follow the steps on p. 19 to be retained...

User Guide
Page 22
Formatting (initializing) a memory card erases all data on the screen. 22 As you should format the card with this camera. X A confirmation screen will be formatted. Display the menu. ● Press the n button. Choose [Format]. ● Press the qr buttons to choose the 3 tab. ● Press ...
Formatting (initializing) a memory card erases all data on the screen. 22 As you should format the card with this camera. X A confirmation screen will be formatted. Display the menu. ● Press the n button. Choose [Format]. ● Press the qr buttons to choose the 3 tab. ● Press ...
User Guide
Page 23
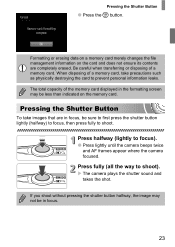
... the m button. The total capacity of a memory card. Press fully (all the way to focus). ● Press lightly until the camera beeps twice and AF frames appear where the camera focused. X The camera plays the shutter sound and takes the shot. Pressing the Shutter Button To take precautions such as physically destroying the...
... the m button. The total capacity of a memory card. Press fully (all the way to focus). ● Press lightly until the camera beeps twice and AF frames appear where the camera focused. X The camera plays the shutter sound and takes the shot. Pressing the Shutter Button To take precautions such as physically destroying the...
User Guide
Page 24
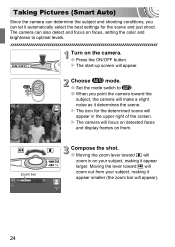
...appear). 24 Moving the lever toward j will zoom out from your subject, making it appear smaller (the zoom bar will appear. The camera can let it automatically select the best settings for the determined scene will focus on detected faces and display frames on them. Turn on the... camera. ● Press the ON/OFF button. X The camera will appear in on your subject, making it appear larger. Taking Pictures (Smart Auto) Since the camera can determine the subject and shooting conditions, you can also detect ...
...appear). 24 Moving the lever toward j will zoom out from your subject, making it appear smaller (the zoom bar will appear. The camera can let it automatically select the best settings for the determined scene will focus on detected faces and display frames on them. Turn on the... camera. ● Press the ON/OFF button. X The camera will appear in on your subject, making it appear larger. Taking Pictures (Smart Auto) Since the camera can determine the subject and shooting conditions, you can also detect ...


