User Manual
Page 4
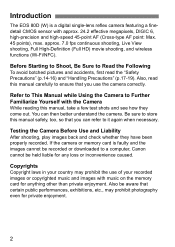
...continuous shooting, Live View shooting, Full High-Definition (Full HD) movie shooting, and wireless functions (Wi-Fi/NFC). Refer to This Manual while Using the Camera to a computer, Canon cannot be held liable for anything other than private enjoyment. If the camera or memory card is a digital single-lens reflex camera featuring... To avoid botched pictures and accidents, first read this manual, take a few test shots and see how they have been properly recorded. Introduction The EOS 80D (W) is faulty and the images cannot be aware that you can then better understand the camera.
...continuous shooting, Live View shooting, Full High-Definition (Full HD) movie shooting, and wireless functions (Wi-Fi/NFC). Refer to This Manual while Using the Camera to a computer, Canon cannot be held liable for anything other than private enjoyment. If the camera or memory card is a digital single-lens reflex camera featuring... To avoid botched pictures and accidents, first read this manual, take a few test shots and see how they have been properly recorded. Introduction The EOS 80D (W) is faulty and the images cannot be aware that you can then better understand the camera.
User Manual
Page 6
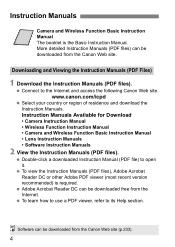
...detailed Instruction Manuals (PDF files) can be downloaded free from the Internet. To learn how to use a PDF viewer, refer to the Internet and access the following Canon Web site. Downloading and Viewing the Instruction Manuals (PDF Files) 1 Download the Instruction Manuals (PDF files).... Connect to its Help section. www.canon.com/icpd Select your country or region of residence and download the Instruction Manuals. Software can be downloaded from the Canon Web site (p.233). 4 Instruction Manuals Camera and Wireless Function Basic Instruction...
...detailed Instruction Manuals (PDF files) can be downloaded free from the Internet. To learn how to use a PDF viewer, refer to the Internet and access the following Canon Web site. Downloading and Viewing the Instruction Manuals (PDF Files) 1 Download the Instruction Manuals (PDF files).... Connect to its Help section. www.canon.com/icpd Select your country or region of residence and download the Instruction Manuals. Software can be downloaded from the Canon Web site (p.233). 4 Instruction Manuals Camera and Wireless Function Basic Instruction...
User Manual
Page 7
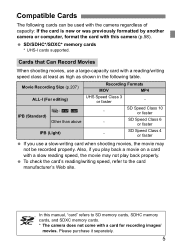
Cards that Can Record Movies When shooting movies, use a slow-writing card when shooting movies, the movie may not play back a movie on a card with... ALL-I cards supported. SD Speed Class 6 or faster - Compatible Cards The following table. Also, if you use a large-capacity card with a reading/writing speed class at least as high as shown in the following cards can be... used with the camera regardless of capacity: If the card is new or was previously formatted by another camera...
Cards that Can Record Movies When shooting movies, use a slow-writing card when shooting movies, the movie may not play back a movie on a card with... ALL-I cards supported. SD Speed Class 6 or faster - Compatible Cards The following table. Also, if you use a large-capacity card with a reading/writing speed class at least as high as shown in the following cards can be... used with the camera regardless of capacity: If the card is new or was previously formatted by another camera...
User Manual
Page 10
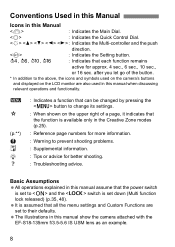
...or advice for better shooting. : Troubleshooting advice. after you let go of the button. * In addition to the above, the icons and symbols used in this manual when discussing relevant operations and functionality. 3 O (p.**) : Indicates a function that can be changed by pressing the button to change...upper right of a page, it indicates that each function remains active for approx. 4 sec., 6 sec., 10 sec., or 16 sec. Conventions Used in this Manual Icons in this Manual : Indicates the Main Dial. : Indicates the Quick Control Dial. : Indicates the Multi-controller and the push...
...or advice for better shooting. : Troubleshooting advice. after you let go of the button. * In addition to the above, the icons and symbols used in this manual when discussing relevant operations and functionality. 3 O (p.**) : Indicates a function that can be changed by pressing the button to change...upper right of a page, it indicates that each function remains active for approx. 4 sec., 6 sec., 10 sec., or 16 sec. Conventions Used in this Manual Icons in this Manual : Indicates the Main Dial. : Indicates the Quick Control Dial. : Indicates the Multi-controller and the push...
User Manual
Page 12
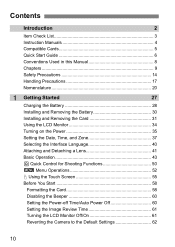
...Precautions 17 Nomenclature 20 1 Getting Started 27 Charging the Battery 28 Installing and Removing the Battery 30 Installing and Removing the Card 31 Using the LCD Monitor 34 Turning on the Power 35 Setting the Date, Time, and Zone 37 Selecting the Interface Language 40 Attaching and... Detaching a Lens 41 Basic Operation 43 Q Quick Control for Shooting Functions 50 3 Menu Operations 52 d Using the Touch Screen 55 Before You Start 58 Formatting the Card 58 Disabling the Beeper 60 Setting the Power-off Time/Auto Power Off ...
...Precautions 17 Nomenclature 20 1 Getting Started 27 Charging the Battery 28 Installing and Removing the Battery 30 Installing and Removing the Card 31 Using the LCD Monitor 34 Turning on the Power 35 Setting the Date, Time, and Zone 37 Selecting the Interface Language 40 Attaching and... Detaching a Lens 41 Basic Operation 43 Q Quick Control for Shooting Functions 50 3 Menu Operations 52 d Using the Touch Screen 55 Before You Start 58 Formatting the Card 58 Disabling the Beeper 60 Setting the Power-off Time/Auto Power Off ...
User Manual
Page 14
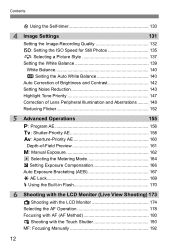
Contents j Using the Self-timer 130 4 Image Settings 131 Setting the Image-Recording Quality 132 i: Setting the ISO Speed for Still Photos 135 A Selecting a Picture Style 137 ... Depth-of-Field Preview 161 a: Manual Exposure 162 q Selecting the Metering Mode 164 O Setting Exposure Compensation 166 Auto Exposure Bracketing (AEB 167 A AE Lock 169 D Using the Built-in Flash 170 6 Shooting with the LCD Monitor (Live View Shooting) 173 A Shooting with the LCD Monitor 174 Selecting the AF Operation 178...
Contents j Using the Self-timer 130 4 Image Settings 131 Setting the Image-Recording Quality 132 i: Setting the ISO Speed for Still Photos 135 A Selecting a Picture Style 137 ... Depth-of-Field Preview 161 a: Manual Exposure 162 q Selecting the Metering Mode 164 O Setting Exposure Compensation 166 Auto Exposure Bracketing (AEB 167 A AE Lock 169 D Using the Built-in Flash 170 6 Shooting with the LCD Monitor (Live View Shooting) 173 A Shooting with the LCD Monitor 174 Selecting the AF Operation 178...
User Manual
Page 16
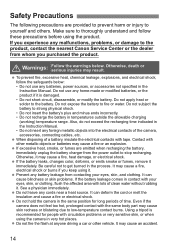
...it . Prevent any malfunctions, problems, or damage to the product, contact the nearest Canon Service Center or the dealer from the power outlet to yourself and others. Do not use any batteries, power sources, or accessories not specified in the Instruction Manual. Do not expose ...time. Otherwise, it may result. To prevent fire, excessive heat, chemical leakage, explosions, and electrical shock, follow these precautions before using the camera in contact with your eyes, skin, and clothing. It can deform the cord or melt the insulation and cause a fire or ...
...it . Prevent any malfunctions, problems, or damage to the product, contact the nearest Canon Service Center or the dealer from the power outlet to yourself and others. Do not use any batteries, power sources, or accessories not specified in the Instruction Manual. Do not expose ...time. Otherwise, it may result. To prevent fire, excessive heat, chemical leakage, explosions, and electrical shock, follow these precautions before using the camera in contact with your eyes, skin, and clothing. It can deform the cord or melt the insulation and cause a fire or ...

User Manual
Page 17
...choking, electrical shock, or injury. If a child or infant swallows a part or accessory, consult a physician immediately. Do not use , make sure to remove the battery, and disconnect the power plug and connecting cables from metallic items and store it is allowed. Doing so... of an electrical shock. Do not disassemble or modify the equipment. Safety Precautions When the camera or accessories are using the camera inside the product, promptly remove the battery. Likewise, keep the battery away from the equipment before storing. Electromagnetic waves emitted ...
...choking, electrical shock, or injury. If a child or infant swallows a part or accessory, consult a physician immediately. Do not use , make sure to remove the battery, and disconnect the power plug and connecting cables from metallic items and store it is allowed. Doing so... of an electrical shock. Do not disassemble or modify the equipment. Safety Precautions When the camera or accessories are using the camera inside the product, promptly remove the battery. Likewise, keep the battery away from the equipment before storing. Electromagnetic waves emitted ...
User Manual
Page 18
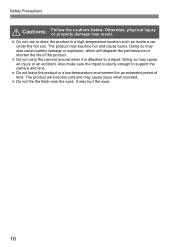
... not fire the flash near the eyes. The product will degrade the performance or shorten the life of time. It may result. Do not use or store the product in a low-temperature environment for an extended period of the product. Do not carry the camera around when it is...
... not fire the flash near the eyes. The product will degrade the performance or shorten the life of time. It may result. Do not use or store the product in a low-temperature environment for an extended period of the product. Do not carry the camera around when it is...
User Manual
Page 19
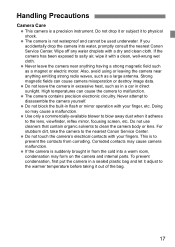
...cause camera misoperation or destroy image data. Do not leave the camera in from corroding. Do not use cleaners that contain organic solvents to the nearest Canon Service Center. Do not touch the camera's electrical contacts with your fingers. Corroded contacts may cause ...camera malfunction. If the camera is not waterproof and cannot be used underwater. To prevent condensation, first put...
...cause camera misoperation or destroy image data. Do not leave the camera in from corroding. Do not use cleaners that contain organic solvents to the nearest Canon Service Center. Do not touch the camera's electrical contacts with your fingers. Corroded contacts may cause ...camera malfunction. If the camera is not waterproof and cannot be used underwater. To prevent condensation, first put...
User Manual
Page 20
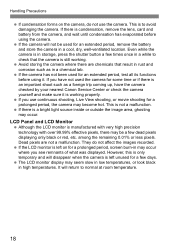
...61501; The LCD monitor display may seem slow in low temperatures, or look black in may occur where you have not used for some time or if there is an important shoot such as in a cool, dry, well-ventilated location. LCD ... the camera is condensation, remove the lens, card and battery from the camera, and wait until condensation has evaporated before using the camera. If the camera will not be a few times once in a while to normal at room ... as a foreign trip coming up, have the camera checked by your nearest Canon Service Center or check the camera yourself and make sure it .
...61501; The LCD monitor display may seem slow in low temperatures, or look black in may occur where you have not used for some time or if there is an important shoot such as in a cool, dry, well-ventilated location. LCD ... the camera is condensation, remove the lens, card and battery from the camera, and wait until condensation has evaporated before using the camera. If the camera will not be a few times once in a while to normal at room ... as a foreign trip coming up, have the camera checked by your nearest Canon Service Center or check the camera yourself and make sure it .
User Manual
Page 21
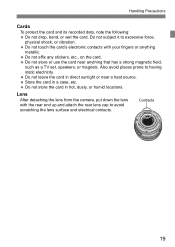
... leave the card in direct sunlight or near anything metallic. Do not affix any stickers, etc., on the card. Do not store or use the card near a heat source. Store the card in a case, etc. Do not store the card in hot, dusty, or humid locations. Contacts...
... leave the card in direct sunlight or near anything metallic. Do not affix any stickers, etc., on the card. Do not store or use the card near a heat source. Store the card in a case, etc. Do not store the card in hot, dusty, or humid locations. Contacts...
User Manual
Page 22
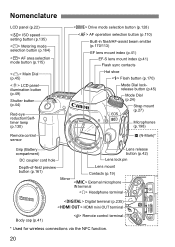
... pin Lens mount Mirror Contacts (p.19) External microphone IN terminal Headphone terminal Digital terminal (p.235) HDMI mini OUT terminal Body cap (p.41) Remote control terminal * Used for wireless connections via the NFC function. 20
... pin Lens mount Mirror Contacts (p.19) External microphone IN terminal Headphone terminal Digital terminal (p.235) HDMI mini OUT terminal Body cap (p.41) Remote control terminal * Used for wireless connections via the NFC function. 20
User Manual
Page 28
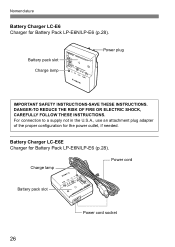
For connection to a supply not in the U.S.A., use an attachment plug adapter of the proper configuration for Battery Pack LP-E6N/LP-E6 (p.28). Charge lamp Power cord Battery pack slot Power cord socket 26 Battery pack slot Charge lamp Power plug IMPORTANT SAFETY INSTRUCTIONS-SAVE THESE INSTRUCTIONS. Nomenclature Battery Charger LC-E6 Charger for the power outlet, if needed. Battery Charger LC-E6E Charger for Battery Pack LP-E6N/LP-E6 (p.28). DANGER-TO REDUCE THE RISK OF FIRE OR ELECTRIC SHOCK, CAREFULLY FOLLOW THESE INSTRUCTIONS.
For connection to a supply not in the U.S.A., use an attachment plug adapter of the proper configuration for Battery Pack LP-E6N/LP-E6 (p.28). Charge lamp Power cord Battery pack slot Power cord socket 26 Battery pack slot Charge lamp Power plug IMPORTANT SAFETY INSTRUCTIONS-SAVE THESE INSTRUCTIONS. Nomenclature Battery Charger LC-E6 Charger for the power outlet, if needed. Battery Charger LC-E6E Charger for Battery Pack LP-E6N/LP-E6 (p.28). DANGER-TO REDUCE THE RISK OF FIRE OR ELECTRIC SHOCK, CAREFULLY FOLLOW THESE INSTRUCTIONS.
User Manual
Page 31
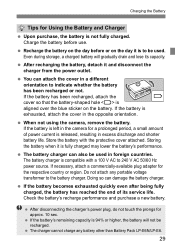
...amount of its capacity. After recharging the battery, detach it and disconnect the charger from the power outlet. You can also be used . If the battery has been recharged, attach the cover so that the battery-shaped hole is exhausted, attach the cover in the opposite orientation. &#...61501; When not using the camera, remove the battery. If the battery is 94% or higher, the battery will gradually drain and lose its service life. Charge ...
...amount of its capacity. After recharging the battery, detach it and disconnect the charger from the power outlet. You can also be used . If the battery has been recharged, attach the cover so that the battery-shaped hole is exhausted, attach the cover in the opposite orientation. &#...61501; When not using the camera, remove the battery. If the battery is 94% or higher, the battery will gradually drain and lose its service life. Charge ...

User Manual
Page 32
... battery. Insert the end with the electrical contacts. Insert the battery until it locks in the viewfinder becomes blurred and focus cannot be used. Only Battery Pack LP-E6N/LP-E6 can be achieved. The camera's viewfinder becomes bright when a battery is installed, and darkens when the battery is...
... battery. Insert the end with the electrical contacts. Insert the battery until it locks in the viewfinder becomes blurred and focus cannot be used. Only Battery Pack LP-E6N/LP-E6 can be achieved. The camera's viewfinder becomes bright when a battery is installed, and darkens when the battery is...
User Manual
Page 33
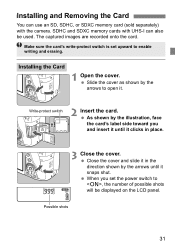
... by the illustration, face the card's label side toward you set the power switch to , the number of possible shots will be used. Installing and Removing the Card You can use an SD, SDHC, or SDXC memory card (sold separately) with UHS-I can also be displayed on the LCD panel. SDHC and...
... by the illustration, face the card's label side toward you set the power switch to , the number of possible shots will be used. Installing and Removing the Card You can use an SD, SDHC, or SDXC memory card (sold separately) with UHS-I can also be displayed on the LCD panel. SDHC and...
User Manual
Page 35
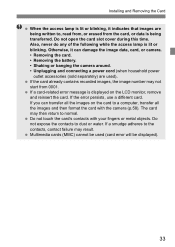
... access lamp is lit or blinking, it can transfer all the images on the LCD monitor, remove and reinsert the card. If the error persists, use a different card. Do not open the card slot cover during this time. Also, never do any of the following while the access lamp is lit... or blinking. Otherwise, it indicates that images are used (card error will be used ). If the card already contains recorded images, the image number may then return to dust or water.
... access lamp is lit or blinking, it can transfer all the images on the LCD monitor, remove and reinsert the card. If the error persists, use a different card. Do not open the card slot cover during this time. Also, never do any of the following while the access lamp is lit... or blinking. Otherwise, it indicates that images are used (card error will be used ). If the card already contains recorded images, the image number may then return to dust or water.
User Manual
Page 36
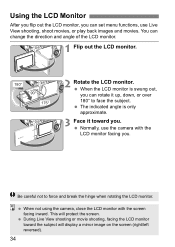
... is only approximate. 3 Face it up, down, or over 180° to force and break the hinge when rotating the LCD monitor. When not using the camera, close the LCD monitor with the LCD monitor facing you. This will display a mirror image on the screen (right/left reversed). 34... Using the LCD Monitor After you flip out the LCD monitor, you . Normally, use Live View shooting, shoot movies, or play back images and movies. You can change the direction and angle of...
... is only approximate. 3 Face it up, down, or over 180° to force and break the hinge when rotating the LCD monitor. When not using the camera, close the LCD monitor with the LCD monitor facing you. This will display a mirror image on the screen (right/left reversed). 34... Using the LCD Monitor After you flip out the LCD monitor, you . Normally, use Live View shooting, shoot movies, or play back images and movies. You can change the direction and angle of...
User Manual
Page 37
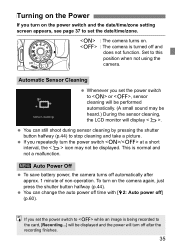
... a malfunction. 3 Auto Power Off To save battery power, the camera turns off automatically after the recording finishes. 35 Set to this position when not using the camera. If you set the power switch to while an image is being recorded to the card, [Recording...] will be heard.) During the sensor...
... a malfunction. 3 Auto Power Off To save battery power, the camera turns off automatically after the recording finishes. 35 Set to this position when not using the camera. If you set the power switch to while an image is being recorded to the card, [Recording...] will be heard.) During the sensor...
