/app/pdf/projector/lv5220-7220-7225_manual.pdf
Page 3
... 12 Wireless Mouse Operation 13 Operating Range 13 Remote Control Code 14 Remote Control Battery Installation 14 Installation 15 Positioning the Projector 15 Adjustable Feet 15 Connecting the AC Power Cord 16 Connecting to a Computer 17 Connecting to Video Equipment 18 Connecting...P-Timer Function 26 Sound Adjustment 26 Computer Input 27 Input Source Selection 27 Computer System Selection 28 Auto PC Adjustment 29 Manual PC Adjustment 30 Image Level Selection 32 Image Level Adjustment 33 Screen Size Adjustment 34 Video Input 35 Input Source Selection (...
... 12 Wireless Mouse Operation 13 Operating Range 13 Remote Control Code 14 Remote Control Battery Installation 14 Installation 15 Positioning the Projector 15 Adjustable Feet 15 Connecting the AC Power Cord 16 Connecting to a Computer 17 Connecting to Video Equipment 18 Connecting...P-Timer Function 26 Sound Adjustment 26 Computer Input 27 Input Source Selection 27 Computer System Selection 28 Auto PC Adjustment 29 Manual PC Adjustment 30 Image Level Selection 32 Image Level Adjustment 33 Screen Size Adjustment 34 Video Input 35 Input Source Selection (...
/app/pdf/projector/lv5220-7220-7225_manual.pdf
Page 4
...other accidents. To the Owner Before operating this projector, read this manual again, check operations and cable connections and try the solutions in the "Troubleshooting" section in a proper position. Operating the projector properly enables you purchased the projector or the service center. Do not stare directly...; dans une salle d'ordinateurs telle que définie dans la norme ANSI/NFPA 75 Standard for Protection of this manual thoroughly and operate the projector properly. Wanneer deze leeg zijn, moet u ze niet weggooien maar inleveren als KCA. 4 CAUTION RISK OF ELECTRIC SHOCK...
...other accidents. To the Owner Before operating this projector, read this manual again, check operations and cable connections and try the solutions in the "Troubleshooting" section in a proper position. Operating the projector properly enables you purchased the projector or the service center. Do not stare directly...; dans une salle d'ordinateurs telle que définie dans la norme ANSI/NFPA 75 Standard for Protection of this manual thoroughly and operate the projector properly. Wanneer deze leeg zijn, moet u ze niet weggooien maar inleveren als KCA. 4 CAUTION RISK OF ELECTRIC SHOCK...
/app/pdf/projector/lv5220-7220-7225_manual.pdf
Page 15
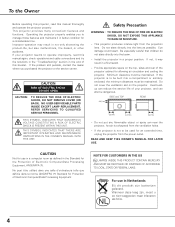
...(7.7m) 300" 6096 x 4572 ----- Keystone distortion of the projected image can be adjusted automatically with Auto Setup function or manually with the adjustable feet. 1 Lift the front of the projector and pull and undo the feet lock latches. Refer to obtain the best image. • The values shown above are... the adjustable feet and rotate the adjustable feet to adjust the position and tilt. 3 To retract the adjustable feet, lift the front of the projector and pull upward the feet lock latches on picture quality. Zoom 190" A Min. It is designed to project on a flat projection surface and...
...(7.7m) 300" 6096 x 4572 ----- Keystone distortion of the projected image can be adjusted automatically with Auto Setup function or manually with the adjustable feet. 1 Lift the front of the projector and pull and undo the feet lock latches. Refer to obtain the best image. • The values shown above are... the adjustable feet and rotate the adjustable feet to adjust the position and tilt. 3 To retract the adjustable feet, lift the front of the projector and pull upward the feet lock latches on picture quality. Zoom 190" A Min. It is designed to project on a flat projection surface and...
/app/pdf/projector/lv5220-7220-7225_manual.pdf
Page 24
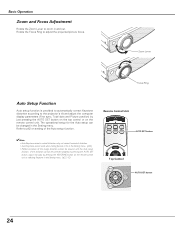
Refer to the projector's tilt and adjust the computer display parameters (Fine sync, Total dots and Picture position) by pressing the KEYSTONE button on setting of the Auto setup ... be ensured with the Auto setup function. The operational setup for the Auto setup can be corrected properly by pressing the AUTO SET button, adjust manually by just pressing the AUTO SET button on the top control or on the remote control unit. L VOL + AUTO SET L INPUT AUTO SET button 24...
Refer to the projector's tilt and adjust the computer display parameters (Fine sync, Total dots and Picture position) by pressing the KEYSTONE button on setting of the Auto setup ... be ensured with the Auto setup function. The operational setup for the Auto setup can be corrected properly by pressing the AUTO SET button, adjust manually by just pressing the AUTO SET button on the top control or on the remote control unit. L VOL + AUTO SET L INPUT AUTO SET button 24...
/app/pdf/projector/lv5220-7220-7225_manual.pdf
Page 25
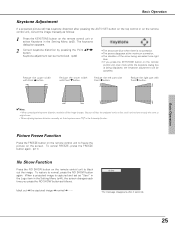
... The direction of the arrow being displayed, the keystone adjustment will be shown exactly the same as original ones. • When adjusting keystone distortion manually, set as follows: 1 Press the KEYSTONE button on the remote control unit or select Keystone in the Setting Menu (p44), the screen changes ... ➜ normal The message disappears after pressing the AUTO SET button on the top control or on the remote control unit, correct the image manually as "User" in the Logo item in the Setting Menu (p42). Reduce the left part with Point e button. Reduce the upper width ...
... The direction of the arrow being displayed, the keystone adjustment will be shown exactly the same as original ones. • When adjusting keystone distortion manually, set as follows: 1 Press the KEYSTONE button on the remote control unit or select Keystone in the Setting Menu (p44), the screen changes ... ➜ normal The message disappears after pressing the AUTO SET button on the top control or on the remote control unit, correct the image manually as "User" in the Logo item in the Setting Menu (p42). Reduce the left part with Point e button. Reduce the upper width ...
/app/pdf/projector/lv5220-7220-7225_manual.pdf
Page 28
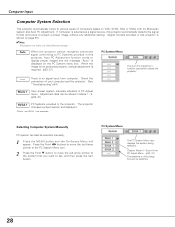
... The Auto PC Adjustment function operates to adjust the projector. ----- The projector chooses a proper system and displays it. *Mode 1 and SVGA 1 are examples. PC System Menu The PC System Menu icon displays the system being selected. Selecting Computer System Manually PC system can be selected manually. 1 Press the MENU button and the On-Screen Menu...
... The Auto PC Adjustment function operates to adjust the projector. ----- The projector chooses a proper system and displays it. *Mode 1 and SVGA 1 are examples. PC System Menu The PC System Menu icon displays the system being selected. Selecting Computer System Manually PC system can be selected manually. 1 Press the MENU button and the On-Screen Menu...
/app/pdf/projector/lv5220-7220-7225_manual.pdf
Page 29
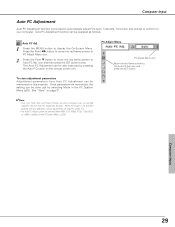
... "Store" on the remote control unit. Auto PC Adjustment function can be operated as follows. When the image is not provided properly with this operation, manual adjustments are memorized, the setting can be done just by pressing the Auto PC button on page 31. ✔Note: • Fine sync, Total ... fully adjusted with this Auto PC Adjustment function. To store adjustment parameters Adjustment parameters from Auto PC Adjustment can not be memorized in this projector. Computer Input Auto PC Adjustment Auto PC Adjustment function is selected in the PC System Menu (p28).
... "Store" on the remote control unit. Auto PC Adjustment function can be operated as follows. When the image is not provided properly with this operation, manual adjustments are memorized, the setting can be done just by pressing the Auto PC button on page 31. ✔Note: • Fine sync, Total ... fully adjusted with this Auto PC Adjustment function. To store adjustment parameters Adjustment parameters from Auto PC Adjustment can not be memorized in this projector. Computer Input Auto PC Adjustment Auto PC Adjustment function is selected in the PC System Menu (p28).
/app/pdf/projector/lv5220-7220-7225_manual.pdf
Page 30
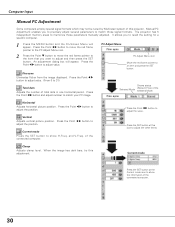
...the selected Mode. Current mode Press the SET button at this projector. Press the Point 7 8 button and adjust number to adjust the value. Press the Point 7 8 button to match your PC image. Computer Input Manual PC Adjustment Some computers employ special signal formats which may not be...the item that you want to show the information of total dots in one horizontal period. Fine sync Eliminates flicker from the image displayed. The projector has 5 independent memory areas to 31) Total dots Adjusts the number of the connected computer. 30 Press the Point 7 8 button to ...
...the selected Mode. Current mode Press the SET button at this projector. Press the Point 7 8 button and adjust number to adjust the value. Press the Point 7 8 button to match your PC image. Computer Input Manual PC Adjustment Some computers employ special signal formats which may not be...the item that you want to show the information of total dots in one horizontal period. Fine sync Eliminates flicker from the image displayed. The projector has 5 independent memory areas to 31) Total dots Adjusts the number of the connected computer. 30 Press the Point 7 8 button to ...
/app/pdf/projector/lv5220-7220-7225_manual.pdf
Page 33
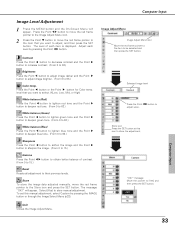
.... (From 0 to 63.) Brightness Press the Point 7 button to adjust image darker and the Point 8 button to adjust image brighter. (From 0 to store manual adjustment. "OK?" Press the Point 7 button or the Point 8 button for Color temp. Sharpness Press the Point 7 button to soften the image and the Point... to 15.) Reset Resets all adjustment to adjust, and then press the SET button. The message "OK?" Store icon Press the SET button at this manual adjustment, select Custom by pressing the Point 7 8 button. To set this icon to [Yes] and then press the SET button. Quit Closes the ...
.... (From 0 to 63.) Brightness Press the Point 7 button to adjust image darker and the Point 8 button to adjust image brighter. (From 0 to store manual adjustment. "OK?" Press the Point 7 button or the Point 8 button for Color temp. Sharpness Press the Point 7 button to soften the image and the Point... to 15.) Reset Resets all adjustment to adjust, and then press the SET button. The message "OK?" Store icon Press the SET button at this manual adjustment, select Custom by pressing the Point 7 8 button. To set this icon to [Yes] and then press the SET button. Quit Closes the ...
/app/pdf/projector/lv5220-7220-7225_manual.pdf
Page 37
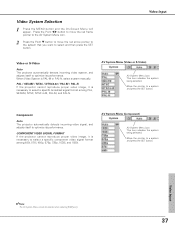
...to select a specific broadcast signal format among 480i, 575i, 480p, 575p, 720p, 1035i, and 1080i. COMPONENT VIDEO SIGNAL FORMAT If the projector cannot reproduce proper video image, it is necessary to optimize its performance. Video System Selection 1 Press the MENU button and the On-Screen Menu... when selecting RGB(Scart). 37 PAL / SECAM / NTSC / NTSC4.43 / PAL-M / PAL-N If the projector cannot reproduce proper video image, it is PAL-M or PAL-N, select system manually. AV System Menu (Component) AV System Menu icon This box indicates the system being selected. AV System Menu (...
...to select a specific broadcast signal format among 480i, 575i, 480p, 575p, 720p, 1035i, and 1080i. COMPONENT VIDEO SIGNAL FORMAT If the projector cannot reproduce proper video image, it is necessary to optimize its performance. Video System Selection 1 Press the MENU button and the On-Screen Menu... when selecting RGB(Scart). 37 PAL / SECAM / NTSC / NTSC4.43 / PAL-M / PAL-N If the projector cannot reproduce proper video image, it is PAL-M or PAL-N, select system manually. AV System Menu (Component) AV System Menu icon This box indicates the system being selected. AV System Menu (...

/app/pdf/projector/lv5220-7220-7225_manual.pdf
Page 40
... "L2" for an active picture. Store To store the adjustment data, move the red frame pointer to video mode. To select this function On, the projector reproduces pictures faithful to get the best film-like images. "OK?" Off . . . .Not activated. L1 . . . . .Select "L1" for a still picture. The message "... television signals (or video) have a run rate of changing images from film mode to the Store icon and press the SET button. With this manual adjustment, select Custom by pressing the IMAGE button or through the Image Select Menu (p38). Select [Yes] to [Yes] and then press the ...
... "L2" for an active picture. Store To store the adjustment data, move the red frame pointer to video mode. To select this function On, the projector reproduces pictures faithful to get the best film-like images. "OK?" Off . . . .Not activated. L1 . . . . .Select "L1" for a still picture. The message "... television signals (or video) have a run rate of changing images from film mode to the Store icon and press the SET button. With this manual adjustment, select Custom by pressing the IMAGE button or through the Image Select Menu (p38). Select [Yes] to [Yes] and then press the ...
/app/pdf/projector/lv5220-7220-7225_manual.pdf
Page 42
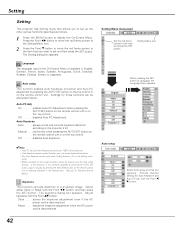
...Auto Keystone cannot work when Ceiling feature is On in the On-Screen Menu is not corrected properly by pressing the AUTO SET button, adjust manually by pressing the AUTO SET button on the top control or on the top control. Press the Point 7 8 button to move the ...the AC power cord is disconnected. Setting Menu (Language) Set the red frame pointer to the projector's tilt. Store . . . . with the Point 7 8 button, and then press the SET button. Setting Setting This projector has Setting menu that you to set up the other various functions described as follows: Auto ...
...Auto Keystone cannot work when Ceiling feature is On in the On-Screen Menu is not corrected properly by pressing the AUTO SET button, adjust manually by pressing the AUTO SET button on the top control or on the top control. Press the Point 7 8 button to move the ...the AC power cord is disconnected. Setting Menu (Language) Set the red frame pointer to the projector's tilt. Store . . . . with the Point 7 8 button, and then press the SET button. Setting Setting This projector has Setting menu that you to set up the other various functions described as follows: Auto ...
/app/pdf/projector/lv5220-7220-7225_manual.pdf
Page 53
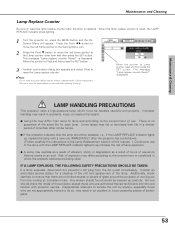
...replace counter Reset?" Contact an authorized service station for each lamp. No one IMMEDIATELY after the projector has cooled down. ( Follow carefully the instructions in the Lamp Replacement section of this manual. ) Continuous use of the lamp with the LAMP REPLACE indicator lighted may increase the risk...Additionally, check carefully to reset the Lamp replace counter. ✔Note: Do not reset the Lamp replace counter without implementation of the projector except those who are no guarantee of use . Move the pointer to the Lamp counter reset item and then press the SET button...
...replace counter Reset?" Contact an authorized service station for each lamp. No one IMMEDIATELY after the projector has cooled down. ( Follow carefully the instructions in the Lamp Replacement section of this manual. ) Continuous use of the lamp with the LAMP REPLACE indicator lighted may increase the risk...Additionally, check carefully to reset the Lamp replace counter. ✔Note: Do not reset the Lamp replace counter without implementation of the projector except those who are no guarantee of use . Move the pointer to the Lamp counter reset item and then press the SET button...
/app/pdf/projector/lv5220-7220-7225_manual.pdf
Page 54
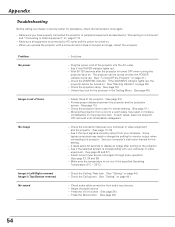
... "Setting" on page 44.) - Check the WARNING indicator. See your computer's instruction manual for assistance, check the items below once again. - See if the selected system is connected to a warm place may need to change the setting for the projector in "Connecting to a Computer" and "Connecting to see if it does not...
... "Setting" on page 44.) - Check the WARNING indicator. See your computer's instruction manual for assistance, check the items below once again. - See if the selected system is connected to a warm place may need to change the setting for the projector in "Connecting to a Computer" and "Connecting to see if it does not...
/app/pdf/projector/lv5220-7220-7225_manual.pdf
Page 60
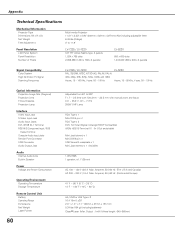
...Projector 11.81" x 3.23" x 8.94" (300mm x 82mm x 227mm) (Not including adjustable feet) 6.48 lbs (2.9kgs) 0˚ to 11.9˚ Panel Resolution LCD Panel System Panel Resolution Number of Pixels LV-7225 / LV-7220 0.8" TFT Active Matrix type, 3 panels 1,024 x 768 dots 2,359,296 (1,024 x 768 x 3 panels) LV-5220...Remote Control Unit Battery Operating Range Dimensions Net Weight Laser Pointer 60 Adjustable from 40" to 300" F 1.7 ~ 2.5 lens with f 20.3mm ~ 32.5 mm with manual zoom and focus 3.3' ~ 25.3' (1.0m ~ 7.7m) 200W UHP Lamp RCA Type x 1 Mini DIN 4 pin x 1 RCA Type x 2 DVI-I Terminal (...
...Projector 11.81" x 3.23" x 8.94" (300mm x 82mm x 227mm) (Not including adjustable feet) 6.48 lbs (2.9kgs) 0˚ to 11.9˚ Panel Resolution LCD Panel System Panel Resolution Number of Pixels LV-7225 / LV-7220 0.8" TFT Active Matrix type, 3 panels 1,024 x 768 dots 2,359,296 (1,024 x 768 x 3 panels) LV-5220...Remote Control Unit Battery Operating Range Dimensions Net Weight Laser Pointer 60 Adjustable from 40" to 300" F 1.7 ~ 2.5 lens with f 20.3mm ~ 32.5 mm with manual zoom and focus 3.3' ~ 25.3' (1.0m ~ 7.7m) 200W UHP Lamp RCA Type x 1 Mini DIN 4 pin x 1 RCA Type x 2 DVI-I Terminal (...

/app/pdf/projector/lv5220-7220-7225_manual.pdf
Page 61
.... When ordering those parts, give the item name and Model No. to the highest possible standards. Model No. Appendix Accessories Owner's Manual AC Power Cord Remote Control Unit and Batteries DVI-VGA Cable USB Cable Lens Cover with String and Screw Soft Carrying Bag PIN Code ...Label ● The specifications are subject to change without notice. ● LCD panels are optionally available. COMPONENT-VGA Cable : LV-CA32 SCART - Optional Parts The parts listed below are manufactured to the sales dealer. Even though 99.99% of the pixels are effective, a...
.... When ordering those parts, give the item name and Model No. to the highest possible standards. Model No. Appendix Accessories Owner's Manual AC Power Cord Remote Control Unit and Batteries DVI-VGA Cable USB Cable Lens Cover with String and Screw Soft Carrying Bag PIN Code ...Label ● The specifications are subject to change without notice. ● LCD panels are optionally available. COMPONENT-VGA Cable : LV-CA32 SCART - Optional Parts The parts listed below are manufactured to the sales dealer. Even though 99.99% of the pixels are effective, a...
Serial Functional Specification
Page 27
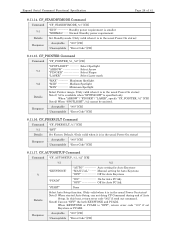
... for Auto PC Adj. Response Acceptable "000" [CR] Unacceptable "Error Code" [CR] CF_AUTOSETUP Command Command "CF_AUTOSETUP_%1_%2" [CR] %1 %2 "AUTO Auto setting for Auto Keystone "KEYSTONE" " M A N U A L Manual setting for Auto Keystone % "OFF Off for Auto Keystone "PCADJ" "ON On for Auto PC Adj. "START" None Details Select Auto Setup function. (Only valid...
... for Auto PC Adj. Response Acceptable "000" [CR] Unacceptable "Error Code" [CR] CF_AUTOSETUP Command Command "CF_AUTOSETUP_%1_%2" [CR] %1 %2 "AUTO Auto setting for Auto Keystone "KEYSTONE" " M A N U A L Manual setting for Auto Keystone % "OFF Off for Auto Keystone "PCADJ" "ON On for Auto PC Adj. "START" None Details Select Auto Setup function. (Only valid...
Serial Functional Specification
Page 41
...Auto Keystone "PCADJ Specify Auto PC Adj. Fan mode L2 Unacceptable "?" [CR] 9.12. No signal Unacceptable "?" [CR] 9.12.2. Manual setting "OFF Off setting When Auto PC Adj. Acceptable "000_%a" [CR] Response %a "L1" -------- CR_SIGNAL Command Command "CR_SIGNAL" [... Status Read Command 9.12.1. Details Get Auto Setup setting status Acceptable "000_%a" [CR] When Keystone "AUTO Auto setting Response %a "MANUAL" ------ CR_FANMODE Command Command "CR_FANMODE" [CR] Details Get selected Fan mode. CR_VMUTE Command Command "CR_VMUTE" [CR] Details Get No ...
...Auto Keystone "PCADJ Specify Auto PC Adj. Fan mode L2 Unacceptable "?" [CR] 9.12. No signal Unacceptable "?" [CR] 9.12.2. Manual setting "OFF Off setting When Auto PC Adj. Acceptable "000_%a" [CR] Response %a "L1" -------- CR_SIGNAL Command Command "CR_SIGNAL" [... Status Read Command 9.12.1. Details Get Auto Setup setting status Acceptable "000_%a" [CR] When Keystone "AUTO Auto setting Response %a "MANUAL" ------ CR_FANMODE Command Command "CR_FANMODE" [CR] Details Get selected Fan mode. CR_VMUTE Command Command "CR_VMUTE" [CR] Details Get No ...


