
Getting Started
Page 2
Contents 1 Preparation 2 Turn the Power On 3 Install the Print Head 4 Install the Ink Tanks 5 Install the Software 6 Loading Paper After Installing the Printer
Contents 1 Preparation 2 Turn the Power On 3 Install the Print Head 4 Install the Ink Tanks 5 Install the Software 6 Loading Paper After Installing the Printer

Getting Started
Page 5
... object on top of the printer. • You can print on large size paper such as 14" x 17"/355.6 x 431.8 mm or thick paper by loading the paper in the Front Tray. Lift the front of the printer. It may fall into the printer when opening covers, resulting in malfunction. •...
... object on top of the printer. • You can print on large size paper such as 14" x 17"/355.6 x 431.8 mm or thick paper by loading the paper in the Front Tray. Lift the front of the printer. It may fall into the printer when opening covers, resulting in malfunction. •...
Getting Started
Page 19
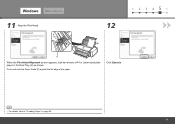
Windows Macintosh 11 Align the Print Head 12 1 2 3 456 C D When the Print Head Alignment screen appears, load two sheets of the paper. Click Execute. • For details, refer to "6 Loading Paper" on page 28. 17 Pinch and slide the Paper Guide (D) against the left edge of A4 or Letter-sized plain paper in the Rear Tray (C) as shown.
Windows Macintosh 11 Align the Print Head 12 1 2 3 456 C D When the Print Head Alignment screen appears, load two sheets of the paper. Click Execute. • For details, refer to "6 Loading Paper" on page 28. 17 Pinch and slide the Paper Guide (D) against the left edge of A4 or Letter-sized plain paper in the Rear Tray (C) as shown.
Getting Started
Page 22
If Restart is displayed, make sure that the Restart the system now (recommended) check box is selected, then click Restart. After restarting the computer, remove the Setup CD-ROM and keep it in a safe place. Next, read "6 Loading Paper" on the printer's functionality.) Click Exit. If you click Do not agree, the Extended Survey Program will not be installed. (This has no effect on page 28! 20 If you can agree, click Agree. 5 Windows Macintosh 17 18 When the Extended Survey Program screen appears, confirm the message.
If Restart is displayed, make sure that the Restart the system now (recommended) check box is selected, then click Restart. After restarting the computer, remove the Setup CD-ROM and keep it in a safe place. Next, read "6 Loading Paper" on the printer's functionality.) Click Exit. If you click Do not agree, the Extended Survey Program will not be installed. (This has no effect on page 28! 20 If you can agree, click Agree. 5 Windows Macintosh 17 18 When the Extended Survey Program screen appears, confirm the message.
Getting Started
Page 26
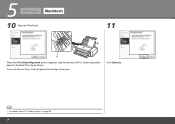
Click Execute. • For details, refer to "6 Loading Paper" on page 28. 24 5 Windows Macintosh 10 Align the Print Head 11 A B When the Print Head Alignment screen appears, load two sheets of the paper. Pinch and slide the Paper Guide (B) against the left edge of A4 or Letter-sized plain paper in the Rear Tray (A) as shown.
Click Execute. • For details, refer to "6 Loading Paper" on page 28. 24 5 Windows Macintosh 10 Align the Print Head 11 A B When the Print Head Alignment screen appears, load two sheets of the paper. Pinch and slide the Paper Guide (B) against the left edge of A4 or Letter-sized plain paper in the Rear Tray (A) as shown.

Getting Started
Page 29
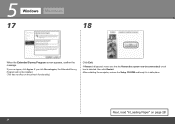
Next, read "6 Loading Paper" on the printer's functionality.) Click Exit. If you can agree, click Agree. Windows Macintosh 16 17 1 2 3 456 When the Extended Survey Program screen appears, confirm the message. If you click Do not agree, the Extended Survey Program will not be installed. (This has no effect on page 28! 27 Remove the Setup CD-ROM and keep it in a safe place. • The screen does not appear on Mac OS X v.10.3.9.
Next, read "6 Loading Paper" on the printer's functionality.) Click Exit. If you can agree, click Agree. Windows Macintosh 16 17 1 2 3 456 When the Extended Survey Program screen appears, confirm the message. If you click Do not agree, the Extended Survey Program will not be installed. (This has no effect on page 28! 27 Remove the Setup CD-ROM and keep it in a safe place. • The screen does not appear on Mac OS X v.10.3.9.
Getting Started
Page 30
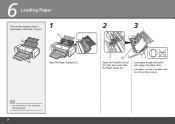
A 1 C B Open the Paper Support (C). 2 3 E D Open the Feed Slot Cover (D), then pinch and slide the Paper Guide (E). Load paper in the Rear Tray (A). Load paper straight along the right edge of the Rear Tray. 6 Loading Paper This section explains how to load paper in portrait orientation with the printing side facing up. • Pull out the Front Tray Extension (B) beforehand. 28
A 1 C B Open the Paper Support (C). 2 3 E D Open the Feed Slot Cover (D), then pinch and slide the Paper Guide (E). Load paper in the Rear Tray (A). Load paper straight along the right edge of the Rear Tray. 6 Loading Paper This section explains how to load paper in portrait orientation with the printing side facing up. • Pull out the Front Tray Extension (B) beforehand. 28
Getting Started
Page 31
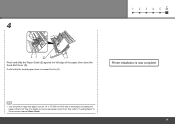
Printer installation is now complete! • You can print on large size paper such as 14" x 17"/355.6 x 431.8 mm or thick paper by loading the paper in the on how to load paper in the Front Tray, refer to "Loading Paper" in the Front Tray. Confirm that the loaded paper does not exceed the line (F). For details on -screen manual: Basic Guide. 29 1 2 3 4 56 4 EF D Pinch and slide the Paper Guide (E) against the left edge of the paper, then close the Feed Slot Cover (D).
Printer installation is now complete! • You can print on large size paper such as 14" x 17"/355.6 x 431.8 mm or thick paper by loading the paper in the on how to load paper in the Front Tray, refer to "Loading Paper" in the Front Tray. Confirm that the loaded paper does not exceed the line (F). For details on -screen manual: Basic Guide. 29 1 2 3 4 56 4 EF D Pinch and slide the Paper Guide (E) against the left edge of the paper, then close the Feed Slot Cover (D).


