
Quick Start Guide
Page 5
... 26 Accessing the Printer Driver (Windows 33 Using the Bundled Software 35 Printing Maintenance Replacing an Ink Tank 36 When Printing Becomes Faint or Colors are Incorrect 45 Printing the Nozzle Check Pattern 46 Print Head Cleaning 51 Print Head Deep Cleaning 55 Aligning the Print Head 58 Troubleshooting Cannot Install the Printer Driver or an Application Program 63 Cannot Connect to PC Properly 64 Print Results Not Satisfactory or Contains Errors 65 Troubleshooting Printer Hardware 68 Paper Does Not Feed Properly 71 Paper Jams 72 Handling Error Messages 73 An Error Message...
... 26 Accessing the Printer Driver (Windows 33 Using the Bundled Software 35 Printing Maintenance Replacing an Ink Tank 36 When Printing Becomes Faint or Colors are Incorrect 45 Printing the Nozzle Check Pattern 46 Print Head Cleaning 51 Print Head Deep Cleaning 55 Aligning the Print Head 58 Troubleshooting Cannot Install the Printer Driver or an Application Program 63 Cannot Connect to PC Properly 64 Print Results Not Satisfactory or Contains Errors 65 Troubleshooting Printer Hardware 68 Paper Does Not Feed Properly 71 Paper Jams 72 Handling Error Messages 73 An Error Message...
Quick Start Guide
Page 27
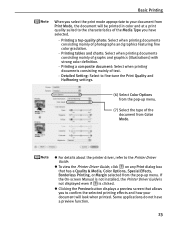
... the Print Quality and Halftoning settings. (6) Select Color Options from Color Mode. Printing tables and charts: Select when printing documents consisting mainly of the document from the pop-up menu. If the On-screen Manual is not installed, the Printer Driver Guide is not displayed even if is clicked. z Clicking the Preview button displays a preview screen that has a Quality & Media, Color Options, Special Effects, Borderless Printing, or Margin selected from Print Mode, the document will look when printed. Printing a top-quality photo: Select when printing documents...
... the Print Quality and Halftoning settings. (6) Select Color Options from Color Mode. Printing tables and charts: Select when printing documents consisting mainly of the document from the pop-up menu. If the On-screen Manual is not installed, the Printer Driver Guide is not displayed even if is clicked. z Clicking the Preview button displays a preview screen that has a Quality & Media, Color Options, Special Effects, Borderless Printing, or Margin selected from Print Mode, the document will look when printed. Printing a top-quality photo: Select when printing documents...

Quick Start Guide
Page 36
... disconnecting the USB cable between the device and printer, follow the instructions given in a warm black and white tone. z Controls of the paper such as 35 mm film style layout (contact printing layout). Select Layout, then select the item displayed with the [i] icon. • 35 mm Film Style Layout (Contact Printing Layout) You can use a Canon PictBridge-compliant device, you select an image which...
... disconnecting the USB cable between the device and printer, follow the instructions given in a warm black and white tone. z Controls of the paper such as 35 mm film style layout (contact printing layout). Select Layout, then select the item displayed with the [i] icon. • 35 mm Film Style Layout (Contact Printing Layout) You can use a Canon PictBridge-compliant device, you select an image which...

Quick Start Guide
Page 40
... white streaks appear despite sufficient ink levels, refer to "When Printing Becomes Faint or Colors are ; green, red, photo magenta, black, photo cyan, cyan, magenta and yellow. z Green: CLI-8G z Photo Cyan: CLI-8PC z Red: CLI-8R z Cyan: CLI-8C z Photo Magenta: CLI-8PM z Magenta: CLI-8M z Black: CLI-8BK z Yellow: CLI-8Y z Carefully check the labels on page 45. 36 Printing Maintenance Printing Maintenance Replacing an Ink Tank Replace ink tank(s) if they are used...
... white streaks appear despite sufficient ink levels, refer to "When Printing Becomes Faint or Colors are ; green, red, photo magenta, black, photo cyan, cyan, magenta and yellow. z Green: CLI-8G z Photo Cyan: CLI-8PC z Red: CLI-8R z Cyan: CLI-8C z Photo Magenta: CLI-8PM z Magenta: CLI-8M z Black: CLI-8BK z Yellow: CLI-8Y z Carefully check the labels on page 45. 36 Printing Maintenance Printing Maintenance Replacing an Ink Tank Replace ink tank(s) if they are used...

Quick Start Guide
Page 49
... color guide on the print head lock lever. If any one of the ink lamps is flashing slowly, the associated ink tank is inserted in the wrong position. See "Print Results Not Satisfactory or Contains Errors" on page 36. Contact the Customer Care Center. 45 Make sure that the correct ink tank color is peeled off the ink tank. See "Replacing an Ink Tank" on page 65. Make sure that ink tank, it . z Increase the Print Quality setting in the ink tanks, the Print Head nozzles...
... color guide on the print head lock lever. If any one of the ink lamps is flashing slowly, the associated ink tank is inserted in the wrong position. See "Print Results Not Satisfactory or Contains Errors" on page 36. Contact the Customer Care Center. 45 Make sure that the correct ink tank color is peeled off the ink tank. See "Replacing an Ink Tank" on page 65. Make sure that ink tank, it . z Increase the Print Quality setting in the ink tanks, the Print Head nozzles...
Quick Start Guide
Page 64
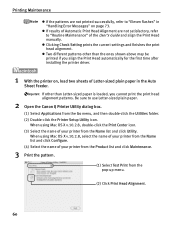
...-sized paper is loaded, you align the Print Head automatically for the first time after installing the printer driver. 1 With the printer on page 73. Be sure to use Letter-sized plain paper. 2 Open the Canon IJ Printer Utility dialog box. (1) Select Applications from the Name list and click Utility. z If results of Automatic Print Head Alignment are not printed successfully, refer to "Routine Maintenance" of Letter-sized plain paper in "Handling Error Messages" on , load two sheets of the User's Guide and align the Print Head manually. When using Mac...
...-sized paper is loaded, you align the Print Head automatically for the first time after installing the printer driver. 1 With the printer on page 73. Be sure to use Letter-sized plain paper. 2 Open the Canon IJ Printer Utility dialog box. (1) Select Applications from the Name list and click Utility. z If results of Automatic Print Head Alignment are not printed successfully, refer to "Routine Maintenance" of Letter-sized plain paper in "Handling Error Messages" on , load two sheets of the User's Guide and align the Print Head manually. When using Mac...
Quick Start Guide
Page 65
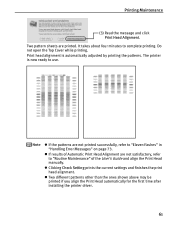
... the printer driver. 61 It takes about four minutes to "Routine Maintenance" of the User's Guide and align the Print Head manually. Print head alignment is now ready to "Eleven flashes" in "Handling Error Messages" on page 73. The printer is automatically adjusted by printing the patterns. z If the patterns are printed. z Clicking Check Setting prints the current settings and finishes the print head alignment. Printing Maintenance (3) Read the message and click Print Head Alignment. Two pattern sheets are not printed successfully, refer to use. Do not open the Top Cover while...
... the printer driver. 61 It takes about four minutes to "Routine Maintenance" of the User's Guide and align the Print Head manually. Print head alignment is now ready to "Eleven flashes" in "Handling Error Messages" on page 73. The printer is automatically adjusted by printing the patterns. z If the patterns are printed. z Clicking Check Setting prints the current settings and finishes the print head alignment. Printing Maintenance (3) Read the message and click Print Head Alignment. Two pattern sheets are not printed successfully, refer to use. Do not open the Top Cover while...

Quick Start Guide
Page 67
...-In. 1. Remove the CD-ROM from the Go menu, and double-click the Canon Utilities folder, the Easy-PhotoPrint Pro folder and then the Plug-In Installer icon. 2. Unable to start automatically when the Setup CD-ROM is installed If the Easy-PhotoPrint Pro menu does not appear on the Printer Connection screen. 2. Turn the printer off. 6. Easy-PhotoPrint Pro does not start automatically when you have installed Easy-PhotoPrint Pro, make sure that...
...-In. 1. Remove the CD-ROM from the Go menu, and double-click the Canon Utilities folder, the Easy-PhotoPrint Pro folder and then the Plug-In Installer icon. 2. Unable to start automatically when the Setup CD-ROM is installed If the Easy-PhotoPrint Pro menu does not appear on the Printer Connection screen. 2. Turn the printer off. 6. Easy-PhotoPrint Pro does not start automatically when you have installed Easy-PhotoPrint Pro, make sure that...

Quick Start Guide
Page 69
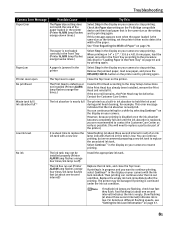
... remove each sheet as soon as uneven coloration or white streaks, and the print quality may occur on page 36. Troubleshooting Print Results Not Satisfactory or Contains Errors Problem Possible Cause Try This Ink does not eject properly/Printing is misaligned Perform Automatic Print Head Alignment. When a specific color is not set Be sure to set to High in Windows, or Fine in the Print dialog box, and clear the Grayscale Printing check box, then print. Paper loaded wrong side up menu...
... remove each sheet as soon as uneven coloration or white streaks, and the print quality may occur on page 36. Troubleshooting Print Results Not Satisfactory or Contains Errors Problem Possible Cause Try This Ink does not eject properly/Printing is misaligned Perform Automatic Print Head Alignment. When a specific color is not set Be sure to set to High in Windows, or Fine in the Print dialog box, and clear the Grayscale Printing check box, then print. Paper loaded wrong side up menu...

Quick Start Guide
Page 70
... Print Head. See "Aligning the Print Head" on is too thick or curled. When you cannot choose the High setting or when the print quality does not improve, select Custom, click Set and then adjust the Quality bar for the Print Quality setting. See "Print Media to High in Windows, or Fine in the User's Guide. 66 Paper feed roller is or Ink Blots too thin Incorrect paper type 1. Check to see if the paper you are using Borderless Printing. Open the printer...
... Print Head. See "Aligning the Print Head" on is too thick or curled. When you cannot choose the High setting or when the print quality does not improve, select Custom, click Set and then adjust the Quality bar for the Print Quality setting. See "Print Media to High in Windows, or Fine in the User's Guide. 66 Paper feed roller is or Ink Blots too thin Incorrect paper type 1. Check to see if the paper you are using Borderless Printing. Open the printer...

Quick Start Guide
Page 73
... loaded when printing the nozzle check pattern or the head alignment patterns Press the RESUME/CANCEL button on the printer to detect the width of Paper" on the ink tank until it clicks into place. See "Error Regarding the Width of the paper. Make sure all of the orange parts. (1) Correct * An L-shaped notch appears on printer driver settings, refer to use is not displayed, open the File menu of each media from Media Type and a paper size which says "Art XX [Margin...
... loaded when printing the nozzle check pattern or the head alignment patterns Press the RESUME/CANCEL button on the printer to detect the width of Paper" on the ink tank until it clicks into place. See "Error Regarding the Width of the paper. Make sure all of the orange parts. (1) Correct * An L-shaped notch appears on printer driver settings, refer to use is not displayed, open the File menu of each media from Media Type and a paper size which says "Art XX [Margin...

Quick Start Guide
Page 79
.../CANCEL button on page 36. Load the paper correctly in the Front Tray according to clear the error, then load two sheets of Letter-sized plain paper in the Auto Sheet Feeder. Then check the Page Size setting in the Page Setup tab (Windows) or the Page Setup dialog box (Macintosh) in the printer driver and load paper that is the same size as the setting, set the printer driver not to a strong light source preventing correct print head alignment. Troubleshooting Number of Flashes Eleven flashes Possible Cause Try This Automatic print head alignment failed/The Page Size setting...
.../CANCEL button on page 36. Load the paper correctly in the Front Tray according to clear the error, then load two sheets of Letter-sized plain paper in the Auto Sheet Feeder. Then check the Page Size setting in the Page Setup tab (Windows) or the Page Setup dialog box (Macintosh) in the printer driver and load paper that is the same size as the setting, set the printer driver not to a strong light source preventing correct print head alignment. Troubleshooting Number of Flashes Eleven flashes Possible Cause Try This Automatic print head alignment failed/The Page Size setting...

Quick Start Guide
Page 80
... Printers and Faxes. Faulty connection Ensure that the printer is indicated. Open the File menu and select Properties. 4. A USB port is selected if either USBnnn (Canon Pro9000) or MPUSBPRNnn (Canon Pro9000) (where n is a number) is securely connected to uninstall the driver. 3. If successful, the problem may have been with the cable(s). Replace the cable(s) and try printing again. If the POWER lamp is not correct, change the port setting according to the interface you are using a switching...
... Printers and Faxes. Faulty connection Ensure that the printer is indicated. Open the File menu and select Properties. 4. A USB port is selected if either USBnnn (Canon Pro9000) or MPUSBPRNnn (Canon Pro9000) (where n is a number) is securely connected to uninstall the driver. 3. If successful, the problem may have been with the cable(s). Replace the cable(s) and try printing again. If the POWER lamp is not correct, change the port setting according to the interface you are using a switching...

Quick Start Guide
Page 82
... page 73. A paper size that the POWER lamp lights green. z If using a switching hub or other than Lettersized paper is loaded when printing the nozzle check pattern or the print head alignment patterns If other device, disconnect the printer and reconnect it directly to "Handling Error Messages" on how to your Windows documentation. 3. The settings here are also applied under Direct Printing from the Auto Sheet Feeder is loaded, you cannot open the Custom Settings dialog box. Printer is flashing orange, an error...
... page 73. A paper size that the POWER lamp lights green. z If using a switching hub or other than Lettersized paper is loaded when printing the nozzle check pattern or the print head alignment patterns If other device, disconnect the printer and reconnect it directly to "Handling Error Messages" on how to your Windows documentation. 3. The settings here are also applied under Direct Printing from the Auto Sheet Feeder is loaded, you cannot open the Custom Settings dialog box. Printer is flashing orange, an error...

Quick Start Guide
Page 83
... Auto Sheet Feeder and then press the RESUME/CANCEL button on the printer. When using Mac OS X v.10.2.8, ensure that page again. 79 Ensure that is pulled up menu on the printer and try printing again. The Front Tray is displayed. The Front Tray is not Load the paper correctly in the Front Tray according to the procedure described ready to feed paper in "Loading Paper in the screen that Pro9000 is displayed and the check...
... Auto Sheet Feeder and then press the RESUME/CANCEL button on the printer. When using Mac OS X v.10.2.8, ensure that page again. 79 Ensure that is pulled up menu on the printer and try printing again. The Front Tray is displayed. The Front Tray is not Load the paper correctly in the Front Tray according to the procedure described ready to feed paper in "Loading Paper in the screen that Pro9000 is displayed and the check...
Quick Start Guide
Page 85
... recommended to contact the Customer Care Center as early as possible. (You will need to replace a particular part of the printer.) Low ink level It is nearly full. Troubleshooting Camera Error Message Possible Cause Paper Error The Paper size setting does not match the size of the paper loaded in the printer (Printer ALARM lamp flashes orange eleven times.) Try This Select Stop in ink absorber to hold the ink used during print head cleaning, for a while by selecting...
... recommended to contact the Customer Care Center as early as possible. (You will need to replace a particular part of the printer.) Low ink level It is nearly full. Troubleshooting Camera Error Message Possible Cause Paper Error The Paper size setting does not match the size of the paper loaded in the printer (Printer ALARM lamp flashes orange eleven times.) Try This Select Stop in ink absorber to hold the ink used during print head cleaning, for a while by selecting...
Quick Start Guide
Page 96
... Error Messages 73 Help button 2 High Resolution Paper 16 I Ink lamp Ink Level Indication on the Screen 76 B Borderless Printing 66 C Camera Error Message 80 Canceling Print Jobs (Windows 20 Canceling Printing 25 Cannot Connect to avoid 4 Media Type 16, 19, 22 N Nozzle Check 47, 48 Nozzle Check Pattern examining 49 printing 46 O Opening the Printer Properties Dialog Box Directly from the Start Menu (Windows 33 Opening the Printer Properties Dialog Box from the Digital Camera 80 Canon IJ Printer Utility dialog box (Macintosh 48 Canon IJ Status...
... Error Messages 73 Help button 2 High Resolution Paper 16 I Ink lamp Ink Level Indication on the Screen 76 B Borderless Printing 66 C Camera Error Message 80 Canceling Print Jobs (Windows 20 Canceling Printing 25 Cannot Connect to avoid 4 Media Type 16, 19, 22 N Nozzle Check 47, 48 Nozzle Check Pattern examining 49 printing 46 O Opening the Printer Properties Dialog Box Directly from the Start Menu (Windows 33 Opening the Printer Properties Dialog Box from the Digital Camera 80 Canon IJ Printer Utility dialog box (Macintosh 48 Canon IJ Status...

Quick Start Guide
Page 97
... Device 26 Printing the Nozzle Check Pattern 46 Printing with Macintosh 21 Printing with Windows 18 R Regulatory Information 89 Replacing an Ink Tank 36 RESUME/CANCEL button 20 S Safety Precautions 87 Specialty Media 15 Specifications 84 Super White Paper 16 T Troubleshooting 62 Troubleshooting Printer Hardware 68 Turning off the Printer 3 Turning on the Printer 2 U Uninstalling the printer driver (Windows 76 USB 2.0 Hi-speed Connection Does Not Work Properly . 64 Using Specialty Media 15 Using the Auto Sheet Feeder and the Front Tray 4 Using the Bundled Software 35...
... Device 26 Printing the Nozzle Check Pattern 46 Printing with Macintosh 21 Printing with Windows 18 R Regulatory Information 89 Replacing an Ink Tank 36 RESUME/CANCEL button 20 S Safety Precautions 87 Specialty Media 15 Specifications 84 Super White Paper 16 T Troubleshooting 62 Troubleshooting Printer Hardware 68 Turning off the Printer 3 Turning on the Printer 2 U Uninstalling the printer driver (Windows 76 USB 2.0 Hi-speed Connection Does Not Work Properly . 64 Using Specialty Media 15 Using the Auto Sheet Feeder and the Front Tray 4 Using the Bundled Software 35...
Easy Setup Instructions
Page 1
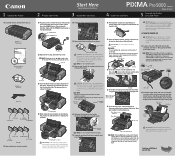
... the printer is ready. 2 Connect one end of the ink tank. USB Cable USB Port PIXMA Pro9000 Print Head Power Cord CLI-8R Red CLI-8G Green CLI-8PM Photo Magenta CLI-8BK Black Front Tray 3 The Print Head Holder automatically moves to the appropriate USB port on the print head lock lever. The tape position is removed, as this to get ink on the ink tank until it down the serial number located inside of the paper. this has no effect on side...
... the printer is ready. 2 Connect one end of the ink tank. USB Cable USB Port PIXMA Pro9000 Print Head Power Cord CLI-8R Red CLI-8G Green CLI-8PM Photo Magenta CLI-8BK Black Front Tray 3 The Print Head Holder automatically moves to the appropriate USB port on the print head lock lever. The tape position is removed, as this to get ink on the ink tank until it down the serial number located inside of the paper. this has no effect on side...
Easy Setup Instructions
Page 2
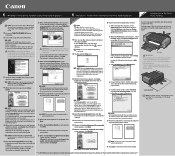
... message and click Print Head Alignment. 3 Insert the Setup CD-ROM. If you would like to install. · Adobe Photoshop CS, Adobe Photoshop CS2, or Digital Photo Professional must be installed to use Easy-PhotoPrint Pro. 5 When the list of the Administrators group before continuing. 2 Turn on the computer and start another operation here. · Do not open automatically, double-click the on -screen manuals and printer driver. Select Custom Install...
... message and click Print Head Alignment. 3 Insert the Setup CD-ROM. If you would like to install. · Adobe Photoshop CS, Adobe Photoshop CS2, or Digital Photo Professional must be installed to use Easy-PhotoPrint Pro. 5 When the list of the Administrators group before continuing. 2 Turn on the computer and start another operation here. · Do not open automatically, double-click the on -screen manuals and printer driver. Select Custom Install...


