User Manual
Page 5
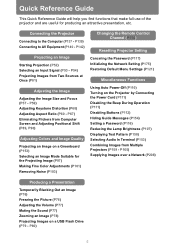
...help you find functions that make full use of the projector and are useful for the Projecting Image (P97) Making Fine Color Adjustments (P101) Removing Noise (P103) Changing the Remote Control Channel (P114) Resetting Projector Setting Canceling the Password (P117) Initializing the Network Setting (P175) Restoring Default Menu Settings (P121) Miscellaneous Functions Using Auto Power-Off (P110) Turning on the Projector by Connecting the Power Cord (P111) Disabling the Beep During Operation (P111) Disabling Buttons (P112) Hiding Guide Messages (P154) Setting a Password (P116) Reducing the Lamp...
...help you find functions that make full use of the projector and are useful for the Projecting Image (P97) Making Fine Color Adjustments (P101) Removing Noise (P103) Changing the Remote Control Channel (P114) Resetting Projector Setting Canceling the Password (P117) Initializing the Network Setting (P175) Restoring Default Menu Settings (P121) Miscellaneous Functions Using Auto Power-Off (P110) Turning on the Projector by Connecting the Power Cord (P111) Disabling the Beep During Operation (P111) Disabling Buttons (P112) Hiding Guide Messages (P154) Setting a Password (P116) Reducing the Lamp...

User Manual
Page 11
... Locking Installation Settings 146 Flipping Image Display 146 Specifying the Screen Aspect 148 Adjusting the Size of Projected Images (WUX400ST/WX450ST 149 Specifying Keystone Correction 150 Specifying Digital Image Shift 150 Specifying Micro Digital Image Shift 151 Adjusting Image Registration 151 Specifying the Fan Mode 152 Specifying Vertical Projection 152 Selecting the Audio In Terminal 153 Adjusting Colors to Suit the Screen Color 153 Specifying a Menu Position 154 Showing/Hiding the Guide Screen 154 Showing/Hiding Input Status 155 Showing/Hiding Overheat Warnings...
... Locking Installation Settings 146 Flipping Image Display 146 Specifying the Screen Aspect 148 Adjusting the Size of Projected Images (WUX400ST/WX450ST 149 Specifying Keystone Correction 150 Specifying Digital Image Shift 150 Specifying Micro Digital Image Shift 151 Adjusting Image Registration 151 Specifying the Fan Mode 152 Specifying Vertical Projection 152 Selecting the Audio In Terminal 153 Adjusting Colors to Suit the Screen Color 153 Specifying a Menu Position 154 Showing/Hiding the Guide Screen 154 Showing/Hiding Input Status 155 Showing/Hiding Overheat Warnings...
User Manual
Page 16
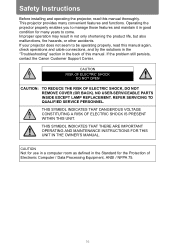
Safety Instructions Before installing and operating the projector, read this manual again, check operations and cable connections, and try the solutions in the "Troubleshooting" section in the back of Electronic Computer / Data Processing Equipment, ANSI / NFPA 75. 16 If the problem still persists, contact the Canon Customer Support Center. If your projector does not seem to be operating properly, read this manual. CAUTION RISK OF ELECTRIC SHOCK DO...
Safety Instructions Before installing and operating the projector, read this manual again, check operations and cable connections, and try the solutions in the "Troubleshooting" section in the back of Electronic Computer / Data Processing Equipment, ANSI / NFPA 75. 16 If the problem still persists, contact the Canon Customer Support Center. If your projector does not seem to be operating properly, read this manual. CAUTION RISK OF ELECTRIC SHOCK DO...

User Manual
Page 18
... not recommended by placing the projector on the projector. Do not place this projector on the projector. An appliance and cart combination should be read before cleaning. Safety Instructions ■ READ AND KEEP THIS OWNER'S MANUAL FOR LATER USE. This will prevent damage due to operate the product. Do not expose this projector from overheating. The openings should never be covered with cloth or other...
... not recommended by placing the projector on the projector. Do not place this projector on the projector. An appliance and cart combination should be read before cleaning. Safety Instructions ■ READ AND KEEP THIS OWNER'S MANUAL FOR LATER USE. This will prevent damage due to operate the product. Do not expose this projector from overheating. The openings should never be covered with cloth or other...

User Manual
Page 26
... projector uses a high-pressure mercury lamp, which may be broken. When replacing the lamp, or when the lamp is recommended that periodic maintenance of the projector be handled carefully and correctly as describeded below. Always request service from doing so. For details of the lamp cover, not directly under it . Contact the Canon Customer Support Center for cleaning and inspection of the projector interior and lamp replacement...
... projector uses a high-pressure mercury lamp, which may be broken. When replacing the lamp, or when the lamp is recommended that periodic maintenance of the projector be handled carefully and correctly as describeded below. Always request service from doing so. For details of the lamp cover, not directly under it . Contact the Canon Customer Support Center for cleaning and inspection of the projector interior and lamp replacement...

User Manual
Page 43
...replacing the lamp is near. (In standby mode.) The time for replacing the lamp is near . (During projection) Internal temperature is high. The lamp cover is in . Power was turned off due to indicate the operating status of the projector. : Off : Lit : Flashing LED indicator POWER ON (green) WARNING (red) LAMP (orange) TEMP (red) Operating status A projector is not plugged in standby mode (blinks slowly: every 4 seconds). Before Use Part Names • POWER ON (green) : Lights up or flashes when an error occurs. • LAMP (orange) : Flashes when the time for replacing...
...replacing the lamp is near. (In standby mode.) The time for replacing the lamp is near . (During projection) Internal temperature is high. The lamp cover is in . Power was turned off due to indicate the operating status of the projector. : Off : Lit : Flashing LED indicator POWER ON (green) WARNING (red) LAMP (orange) TEMP (red) Operating status A projector is not plugged in standby mode (blinks slowly: every 4 seconds). Before Use Part Names • POWER ON (green) : Lights up or flashes when an error occurs. • LAMP (orange) : Flashes when the time for replacing...

User Manual
Page 44
...used to connect the remote control using a cable. (4) USB port (P79) Connects a USB flash drive. Carries both video and audio signals across a single cable. (8) LAN port (P168) Connects the LAN cable (shielded twisted pair). Used for projection of images on a USB flash drive, or for 2 kinds of image input other than HDMI. Part Names Input Terminal (1) (3) (2) (4) (5) (6) (7) (8) (9) (1) AUDIO OUT terminal (AUDIO OUT) (P139, P142) Outputs the audio to a network. (9) Service port (CONTROL) It is used to receive the component image signal (Component). (7) HDMI input terminal (HDMI...
...used to connect the remote control using a cable. (4) USB port (P79) Connects a USB flash drive. Carries both video and audio signals across a single cable. (8) LAN port (P168) Connects the LAN cable (shielded twisted pair). Used for projection of images on a USB flash drive, or for 2 kinds of image input other than HDMI. Part Names Input Terminal (1) (3) (2) (4) (5) (6) (7) (8) (9) (1) AUDIO OUT terminal (AUDIO OUT) (P139, P142) Outputs the audio to a network. (9) Service port (CONTROL) It is used to receive the component image signal (Component). (7) HDMI input terminal (HDMI...
User Manual
Page 70
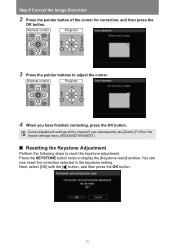
... then press the OK button. 70 You can now reset the correction selected in the [Install settings] menu (WUX400ST/WX450ST). ■ Resetting the Keystone Adjustment Perform the following steps to reset the keystone adjustment. Remote control Projector 3 Press the pointer buttons to display the [Keystone reset] window. Step 5 Correct the Image Distortion 2 Press the pointer button of the corner for correction, and then press the OK button. Remote control Projector 4 When you subsequently use [Zoom] (P149) in the keystone setting.
... then press the OK button. 70 You can now reset the correction selected in the [Install settings] menu (WUX400ST/WX450ST). ■ Resetting the Keystone Adjustment Perform the following steps to reset the keystone adjustment. Remote control Projector 3 Press the pointer buttons to display the [Keystone reset] window. Step 5 Correct the Image Distortion 2 Press the pointer button of the corner for correction, and then press the OK button. Remote control Projector 4 When you subsequently use [Zoom] (P149) in the keystone setting.
User Manual
Page 88
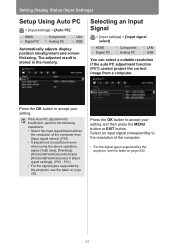
... using the above operation, adjust [Total dots], [Tracking], [Horizontal/Vertical position] and [Horizontal/Vertical pixels] in the memory. Press the OK button to accept your setting and then press the MENU button or EXIT button. Selecting an Input Signal > [Input settings] > [Input signal select] HDMI Digital PC Component Analog PC LAN USB You can select a suitable resolution if the auto PC adjustment function (P57) cannot project the correct image from [Input signal select]. (P88) • If adjustment...
... using the above operation, adjust [Total dots], [Tracking], [Horizontal/Vertical position] and [Horizontal/Vertical pixels] in the memory. Press the OK button to accept your setting and then press the MENU button or EXIT button. Selecting an Input Signal > [Input settings] > [Input signal select] HDMI Digital PC Component Analog PC LAN USB You can select a suitable resolution if the auto PC adjustment function (P57) cannot project the correct image from [Input signal select]. (P88) • If adjustment...
User Manual
Page 107
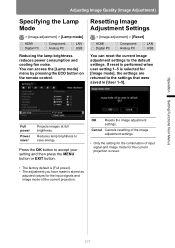
... [User 1-5]. Reduces lamp brightness to the default settings. Operation Setting Functions from Menus Adjusting Image Quality (Image Adjustment) Specifying the Lamp Mode > [Image adjustment] > [Lamp mode] HDMI Digital PC Component Analog PC LAN USB Reducing the lamp brightness reduces power consumption and cooling fan noise. Resetting Image Adjustment Settings > [Image adjustment] > [Reset] HDMI Digital PC Component Analog PC LAN USB You can access the [Lamp mode] menu by pressing the ECO button on the remote control. OK Resets the image adjustment settings. You...
... [User 1-5]. Reduces lamp brightness to the default settings. Operation Setting Functions from Menus Adjusting Image Quality (Image Adjustment) Specifying the Lamp Mode > [Image adjustment] > [Lamp mode] HDMI Digital PC Component Analog PC LAN USB Reducing the lamp brightness reduces power consumption and cooling fan noise. Resetting Image Adjustment Settings > [Image adjustment] > [Reset] HDMI Digital PC Component Analog PC LAN USB You can access the [Lamp mode] menu by pressing the ECO button on the remote control. OK Resets the image adjustment settings. You...
User Manual
Page 110
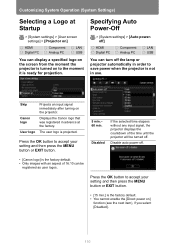
... at Startup > [System settings] > [User screen settings] > [Projector on] HDMI Digital PC Component Analog PC LAN USB You can display a specified logo on the screen from the moment the projector is turned on to save power when the projector is the factory default. • You cannot enable the [Direct power on the projector. The user logo is ready for projection. Disabled If the selected time elapses without any input signal, the projector displays the countdown of...
... at Startup > [System settings] > [User screen settings] > [Projector on] HDMI Digital PC Component Analog PC LAN USB You can display a specified logo on the screen from the moment the projector is turned on to save power when the projector is the factory default. • You cannot enable the [Direct power on the projector. The user logo is ready for projection. Disabled If the selected time elapses without any input signal, the projector displays the countdown of...

User Manual
Page 120
... Operation (System Settings) • The lamp counter provides an estimate of the time for cleaning and replacing the air filter. Resetting the Air Filter Counter > [System settings] > [Other settings] > [Air filter counter] HDMI Digital PC Component Analog PC LAN USB This resets the counter which reminds you of the time remaining until the lamp must be replaced. To view the air filter counter, press the OK button when [Air filter counter] is equivalent to use and the present load on the confirmation screen and press the OK button...
... Operation (System Settings) • The lamp counter provides an estimate of the time for cleaning and replacing the air filter. Resetting the Air Filter Counter > [System settings] > [Other settings] > [Air filter counter] HDMI Digital PC Component Analog PC LAN USB This resets the counter which reminds you of the time remaining until the lamp must be replaced. To view the air filter counter, press the OK button when [Air filter counter] is equivalent to use and the present load on the confirmation screen and press the OK button...
User Manual
Page 121
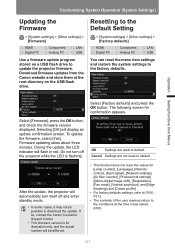
Download firmware updates from Menus Select [Factory defaults] and press the OK button. The following screen for [Lamp counter], [Language], [Remote control], [Input signal], [Network settings], [Air filter counter], [Professional settings] ([Micro-digital image shift], [Registration], [Fan mode], [Vertical projection], and [Edge blending]) and [Create profile]. • For factory defaults settings, refer to P306 P313. • The contents of the user memory return to download the update. OK Settings are not reset to default. Cancel Settings are reset to default. Operation ...
Download firmware updates from Menus Select [Factory defaults] and press the OK button. The following screen for [Lamp counter], [Language], [Remote control], [Input signal], [Network settings], [Air filter counter], [Professional settings] ([Micro-digital image shift], [Registration], [Fan mode], [Vertical projection], and [Edge blending]) and [Create profile]. • For factory defaults settings, refer to P306 P313. • The contents of the user memory return to download the update. OK Settings are not reset to default. Cancel Settings are reset to default. Operation ...

User Manual
Page 128
... air may condense on the ceiling or installed in a high location, it is necessary to rise and possibly resulting in a malfunction or fire. Use a vacuum cleaner or similar means to become blurred. Wait until the condensation has evaporated for [Fan mode] (P152) in the [Install settings] menu. ■ When Using Mounted on the Ceiling When the projector is used mounted on the projector lens and mirror, causing the image to remove...
... air may condense on the ceiling or installed in a high location, it is necessary to rise and possibly resulting in a malfunction or fire. Use a vacuum cleaner or similar means to become blurred. Wait until the condensation has evaporated for [Fan mode] (P152) in the [Install settings] menu. ■ When Using Mounted on the Ceiling When the projector is used mounted on the projector lens and mirror, causing the image to remove...
User Manual
Page 182
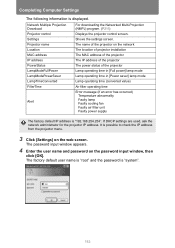
...) Air filter operating time Alert Error message (if an error has occurred) Temperature abnormality Faulty lamp Faulty cooling fan Faulty air filter unit Faulty power supply The factory default IP address is displayed. If DHCP settings are used, ask the network administrator for the projector IP address. Completing Computer Settings The following information is "192.168.254.254". The factory default user name is "root" and the password is possible to check the IP address from the projector menu. 3 Click [Settings] on the password input window...
...) Air filter operating time Alert Error message (if an error has occurred) Temperature abnormality Faulty lamp Faulty cooling fan Faulty air filter unit Faulty power supply The factory default IP address is displayed. If DHCP settings are used, ask the network administrator for the projector IP address. Completing Computer Settings The following information is "192.168.254.254". The factory default user name is "root" and the password is possible to check the IP address from the projector menu. 3 Click [Settings] on the password input window...

User Manual
Page 194
... Settings ■ Error Notification Mails The messages shown in the following error list are sent when an error occurs in the power supply. Faulty lamp The lamp has burnt out. If it is installed and operated normally, turn off the projector to the power Error name Text Error name Text Error name Text Error name Text Error name Text Temperature abnormality The temperature inside , and retry projection. Faulty air filter unit The air filter unit is installed...
... Settings ■ Error Notification Mails The messages shown in the following error list are sent when an error occurs in the power supply. Faulty lamp The lamp has burnt out. If it is installed and operated normally, turn off the projector to the power Error name Text Error name Text Error name Text Error name Text Error name Text Temperature abnormality The temperature inside , and retry projection. Faulty air filter unit The air filter unit is installed...

User Manual
Page 200
... internal temperature of the projector and remove the air filter. The following screen is displayed when turning on the projector if the air filter needs to clean off the dust. • If the air filter cleaning screen is displayed when turning on the projector after approx. 300 hours). Should the air filter become operable. • Turn the power of the projector off power." Cleaning and Replacing the Air Filter 5 Follow this screen is displayed. (When you also clean or replace the air filter. • Contact the Canon Customer Support...
... internal temperature of the projector and remove the air filter. The following screen is displayed when turning on the projector if the air filter needs to clean off the dust. • If the air filter cleaning screen is displayed when turning on the projector after approx. 300 hours). Should the air filter become operable. • Turn the power of the projector off power." Cleaning and Replacing the Air Filter 5 Follow this screen is displayed. (When you also clean or replace the air filter. • Contact the Canon Customer Support...
User Manual
Page 202
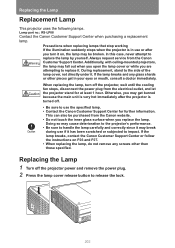
... to replace it . When replacing the lamp, turn it has been scratched or subjected to the side of the lamp cover, not directly under it . Replacing the Lamp 1 Turn off the projector, wait until the cooling fan stops, disconnect the power plug from the Canon Customer Support Center. Otherwise, you replace the lamp. If the lamp breaks, contact the Canon Customer Support Center or follow the instructions on , the lamp may...
... to replace it . When replacing the lamp, turn it has been scratched or subjected to the side of the lamp cover, not directly under it . Replacing the Lamp 1 Turn off the projector, wait until the cooling fan stops, disconnect the power plug from the Canon Customer Support Center. Otherwise, you replace the lamp. If the lamp breaks, contact the Canon Customer Support Center or follow the instructions on , the lamp may...

User Manual
Page 204
Replacing the Lamp 7 Turn on the projector and gently push the lamp cover to attach it. 204 Bring up the menu and select [System settings] - [Other settings] - [Lamp counter]. 8 Select [Reset] - [Yes] to reset the lamp counter. • We recommend cleaning or replacing the air filter (part no.: RS-FL02) when you replace the lamp. • Contact the Canon Customer Support Center for further information. ■ If the Lamp Cover Comes Off Align the point of attachment on the lamp cover with the groove on the power.
Replacing the Lamp 7 Turn on the projector and gently push the lamp cover to attach it. 204 Bring up the menu and select [System settings] - [Other settings] - [Lamp counter]. 8 Select [Reset] - [Yes] to reset the lamp counter. • We recommend cleaning or replacing the air filter (part no.: RS-FL02) when you replace the lamp. • Contact the Canon Customer Support Center for further information. ■ If the Lamp Cover Comes Off Align the point of attachment on the lamp cover with the groove on the power.
User Manual
Page 263
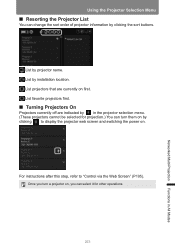
... Web Screen" (P195). Using the Projector Selection Menu ■ Resorting the Projector List You can turn a projector on, you can select it for other operations. 263 Networked Multi-Projection Functions in the projector selection menu. (These projectors cannot be selected for projection.) You can change the sort order of projector information by clicking the sort buttons. For instructions after this step, refer to display the projector web screen and switching the power on...
... Web Screen" (P195). Using the Projector Selection Menu ■ Resorting the Projector List You can turn a projector on, you can select it for other operations. 263 Networked Multi-Projection Functions in the projector selection menu. (These projectors cannot be selected for projection.) You can change the sort order of projector information by clicking the sort buttons. For instructions after this step, refer to display the projector web screen and switching the power on...


