iPF650 655 750 755 Basic Guide Step1
Page 1
... Keep this manual in the Printer 18 Removing Sheets 20 Consumables 21 Replacing Ink Tanks 22 Replacing the Maintenance Cartridge 26 Replacing the Printhead 30 Menu Map 35 Troubleshooting 2 Troubleshooting 2 If Roll Paper Jams 18 If a Sheet Jams 21 If Paper is Soiled 23 If Printing... is Faint 25 If Vertical Lines are Warped or Colors are Misaligned 26 If Banding Occurs 28 If Line Length Does Not Match 30 Error Messages 32 Printer Relocation 3 Preparing to operate the printer. Large-Format Printers Basic Guide Printer Operations 1...
... Keep this manual in the Printer 18 Removing Sheets 20 Consumables 21 Replacing Ink Tanks 22 Replacing the Maintenance Cartridge 26 Replacing the Printhead 30 Menu Map 35 Troubleshooting 2 Troubleshooting 2 If Roll Paper Jams 18 If a Sheet Jams 21 If Paper is Soiled 23 If Printing... is Faint 25 If Vertical Lines are Warped or Colors are Misaligned 26 If Banding Occurs 28 If Line Length Does Not Match 30 Error Messages 32 Printer Relocation 3 Preparing to operate the printer. Large-Format Printers Basic Guide Printer Operations 1...

iPF650 655 750 755 Basic Guide Step1
Page 4
... in the U.S. Please note that the shape of the cable connector matches the connection point on the printer. • During printing, turn on the printer such as small metal objects (paper clips, staples), liquids, any type of Microsoft Corporation, registered in the U.S. a • To..., and then call for installation. Macintosh is illegal to use flammable sprays around the printer. Trademarks Canon, the Canon logo, and imagePROGRAF are high voltage parts inside the printer can cause injuries. • Never place anything on the ventilation system in this could cause ...
... in the U.S. Please note that the shape of the cable connector matches the connection point on the printer. • During printing, turn on the printer such as small metal objects (paper clips, staples), liquids, any type of Microsoft Corporation, registered in the U.S. a • To..., and then call for installation. Macintosh is illegal to use flammable sprays around the printer. Trademarks Canon, the Canon logo, and imagePROGRAF are high voltage parts inside the printer can cause injuries. • Never place anything on the ventilation system in this could cause ...
iPF650 655 750 755 Basic Guide Step1
Page 5
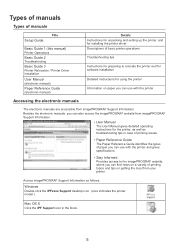
... gives specifications. • Stay Informed Provides access to relocate the printer and for software installation Detailed instructions for using the printer Information on paper you can use with the printer Accessing the electronic manuals The electronic manuals are accessible from imagePROGRAF Support Information. • User Manual The User Manual gives detailed operating instructions...
... gives specifications. • Stay Informed Provides access to relocate the printer and for software installation Detailed instructions for using the printer Information on paper you can use with the printer Accessing the electronic manuals The electronic manuals are accessible from imagePROGRAF Support Information. • User Manual The User Manual gives detailed operating instructions...

iPF650 655 750 755 Basic Guide Step1
Page 8
... before loading it . (iPF750 and iPF755 only.) Load the roll on the Roll Holder with the iPF750 and iPF755. • With the iPF650 and iPF655, the Stand is full.) A round-bladed cutter for alignment of printer parts are ejected. Open this...Stand is provided as follows. Use this cover to operate the printer and check the printer status. Front c n o ab c d qr f e m f p s s g ih lk j t t Name a Roll Cover b Paper Feed Slot c Roll Ledge d Release Lever e Control Panel f Ink Tank Cover g Paper Alignment Line h Maintenance Cartridge Cover i Maintenance Cartridge j Cutter...
... before loading it . (iPF750 and iPF755 only.) Load the roll on the Roll Holder with the iPF750 and iPF755. • With the iPF650 and iPF655, the Stand is full.) A round-bladed cutter for alignment of printer parts are ejected. Open this...Stand is provided as follows. Use this cover to operate the printer and check the printer status. Front c n o ab c d qr f e m f p s s g ih lk j t t Name a Roll Cover b Paper Feed Slot c Roll Ledge d Release Lever e Control Panel f Ink Tank Cover g Paper Alignment Line h Maintenance Cartridge Cover i Maintenance Cartridge j Cutter...

iPF650 655 750 755 Basic Guide Step1
Page 9
...For catching ink outside the edges of paper during borderless printing. This retainer holds paper as it is fed. Be careful not to touch this part when cleaning inside the Top Cover or clearing paper jams. When cleaning inside the printer under the Top Cover, use this... shaft. Parts Top Cover (Inside) g a b c f d Name a Carriage b Carriage Shaft c Paper Retainer d Platen e Borderless Printing Ink Grooves f Linear Scale g Cleaning Brush...
...For catching ink outside the edges of paper during borderless printing. This retainer holds paper as it is fed. Be careful not to touch this part when cleaning inside the Top Cover or clearing paper jams. When cleaning inside the printer under the Top Cover, use this... shaft. Parts Top Cover (Inside) g a b c f d Name a Carriage b Carriage Shaft c Paper Retainer d Platen e Borderless Printing Ink Grooves f Linear Scale g Cleaning Brush...

iPF650 655 750 755 Basic Guide Step1
Page 10
... pressed except the Power button. 10 Lit or flashes when messages are loaded cuts the paper. Cancels print jobs in the Printer) Pressing this button to move to reposition the paper. In menu items requiring numerical input, press this button when rolls are loaded enables you...Selection screen. (→ , Menu Map) Press this button when rolls are displayed. Pressing this button when loading or replacing paper. (→ , Loading Rolls in the Printer), (→ , Loading Sheets in progress and ends the ink drying period. Press this button when viewing menus to display the...
... pressed except the Power button. 10 Lit or flashes when messages are loaded cuts the paper. Cancels print jobs in the Printer) Pressing this button to move to reposition the paper. In menu items requiring numerical input, press this button when rolls are loaded enables you...Selection screen. (→ , Menu Map) Press this button when rolls are displayed. Pressing this button when loading or replacing paper. (→ , Loading Rolls in the Printer), (→ , Loading Sheets in progress and ends the ink drying period. Press this button when viewing menus to display the...

iPF650 655 750 755 Basic Guide Step1
Page 11
... these steps to select desired settings, and then press the OK button. Paper Size Back button ManageRemainRoll Paper Menu Roll Paper Cut Sheet • Specifying menu items Press ▲ or ▼ to enter numbers. After the printer starts up, the Tab Selection screen is selected, and menu items are... now displayed. Ready OK: Paper Menu Plain Paper ISO A2 Roll To select a menu, press ▲ or ▼, and then press the...
... these steps to select desired settings, and then press the OK button. Paper Size Back button ManageRemainRoll Paper Menu Roll Paper Cut Sheet • Specifying menu items Press ▲ or ▼ to enter numbers. After the printer starts up, the Tab Selection screen is selected, and menu items are... now displayed. Ready OK: Paper Menu Plain Paper ISO A2 Roll To select a menu, press ▲ or ▼, and then press the...

iPF650 655 750 755 Basic Guide Step1
Page 12
...1 Lift the Holder Stopper lever (a) from the Roll Holder. Parts to soil the printing surface. When printing on both ends of Paper," User Manual) • To view instructions as follows. Attaching the Roll Holder to Rolls Attach the roll holder to the roll.... Rolls have a two- The printer comes equipped with a 3-inch paper core 3-Inch Paper Core Attachment L (b) 3-Inch Paper Core Attachment R (c) a b c • Set the roll on supported sizes and types of rolls, see "Paper Sizes" or the Paper Reference Guide. (→"Paper Sizes," User Manual), (→"Types of...
...1 Lift the Holder Stopper lever (a) from the Roll Holder. Parts to soil the printing surface. When printing on both ends of Paper," User Manual) • To view instructions as follows. Attaching the Roll Holder to Rolls Attach the roll holder to the roll.... Rolls have a two- The printer comes equipped with a 3-inch paper core 3-Inch Paper Core Attachment L (b) 3-Inch Paper Core Attachment R (c) a b c • Set the roll on supported sizes and types of rolls, see "Paper Sizes" or the Paper Reference Guide. (→"Paper Sizes," User Manual), (→"Types of...

iPF650 655 750 755 Basic Guide Step1
Page 14
.... • Before loading rolls, make sure the printer is aligned with the R label on the Roll Ledge (b). Press ▲ or ▼ to remove it. Remove the paper and go to select Load Roll Paper, and then press the OK button. • If any paper has been advanced that the R label on the... Roll Holder flange (c) is clean inside the Top Cover and around the Ejection Guide. If these areas are dirty, we recommend cleaning them in the printer as shown. b d b At this time, position...
.... • Before loading rolls, make sure the printer is aligned with the R label on the Roll Ledge (b). Press ▲ or ▼ to remove it. Remove the paper and go to select Load Roll Paper, and then press the OK button. • If any paper has been advanced that the R label on the... Roll Holder flange (c) is clean inside the Top Cover and around the Ejection Guide. If these areas are dirty, we recommend cleaning them in the printer as shown. b d b At this time, position...

iPF650 655 750 755 Basic Guide Step1
Page 15
.... b c Loading Rolls in the Paper Feed Slot (a) until you load the holder fully in the Roll Holder Slot, keeping it at the positions indicated, close the Roll Cover. 15 a a The printer now starts advancing the paper, and a menu for selection of the type of paper is not fed askew. 7 Press ...▲ or ▼ to select the type of paper, and then press the OK button. • For details on the ...
.... b c Loading Rolls in the Paper Feed Slot (a) until you load the holder fully in the Roll Holder Slot, keeping it at the positions indicated, close the Roll Cover. 15 a a The printer now starts advancing the paper, and a menu for selection of the type of paper is not fed askew. 7 Press ...▲ or ▼ to select the type of paper, and then press the OK button. • For details on the ...
iPF650 655 750 755 Basic Guide Step1
Page 16
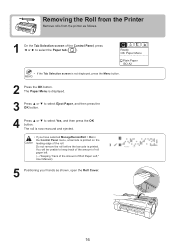
... keep track of the amount of roll paper left. (→"Keeping Track of the Amount of Roll Paper Left," User Manual) 5 Positioning your hands as follows. 1 On the Tab Selection screen of the roll. Removing the Roll from the Printer Remove rolls from the printer as shown, open the Roll Cover. 16... Ready OK: Paper Menu Plain Paper ISO A2 • If the Tab Selection screen is printed. You will be unable to select Yes...
... keep track of the amount of roll paper left. (→"Keeping Track of the Amount of Roll Paper Left," User Manual) 5 Positioning your hands as follows. 1 On the Tab Selection screen of the roll. Removing the Roll from the Printer Remove rolls from the printer as shown, open the Roll Cover. 16... Ready OK: Paper Menu Plain Paper ISO A2 • If the Tab Selection screen is printed. You will be unable to select Yes...

iPF650 655 750 755 Basic Guide Step1
Page 17
Removing the Roll from the Printer 7 Holding the Roll Holder flange (a), remove the holder from Rolls," User Manual) 8 Holding it at the positions indicated, close the Roll Cover. • To load new paper in the Printer) 17 6 Using both hands, rotate the Roll Holder toward the back to rewind the roll. a • See the following procedure. (→ , Loading Rolls in the printer at this point, see the following procedure for instructions on removing the Roll Holder from the roll. (→"Removing the Roll Holder from the Roll Holder Slot.
Removing the Roll from the Printer 7 Holding the Roll Holder flange (a), remove the holder from Rolls," User Manual) 8 Holding it at the positions indicated, close the Roll Cover. • To load new paper in the Printer) 17 6 Using both hands, rotate the Roll Holder toward the back to rewind the roll. a • See the following procedure. (→ , Loading Rolls in the printer at this point, see the following procedure for instructions on removing the Roll Holder from the roll. (→"Removing the Roll Holder from the Roll Holder Slot.

iPF650 655 750 755 Basic Guide Step1
Page 18
...Do not load more than one sheet at against the Roll Cover. If necessary, straighten the paper and reload it . Go to select Yes, and then press the OK button. Press ... the Width Guide (a) to select Load Cut Sheet, and then press the OK button. • If any paper has been advanced that is flat a time. Press ▲ or ▼ to the next step....Screen. The sheet may cause paper jams. • Before feeding paper or printing, make sure the sheet is wrinkled or warped may jam. a 18 Loading Sheets in the Printer Load sheets in the printer as the paper source. • If ...
...Do not load more than one sheet at against the Roll Cover. If necessary, straighten the paper and reload it . Go to select Yes, and then press the OK button. Press ... the Width Guide (a) to select Load Cut Sheet, and then press the OK button. • If any paper has been advanced that is flat a time. Press ▲ or ▼ to the next step....Screen. The sheet may cause paper jams. • Before feeding paper or printing, make sure the sheet is wrinkled or warped may jam. a 18 Loading Sheets in the Printer Load sheets in the printer as the paper source. • If ...

iPF650 655 750 755 Basic Guide Step1
Page 19
... Width Guide (a) carefully to match the size of the paper to select the type of paper is automatically shown on types of paper to select, see the Paper Reference Guide. (→ , Types of the Roll Cover. The printer now starts feeding the paper. • For details on the Display Screen. Set ... contact and you hear a tone. Press ▲ or ▼ to prevent the paper from becoming crooked or wrinkled. a 5 Press the OK button. • If a print job was received The printer now starts feeding the paper. • If no print job was received A menu for selection of the type ...
... Width Guide (a) carefully to match the size of the paper to select the type of paper is automatically shown on types of paper to select, see the Paper Reference Guide. (→ , Types of the Roll Cover. The printer now starts feeding the paper. • For details on the Display Screen. Set ... contact and you hear a tone. Press ▲ or ▼ to prevent the paper from becoming crooked or wrinkled. a 5 Press the OK button. • If a print job was received The printer now starts feeding the paper. • If no print job was received A menu for selection of the type ...

iPF650 655 750 755 Basic Guide Step1
Page 20
... screen of the printer. 5 Holding the paper, push the Release Lever back and remove the sheet. 6 Pull the Release Lever forward. 20 The paper is displayed. 3 Press ▲ or ▼ to select Eject Paper, and then press the OK button. 4 Press ▲ or ▼ to select the Paper tab ( ). Ready OK: Paper Menu Plain Paper ISO A2...
... screen of the printer. 5 Holding the paper, push the Release Lever back and remove the sheet. 6 Pull the Release Lever forward. 20 The paper is displayed. 3 Press ▲ or ▼ to select Eject Paper, and then press the OK button. 4 Press ▲ or ▼ to select the Paper tab ( ). Ready OK: Paper Menu Plain Paper ISO A2...

iPF650 655 750 755 Basic Guide Step1
Page 22
...OK CMY M B K M B K B K • Do not remove an Ink Tank during initialization immediately after breaking the seal. Make sure the printer is ready for extended periods (a month or more). You can be ink around the ink supply section of printing within six months after turning on... the printer, or during printhead cleaning. • Ink Tank replacement is being canceled, or when paper is possible even during replacement. Printing OK: Ink Menu CMY M B K M B K B K Printing OK...
...OK CMY M B K M B K B K • Do not remove an Ink Tank during initialization immediately after breaking the seal. Make sure the printer is ready for extended periods (a month or more). You can be ink around the ink supply section of printing within six months after turning on... the printer, or during printhead cleaning. • Ink Tank replacement is being canceled, or when paper is possible even during replacement. Printing OK: Ink Menu CMY M B K M B K B K Printing OK...

iPF650 655 750 755 Basic Guide Step1
Page 30
...open the Printhead pouch until immediately before replacing it. After removing the Printhead from the printer menu • If the Display Screen indicates Open top cover and replace the printhead. • If your Canon dealer has advised you remove. If the Printhead is Soiled) 30 The ink may ...be ink around the nozzles of Head Cleaning B from the pouch, install it . (→"Cutting Roll Paper After Printing," User Manual) 2 Clean inside the Top Cover. (→ , If Paper is left after one or two cycles of the Printhead you to replace the printhead Replace the Printhead in ...
...open the Printhead pouch until immediately before replacing it. After removing the Printhead from the printer menu • If the Display Screen indicates Open top cover and replace the printhead. • If your Canon dealer has advised you remove. If the Printhead is Soiled) 30 The ink may ...be ink around the nozzles of Head Cleaning B from the pouch, install it . (→"Cutting Roll Paper After Printing," User Manual) 2 Clean inside the Top Cover. (→ , If Paper is left after one or two cycles of the Printhead you to replace the printhead Replace the Printhead in ...

iPF650 655 750 755 Basic Guide Step1
Page 35
... is updated when you install the printer driver from the User Software CD-ROM or if you change paper information by using the Media Configuration Tool. *2: For information on the sizes of paper the printer supports, refer to the User Manual. (→"Paper Sizes," User Manual) *3: Available only... Job List Print Job List Print Delete *14: Available only on the iPF755. *16: Available only on the types of paper the printer supports, refer to the Paper Reference Guide. Paper Menu Load Paper Eject Paper *1 Chg. E Off 30 sec. 1 min. 3 min. 5 min. 10 min. 30 min. 60 min. * *1: For ...
... is updated when you install the printer driver from the User Software CD-ROM or if you change paper information by using the Media Configuration Tool. *2: For information on the sizes of paper the printer supports, refer to the User Manual. (→"Paper Sizes," User Manual) *3: Available only... Job List Print Job List Print Delete *14: Available only on the iPF755. *16: Available only on the types of paper the printer supports, refer to the Paper Reference Guide. Paper Menu Load Paper Eject Paper *1 Chg. E Off 30 sec. 1 min. 3 min. 5 min. 10 min. 30 min. 60 min. * *1: For ...

iPF650 655 750 755 Basic Guide Step1
Page 36
... the iPF755. *15: Available only on the iPF750. *16: Available only on the iPF655. *17: Available only on the iPF650. 36 Menu OK Back OK Back OK Back OK Back OK Back OK Back OK Back Test Print Adjust Printer G Head Posi. Feed Priority Maintenance GL2 Replot ...*15*17 *15*17 GL2 BufferClear GL2 Settings Adj. Priority Adj. Adj. maint cart Head Info Quality Manager Paper Manager Auto(Standard) Auto(Advanced) Manual *5 Adj. xxxxxxxxsq.mm F (Indicates the ink color.) xxx.xxx ml F ...
... the iPF755. *15: Available only on the iPF750. *16: Available only on the iPF655. *17: Available only on the iPF650. 36 Menu OK Back OK Back OK Back OK Back OK Back OK Back OK Back Test Print Adjust Printer G Head Posi. Feed Priority Maintenance GL2 Replot ...*15*17 *15*17 GL2 BufferClear GL2 Settings Adj. Priority Adj. Adj. maint cart Head Info Quality Manager Paper Manager Auto(Standard) Auto(Advanced) Manual *5 Adj. xxxxxxxxsq.mm F (Indicates the ink color.) xxx.xxx ml F ...

iPF750 User Manual
Page 75
... PaprSetngs Init.Admin.Pswd Choose OK to Canon measurement conditions for estimates calculated according to restore the Admin. Ink Info Indicates ink levels and maintenance cartridge capacity. The average margin of ink. *2: It is ±15%. Printer Paper Info Info Indicates the current paper size, type, and related printer settings. System Info Indicates the ...
... PaprSetngs Init.Admin.Pswd Choose OK to Canon measurement conditions for estimates calculated according to restore the Admin. Ink Info Indicates ink levels and maintenance cartridge capacity. The average margin of ink. *2: It is ±15%. Printer Paper Info Info Indicates the current paper size, type, and related printer settings. System Info Indicates the ...


