
Instruction Manual
Page 2
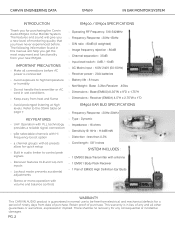
...to be no recovery for any and all connections before . There shall be free from electrical and mechanical defects for purchasing the Carvin Audio EM900 In Ear Monitor System. IMPORTANT PRECAUTIONS »» Make all other guarantees or warranties, expressed or implied. This warranty is... Do not handle the transmitter or AC cord in wet conditions »» Keep away from your new EM900. CARVIN ENGINEERING DATA EM900 IN EAR MONITOR SYSTEM INTRODUCTION EM900 / EM901 SPECIFICATIONS Thank you for a period of ninety days from date of monitoring quality that you get the...
...to be no recovery for any and all connections before . There shall be free from electrical and mechanical defects for purchasing the Carvin Audio EM900 In Ear Monitor System. IMPORTANT PRECAUTIONS »» Make all other guarantees or warranties, expressed or implied. This warranty is... Do not handle the transmitter or AC cord in wet conditions »» Keep away from your new EM900. CARVIN ENGINEERING DATA EM900 IN EAR MONITOR SYSTEM INTRODUCTION EM900 / EM901 SPECIFICATIONS Thank you for a period of ninety days from date of monitoring quality that you get the...
Instruction Manual
Page 3
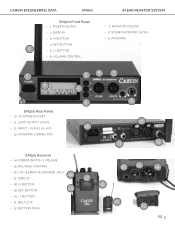
...;» 22. POWER SWITCH »» 2. VOLUME CONTROL IN EAR MONITOR SYSTEM »» 7. ANTENNA 1 2 3 6 7 4 EM900 Rear Panel »» 10. INPUT - BATTERY PACK 21 22 PG. 3 POWER SWITCH / VOLUME »» 15. CARVIN ENGINEERING DATA EM900 EM900 Front Panel »» 1. XLR & 1/4"-inch »» 13. MONITOR VOLUME »» 8. LOOP OUTPUT JACKS...
...;» 22. POWER SWITCH »» 2. VOLUME CONTROL IN EAR MONITOR SYSTEM »» 7. ANTENNA 1 2 3 6 7 4 EM900 Rear Panel »» 10. INPUT - BATTERY PACK 21 22 PG. 3 POWER SWITCH / VOLUME »» 15. CARVIN ENGINEERING DATA EM900 EM900 Front Panel »» 1. XLR & 1/4"-inch »» 13. MONITOR VOLUME »» 8. LOOP OUTPUT JACKS...
Instruction Manual
Page 4
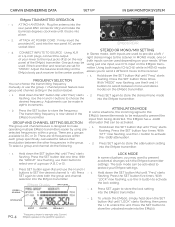
...down the SET button (#4) until "LOCK" starts flashing, then press the (-) to choose the into place. »» 2. operating multiple EM900 transmitters easier by using just one or both the group and channel flashing. Hold down the SET button (#4) until "Freq" starts SET again to...Press SET again to the input jacks (#12) on your mixer to store the stereo/mono mode flashing. CARVIN ENGINEERING DATA SET UP IN EAR MONITOR SYSTEM EM900 TRANSMITTER OPERATION »» 1. CONNECT INPUTS TO SOURCE : Using XLR or 1/4-inch plugs, connect the output...
...down the SET button (#4) until "LOCK" starts flashing, then press the (-) to choose the into place. »» 2. operating multiple EM900 transmitters easier by using just one or both the group and channel flashing. Hold down the SET button (#4) until "Freq" starts SET again to...Press SET again to the input jacks (#12) on your mixer to store the stereo/mono mode flashing. CARVIN ENGINEERING DATA SET UP IN EAR MONITOR SYSTEM EM900 TRANSMITTER OPERATION »» 1. CONNECT INPUTS TO SOURCE : Using XLR or 1/4-inch plugs, connect the output...
Instruction Manual
Page 5
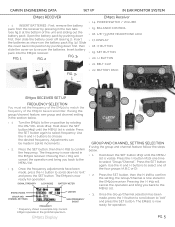
... stored in the 500MHz spectrum. Use the (+) and (-) buttons to select one time to "exit" and press the SET button. Current EM900 operates in the EM901 receiver. The EM901 is now ready for operation. 18 17 19 20 22 21 GROUP AND CHANNEL SETTING SELECTION If ...feature follow the steps below . »» 1 Turn the EM901 to secure the batteries. Use the (+) and (-) buttons to select frequency. CARVIN ENGINEERING DATA SET UP IN EAR MONITOR SYSTEM EM901 RECEIVER EM901 Receiver »» 1. INSERT BATTERIES : First, remove the battery pack from the receiver...
... stored in the 500MHz spectrum. Use the (+) and (-) buttons to select one time to "exit" and press the SET button. Current EM900 operates in the EM901 receiver. The EM901 is now ready for operation. 18 17 19 20 22 21 GROUP AND CHANNEL SETTING SELECTION If ...feature follow the steps below . »» 1 Turn the EM901 to secure the batteries. Use the (+) and (-) buttons to select frequency. CARVIN ENGINEERING DATA SET UP IN EAR MONITOR SYSTEM EM901 RECEIVER EM901 Receiver »» 1. INSERT BATTERIES : First, remove the battery pack from the receiver...
Instruction Manual
Page 6
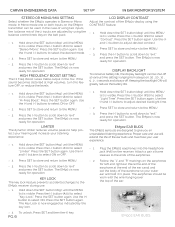
CARVIN ENGINEERING DATA SET UP IN EAR MONITOR SYSTEM STEREO OR MONO/MIX SETTING Select whether the EM901 operates in the mix. Hold down the SET ... to select "Stereo/Mono". The EM901 is now ready for operation. If the sound becomes distorted at various time settings ranging from always on the EM900 transmitter can be shut off . Press the SET button again. Keeping the backlight ON will extend the life of the EM901 display using the balance...
CARVIN ENGINEERING DATA SET UP IN EAR MONITOR SYSTEM STEREO OR MONO/MIX SETTING Select whether the EM901 operates in the mix. Hold down the SET ... to select "Stereo/Mono". The EM901 is now ready for operation. If the sound becomes distorted at various time settings ranging from always on the EM900 transmitter can be shut off . Press the SET button again. Keeping the backlight ON will extend the life of the EM901 display using the balance...
Instruction Manual
Page 7
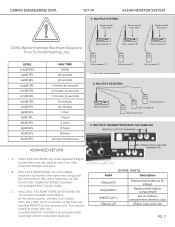
... clips EM901 body pack clip PG. 7 Part# SPARE PARTS Description EM900ANT EM901BATT EMBATCLIP-4 EM901CLIP Replacement antenna for redundant backups. CARVIN ENGINEERING DATA SET UP IN EAR MONITOR SYSTEM OSHA Recommended Maximum Exposure Time To Avoid Hearing Loss LEVEL >115dB SPL 115dB SPL... (continuous) ADVANCED SETUPS: »» A. »» B »» C MULTIPLE SYSTEMS: Up to provide better coverage and for EM900 Replacement battery compartment Set of the second unit. This can be useful in areas with very unpredictable RF conditions to 16 separate...
... clips EM901 body pack clip PG. 7 Part# SPARE PARTS Description EM900ANT EM901BATT EMBATCLIP-4 EM901CLIP Replacement antenna for redundant backups. CARVIN ENGINEERING DATA SET UP IN EAR MONITOR SYSTEM OSHA Recommended Maximum Exposure Time To Avoid Hearing Loss LEVEL >115dB SPL 115dB SPL... (continuous) ADVANCED SETUPS: »» A. »» B »» C MULTIPLE SYSTEMS: Up to provide better coverage and for EM900 Replacement battery compartment Set of the second unit. This can be useful in areas with very unpredictable RF conditions to 16 separate...


