Owners Manual
Page 4
... Exposure Mode 29 Changing the Image Size Size) . . 31 Using Flash Flash) . . 35 Specifying ISO Sensitivity ISO) . . 38 Adjusting White Balance White Balance) . . 38 Correcting Image Brightness EV Shift) . . 40 Specifying the Metering Mode Metering) . . 41 Specifying the Auto Focus Area AF Area) . . 41 Changing the Control Panel Date/Time Style 43 Shooting with Zoom 43 ❚ Optical Zoom/Digital Zoom Switch Point 44 Selecting a Focus Mode Focus) . . 46 Locking the Auto Exposure and Auto Focus Setting 49 ❚ Specifying the [AEL] button Operation 49 Using Continuous Shutter...
... Exposure Mode 29 Changing the Image Size Size) . . 31 Using Flash Flash) . . 35 Specifying ISO Sensitivity ISO) . . 38 Adjusting White Balance White Balance) . . 38 Correcting Image Brightness EV Shift) . . 40 Specifying the Metering Mode Metering) . . 41 Specifying the Auto Focus Area AF Area) . . 41 Changing the Control Panel Date/Time Style 43 Shooting with Zoom 43 ❚ Optical Zoom/Digital Zoom Switch Point 44 Selecting a Focus Mode Focus) . . 46 Locking the Auto Exposure and Auto Focus Setting 49 ❚ Specifying the [AEL] button Operation 49 Using Continuous Shutter...
Owners Manual
Page 5
...10074; Shooting with Continuous Auto Focus Continuous AF) . . . 81 ❚ Specifying the [AEL] button Operation AE/AF Lock) . . . 82 ❚ Configuring the Continuous Shutter Image Save Method Save CS Images) . . . 82 ❚ Turning Digital Zoom On or Off Digital Zoom) . . . 82 ❚ Shooting with Quick Shutter Quick Shutter) . . . 83 ❚ Turning on Image Review Review) . . . 83 ❚ Displaying the On-screen Grid Grid) . . . 83 ❚ Using Icon Help Icon Help) . . . 84 ❚ Configuring Power On Default Settings Memory) . . . 84 Image Quality Settings Quality...
...10074; Shooting with Continuous Auto Focus Continuous AF) . . . 81 ❚ Specifying the [AEL] button Operation AE/AF Lock) . . . 82 ❚ Configuring the Continuous Shutter Image Save Method Save CS Images) . . . 82 ❚ Turning Digital Zoom On or Off Digital Zoom) . . . 82 ❚ Shooting with Quick Shutter Quick Shutter) . . . 83 ❚ Turning on Image Review Review) . . . 83 ❚ Displaying the On-screen Grid Grid) . . . 83 ❚ Using Icon Help Icon Help) . . . 84 ❚ Configuring Power On Default Settings Memory) . . . 84 Image Quality Settings Quality...
Owners Manual
Page 7
... Time) . 128 Time Stamping Snapshots Timestamp) . 129 Setting the Camera's Clock Adjust) . 129 Specifying the Date Style Date Style) . 130 Specifying the Display Language Language) . 130 Configuring Sleep State Settings Sleep) . 131 Configuring Auto Power Settings Auto Power Off) . 131 Configuring [r] and [p] Settings REC/PLAY) . 132 Controlling Monitor Screen Priority LCD Priority) . 132 Configuring USB Protocol Settings USB) . 133 Selecting the Screen Aspect Ratio and Video Output System (Video Out) . 133 Specifying the Battery Type Battery Type) . 134 Configuring a Startup Image...
... Time) . 128 Time Stamping Snapshots Timestamp) . 129 Setting the Camera's Clock Adjust) . 129 Specifying the Date Style Date Style) . 130 Specifying the Display Language Language) . 130 Configuring Sleep State Settings Sleep) . 131 Configuring Auto Power Settings Auto Power Off) . 131 Configuring [r] and [p] Settings REC/PLAY) . 132 Controlling Monitor Screen Priority LCD Priority) . 132 Configuring USB Protocol Settings USB) . 133 Selecting the Screen Aspect Ratio and Video Output System (Video Out) . 133 Specifying the Battery Type Battery Type) . 134 Configuring a Startup Image...
Owners Manual
Page 14
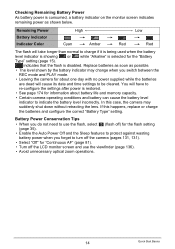
... about battery life and memory capacity. • Certain camera operating conditions and battery can cause the battery level indicator to re-configure the settings after power is disabled. If this case, the camera may change when you do not need to use the flash, select ? (flash off the LCD monitor screen and use the viewfinder (page 136). • Avoid unnecessary optical zoom operations. 14 Quick Start Basics In this happens, replace or charge the batteries and...
... about battery life and memory capacity. • Certain camera operating conditions and battery can cause the battery level indicator to re-configure the settings after power is disabled. If this case, the camera may change when you do not need to use the flash, select ? (flash off the LCD monitor screen and use the viewfinder (page 136). • Avoid unnecessary optical zoom operations. 14 Quick Start Basics In this happens, replace or charge the batteries and...
Owners Manual
Page 15
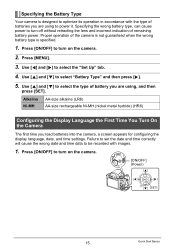
... [MENU]. 3. Use [8] and [2] to turn on the camera. [ON/OFF] (Power) =8? =4? =6? =2? [SET] 15 Quick Start Basics Press [ON/OFF] to select "Battery Type" and then press [6]. 5. Use [8] and [2] to be recorded with the type of battery you load batteries into the camera, a screen appears for configuring the display language, date, and time settings. Failure to set the date and time correctly will cause the wrong date and time data to select the type of batteries you are using...
... [MENU]. 3. Use [8] and [2] to turn on the camera. [ON/OFF] (Power) =8? =4? =6? =2? [SET] 15 Quick Start Basics Press [ON/OFF] to select "Battery Type" and then press [6]. 5. Use [8] and [2] to be recorded with the type of battery you load batteries into the camera, a screen appears for configuring the display language, date, and time settings. Failure to set the date and time correctly will cause the wrong date and time data to select the type of batteries you are using...
Owners Manual
Page 16
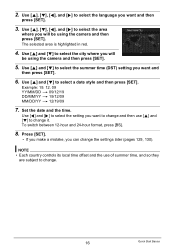
... select the language you will be using the camera and then press [SET]. 5. The selected area is highlighted in red. 4. Use [8] and [2] to select the summer time (DST) setting you want to change . 16 Quick Start Basics Use [8] and [2] to select the area where you want and then press [SET]. 3. To switch between 12-hour and 24-hour format, press [BS]. 8. Set the date and the time. Example...
... select the language you will be using the camera and then press [SET]. 5. The selected area is highlighted in red. 4. Use [8] and [2] to select the summer time (DST) setting you want to change . 16 Quick Start Basics Use [8] and [2] to select the area where you want and then press [SET]. 3. To switch between 12-hour and 24-hour format, press [BS]. 8. Set the date and the time. Example...
Owners Manual
Page 17
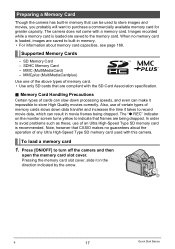
... speeds, and even can be used with a memory card. In order to avoid problems such as these, use of certain types of cards can slow down data transfer and increases the time it takes to built-in the direction indicated by the arrow. 1 2 B 17 Quick Start Basics When no guarantees about memory card capacities, see page 168. Images recorded while a memory card is loaded are saved to turn off the camera and then open the memory card...
... speeds, and even can be used with a memory card. In order to avoid problems such as these, use of certain types of cards can slow down data transfer and increases the time it takes to built-in the direction indicated by the arrow. 1 2 B 17 Quick Start Basics When no guarantees about memory card capacities, see page 168. Images recorded while a memory card is loaded are saved to turn off the camera and then open the memory card...
Owners Manual
Page 25
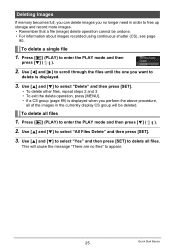
.... 25 Quick Start Basics Use [8] and [2] to enter the PLAY mode and then press [2] ( ). 2. Use [8] and [2] to select "Yes" and then press [SET] to delete all files 1. Use [8] and [2] to select "Delete" and then press [SET]. • To delete other files, repeat steps 2 and 3. • To exit the delete operation, press [MENU]. • If a CS group (page 89) is displayed. 3. This will be undone. • For information about images recorded using continuous shutter...
.... 25 Quick Start Basics Use [8] and [2] to enter the PLAY mode and then press [2] ( ). 2. Use [8] and [2] to select "Yes" and then press [SET] to delete all files 1. Use [8] and [2] to select "Delete" and then press [SET]. • To delete other files, repeat steps 2 and 3. • To exit the delete operation, press [MENU]. • If a CS group (page 89) is displayed. 3. This will be undone. • For information about images recorded using continuous shutter...
Owners Manual
Page 27
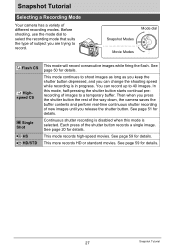
... page 59 for details. This mode continues to a temporary buffer. This mode records high-speed movies. Mode dial Snapshot Modes Movie Modes ª Flash CS × Highspeed CS t Single Shot © HS ³ HD/STD This mode will record consecutive images while firing the flash. Continuous shutter recording is disabled when this mode, half-pressing the shutter button starts continual prerecording of subject you are trying to 40 images. In this mode is in progress. Each press of...
... page 59 for details. This mode continues to a temporary buffer. This mode records high-speed movies. Mode dial Snapshot Modes Movie Modes ª Flash CS × Highspeed CS t Single Shot © HS ³ HD/STD This mode will record consecutive images while firing the flash. Continuous shutter recording is disabled when this mode, half-pressing the shutter button starts continual prerecording of subject you are trying to 40 images. In this mode is in progress. Each press of...
Owners Manual
Page 28
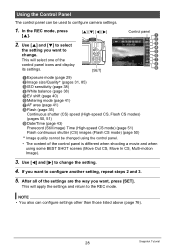
... (page 41) 8Flash (page 35) Continuous shutter (CS) speed (High-speed CS, Flash CS modes) (pages 50, 51) 9Date/Time (page 43) Prerecord (Still image) Time (High-speed CS mode) (page 51) Flash continuous shutter (CS) images (Flash CS mode) (page 50) * Image quality cannot be used to configure another setting, repeat steps 2 and 3. 5. After all of the control panel is different when shooting a movie and when using some BEST SHOT scenes (Move Out CS, Move In...
... (page 41) 8Flash (page 35) Continuous shutter (CS) speed (High-speed CS, Flash CS modes) (pages 50, 51) 9Date/Time (page 43) Prerecord (Still image) Time (High-speed CS mode) (page 51) Flash continuous shutter (CS) images (Flash CS mode) (page 50) * Image quality cannot be used to configure another setting, repeat steps 2 and 3. 5. After all of the control panel is different when shooting a movie and when using some BEST SHOT scenes (Move Out CS, Move In...
Owners Manual
Page 34
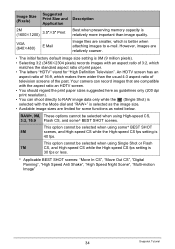
... can record images that are compatible with the aspect ratio an HDTV screen. • You should regard the print paper sizes suggested here as the image size. • Available image sizes are relatively coarser. • The initial factory default image size setting is 30 fps or less. * Applicable BEST SHOT scenes: "Move In CS", "Move Out CS", "Digital Panning", "High Speed Anti Shake", "High Speed Night Scene", "Multi-motion Image" 34 Snapshot Tutorial...
... can record images that are compatible with the aspect ratio an HDTV screen. • You should regard the print paper sizes suggested here as the image size. • Available image sizes are relatively coarser. • The initial factory default image size setting is 30 fps or less. * Applicable BEST SHOT scenes: "Move In CS", "Move Out CS", "Digital Panning", "High Speed Anti Shake", "High Speed Night Scene", "Multi-motion Image" 34 Snapshot Tutorial...
Owners Manual
Page 38
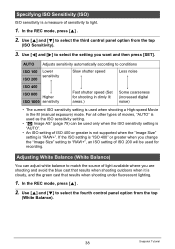
... shutter speed Less noise ISO 400 ISO 800 Higher ISO 1600 sensitivity Fast shutter speed (Set for shooting in the M (manual exposure) mode. AUTO ISO 100 ISO 200 Adjusts sensitivity automatically according to select the fourth control panel option from the top (ISO Sensitivity). 3. If the ISO setting is used when shooting a High-speed Movie in dimly lit areas.) Some coarseness (increased digital noise) • The current ISO sensitivity setting is "ISO 400" or greater when you change the "Image Size" setting to light. 1. Adjusting White Balance (White Balance...
... shutter speed Less noise ISO 400 ISO 800 Higher ISO 1600 sensitivity Fast shutter speed (Set for shooting in the M (manual exposure) mode. AUTO ISO 100 ISO 200 Adjusts sensitivity automatically according to select the fourth control panel option from the top (ISO Sensitivity). 3. If the ISO setting is used when shooting a High-speed Movie in dimly lit areas.) Some coarseness (increased digital noise) • The current ISO sensitivity setting is "ISO 400" or greater when you change the "Image Size" setting to light. 1. Adjusting White Balance (White Balance...

Owners Manual
Page 74
...; "0 AUTO" flashes on page 71. When the boundary on the monitor screen. 2. B 74 Using BEST SHOT Half-press the shutter button. • The camera will adjust exposure and focus automatically. • In this time the camera will continue until the end of the way down . Save the CS images (page 53). You then will start pre-recording images and storing them in a buffer, in accordance with the Prerecord Time setting you...
...; "0 AUTO" flashes on page 71. When the boundary on the monitor screen. 2. B 74 Using BEST SHOT Half-press the shutter button. • The camera will adjust exposure and focus automatically. • In this time the camera will continue until the end of the way down . Save the CS images (page 53). You then will start pre-recording images and storing them in a buffer, in accordance with the Prerecord Time setting you...

Owners Manual
Page 83
... a high-speed focus operation that is used. Turning on , the camera will record the image using Auto Focus at this time. It does not work with Quick Shutter (Quick Shutter) Procedure [r] (REC) * [MENU] * REC Tab * Quick Shutter When Quick Shutter is turned on, you press the shutter button to record it. • Image review is turned on Image Review (Review) Procedure [r] (REC) * [MENU] * REC Tab * Review While Review is available only when shooting single images. Shooting with continuous shutter. This will display a image for Auto Focus. On Turns on Quick Shutter...
... a high-speed focus operation that is used. Turning on , the camera will record the image using Auto Focus at this time. It does not work with Quick Shutter (Quick Shutter) Procedure [r] (REC) * [MENU] * REC Tab * Quick Shutter When Quick Shutter is turned on, you press the shutter button to record it. • Image review is turned on Image Review (Review) Procedure [r] (REC) * [MENU] * REC Tab * Review While Review is available only when shooting single images. Shooting with continuous shutter. This will display a image for Auto Focus. On Turns on Quick Shutter...
Owners Manual
Page 103
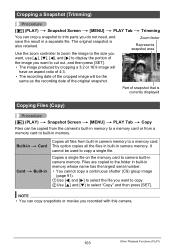
... camera memory. Files are copied to the folder in built-in memory whose name has the largest serial number. • You cannot copy a continuous shutter (CS) group image (page 91). 1Use [4] and [6] to select the file you recorded with this camera. 103 Other Playback Functions (PLAY) This option copies all files from a memory card to built-in memory. The original snapshot is currently displayed Copying Files (Copy) Procedure [p] (PLAY) * Snapshot Screen * [MENU] * PLAY Tab * Copy Files can be the same as the recording date...
... camera memory. Files are copied to the folder in built-in memory whose name has the largest serial number. • You cannot copy a continuous shutter (CS) group image (page 91). 1Use [4] and [6] to select the file you recorded with this camera. 103 Other Playback Functions (PLAY) This option copies all files from a memory card to built-in memory. The original snapshot is currently displayed Copying Files (Copy) Procedure [p] (PLAY) * Snapshot Screen * [MENU] * PLAY Tab * Copy Files can be the same as the recording date...
Owners Manual
Page 122
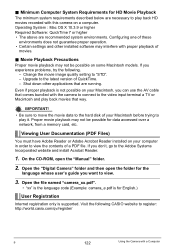
... of movies. . Proper movie playback may not be possible for the language whose user's guide you can use the AV cable that comes bundled with this camera on your Macintosh before trying to play back HD movies recorded with the camera to connect to view. 3. Open the "Digital Camera" folder and then open the "Manual" folder. 2. Shut down other installed software may interfere with a Computer IMPORTANT! • Be sure to move the movie data to the hard disk...
... of movies. . Proper movie playback may not be possible for the language whose user's guide you can use the AV cable that comes bundled with this camera on your Macintosh before trying to play back HD movies recorded with the camera to connect to view. 3. Open the "Digital Camera" folder and then open the "Manual" folder. 2. Shut down other installed software may interfere with a Computer IMPORTANT! • Be sure to move the movie data to the hard disk...
Owners Manual
Page 161
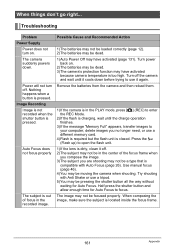
... time for Auto Focus. Try shooting with Auto Focus (page 26). When composing the image, make sure the subject is pressed. The camera suddenly powers down before trying to open the flash unit. 1)If the lens is too high. Turn off the camera and wait until the charge operation finishes. 3)If the message "Memory Full" appears, transfer images to focus. The image may have activated because camera temperature is dirty, clean it again. Turn power back on . Use manual focus...
... time for Auto Focus. Try shooting with Auto Focus (page 26). When composing the image, make sure the subject is pressed. The camera suddenly powers down before trying to open the flash unit. 1)If the lens is too high. Turn off the camera and wait until the charge operation finishes. 3)If the message "Memory Full" appears, transfer images to focus. The image may have activated because camera temperature is dirty, clean it again. Turn power back on . Use manual focus...
Owners Manual
Page 163
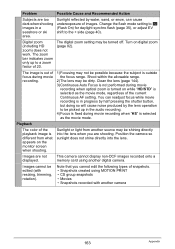
...). Digital zoom (including HD zoom) does not work. The digital zoom setting may be turned off. This camera cannot display non-DCF images recorded onto a memory card using MOTION PRINT • CS group snapshots • Movies • Snapshots recorded with resizing, trimming, rotation). Clean the lens (page 144). 3)Continuous Auto Focus is not performed during movie recording when optical zoom is turned on digital zoom (page 82). Sunlight or light from what appears on the monitor screen when shooting. Images are shooting. Problem Possible...
...). Digital zoom (including HD zoom) does not work. The digital zoom setting may be turned off. This camera cannot display non-DCF images recorded onto a memory card using MOTION PRINT • CS group snapshots • Movies • Snapshots recorded with resizing, trimming, rotation). Clean the lens (page 144). 3)Continuous Auto Focus is not performed during movie recording when optical zoom is turned on digital zoom (page 82). Sunlight or light from what appears on the monitor screen when shooting. Images are shooting. Problem Possible...
Owners Manual
Page 164
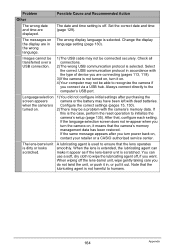
... , configure each setting. Change the display language setting (page 130). If the same message appears after purchasing the camera or the battery may not be a problem with the camera's memory data. A lubricating agent is not turned on, turn power back on . 4)Your computer may be connected securely. Configure the correct settings (pages 15, 130). 2)There may not be able to the computer's USB port. Set the correct date and time (page...
... , configure each setting. Change the display language setting (page 130). If the same message appears after purchasing the camera or the battery may not be a problem with the camera's memory data. A lubricating agent is not turned on, turn power back on . 4)Your computer may be connected securely. Configure the correct settings (pages 15, 130). 2)There may not be able to the computer's USB port. Set the correct date and time (page...

Owners Manual
Page 166
... image), this message indicates that there is not enough memory capacity to record a file while there are trying to save is locked. Folder cannot be performed for an image that cannot register. Shoot the image again. B 166 Appendix This message appears and the camera turns off . • The printer generated an error, etc. Memory Full Printing Error Record Error SYSTEM ERROR The card is not formatted. Memory is no image to The setup you no longer need (page 25). Image...
... image), this message indicates that there is not enough memory capacity to record a file while there are trying to save is locked. Folder cannot be performed for an image that cannot register. Shoot the image again. B 166 Appendix This message appears and the camera turns off . • The printer generated an error, etc. Memory Full Printing Error Record Error SYSTEM ERROR The card is not formatted. Memory is no image to The setup you no longer need (page 25). Image...


