
Owners Manual
Page 3
... QUICK START GUIDE First, charge the battery 18 To configure display language and clock settings ..... 19 To record an image 20 To view a recorded image 21 To delete an image 21 22 GETTING READY About This Manual 22 General Guide 23 Camera 23 USB Cradle 25 Monitor Screen Contents 26 REC Mode 26 PLAY Mode 28 Changing the Contents of the Monitor Screen 30 Attaching the Strap 31 Power Requirements 32 Loading the Rechargeable Battery 32 To charge...
... QUICK START GUIDE First, charge the battery 18 To configure display language and clock settings ..... 19 To record an image 20 To view a recorded image 21 To delete an image 21 22 GETTING READY About This Manual 22 General Guide 23 Camera 23 USB Cradle 25 Monitor Screen Contents 26 REC Mode 26 PLAY Mode 28 Changing the Contents of the Monitor Screen 30 Attaching the Strap 31 Power Requirements 32 Loading the Rechargeable Battery 32 To charge...
Owners Manual
Page 4
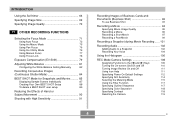
... Image Size 69 Specifying Image Quality 70 71 OTHER RECORDING FUNCTIONS Selecting the Focus Mode 71 Using Auto Focus 72 Using the Macro Mode 75 Using Pan Focus 76 Using the Infinity Mode 76 Using Manual Focus 77 Using Focus Lock 78 Exposure Compensation (EV Shift 79 Adjusting White Balance 81 Configuring the White Balance Setting Manually 82 Recording Consecutive Images (Continuous Shutter Mode 84 BEST SHOT Mode for Snapshots and Movies ......... 85 Displaying Sample Scenes Individually 87 Creating Your Own BEST SHOT Setup 88 To delete a BEST SHOT user setup...
... Image Size 69 Specifying Image Quality 70 71 OTHER RECORDING FUNCTIONS Selecting the Focus Mode 71 Using Auto Focus 72 Using the Macro Mode 75 Using Pan Focus 76 Using the Infinity Mode 76 Using Manual Focus 77 Using Focus Lock 78 Exposure Compensation (EV Shift 79 Adjusting White Balance 81 Configuring the White Balance Setting Manually 82 Recording Consecutive Images (Continuous Shutter Mode 84 BEST SHOT Mode for Snapshots and Movies ......... 85 Displaying Sample Scenes Individually 87 Creating Your Own BEST SHOT Setup 88 To delete a BEST SHOT user setup...

Owners Manual
Page 6
... World Time settings 158 Changing the Display Language 159 Changing the USB Port Protocol 160 Configuring [ ] (REC) and [ ] (PLAY) Power On/Off Functions 161 Formatting Built-in Memory 162 163 USING A MEMORY CARD Using a Memory Card 164 To insert a memory card into the camera 164 To replace the memory card 165 Formatting a Memory Card 166 Copying Files 167 To copy all the files in built-in memory to a memory card 168 To copy a specific file from a memory card to built-in memory 168 170 PRINTING IMAGES DPOF 171 To configure print settings for a single image...
... World Time settings 158 Changing the Display Language 159 Changing the USB Port Protocol 160 Configuring [ ] (REC) and [ ] (PLAY) Power On/Off Functions 161 Formatting Built-in Memory 162 163 USING A MEMORY CARD Using a Memory Card 164 To insert a memory card into the camera 164 To replace the memory card 165 Formatting a Memory Card 166 Copying Files 167 To copy all the files in built-in memory to a memory card 168 To copy a specific file from a memory card to built-in memory 168 170 PRINTING IMAGES DPOF 171 To configure print settings for a single image...

Owners Manual
Page 7
... Playing a Movie 207 Editing a Movie 210 Viewing User Documentation (PDF Files) 212 User Registration 212 Exiting the Menu Application 212 Using the Camera with a Macintosh Computer ....... 213 About the bundled CD-ROM 213 Computer System Requirements 214 Managing Images on a Macintosh 215 Viewing User Documentation (PDF Files) 216 To register as a camera user 216 217 APPENDIX Menu Reference 217 Indicator Lamp Reference 220 Troubleshooting Guide 223 If you have problems installing the USB driver... 227 Display Messages 228 Specifications...
... Playing a Movie 207 Editing a Movie 210 Viewing User Documentation (PDF Files) 212 User Registration 212 Exiting the Menu Application 212 Using the Camera with a Macintosh Computer ....... 213 About the bundled CD-ROM 213 Computer System Requirements 214 Managing Images on a Macintosh 215 Viewing User Documentation (PDF Files) 216 To register as a camera user 216 217 APPENDIX Menu Reference 217 Indicator Lamp Reference 220 Troubleshooting Guide 223 If you have problems installing the USB driver... 227 Display Messages 228 Specifications...

Owners Manual
Page 8
.... • Other company, product and service names used herein may arise through the use of malfunction, repairs, or battery replacement. Be sure to back up all copyrights and other related rights to these applications revert to change without notice. • CASIO COMPUTER CO., LTD. Except as a result of Photo Loader and/or Photohands. • CASIO COMPUTER CO., LTD. shall not...
.... • Other company, product and service names used herein may arise through the use of malfunction, repairs, or battery replacement. Be sure to back up all copyrights and other related rights to these applications revert to change without notice. • CASIO COMPUTER CO., LTD. Except as a result of Photo Loader and/or Photohands. • CASIO COMPUTER CO., LTD. shall not...

Owners Manual
Page 15
... error message to eliminate the cause of data in temperatures ranging from the USB cradle while a data communication operation is still flashing green after you turn off the camera - In areas subject to strong vibration 15 Any of the following areas. - Removing the battery or memory card, or setting the camera onto the USB cradle while the camera is performing a record or memory access operation - Low battery power - Follow the instructions provided by the message...
... error message to eliminate the cause of data in temperatures ranging from the USB cradle while a data communication operation is still flashing green after you turn off the camera - In areas subject to strong vibration 15 Any of the following areas. - Removing the battery or memory card, or setting the camera onto the USB cradle while the camera is performing a record or memory access operation - Low battery power - Follow the instructions provided by the message...
Owners Manual
Page 44
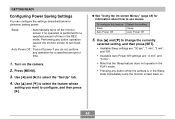
... feature does not operate in the PLAY mode. • Pressing any button while the camera is performed for a specified amount of time in the Sleep state immediately turns the monitor screen back on. 44 Turn on the camera. 2. Use [̆] and [̄] to configure, and then press [̈]. Press [MENU]. 3. To configure this feature: Sleep Auto Power Off Select this setting: Sleep Auto Power Off 5. Performing any...
... feature does not operate in the PLAY mode. • Pressing any button while the camera is performed for a specified amount of time in the Sleep state immediately turns the monitor screen back on. 44 Turn on the camera. 2. Use [̆] and [̄] to configure, and then press [̈]. Press [MENU]. 3. To configure this feature: Sleep Auto Power Off Select this setting: Sleep Auto Power Off 5. Performing any...
Owners Manual
Page 112
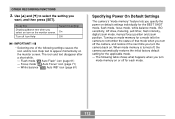
... you select an icon on default settings individually for each mode. 112 OTHER RECORDING FUNCTIONS 3. Turning on . To do this setting: On Off IMPORTANT! • Selecting one of that mode when you turn the camera back on mode memory for the applicable mode. - Use [̆] and [̄] to appear momentarily on or off for the BEST SHOT mode, flash mode, focus mode, white balance mode, ISO sensitivity, AF Area, metering, self-timer, flash intensity, digital zoom mode, manual focus position and zoom position. Focus mode " Auto Focus" icon (page 71...
... you select an icon on default settings individually for each mode. 112 OTHER RECORDING FUNCTIONS 3. Turning on . To do this setting: On Off IMPORTANT! • Selecting one of that mode when you turn the camera back on mode memory for the applicable mode. - Use [̆] and [̄] to appear momentarily on or off for the BEST SHOT mode, flash mode, focus mode, white balance mode, ISO sensitivity, AF Area, metering, self-timer, flash intensity, digital zoom mode, manual focus position and zoom position. Focus mode " Auto Focus" icon (page 71...
Owners Manual
Page 126
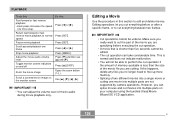
... this happens, delete any files you can splice movies and cut operation can adjust the volume level of two different movies into a single movie or cutting one more step. Press [SET]. Use IMPORTANT! • You can take considerable time. However, you no longer need to normal speed Pause movie playback Scroll paused playback one frame Stop movie playback Adjust the movie audio volume level Toggle monitor screen indicators on and off Zoom the movie image Scroll a zoomed movie image on your...
... this happens, delete any files you can splice movies and cut operation can adjust the volume level of two different movies into a single movie or cutting one more step. Press [SET]. Use IMPORTANT! • You can take considerable time. However, you no longer need to normal speed Pause movie playback Scroll paused playback one frame Stop movie playback Adjust the movie audio volume level Toggle monitor screen indicators on and off Zoom the movie image Scroll a zoomed movie image on your...
Owners Manual
Page 141
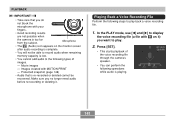
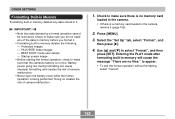
... longer need audio before re-recording or deleting it ) you want to play back a voice recording file. 1. Press [SET]. • This starts playback of images. - In the PLAY mode, use [̇] and [̈] to display the voice recording file (a file with MOTION PRINT - Images created with on the monitor screen after audio recording is complete. • You will not be recovered. Playing Back a Voice Recording File Perform the following operations while audio is playing. 141 PLAYBACK IMPORTANT! • Take...
... longer need audio before re-recording or deleting it ) you want to play back a voice recording file. 1. Press [SET]. • This starts playback of images. - In the PLAY mode, use [̇] and [̈] to display the voice recording file (a file with MOTION PRINT - Images created with on the monitor screen after audio recording is complete. • You will not be recovered. Playing Back a Voice Recording File Perform the following operations while audio is playing. 141 PLAYBACK IMPORTANT! • Take...
Owners Manual
Page 143
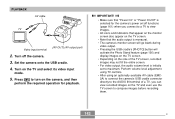
... required operation for the camera's power on/off the camera. 3. PLAYBACK AV cable TV Video input terminal [AV OUT] (AV output port) 2. Press [ ] to turn on the TV and select its video input mode. 5. Set the camera onto the USB cradle. 4. Perform volume level adjustment using TV controls. • After using an optionally available AV cable (EMC2A) to connect the camera's USB cradle connector directly to the AUDIO IN terminal of the TV screen, recorded images...
... required operation for the camera's power on/off the camera. 3. PLAYBACK AV cable TV Video input terminal [AV OUT] (AV output port) 2. Press [ ] to turn on the TV and select its video input mode. 5. Set the camera onto the USB cradle. 4. Perform volume level adjustment using TV controls. • After using an optionally available AV cable (EMC2A) to connect the camera's USB cradle connector directly to the AUDIO IN terminal of the TV screen, recorded images...
Owners Manual
Page 145
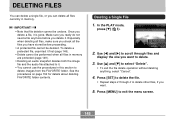
.... • A protected file cannot be undone. Press [MENU] to select "Delete". • To exit the file delete operation without deleting anything, select "Cancel". 4. Especially when deleting all files, make sure you check all files in memory are protected (page 149). • Deleting an audio snapshot deletes both the image file and the audio file attached to delete the file. • Repeat steps 2 through files and display the one you delete a file, it . In the PLAY mode, press...
.... • A protected file cannot be undone. Press [MENU] to select "Delete". • To exit the file delete operation without deleting anything, select "Cancel". 4. Especially when deleting all files, make sure you check all files in memory are protected (page 149). • Deleting an audio snapshot deletes both the image file and the audio file attached to delete the file. • Repeat steps 2 through files and display the one you delete a file, it . In the PLAY mode, press...
Owners Manual
Page 162
... memory deletes the following. - Press [MENU]. 3. Startup screen image • Before starting the format operation, check to make sure that data deleted by a format operation cannot be recovered. Use [̆] and [̄] to appear. • To exit the format operation without formatting, select "Cancel". 162 Entering the PLAY mode after formatting built-in memory will cause the message "There are no memory card loaded in the camera, remove it . Protected images - Check to make sure there is no files." BEST SHOT mode user setups...
... memory deletes the following. - Press [MENU]. 3. Startup screen image • Before starting the format operation, check to make sure that data deleted by a format operation cannot be recovered. Use [̆] and [̄] to appear. • To exit the format operation without formatting, select "Cancel". 162 Entering the PLAY mode after formatting built-in memory will cause the message "There are no memory card loaded in the camera, remove it . Protected images - Check to make sure there is no files." BEST SHOT mode user setups...

Owners Manual
Page 181
... to transfer files from the camera's built-in memory to a computer, make sure that supports only USB 1.1 protocol, higher speed data transfer becomes possible when USB 2.0 Hi-Speed is not required in the case of Windows 98SE and 98. Do not connect the camera to recognize the camera. • USB driver installation is no memory card loaded in the case of Windows XP, 2000, and Me. 181 Note that certain computer models, connecting through a USB...
... to transfer files from the camera's built-in memory to a computer, make sure that supports only USB 1.1 protocol, higher speed data transfer becomes possible when USB 2.0 Hi-Speed is not required in the case of Windows 98SE and 98. Do not connect the camera to recognize the camera. • USB driver installation is no memory card loaded in the case of Windows XP, 2000, and Me. 181 Note that certain computer models, connecting through a USB...

Owners Manual
Page 182
... the menu screen that the example installation presented here uses Windows 98. Click [USB driver B] and then [Install]. • This starts installation. • Follow the instructions that appear on whether your computer. • Use the CD-ROM whose contents label shows "USB driver". 3. Windows XP/2000/Me Users • Installation of the USB driver is running under the English version of your computer is not required, so jump directly to step 6. 2. VIEWING IMAGES...
... the menu screen that the example installation presented here uses Windows 98. Click [USB driver B] and then [Install]. • This starts installation. • Follow the instructions that appear on whether your computer. • Use the CD-ROM whose contents label shows "USB driver". 3. Windows XP/2000/Me Users • Installation of the USB driver is running under the English version of your computer is not required, so jump directly to step 6. 2. VIEWING IMAGES...

Owners Manual
Page 198
... overview of images transferred to a computer Photo Loader 2.3 * DirectX 9.0c CD-ROM Software Supported Windows Versions XP/2000/Me 98SE/98 XP/2000/Me/98SE/98 Required Operation Use the USB cradle to establish a connection between the camera and computer. Installation of the USB driver is optional, and you should install only the ones you need on whether you can do with them. Use the USB cradle to...
... overview of images transferred to a computer Photo Loader 2.3 * DirectX 9.0c CD-ROM Software Supported Windows Versions XP/2000/Me 98SE/98 XP/2000/Me/98SE/98 Required Operation Use the USB cradle to establish a connection between the camera and computer. Installation of the USB driver is optional, and you should install only the ones you need on whether you can do with them. Use the USB cradle to...
Owners Manual
Page 218
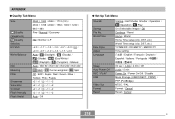
World Time Date Style Adjust Language Sleep Auto Power Off REC / PLAY USB Video Out Format Reset Startup / Half Shutter /Shutter / Operation / Operation / Play On (Selectable image) / Off Continue / Reset Home / World Home Time setup (city, DST, etc.) World Time setup (city, DST, etc.) YY/MM/DD / DD/MM/YY / MM/DD/YY Time setting / English / Français / Deutsch / Español / Italiano / Português / / / 30 sec / 1 min / 2 min / Off 2 min / 5 min Power On / Power On/Off / Disable Mass...
World Time Date Style Adjust Language Sleep Auto Power Off REC / PLAY USB Video Out Format Reset Startup / Half Shutter /Shutter / Operation / Operation / Play On (Selectable image) / Off Continue / Reset Home / World Home Time setup (city, DST, etc.) World Time setup (city, DST, etc.) YY/MM/DD / DD/MM/YY / MM/DD/YY Time setting / English / Français / Deutsch / Español / Italiano / Português / / / 30 sec / 1 min / 2 min / Off 2 min / 5 min Power On / Power On/Off / Disable Mass...
Owners Manual
Page 222
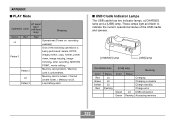
...Power on, recording Lit enabled) One of the USB cradle and camera. [CHARGE] lamp [USB] lamp [CHARGE] lamp Color Red Green Amber Red Status Lit Lit Lit Flashing [USB] lamp Meaning Color Status Charging Charging complete Charge standby Charge error Green Lit USB connection Green Flashing Accessing memory 222 Memory card is locked. / Cannot Lit create folder. / Memory is unformatted. These lamps light and flash to indicate the current operational status of the following operations is being performed: delete, DPOF, Pattern 3 image protect, copy, format, power down, image...
...Power on, recording Lit enabled) One of the USB cradle and camera. [CHARGE] lamp [USB] lamp [CHARGE] lamp Color Red Green Amber Red Status Lit Lit Lit Flashing [USB] lamp Meaning Color Status Charging Charging complete Charge standby Charge error Green Lit USB connection Green Flashing Accessing memory 222 Memory card is locked. / Cannot Lit create folder. / Memory is unformatted. These lamps light and flash to indicate the current operational status of the following operations is being performed: delete, DPOF, Pattern 3 image protect, copy, format, power down, image...

Owners Manual
Page 226
... electrostatic charge, impact, etc. Images are disabled. A memory card with non-DCF images recorded with another digital camera. Cannot transfer files over a USB connection. 1) Camera is not set securely on the USB cradle. 2) USB cable is not connected securely. 3) USB driver is not installed. 4) Camera is turned off . Monitor screen is off . Other 226 Possible Cause Sunlight or light from another device. Remove the battery from the image on the USB cradle. while the camera was connected to another source is shining directly...
... electrostatic charge, impact, etc. Images are disabled. A memory card with non-DCF images recorded with another digital camera. Cannot transfer files over a USB connection. 1) Camera is not set securely on the USB cradle. 2) USB cable is not connected securely. 3) USB driver is not installed. 4) Camera is turned off . Monitor screen is off . Other 226 Possible Cause Sunlight or light from another device. Remove the battery from the image on the USB cradle. while the camera was connected to another source is shining directly...

Owners Manual
Page 227
... USB driver properly if you use the USB cable to connect the camera to recognize the digital camera when it is connected. If this happens, you will make it impossible for the computer to a computer running Windows 98SE/98 before installing the USB driver from the bundled CD-ROM, or if you have another type of driver installed. This will need to re-install the USB driver, see the USB driver's "Read me" file...
... USB driver properly if you use the USB cable to connect the camera to recognize the digital camera when it is connected. If this happens, you will make it impossible for the computer to a computer running Windows 98SE/98 before installing the USB driver from the bundled CD-ROM, or if you have another type of driver installed. This will need to re-install the USB driver, see the USB driver's "Read me" file...


