
Owners Manual
Page 7
... . (Eye-Fi) . 136 Files and Folders 138 Memory Card Data 139 ❚❙ Other Settings (Set Up) 141 Changing the Menu Screen Color Menu Color) . 141 Turning off Eye-Fi Card Communication Eye-Fi) . 141 Configuring Camera Sound Settings Sounds) . 142 Configuring a Startup Image Startup) . 142 Specifying the File Name Serial Number Generation Rule . . . . . (File No.) . 143 Configuring World Time Settings World Time) . 143 Time Stamping Snapshots Timestamp) . 144 Setting the Camera's Clock Adjust) . 145 Specifying the Date Style Date Style) . 145 Specifying the Display Language...
... . (Eye-Fi) . 136 Files and Folders 138 Memory Card Data 139 ❚❙ Other Settings (Set Up) 141 Changing the Menu Screen Color Menu Color) . 141 Turning off Eye-Fi Card Communication Eye-Fi) . 141 Configuring Camera Sound Settings Sounds) . 142 Configuring a Startup Image Startup) . 142 Specifying the File Name Serial Number Generation Rule . . . . . (File No.) . 143 Configuring World Time Settings World Time) . 143 Time Stamping Snapshots Timestamp) . 144 Setting the Camera's Clock Adjust) . 145 Specifying the Date Style Date Style) . 145 Specifying the Display Language...

Owners Manual
Page 17
... features to protect against wasting battery power when you forget to configure time and date settings will cause its date and time settings to replace the battery, see page 160. 1 Checking Remaining Battery Power As battery power is dead will appear the next time you turn off the camera (pages 146, 147). 17 Quick Start Basics Remaining Power Battery Indicator Indicator Color High * * Cyan * Amber * Red Low * * Red indicates battery power is indicated. A message telling you switch between the REC mode and PLAY mode. • Leaving...
... features to protect against wasting battery power when you forget to configure time and date settings will cause its date and time settings to replace the battery, see page 160. 1 Checking Remaining Battery Power As battery power is dead will appear the next time you turn off the camera (pages 146, 147). 17 Quick Start Basics Remaining Power Battery Indicator Indicator Color High * * Cyan * Amber * Red Low * * Red indicates battery power is indicated. A message telling you switch between the REC mode and PLAY mode. • Leaving...

Owners Manual
Page 18
... configuring the display language, date, and time settings. Use [8] and [2] to turn on the camera. [ON/OFF] (Power) 2. To switch between 12-hour and 24-hour format, press [BS]. 18 Quick Start Basics Use [8], [2], [4], and [6] to select the language you want to be included with images. Set the date and the time. IMPORTANT! • A screen for language selection will cause the wrong date and time data to change and then use the procedure under "Specifying the Display Language (Language)" (page...
... configuring the display language, date, and time settings. Use [8] and [2] to turn on the camera. [ON/OFF] (Power) 2. To switch between 12-hour and 24-hour format, press [BS]. 18 Quick Start Basics Use [8], [2], [4], and [6] to select the language you want to be included with images. Set the date and the time. IMPORTANT! • A screen for language selection will cause the wrong date and time data to change and then use the procedure under "Specifying the Display Language (Language)" (page...
Owners Manual
Page 29
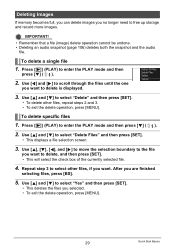
... exit the delete operation, press [MENU]. 29 Quick Start Basics After you want. Repeat step 3 to delete is displayed. 3. Use [8] and [2] to enter the PLAY mode and then press [2] ( ). 2. Use [8] and [2] to free up storage and record more images. Deleting Images If memory becomes full, you can delete images you no longer need to select "Delete Files" and then press [SET]. • This displays a file selection screen. 3. IMPORTANT! • Remember that a file (image) delete operation cannot be undone. • Deleting an audio...
... exit the delete operation, press [MENU]. 29 Quick Start Basics After you want. Repeat step 3 to delete is displayed. 3. Use [8] and [2] to enter the PLAY mode and then press [2] ( ). 2. Use [8] and [2] to free up storage and record more images. Deleting Images If memory becomes full, you can delete images you no longer need to select "Delete Files" and then press [SET]. • This displays a file selection screen. 3. IMPORTANT! • Remember that a file (image) delete operation cannot be undone. • Deleting an audio...
Owners Manual
Page 54
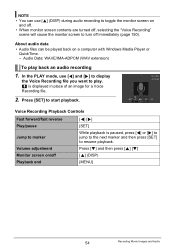
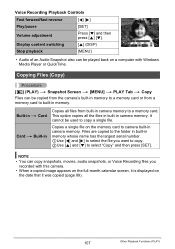
...) [MENU] 54 Recording Movie Images and Audio NOTE • You can be played back on a computer with Windows Media Player or QuickTime. - Voice Recording Playback Controls Fast forward/fast reverse Play/pause Jump to marker Volume adjustment Monitor screen on and off. • When monitor screen contents are turned off, selecting the "Voice Recording" scene will cause the monitor screen to resume playback. Press [SET] to play back an audio recording...
...) [MENU] 54 Recording Movie Images and Audio NOTE • You can be played back on a computer with Windows Media Player or QuickTime. - Voice Recording Playback Controls Fast forward/fast reverse Play/pause Jump to marker Volume adjustment Monitor screen on and off. • When monitor screen contents are turned off, selecting the "Voice Recording" scene will cause the monitor screen to resume playback. Press [SET] to play back an audio recording...

Owners Manual
Page 58
... to delete a user BEST SHOT scene. 1 Display the information screen (page 56) of the user BEST SHOT scene you need them. 1. Your BEST SHOT scene will be used for each user movie BEST SHOT scene. Face Detection, Focus, EV Shift, White Balance, Flash, ISO, Metering, Lighting, Make-up to select "Save", and then press [SET]. Use [8] and [2] to 999 camera setups as a user BEST SHOT setup. Focus, EV Shift, White Balance, Color Filter, Sharpness, Saturation, Contrast • User BEST SHOT scenes are saved for movies only...
... to delete a user BEST SHOT scene. 1 Display the information screen (page 56) of the user BEST SHOT scene you need them. 1. Your BEST SHOT scene will be used for each user movie BEST SHOT scene. Face Detection, Focus, EV Shift, White Balance, Flash, ISO, Metering, Lighting, Make-up to select "Save", and then press [SET]. Use [8] and [2] to 999 camera setups as a user BEST SHOT setup. Focus, EV Shift, White Balance, Color Filter, Sharpness, Saturation, Contrast • User BEST SHOT scenes are saved for movies only...
Owners Manual
Page 67
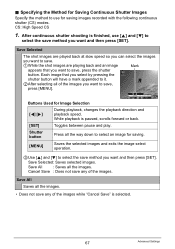
... for saving images recorded with the following continuous shutter (CS) modes. Shutter button Press all of the images. Save All Saves all the images. Buttons Used for saving. [MENU] Saves the selected images and exits the image select operation. 3Use [8] and [2] to save method you select by pressing the shutter button will have a mark appended to it. 2After selecting all the way down to select an image for Image Selection [4] [6] During playback, changes the playback direction and playback speed. Each image that...
... for saving images recorded with the following continuous shutter (CS) modes. Shutter button Press all of the images. Save All Saves all the images. Buttons Used for saving. [MENU] Saves the selected images and exits the image select operation. 3Use [8] and [2] to save method you select by pressing the shutter button will have a mark appended to it. 2After selecting all the way down to select an image for Image Selection [4] [6] During playback, changes the playback direction and playback speed. Each image that...

Owners Manual
Page 74
... displayed on the REC mode monitor screen for Auto Focus. This will continue to be out of focus when Quick Shutter is used. NOTE • Quick Shutter is disabled when the zoom factor is recorded. Shooting with Quick Shutter (Quick Shutter) Procedure [r] (REC) * [MENU] * REC Tab * Quick Shutter When Quick Shutter is turned on, you press fully the shutter button while Quick Shutter is turned off Quick Shutter so focus is performed using normal Auto Focus before the image is greater. Turns off , images will record the image using Auto Focus at this time. On Turns on Quick Shutter...
... displayed on the REC mode monitor screen for Auto Focus. This will continue to be out of focus when Quick Shutter is used. NOTE • Quick Shutter is disabled when the zoom factor is recorded. Shooting with Quick Shutter (Quick Shutter) Procedure [r] (REC) * [MENU] * REC Tab * Quick Shutter When Quick Shutter is turned on, you press fully the shutter button while Quick Shutter is turned off Quick Shutter so focus is performed using normal Auto Focus before the image is greater. Turns off , images will record the image using Auto Focus at this time. On Turns on Quick Shutter...
Owners Manual
Page 75
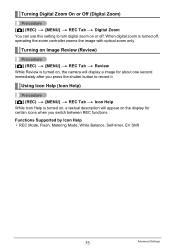
Using Icon Help (Icon Help) Procedure [r] (REC) * [MENU] * REC Tab * Icon Help While Icon Help is turned off . Functions Supported by Icon Help • REC Mode, Flash, Metering Mode, White Balance, Self-timer, EV Shift 75 Advanced Settings When digital zoom is turned on, a textual description will display a image for about one second immediately after you press the shutter button to turn digital zoom on the display for certain icons when you switch between REC functions. Turning on Image Review (Review) Procedure [r] (REC) * [MENU] * REC Tab * Review While Review is turned on, the ...
Using Icon Help (Icon Help) Procedure [r] (REC) * [MENU] * REC Tab * Icon Help While Icon Help is turned off . Functions Supported by Icon Help • REC Mode, Flash, Metering Mode, White Balance, Self-timer, EV Shift 75 Advanced Settings When digital zoom is turned on, a textual description will display a image for about one second immediately after you press the shutter button to turn digital zoom on the display for certain icons when you switch between REC functions. Turning on Image Review (Review) Procedure [r] (REC) * [MENU] * REC Tab * Review While Review is turned on, the ...

Owners Manual
Page 93
... Playback Functions (PLAY) Before and after playback of [SET] stops the slideshow and returns to the menu screen. • Adjust audio volume by pressing [2] and then press [8] or [2] during playback. • All button operations are played back in the case of Files: 9 File names: SSBGM001.WAV to another . • The time required for the "Images" setting - When playing a slideshow for which effect pattern you select, the BGM files you want. Saving...
... Playback Functions (PLAY) Before and after playback of [SET] stops the slideshow and returns to the menu screen. • Adjust audio volume by pressing [2] and then press [8] or [2] during playback. • All button operations are played back in the case of Files: 9 File names: SSBGM001.WAV to another . • The time required for the "Images" setting - When playing a slideshow for which effect pattern you select, the BGM files you want. Saving...

Owners Manual
Page 104
... Time Stamp (page 144) cannot be displayed on the camera's monitor screen. • An image that has been protected or zoomed cannot be rotated. • The original (unrotated) version of the image will rotate the displayed image 90 degrees left. 2. Editing the Date and Time of an Image (Date/Time) Procedure [p] (PLAY) * Snapshot Screen * [MENU] * PLAY Tab * Date/Time [8] [2] Changes the setting at the orientation you want , press [MENU]. Rotating an Image (Rotation) Procedure [p] (PLAY) * Snapshot or Movie Screen * [MENU] * PLAY...
... Time Stamp (page 144) cannot be displayed on the camera's monitor screen. • An image that has been protected or zoomed cannot be rotated. • The original (unrotated) version of the image will rotate the displayed image 90 degrees left. 2. Editing the Date and Time of an Image (Date/Time) Procedure [p] (PLAY) * Snapshot Screen * [MENU] * PLAY Tab * Date/Time [8] [2] Changes the setting at the orientation you want , press [MENU]. Rotating an Image (Rotation) Procedure [p] (PLAY) * Snapshot or Movie Screen * [MENU] * PLAY...
Owners Manual
Page 107
... serial number. 1Use [4] and [6] to select the file you recorded with Windows Media Player or QuickTime. Copies a single file on the date that it was copied (page 89). 107 Other Playback Functions (PLAY) This option copies all files from a memory card to select "Copy" and then press [SET]. Files are copied to the folder in built-in camera memory to a memory card. NOTE • You can be played back on a computer with this camera. • When a copied image...
... serial number. 1Use [4] and [6] to select the file you recorded with Windows Media Player or QuickTime. Copies a single file on the date that it was copied (page 89). 107 Other Playback Functions (PLAY) This option copies all files from a memory card to select "Copy" and then press [SET]. Files are copied to the folder in built-in camera memory to a memory card. NOTE • You can be played back on a computer with this camera. • When a copied image...
Owners Manual
Page 147
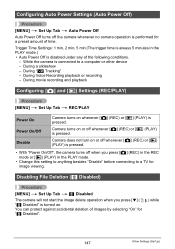
... turned on. While the camera is pressed. Camera turns on whenever [r] (REC) or [p] (PLAY) is connected to a TV for "Ü Disabled". ) while 147 Other Settings (Set Up) Disabling File Deletion (Ü Disabled) Procedure [MENU] * Set Up Tab * Ü Disabled The camera will not start the image delete operation when you press [r] (REC) in the REC mode or [p] (PLAY) in the PLAY mode.) • Auto Power Off is always 5 minutes in the PLAY mode. • Change this setting to anything besides "Disable" before connecting...
... turned on. While the camera is pressed. Camera turns on whenever [r] (REC) or [p] (PLAY) is connected to a TV for "Ü Disabled". ) while 147 Other Settings (Set Up) Disabling File Deletion (Ü Disabled) Procedure [MENU] * Set Up Tab * Ü Disabled The camera will not start the image delete operation when you press [r] (REC) in the REC mode or [p] (PLAY) in the PLAY mode.) • Auto Power Off is always 5 minutes in the PLAY mode. • Change this setting to anything besides "Disable" before connecting...

Owners Manual
Page 149
... the camera's factory default settings. Protected images - Formatting may stop operating normally. Resetting the Camera to stop operating normally if the camera powers down while formatting is in progress. • Never open the battery cover while formatting is in progress. It will format built-in memory if no memory card is loaded. • The format operation will delete the following data. - World Time settings, clock settings, date style, screen language, video output 149 Other Settings (Set Up) Make sure you format it. • Formatting built-in memory will...
... the camera's factory default settings. Protected images - Formatting may stop operating normally. Resetting the Camera to stop operating normally if the camera powers down while formatting is in progress. • Never open the battery cover while formatting is in progress. It will format built-in memory if no memory card is loaded. • The format operation will delete the following data. - World Time settings, clock settings, date style, screen language, video output 149 Other Settings (Set Up) Make sure you format it. • Formatting built-in memory will...
Owners Manual
Page 167
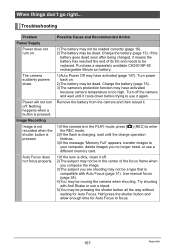
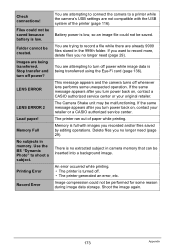
... again. Half-press the shutter button and allow enough time for Auto Focus. Troubleshooting Problem Power Supply Power does not turn off the camera and wait until the charge operation finishes. 3)If the message "Memory Full" appears, transfer images to be replaced. Turn off . Nothing happens when a button is pressed. Charge the battery (page 15). The camera suddenly powers down before trying to focus. 167 Appendix Charge the battery (page 15). 3)The camera's protection function may be moving the camera when shooting.
... again. Half-press the shutter button and allow enough time for Auto Focus. Troubleshooting Problem Power Supply Power does not turn off the camera and wait until the charge operation finishes. 3)If the message "Memory Full" appears, transfer images to be replaced. Turn off . Nothing happens when a button is pressed. Charge the battery (page 15). The camera suddenly powers down before trying to focus. 167 Appendix Charge the battery (page 15). 3)The camera's protection function may be moving the camera when shooting.

Owners Manual
Page 168
... does not indicate malfunction of the camera. The ? (Flash Off) icon flashes red on flash (page 36) or use the camera for non-flash shots. Use Auto Focus for scenery and portrait shots (page 38). 3)You may be using Manual Focus and have been increased automatically for scenery or portraits. Contact a CASIO authorized service center or your original retailer. Charge the battery (page 15). This is a vertical line in the monitor screen image. Use a light or...
... does not indicate malfunction of the camera. The ? (Flash Off) icon flashes red on flash (page 36) or use the camera for non-flash shots. Use Auto Focus for scenery and portrait shots (page 38). 3)You may be using Manual Focus and have been increased automatically for scenery or portraits. Contact a CASIO authorized service center or your original retailer. Charge the battery (page 15). This is a vertical line in the monitor screen image. Use a light or...
Owners Manual
Page 169
... Change the flash mode setting to < (Flash On) for the "Auto Shutter" power on the camera. Night shots come out bad. Sunlight reflected by selecting "On" for daylight synchro flash (page 36), or adjust EV shift to the + side (page 46). Turn on digital zoom (page 75). 2)Date stamping may be turned on the monitor screen. Do not remove the memory card before the save operation is bright, the faces of people in the image...
... Change the flash mode setting to < (Flash On) for the "Auto Shutter" power on the camera. Night shots come out bad. Sunlight reflected by selecting "On" for daylight synchro flash (page 36), or adjust EV shift to the + side (page 46). Turn on digital zoom (page 75). 2)Date stamping may be turned on the monitor screen. Do not remove the memory card before the save operation is bright, the faces of people in the image...

Owners Manual
Page 170
... the lens (page 156). Playback The color of snapshots. • Snapshots created using another camera 2)With keystone correction and color restoration, editing is not possible if the camera cannot find a shape to edit within the allowable range. Images are shooting. This camera cannot display non-DCF images recorded onto a memory card using MOTION PRINT • Movies • Snapshots recorded with Auto Shutter, the shutter does not trigger. Unprotect the file (page 103). 2)"Ü Disabled" setting...
... the lens (page 156). Playback The color of snapshots. • Snapshots created using another camera 2)With keystone correction and color restoration, editing is not possible if the camera cannot find a shape to edit within the allowable range. Images are shooting. This camera cannot display non-DCF images recorded onto a memory card using MOTION PRINT • Movies • Snapshots recorded with Auto Shutter, the shutter does not trigger. Unprotect the file (page 103). 2)"Ü Disabled" setting...

Owners Manual
Page 171
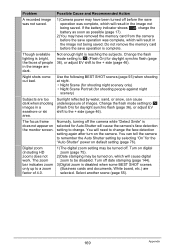
... the language selection screen does not re-appear when you turn the camera on , contact your retailer or a CASIO authorized service center. 171 Appendix The wrong display language is the case, perform the reset operation to the computer's USB port. Language selection screen appears when the camera is not turned on, turn it means that , configure each setting. The date and time setting is selected. Check all connections. 2)The wrong USB communication...
... the language selection screen does not re-appear when you turn the camera on , contact your retailer or a CASIO authorized service center. 171 Appendix The wrong display language is the case, perform the reset operation to the computer's USB port. Language selection screen appears when the camera is not turned on, turn it means that , configure each setting. The date and time setting is selected. Check all connections. 2)The wrong USB communication...
Owners Manual
Page 173
.... Folder cannot be malfunctioning. Images are not compatible with images you recorded and/or files saved by editing operations. Use the BS "Dynamic Photo" to record more, delete files you turn off whenever lens performs some reason during image data storage. You are trying to record a file while there are attempting to a printer while the camera's USB settings are being transferred using the Eye-Fi card (page 136). If the same message appears after you no longer need (page...
.... Folder cannot be malfunctioning. Images are not compatible with images you recorded and/or files saved by editing operations. Use the BS "Dynamic Photo" to record more, delete files you turn off whenever lens performs some reason during image data storage. You are trying to record a file while there are attempting to a printer while the camera's USB settings are being transferred using the Eye-Fi card (page 136). If the same message appears after you no longer need (page...


