Owners Manual
Page 4
... Audio to a Snapshot 108 Recording Your Voice 110 Using the Histogram 112 REC Mode Camera Settings 114 Assigning Functions to the [̇] and [̈] Keys 115 Turning the On-screen Grid On and Off 116 Turning Image Review On and Off 116 Using Icon Help 117 Specifying Power On Default Settings 118...
... Audio to a Snapshot 108 Recording Your Voice 110 Using the Histogram 112 REC Mode Camera Settings 114 Assigning Functions to the [̇] and [̈] Keys 115 Turning the On-screen Grid On and Off 116 Turning Image Review On and Off 116 Using Icon Help 117 Specifying Power On Default Settings 118...
Owners Manual
Page 114
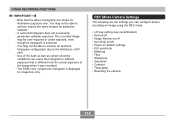
...configure before recording an image using the REC mode. • L/R key setting (key customization) • Grid on/off • Image Review on/off • Icon Help on/off • Power on default settings • ISO sensitivity • Metering • Filter •...; Sharpness • Saturation • Contrast • Timestamp • Resetting the camera 114 REC Mode Camera Settings The following are shown for particular subjects. • A centered histogram does not necessarily guarantee optimum exposure. The recorded image ...
...configure before recording an image using the REC mode. • L/R key setting (key customization) • Grid on/off • Image Review on/off • Icon Help on/off • Power on default settings • ISO sensitivity • Metering • Filter •...; Sharpness • Saturation • Contrast • Timestamp • Resetting the camera 114 REC Mode Camera Settings The following are shown for particular subjects. • A centered histogram does not necessarily guarantee optimum exposure. The recorded image ...
Owners Manual
Page 116
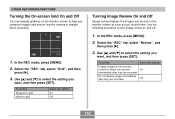
...774;] and [̄] to select the setting you record them. Use the following procedure to select the setting you compose images and ensure that the camera is straight when recording. 1. To do this: Display the grid Hide the grid Select this setting: On Off 116 Select the "REC" tab, ... second immediately after they are recorded Do not display images immediately after they are recorded Select this setting: On Off Turning Image Review On and Off Image review displays the images you record on the monitor screen as soon as you want , and then press [SET]. OTHER RECORDING FUNCTIONS...
...774;] and [̄] to select the setting you record them. Use the following procedure to select the setting you compose images and ensure that the camera is straight when recording. 1. To do this: Display the grid Hide the grid Select this setting: On Off 116 Select the "REC" tab, ... second immediately after they are recorded Do not display images immediately after they are recorded Select this setting: On Off Turning Image Review On and Off Image review displays the images you record on the monitor screen as soon as you want , and then press [SET]. OTHER RECORDING FUNCTIONS...
Owners Manual
Page 227
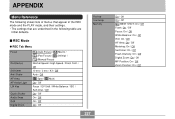
Review Icon Help Memory I REC Mode G REC Tab Menu Focus Continuous Self-timer Anti Shake AF Area AF Assist Light L/R Key Quick Shutter Audio Snap Grid Digital Zoom (Auto Focus) / (Pan Focus) / (Manual Focus) Macro / (Infinity) / Normal Speed / High Speed / Flash Cont. / Off 10 sec / 2 sec / X3 / Off Auto / Off ... ISO: On / Off AF Area: On / Off Metering: On / Off Self-timer: On / Off Flash Intensity: On / Off Digital Zoom: On / Off MF Position: On / Off Zoom Position: On / Off APPENDIX APPENDIX Menu Reference The following shows lists of menus that appear in the REC mode and the PLAY...
Review Icon Help Memory I REC Mode G REC Tab Menu Focus Continuous Self-timer Anti Shake AF Area AF Assist Light L/R Key Quick Shutter Audio Snap Grid Digital Zoom (Auto Focus) / (Pan Focus) / (Manual Focus) Macro / (Infinity) / Normal Speed / High Speed / Flash Cont. / Off 10 sec / 2 sec / X3 / Off Auto / Off ... ISO: On / Off AF Area: On / Off Metering: On / Off Self-timer: On / Off Flash Intensity: On / Off Digital Zoom: On / Off MF Position: On / Off Zoom Position: On / Off APPENDIX APPENDIX Menu Reference The following shows lists of menus that appear in the REC mode and the PLAY...
