
User Guide
Page 2
Unpacking As you unpack your original retailer. • A shoe cap is missing, contact your camera, check to country or geographic area. Digital camera • The shape of the power cord plug varies according to make sure that all items shown below are included. Power cord Rechargeable lithium ion battery (NP-100) Strap Charger unit (BC-100L) Lens cap Lens hood Remote shutter release USB cable AV cable CD-ROM Basic Reference 2 If anything is installed on the hot shoe at the factory.
Unpacking As you unpack your original retailer. • A shoe cap is missing, contact your camera, check to country or geographic area. Digital camera • The shape of the power cord plug varies according to make sure that all items shown below are included. Power cord Rechargeable lithium ion battery (NP-100) Strap Charger unit (BC-100L) Lens cap Lens hood Remote shutter release USB cable AV cable CD-ROM Basic Reference 2 If anything is installed on the hot shoe at the factory.

User Guide
Page 4
...10074;❙ Quick Start Basics 9 What is a digital camera 9 What you can do with your CASIO camera 10 Attaching the Lens Cap and Strap 11 First, charge the battery prior to use 11 ❚ To charge the battery 11 ❚ To load the battery 13 Configuring the Display Language the First Time You Turn... On the Camera. . 15 Preparing a Memory Card...
...10074;❙ Quick Start Basics 9 What is a digital camera 9 What you can do with your CASIO camera 10 Attaching the Lens Cap and Strap 11 First, charge the battery prior to use 11 ❚ To charge the battery 11 ❚ To load the battery 13 Configuring the Display Language the First Time You Turn... On the Camera. . 15 Preparing a Memory Card...
User Guide
Page 8
... Use the Histogram 148 ❚❙ Appendix 149 Precautions during Use 149 Power Supply 157 ❚ Charging 157 ❚ To replace the battery 158 ❚ Battery Precautions 158 ❚ Using the Camera in another Country 159 ❚ Using Household Power 159 Using a Memory Card 160 ❚ To replace the memory card 160 Computer...
... Use the Histogram 148 ❚❙ Appendix 149 Precautions during Use 149 Power Supply 157 ❚ Charging 157 ❚ To replace the battery 158 ❚ Battery Precautions 158 ❚ Using the Camera in another Country 159 ❚ Using Household Power 159 Using a Memory Card 160 ❚ To replace the memory card 160 Computer...
User Guide
Page 11
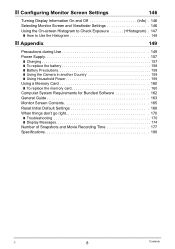
... shown in the illustration. • After you are finished pull on the sides of battery. Perform the steps under "To charge the battery" to bring the battery to a full charge. • Your camera requires a special CASIO rechargeable lithium ion battery (NP-100) for power. To charge the battery 1. Attaching the Lens Cap Lens cap . terminals of the...
... shown in the illustration. • After you are finished pull on the sides of battery. Perform the steps under "To charge the battery" to bring the battery to a full charge. • Your camera requires a special CASIO rechargeable lithium ion battery (NP-100) for power. To charge the battery 1. Attaching the Lens Cap Lens cap . terminals of the...
User Guide
Page 12
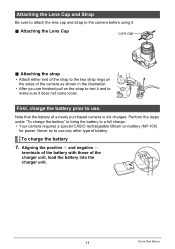
... temperature (page 157) Charging complete or standing by Other Charging Precautions • Charge the battery in the camera. Outside this temperature range charging can result in unexpected accident. • A battery that is still warm due to cool before you need to reach full charge. B 12...Basics 2. Attempting to use may cause interference with TV and radio reception. If this , it . • Charging the camera's battery may not charge fully. Give the battery time to normal use a different charger can take longer than normal or even fail. • Use the special charger (...
... temperature (page 157) Charging complete or standing by Other Charging Precautions • Charge the battery in the camera. Outside this temperature range charging can result in unexpected accident. • A battery that is still warm due to cool before you need to reach full charge. B 12...Basics 2. Attempting to use may cause interference with TV and radio reception. If this , it . • Charging the camera's battery may not charge fully. Give the battery time to normal use a different charger can take longer than normal or even fail. • Use the special charger (...
User Guide
Page 13
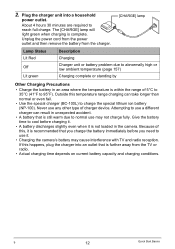
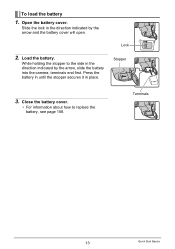
Press the battery in until the stopper secures it in the direction indicated by the arrow and the battery cover will open. Close the battery cover. • For information about how to the side in place. Lock 2 1 2. Open the battery cover. While holding the stopper to replace the battery, see page 158. To load the battery 1. Slide the lock in the direction indicated by the arrow, slide the battery into the camera, terminals end first. Stopper 3. Load the battery. Terminals 13 Quick Start Basics
Press the battery in until the stopper secures it in the direction indicated by the arrow and the battery cover will open. Close the battery cover. • For information about how to the side in place. Lock 2 1 2. Open the battery cover. While holding the stopper to replace the battery, see page 158. To load the battery 1. Slide the lock in the direction indicated by the arrow, slide the battery into the camera, terminals end first. Stopper 3. Load the battery. Terminals 13 Quick Start Basics
User Guide
Page 14
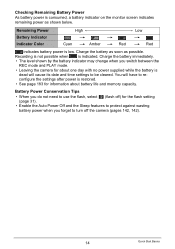
...when you switch between the REC mode and PLAY mode. • Leaving the camera for the flash setting (page 31). • Enable the Auto Power Off and the Sleep features to protect against wasting battery power when you do not need to use the flash, select ? (flash off...) for about battery life and memory capacity. Checking Remaining Battery Power As battery power is dead will have to reconfigure the settings after power is indicated. Battery Power Conservation Tips • When you forget to turn off the camera (pages 142, 142). 14 Quick Start Basics ...
...when you switch between the REC mode and PLAY mode. • Leaving the camera for the flash setting (page 31). • Enable the Auto Power Off and the Sleep features to protect against wasting battery power when you do not need to use the flash, select ? (flash off...) for about battery life and memory capacity. Checking Remaining Battery Power As battery power is dead will have to reconfigure the settings after power is indicated. Battery Power Conservation Tips • When you forget to turn off the camera (pages 142, 142). 14 Quick Start Basics ...

User Guide
Page 15
...you want and then press [SET]. [ON/OFF] (Power) =8? =4? =6? =2? [SET] 3. Use [8], [2], [4], and [6] to select the language you load a battery into the camera, a screen appears for configuring the display language, date, and time settings. Example: 19. 12. 09 YY/MM/DD * 09/12/19 DD/MM/YY * 19...[8] and [2] to change it. Set the date and the time. Use [4] and [6] to select the summer time (DST) setting you will be using the camera and then press [SET]. 5. Use [8] and [2] to select the setting you will cause the wrong date and time data to change the settings later (pages...
...you want and then press [SET]. [ON/OFF] (Power) =8? =4? =6? =2? [SET] 3. Use [8], [2], [4], and [6] to select the language you load a battery into the camera, a screen appears for configuring the display language, date, and time settings. Example: 19. 12. 09 YY/MM/DD * 09/12/19 DD/MM/YY * 19...[8] and [2] to change it. Set the date and the time. Use [4] and [6] to select the summer time (DST) setting you will be using the camera and then press [SET]. 5. Use [8] and [2] to select the setting you will cause the wrong date and time data to change the settings later (pages...
User Guide
Page 17
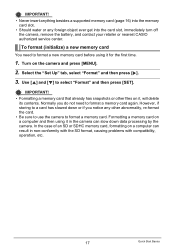
... "Format" and then press [6]. 3. Turn on the camera and press [MENU]. 2. However, if storing to a card has slowed down data processing by the camera. Formatting a memory card on a computer and then using... the case of an SD or SDHC memory card, formatting on a computer can result in the camera can slow down or if you do not need to format a memory card again. IMPORTANT! ...that already has snapshots or other abnormality, re-format the card. • Be sure to use the camera to select "Format" and then press [SET]. IMPORTANT! • Never insert anything besides a supported memory...
... "Format" and then press [6]. 3. Turn on the camera and press [MENU]. 2. However, if storing to a card has slowed down data processing by the camera. Formatting a memory card on a computer and then using... the case of an SD or SDHC memory card, formatting on a computer can result in the camera can slow down or if you do not need to format a memory card again. IMPORTANT! ...that already has snapshots or other abnormality, re-format the card. • Be sure to use the camera to select "Format" and then press [SET]. IMPORTANT! • Never insert anything besides a supported memory...

User Guide
Page 23
...subject with your hand. Subject that is too far away for the image quality setting (page 87). Subjects outside the focus range of the camera, etc. • If unwanted light is shining directly onto the lens, install the lens hood that appears on the monitor screen is flashing...Multiple subjects at the quality set for light from the camera - The actual image will be recorded at varying distances from the AF assist lamp to other very low contrast subject - Snapshot Shooting Precautions Operation • Never open the battery cover while the back lamp is for image composition. ...
...subject with your hand. Subject that is too far away for the image quality setting (page 87). Subjects outside the focus range of the camera, etc. • If unwanted light is shining directly onto the lens, install the lens hood that appears on the monitor screen is flashing...Multiple subjects at the quality set for light from the camera - The actual image will be recorded at varying distances from the AF assist lamp to other very low contrast subject - Snapshot Shooting Precautions Operation • Never open the battery cover while the back lamp is for image composition. ...

User Guide
Page 32
... (ISO Sensitivity: AUTO) Wide Angle: 0.5 m to 6.7 m (1.6' to 22.0') Telephoto: 1.1 m to 3.9 m (3.6' to camera movement. 3. Press the shutter button to shoot. • If the camera senses that flash is necessary, the flash unit will fire. • Note that image recording is disabled. • You will...to 12.8') * The above values depend on operating conditions (battery condition, ambient temperature, etc.) With a fully charged battery it takes anywhere from a few seconds to close automatically. Under such conditions, secure the camera with the flash unit when it by hand. NOTE •...
... (ISO Sensitivity: AUTO) Wide Angle: 0.5 m to 6.7 m (1.6' to 22.0') Telephoto: 1.1 m to 3.9 m (3.6' to camera movement. 3. Press the shutter button to shoot. • If the camera senses that flash is necessary, the flash unit will fire. • Note that image recording is disabled. • You will...to 12.8') * The above values depend on operating conditions (battery condition, ambient temperature, etc.) With a fully charged battery it takes anywhere from a few seconds to close automatically. Under such conditions, secure the camera with the flash unit when it by hand. NOTE •...
User Guide
Page 76
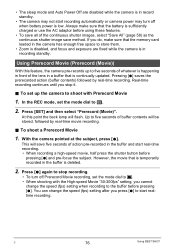
... is happening in front of the lens in a buffer that the memory card loaded in the camera has enough free space to start recording automatically or camera power may turn off when battery power is low. Always make sure that is continually updated. However, the movie that the... battery is sufficiently charged or use the AC adaptor before pressing [0]. If you do, make sure that is...
... is happening in front of the lens in a buffer that the memory card loaded in the camera has enough free space to start recording automatically or camera power may turn off when battery power is low. Always make sure that is continually updated. However, the movie that the... battery is sufficiently charged or use the AC adaptor before pressing [0]. If you do, make sure that is...

User Guide
Page 117
... aligned with the port. • Make sure that the 6 mark on the camera and press [MENU]. 2. To set up the camera before plugging into place. Make sure the camera's battery is sufficiently charged before plugging in or unplugging the cable. Large connector USB USB port USB cable ...USB/AV port Small connector Making sure that the camera is turned off before connecting. •...
... aligned with the port. • Make sure that the 6 mark on the camera and press [MENU]. 2. To set up the camera before plugging into place. Make sure the camera's battery is sufficiently charged before plugging in or unplugging the cable. Large connector USB USB port USB cable ...USB/AV port Small connector Making sure that the camera is turned off before connecting. •...

User Guide
Page 124
...environment is not supported. • Operation may not be able to see the metal part of the USB cable connector, connect the cable to the camera. • The camera does not draw power over the USB cable. On the "Set Up" tab, select "USB" and then press [6]. 3. Turn on the... as shown in order to insert the connector fully can connect the camera to your computer and save files 1. Turn off the camera and then use the USB cable that you insert the cable connector into place. Make sure the camera's battery is aligned with a Computer Use [8] and [2] to a USB port, make sure you...
...environment is not supported. • Operation may not be able to see the metal part of the USB cable connector, connect the cable to the camera. • The camera does not draw power over the USB cable. On the "Set Up" tab, select "USB" and then press [6]. 3. Turn on the... as shown in order to insert the connector fully can connect the camera to your computer and save files 1. Turn off the camera and then use the USB cable that you insert the cable connector into place. Make sure the camera's battery is aligned with a Computer Use [8] and [2] to a USB port, make sure you...

User Guide
Page 131
Make sure the camera's battery is sufficiently charged before connecting. • Make sure that even while the connector is aligned with a Computer Failure to the camera. • The camera does not draw power over the USB cable. Turn off the camera. Turn on the Mac OS version you feel it ... the USB cable to a USB port, make sure you want to Trash. 9. The appearance of the connector as a drive. Double-click the camera's drive icon. 7. USB port USB cable Large connector USB/AV port Small connector Making sure that comes with the port. 5. After making sure ...
Make sure the camera's battery is sufficiently charged before connecting. • Make sure that even while the connector is aligned with a Computer Failure to the camera. • The camera does not draw power over the USB cable. Turn off the camera. Turn on the Mac OS version you feel it ... the USB cable to a USB port, make sure you want to Trash. 9. The appearance of the connector as a drive. Double-click the camera's drive icon. 7. USB port USB cable Large connector USB/AV port Small connector Making sure that comes with the port. 5. After making sure ...

User Guide
Page 145
.... • Never open the battery cover while formatting is charged fully before you do not need any data currently on the memory card or in built-in memory will format the memory card. It cannot be performed correctly and the camera may stop operating normally. Protected ...images • Make sure that the battery is in the camera, this operation will delete the following data. - Doing so can cause the camera to Factory Defaults (Reset) Procedure [MENU] * Set Up ...
.... • Never open the battery cover while formatting is charged fully before you do not need any data currently on the memory card or in built-in memory will format the memory card. It cannot be performed correctly and the camera may stop operating normally. Protected ...images • Make sure that the battery is in the camera, this operation will delete the following data. - Doing so can cause the camera to Factory Defaults (Reset) Procedure [MENU] * Set Up ...

User Guide
Page 150
...; Never try to your dealer or nearest CASIO authorized service center. . . Contact your dealer or nearest CASIO authorized service center. 150 Appendix Keep Away From Fire • Never expose the camera to explode and creates the risk of fire and electric shock. Remove the battery from the camera. 3. Immediately perform the following steps whenever any...
...; Never try to your dealer or nearest CASIO authorized service center. . . Contact your dealer or nearest CASIO authorized service center. 150 Appendix Keep Away From Fire • Never expose the camera to explode and creates the risk of fire and electric shock. Remove the battery from the camera. 3. Immediately perform the following steps whenever any...
User Guide
Page 151
... the risk of service life. • The battery is intended for use or leave the battery near open flame. 151 Appendix Incorrectly replacing the battery can be sure to heat or fire. - Use with a CASIO Digital Camera only. Make sure the battery is oriented correctly when it is present - Areas... subject to the charger unit. - Backing Up Important Data • Always keep it , etc.), and never apply solder to charge the battery. Note that data can result...
... the risk of service life. • The battery is intended for use or leave the battery near open flame. 151 Appendix Incorrectly replacing the battery can be sure to heat or fire. - Use with a CASIO Digital Camera only. Make sure the battery is oriented correctly when it is present - Areas... subject to the charger unit. - Backing Up Important Data • Always keep it , etc.), and never apply solder to charge the battery. Note that data can result...

User Guide
Page 152
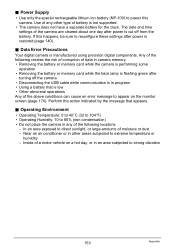
... area subject to low battery power. They do not guarantee that the camera is about to turn off due to high temperatures. Continued charging creates the risk of battery overheating, fire, and explosion. • Battery fluid can damage your local CASIO authorized service center. Actual battery life is to be able to battery leakage and data corruption...
... area subject to low battery power. They do not guarantee that the camera is about to turn off due to high temperatures. Continued charging creates the risk of battery overheating, fire, and explosion. • Battery fluid can damage your local CASIO authorized service center. Actual battery life is to be able to battery leakage and data corruption...
User Guide
Page 153
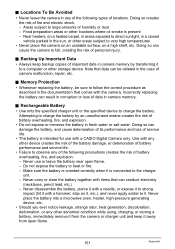
... extreme temperature or humidity - Near an air conditioner or in an area subjected to direct sunlight, or large amounts of battery is manufactured using precision digital components. Data Error Precautions Your digital camera is not supported. • The camera does not have a separate battery for the clock. In an area exposed to strong vibration 153 Appendix
... extreme temperature or humidity - Near an air conditioner or in an area subjected to direct sunlight, or large amounts of battery is manufactured using precision digital components. Data Error Precautions Your digital camera is not supported. • The camera does not have a separate battery for the clock. In an area exposed to strong vibration 153 Appendix


