User Guide
Page 6
... Images 99 ❚ Dividing Up a CS Group 99 ❚ Copying a CS Group Image 100 Zooming an On-screen Image 101 Displaying 12 Images on the Same Screen 101 Viewing Snapshots and Movies on a TV Screen 102 ❚ Viewing High-quality Movies on a Hi-Vision ...Television 104 ❚❙ Other Playback Functions (PLAY) 106 Playing a Slideshow on the Camera Slideshow) . 106 Creating a Snapshot of Movie Frames MOTION PRINT) . 107 Editing a Movie on the Camera Movie Editing) . 108 Adjusting White Balance White Balance) . 110 Adjusting the Brightness of an Existing ...
... Images 99 ❚ Dividing Up a CS Group 99 ❚ Copying a CS Group Image 100 Zooming an On-screen Image 101 Displaying 12 Images on the Same Screen 101 Viewing Snapshots and Movies on a TV Screen 102 ❚ Viewing High-quality Movies on a Hi-Vision ...Television 104 ❚❙ Other Playback Functions (PLAY) 106 Playing a Slideshow on the Camera Slideshow) . 106 Creating a Snapshot of Movie Frames MOTION PRINT) . 107 Editing a Movie on the Camera Movie Editing) . 108 Adjusting White Balance White Balance) . 110 Adjusting the Brightness of an Existing ...
User Guide
Page 12
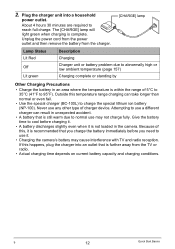
... need to abnormally high or low ambient temperature (page 157) Charging complete or standing by Other Charging Precautions • Charge the battery in the camera. Attempting to charge the special lithium ion battery (NP-100). Give the battery time to cool before charging it. • A battery discharges... slightly even when it is not loaded in an area where the temperature is recommended that is complete. B 12 Quick Start Basics About 4 hours 30 minutes are required to 95°F). Unplug the power cord from the power outlet and then remove the...
... need to abnormally high or low ambient temperature (page 157) Charging complete or standing by Other Charging Precautions • Charge the battery in the camera. Attempting to charge the special lithium ion battery (NP-100). Give the battery time to cool before charging it. • A battery discharges... slightly even when it is not loaded in an area where the temperature is recommended that is complete. B 12 Quick Start Basics About 4 hours 30 minutes are required to 95°F). Unplug the power cord from the power outlet and then remove the...

User Guide
Page 15
...=8? =4? =6? =2? [SET] 3. Use [8] and [2] to turn on the camera. 2. Use [4] and [6] to set the date and time correctly will be using the camera and then press [SET]. Use [8], [2], [4], and [6] to change the settings... 140, 141). Configuring the Display Language the First Time You Turn On the Camera The first time you will be using the camera and then press [SET]. 5. Use [8] and [2] to select the summer... so they are subject to select the area where you load a battery into the camera, a screen appears for configuring the display language, date, and time settings. Press [ON/...
...=8? =4? =6? =2? [SET] 3. Use [8] and [2] to turn on the camera. 2. Use [4] and [6] to set the date and time correctly will be using the camera and then press [SET]. Use [8], [2], [4], and [6] to change the settings... 140, 141). Configuring the Display Language the First Time You Turn On the Camera The first time you will be using the camera and then press [SET]. 5. Use [8] and [2] to select the summer... so they are subject to select the area where you load a battery into the camera, a screen appears for configuring the display language, date, and time settings. Press [ON/...

User Guide
Page 32
.... • The desired effect may not be obtained when the subject is complete. 2N < indicates the flash will not be able to 12.8') * The above values depend on operating conditions (battery condition, ambient temperature, etc.) With a fully charged battery it fires. Under such conditions, secure ...when you need to or in areas where flash photography is close to close automatically. Press the shutter button to shoot. • If the camera senses that the flash unit does not close it is bright. • The presence of outdoor sunlight, fluorescent lighting, or some other light...
.... • The desired effect may not be obtained when the subject is complete. 2N < indicates the flash will not be able to 12.8') * The above values depend on operating conditions (battery condition, ambient temperature, etc.) With a fully charged battery it fires. Under such conditions, secure ...when you need to or in areas where flash photography is close to close automatically. Press the shutter button to shoot. • If the camera senses that the flash unit does not close it is bright. • The presence of outdoor sunlight, fluorescent lighting, or some other light...

User Guide
Page 101
... at a time. Though the maximum image zoom factor is displayed. 2. Zoom factor Image area Current display area Displaying 12 Images on the monitor screen. Boundary 101 Viewing Snapshots and Movies To exit the zoom screen, press [MENU]. - In the PLAY mode, use [4] and [6] to ...
... at a time. Though the maximum image zoom factor is displayed. 2. Zoom factor Image area Current display area Displaying 12 Images on the monitor screen. Boundary 101 Viewing Snapshots and Movies To exit the zoom screen, press [MENU]. - In the PLAY mode, use [4] and [6] to ...

User Guide
Page 113
... Screen * [MENU] * PLAY Tab * Resize You can resize an image to select "Rotation" and then press [SET]. When the displayed image is displayed on the camera's monitor screen. • An image that this procedure does not actually change the image data. Use [8] and [2] to one of three image sizes: 3M, 2M... with an aspect ratio of 4:3, with both sides cut off. • The recording date of the resized version of [SET] will be displayed on the 12-image screen. It simply alters how the image is at the orientation you want, press [MENU].
... Screen * [MENU] * PLAY Tab * Resize You can resize an image to select "Rotation" and then press [SET]. When the displayed image is displayed on the camera's monitor screen. • An image that this procedure does not actually change the image data. Use [8] and [2] to one of three image sizes: 3M, 2M... with an aspect ratio of 4:3, with both sides cut off. • The recording date of the resized version of [SET] will be displayed on the 12-image screen. It simply alters how the image is at the orientation you want, press [MENU].

User Guide
Page 140
...[8] [2] Change the setting at the cursor location [4] [6] Move the cursor between settings [DISP] Toggles between 12-hour and 24-hour format When the date and time settings are what you can specify a date from 2001...Home City (page 139) before setting the time and date. Date Date&Time Off 2009/12/19 2009/12/19 1:25pm No stamping of date and/or time • Even if you do not.... Time Stamping Snapshots (Timestamp) Procedure [MENU] * Set Up Tab * Timestamp You can configure the camera to stamp the recording date only, or date and time in accordance with the date and time settings ...
...[8] [2] Change the setting at the cursor location [4] [6] Move the cursor between settings [DISP] Toggles between 12-hour and 24-hour format When the date and time settings are what you can specify a date from 2001...Home City (page 139) before setting the time and date. Date Date&Time Off 2009/12/19 2009/12/19 1:25pm No stamping of date and/or time • Even if you do not.... Time Stamping Snapshots (Timestamp) Procedure [MENU] * Set Up Tab * Timestamp You can configure the camera to stamp the recording date only, or date and time in accordance with the date and time settings ...

User Guide
Page 141
Example: December 19, 2009 YY/MM/DD 09/12/19 DD/MM/YY 19/12/09 MM/DD/YY 12/19/09 • This setting also affects the control panel date format as shown below (page 28). YY/MM/DD or MM/DD/YY: MM/...
Example: December 19, 2009 YY/MM/DD 09/12/19 DD/MM/YY 19/12/09 MM/DD/YY 12/19/09 • This setting also affects the control panel date format as shown below (page 28). YY/MM/DD or MM/DD/YY: MM/...

User Guide
Page 167
. Movie Playback 12 3 7 1File type 2Protect indicator (page 112) 4 5 3Folder name/file name (page 134) 4Movie recording time (page 96) 5Movie Mode/Quality/Speed (pages 64, 87, 88) 6Date/time (page 141) 6 7Battery level indicator (page 14) * Not displayed during high-speed movie recording while t (Auto) is selected as the REC mode. . CS Image Viewing 12 4 1Current image number/number of images in the group (page 97) 2CS group icon (page 97) 3Playback guide (page 97) 4CS speed (page 97) 3 167 Appendix
. Movie Playback 12 3 7 1File type 2Protect indicator (page 112) 4 5 3Folder name/file name (page 134) 4Movie recording time (page 96) 5Movie Mode/Quality/Speed (pages 64, 87, 88) 6Date/time (page 141) 6 7Battery level indicator (page 14) * Not displayed during high-speed movie recording while t (Auto) is selected as the REC mode. . CS Image Viewing 12 4 1Current image number/number of images in the group (page 97) 2CS group icon (page 97) 3Playback guide (page 97) 4CS speed (page 97) 3 167 Appendix

User Guide
Page 172
...Cause and Recommended Action Digital zoom (including HD zoom) does not work. Turn on the monitor screen when shooting. Note that you are not displayed. Position the camera so sunlight does not shine directly into the lens when you cannot edit the following types of 12. Images cannot be ... bar indicates zoom only up to a zoom factor of snapshots. • Snapshots created using another source may not be dirty. The digital zoom setting may be possible because the subject is different from another digital camera. recording. 2)The lens may be edited (with another...
...Cause and Recommended Action Digital zoom (including HD zoom) does not work. Turn on the monitor screen when shooting. Note that you are not displayed. Position the camera so sunlight does not shine directly into the lens when you cannot edit the following types of 12. Images cannot be ... bar indicates zoom only up to a zoom factor of snapshots. • Snapshots created using another source may not be dirty. The digital zoom setting may be possible because the subject is different from another digital camera. recording. 2)The lens may be edited (with another...

User Guide
Page 180
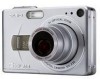
...Mode, Manual Focus • AF Area: Spot, Free, Tracking; with memory protection feature) Effective Pixels 6.0 Megapixels Imaging Element Size: 1/1.8-inch square pixel high-speed CMOS Total Pixels: 6.6 Megapixels Lens/Focal Distance (Snapshot) F2.7 (W) to 4.6 (T) f= 7.3 to 87.6 mm (equivalent to 36...(2.0" to 432 mm in 35 mm format) 12 lenses in 9 groups, including aspherical lens. Metering Multi-pattern, center weighted, and spot by Adobe Systems for use as a standard image file format. Specifications Product Type Digital Camera Model EX-F1 File Format Snapshots: RAW (DNG), JPEG ...
...Mode, Manual Focus • AF Area: Spot, Free, Tracking; with memory protection feature) Effective Pixels 6.0 Megapixels Imaging Element Size: 1/1.8-inch square pixel high-speed CMOS Total Pixels: 6.6 Megapixels Lens/Focal Distance (Snapshot) F2.7 (W) to 4.6 (T) f= 7.3 to 87.6 mm (equivalent to 36...(2.0" to 432 mm in 35 mm format) 12 lenses in 9 groups, including aspherical lens. Metering Multi-pattern, center weighted, and spot by Adobe Systems for use as a standard image file format. Specifications Product Type Digital Camera Model EX-F1 File Format Snapshots: RAW (DNG), JPEG ...

User Guide
Page 181
... to 1/40000 using CMOS electronic shutter when shooting with shutter speed priority AE or Manual exposure. * May differ due to the camera setup. Manual Exposure: F2.7(W) to F7.5 (W) White Balance Auto, Daylight, Overcast, Shade, Day White Fluorescent, Daylight Fluorescent, ..., On, Red-eye reduction, External flash Flash Range (ISO Sensitivity: Auto) Normal: 0.5 m to 6.7 m (1.6' to 22.0') (Wide Angle) 1.1 m to 3.9 m (3.6' to 12.8') (Telephoto) Flash Continuous Shutter: 0.5 m to 3.1 m (1.6' to 10.2') (Wide Angle) 1.1 m to 1.8 m (3.6' to 5.9') (Telephoto) * Range is affected by optical zoom...
... to 1/40000 using CMOS electronic shutter when shooting with shutter speed priority AE or Manual exposure. * May differ due to the camera setup. Manual Exposure: F2.7(W) to F7.5 (W) White Balance Auto, Daylight, Overcast, Shade, Day White Fluorescent, Daylight Fluorescent, ..., On, Red-eye reduction, External flash Flash Range (ISO Sensitivity: Auto) Normal: 0.5 m to 6.7 m (1.6' to 22.0') (Wide Angle) 1.1 m to 3.9 m (3.6' to 12.8') (Telephoto) Flash Continuous Shutter: 0.5 m to 3.1 m (1.6' to 10.2') (Wide Angle) 1.1 m to 1.8 m (3.6' to 5.9') (Telephoto) * Range is affected by optical zoom...