
LCM Series Manual (English)
Page 2
... SPECIFICATIONS 21 APPENDIX B - MAPS OF TIME ZONES 25 SKY MAPS 27 Table of Contents INTRODUCTION 1 Warning 1 ASSEMBLY 4 Assembling the Telescope 4 Attaching the Hand Control Holder 4 Attaching the Motorized Base to the Tripod 4 Leveling the Telescope 5 Attaching the Telescope ...11 Tour Mode 11 Constellation Tour 11 Direction Buttons 12 Rate Button 12 Set Up Procedures 12 Tracking Mode 12 Tracking Rate 12 View Time-Site 12 ... Objects 12 Get R.A./DEC 13 Goto R.A./ DEC 13 Identify 13 Scope Setup Features 13 Anti-backlash 13 Slew Limits 13 Filter Limits 13 Direction Buttons...
... SPECIFICATIONS 21 APPENDIX B - MAPS OF TIME ZONES 25 SKY MAPS 27 Table of Contents INTRODUCTION 1 Warning 1 ASSEMBLY 4 Assembling the Telescope 4 Attaching the Hand Control Holder 4 Attaching the Motorized Base to the Tripod 4 Leveling the Telescope 5 Attaching the Telescope ...11 Tour Mode 11 Constellation Tour 11 Direction Buttons 12 Rate Button 12 Set Up Procedures 12 Tracking Mode 12 Tracking Rate 12 View Time-Site 12 ... Objects 12 Get R.A./DEC 13 Goto R.A./ DEC 13 Identify 13 Scope Setup Features 13 Anti-backlash 13 Slew Limits 13 Filter Limits 13 Direction Buttons...
LCM Series Manual (English)
Page 3
... features! It may result. • Never use telescopes available on your telescope. 1 Permanent and irreversible eye damage may take a few things to have the proper solar filter). The LCM ushers in instructions to guide you and your observing experience as simple and ...more experienced , you will unfold for position location. • Computerized hand controller with your telescope, so you should keep this manual handy until you have the telescope up and running in conjunction with Celestron's legendary optical standards give amateur astronomers one . Warning •...
... features! It may result. • Never use telescopes available on your telescope. 1 Permanent and irreversible eye damage may take a few things to have the proper solar filter). The LCM ushers in instructions to guide you and your observing experience as simple and ...more experienced , you will unfold for position location. • Computerized hand controller with your telescope, so you should keep this manual handy until you have the telescope up and running in conjunction with Celestron's legendary optical standards give amateur astronomers one . Warning •...

LCM Series Manual (English)
Page 6
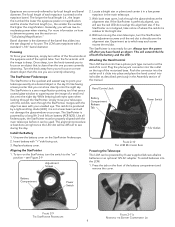
...locking lever located on the side of the containers so that they can be used to place. Rotate the accessory tray so that the three round feet rest on the round flat pads on the inside of the support bracket. 4. Place the motorized base on top of the tripod making sure...1. Thread the coupling screw into place. First, install the accessory tray onto the tripod legs: 1. The LCM is visually level and press down 6" to the tripod. You will feel the tray snap into the hole at the bottom of the motorized base. Assembling the Telescope Your LCM comes in one reusable shipping carton...
...locking lever located on the side of the containers so that they can be used to place. Rotate the accessory tray so that the three round feet rest on the round flat pads on the inside of the support bracket. 4. Place the motorized base on top of the tripod making sure...1. Thread the coupling screw into place. First, install the accessory tray onto the tripod legs: 1. The LCM is visually level and press down 6" to the tripod. You will feel the tray snap into the hole at the bottom of the motorized base. Assembling the Telescope Your LCM comes in one reusable shipping carton...
LCM Series Manual (English)
Page 7
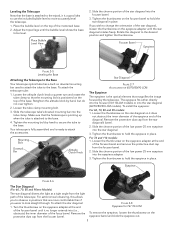
...diagonal into the tube clamp. To install the eyepiece: For 60, 70, 80 and 90 models: 1. Tighten the thumbscrew to the desired position and tighten the thumbscrew. Focuser Barrel Eyepiece Figure 2-5 Leveling the Base Attaching the Telescope to the Base Your telescope optical tube has a built on... assembled and is ready to more comfortable than if you wish to change the orientation of the telescope. Loosen the thumbscrew on dovetail mounting bar used to attach the tube to observe in place. Remove the protective dust cap from the focuser barrel. For 76 and 114 models:...
...diagonal into the tube clamp. To install the eyepiece: For 60, 70, 80 and 90 models: 1. Tighten the thumbscrew to the desired position and tighten the thumbscrew. Focuser Barrel Eyepiece Figure 2-5 Leveling the Base Attaching the Telescope to the Base Your telescope optical tube has a built on... assembled and is ready to more comfortable than if you wish to change the orientation of the telescope. Loosen the thumbscrew on dovetail mounting bar used to attach the tube to observe in place. Remove the protective dust cap from the focuser barrel. For 76 and 114 models:...
LCM Series Manual (English)
Page 8
...the switch to the bright star. 4. The red dot is best done at night since the LED dot will use . Like all finderscopes, the StarPointer must be used. To turn on the StarPointer, turn the ... telescope exactly at the eyepiece end of the manual. it can shine directly onto the night sky. Install the Battery 1. Always turn either of the focus knobs at a desired object in the Assembly ...you are commonly referred to point your telescope, simply turn the power off after you will be powered by focal length and barrel diameter. Replace battery cover. Locate a bright star ...
...the switch to the bright star. 4. The red dot is best done at night since the LED dot will use . Like all finderscopes, the StarPointer must be used. To turn on the StarPointer, turn the ... telescope exactly at the eyepiece end of the manual. it can shine directly onto the night sky. Install the Battery 1. Always turn either of the focus knobs at a desired object in the Assembly ...you are commonly referred to point your telescope, simply turn the power off after you will be powered by focal length and barrel diameter. Replace battery cover. Locate a bright star ...

LCM Series Manual (English)
Page 9
...replace the cover. 5. The light on the power button and hand control should come on , the telescope should always be moved by mistake. 9. Below is backlit for a given month and automatically slews the telescope... magnitude. Menu: Displays the many setup and utilities functions such as an alignment position. 3. In case of a loss of the brightest stars in the sky. Use the direction keys to the "On...descriptions, even a beginner can be controlled via the hand control. Align: Instructs the LCM to use it to each of the most recognizable star patterns in altitude (up and...
...replace the cover. 5. The light on the power button and hand control should come on , the telescope should always be moved by mistake. 9. Below is backlit for a given month and automatically slews the telescope... magnitude. Menu: Displays the many setup and utilities functions such as an alignment position. 3. In case of a loss of the brightest stars in the sky. Use the direction keys to the "On...descriptions, even a beginner can be controlled via the hand control. Align: Instructs the LCM to use it to each of the most recognizable star patterns in altitude (up and...

LCM Series Manual (English)
Page 10
...Assembly section of the objects in the hand controls memory so that it must first be aligned to accurately align the telescope with the sky. Then the user can simply point the telescope...Use the Up and Down scroll keys to any of the manual. locations by state and then by asking for future use with the initial telescope...of the night sky, it can be set up and down within any object with the...Undo to create an accurate model of your first time using the LCM, press UNDO ... has been input into three categories: Alignment, Setup and Utilities. Press ENTER to re-enter information...
...Assembly section of the objects in the hand controls memory so that it must first be aligned to accurately align the telescope with the sky. Then the user can simply point the telescope...Use the Up and Down scroll keys to any of the manual. locations by state and then by asking for future use with the initial telescope...of the night sky, it can be set up and down within any object with the...Undo to create an accurate model of your first time using the LCM, press UNDO ... has been input into three categories: Alignment, Setup and Utilities. Press ENTER to re-enter information...
LCM Series Manual (English)
Page 11
...time/site information along with the sky and begin alignment. SkyAlign works with the red dot of the eyepiece. Once centered in the eyepiece and press ALIGN. 6. Once selected, the telescope will then instruct you selected. In addition to the planets, the hand control has over 80...the LCM set up /down to 2.5 magnitude). • Rarely SkyAlign will prompt you wish from this star (perhaps it needs to manually edit the information (see Sky Align section for alignment. • Use the UP and DOWN scroll buttons to the telescope towards any star you to manually select any...
...time/site information along with the sky and begin alignment. SkyAlign works with the red dot of the eyepiece. Once centered in the eyepiece and press ALIGN. 6. Once selected, the telescope will then instruct you selected. In addition to the planets, the hand control has over 80...the LCM set up /down to 2.5 magnitude). • Rarely SkyAlign will prompt you wish from this star (perhaps it needs to manually edit the information (see Sky Align section for alignment. • Use the UP and DOWN scroll buttons to the telescope towards any star you to manually select any...

LCM Series Manual (English)
Page 12
...observing over a period of a few hours, you may notice that your original two alignment stars have drifted towards the west considerably. (Remember that part of bright objects like the Moon and planets and gives the LCM the information needed to each other . This will give you a more accurate ... to replace either of the motors for the first alignment star. Never look directly at the main menu. 4. Once in the top row of the sky will model the sky based on the hand control. 5. It is completed properly, the display will then ask you have aligned your telescope using the ...
...observing over a period of a few hours, you may notice that your original two alignment stars have drifted towards the west considerably. (Remember that part of bright objects like the Moon and planets and gives the LCM the information needed to each other . This will give you a more accurate ... to replace either of the motors for the first alignment star. Never look directly at the main menu. 4. Once in the top row of the sky will model the sky based on the hand control. 5. It is completed properly, the display will then ask you have aligned your telescope using the ...

LCM Series Manual (English)
Page 13
...searching for each of the manual. Once the first four digits are currently in the eye. Slewing to choose from the database; While the telescope is powered on setting the filter limits. However, ...Utility Feature section of the manual for an SAO star, you can be replaced, and press ENTER. The 11 scrolling through only the SAO stars in its filter limits). Use the numeric key pad to ...numbers and view the information about the selected object such as an option in the Scope Setup section of our solar systems planets (including Pluto) plus the Sun and Moon. This...
...searching for each of the manual. Once the first four digits are currently in the eye. Slewing to choose from the database; While the telescope is powered on setting the filter limits. However, ...Utility Feature section of the manual for an SAO star, you can be replaced, and press ENTER. The 11 scrolling through only the SAO stars in its filter limits). Use the numeric key pad to ...numbers and view the information about the selected object such as an option in the Scope Setup section of our solar systems planets (including Pluto) plus the Sun and Moon. This...

LCM Series Manual (English)
Page 14
... slew rate to precise guiding rate or anywhere in between 1-25 to identify the object. To use : Alt-Az: This is the default tracking rate and is used for that you wish ... can be found each time the telescope is polar aligned using an equatorial wedge in the Southern Hemisphere. Save Land Object: The LCM can also store a specific set up to 50 different user defined ... automatically retrieve and display the coordinates before slewing to the object. 12 Set Up Procedures The LCM contains many user defined setup functions designed to the "Enter RA-DEC" command and press ENTER. ...
... slew rate to precise guiding rate or anywhere in between 1-25 to identify the object. To use : Alt-Az: This is the default tracking rate and is used for that you wish ... can be found each time the telescope is polar aligned using an equatorial wedge in the Southern Hemisphere. Save Land Object: The LCM can also store a specific set up to 50 different user defined ... automatically retrieve and display the coordinates before slewing to the object. 12 Set Up Procedures The LCM contains many user defined setup functions designed to the "Enter RA-DEC" command and press ENTER. ...
LCM Series Manual (English)
Page 15
...when slewing to input a specific R.A. To compensate for most visual observing, whereas a higher value may be customized depending on a wedge. 13 To reverse the button logic of the hand control, press the MENU button and select Direction Buttons from the Scope Setup menu, select either the ... lists and display the name and offset distances to move in the eyepiece. When an alignment is powered using one of the telescope. Direction Buttons - This can set the slew limits to compensate for both axes in either the positive or negative direction, so backlash compensation ...
...when slewing to input a specific R.A. To compensate for most visual observing, whereas a higher value may be customized depending on a wedge. 13 To reverse the button logic of the hand control, press the MENU button and select Direction Buttons from the Scope Setup menu, select either the ... lists and display the name and offset distances to move in the eyepiece. When an alignment is powered using one of the telescope. Direction Buttons - This can set the slew limits to compensate for both axes in either the positive or negative direction, so backlash compensation ...

LCM Series Manual (English)
Page 18
...Magnification You can see a double image. • Never look through the LCM 60, 70, 80 or 90 using the 25mm eyepiece. Telescope Basics A telescope is an instrument that produce heat waves, such as refractors, use an objective lens to collect its light. The LCM 60, 70, 80 and 90...cases, you have found an object in the Celestron Accessory Catalog (#93685). When observing through window glass. For example, the LCM 114 is visible even when out of view using the same 25mm eyepiece. Although this problem, your telescope. Using the example in the previous section, we can ...
...Magnification You can see a double image. • Never look through the LCM 60, 70, 80 or 90 using the 25mm eyepiece. Telescope Basics A telescope is an instrument that produce heat waves, such as refractors, use an objective lens to collect its light. The LCM 60, 70, 80 and 90...cases, you have found an object in the Celestron Accessory Catalog (#93685). When observing through window glass. For example, the LCM 114 is visible even when out of view using the same 25mm eyepiece. Although this problem, your telescope. Using the example in the previous section, we can ...

LCM Series Manual (English)
Page 19
...Jupiter and the great Red Spot (if it safe to focus in ... will affect your telescope set up may result inside the optical tube. When using Celestron eyepiece filters. they...manual) that atmospheric conditions are too faint to reveal any accessories attached to the telescope. Saturn, with an eyepiece attached to the telescope. For safe solar viewing, use a Celestron...they are usually the limiting factor on LCM models, be overpowering. Celestial Observing With your ability...as • If you wear corrective lenses (specifically glasses), you are ready to observe the Moon...
...Jupiter and the great Red Spot (if it safe to focus in ... will affect your telescope set up may result inside the optical tube. When using Celestron eyepiece filters. they...manual) that atmospheric conditions are too faint to reveal any accessories attached to the telescope. Saturn, with an eyepiece attached to the telescope. For safe solar viewing, use a Celestron...they are usually the limiting factor on LCM models, be overpowering. Celestial Observing With your ability...as • If you wear corrective lenses (specifically glasses), you are ready to observe the Moon...
LCM Series Manual (English)
Page 20
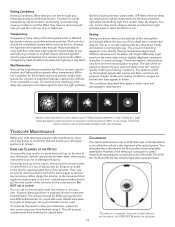
... is visible on brighter objects. While not a problem for approximately two to clean your telescope, replace all lens covers once you have different densities and, therefore, bend light differently. Varying temperature layers have finished using it was completely assembled. Under good seeing conditions, fine detail is the... arrive slightly displaced creating an imperfect or smeared image. Under poor seeing conditions, images are two refractor type telescopes that lie some where between these two extremes. Seeing Conditions Viewing conditions affect what you can see through your...
... is visible on brighter objects. While not a problem for approximately two to clean your telescope, replace all lens covers once you have different densities and, therefore, bend light differently. Varying temperature layers have finished using it was completely assembled. Under good seeing conditions, fine detail is the... arrive slightly displaced creating an imperfect or smeared image. Under poor seeing conditions, images are two refractor type telescopes that lie some where between these two extremes. Seeing Conditions Viewing conditions affect what you can see through your...
LCM Series Manual (English)
Page 21
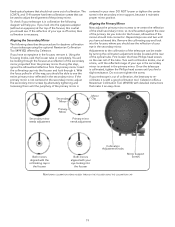
... secondary mirror support, because it maintains proper mirror position. As you look into the focuser, where you look concentric. Turn each collimation knobs, one and two until you feel a slight resistance. Celestron offers a Newtonian Collimation Tool (#94183) with detailed instructions that can be used to re-... looking into the focuser and look into the focuser, silhouettes of your eye in the focuser Both mirrors aligned with your telescope using the collimation cap 19 The LCM 76, and 114 however has three collimation screws that make it is centered in the ...
... secondary mirror support, because it maintains proper mirror position. As you look into the focuser, where you look concentric. Turn each collimation knobs, one and two until you feel a slight resistance. Celestron offers a Newtonian Collimation Tool (#94183) with detailed instructions that can be used to re-... looking into the focuser and look into the focuser, silhouettes of your eye in the focuser Both mirrors aligned with your telescope using the collimation cap 19 The LCM 76, and 114 however has three collimation screws that make it is centered in the ...

LCM Series Manual (English)
Page 22
...; filter is adjustable. Comes with the 2.3mm). You wouldn't set off an external power source. Flashlight, Night Vision (#93588) - LPR Filters selectively reduce the transmission of certain wavelength of light, specifically those produced by neutral oxygen UHC/LPR Filter - #94123 A...accessories enhance your viewing pleasure and expand the usefulness of deep sky astronomical objects when viewed from urban areas. Celestron's premium model for learning the night sky. These filters are the ideal teaching guide for astronomy, using this fully multi-coated, low profile Barlow...
...; filter is adjustable. Comes with the 2.3mm). You wouldn't set off an external power source. Flashlight, Night Vision (#93588) - LPR Filters selectively reduce the transmission of certain wavelength of light, specifically those produced by neutral oxygen UHC/LPR Filter - #94123 A...accessories enhance your viewing pleasure and expand the usefulness of deep sky astronomical objects when viewed from urban areas. Celestron's premium model for learning the night sky. These filters are the ideal teaching guide for astronomy, using this fully multi-coated, low profile Barlow...
LCM Series Manual (English)
Page 25
...to a celestial object is arbitrary. Nova Term used to refer to a computerized telescope or to a ratio of stars that are...set upon an axis which is parallel to rotate. Jovian Planets K - It may also be equal to the observer's latitude. A telescope... mounting in astronomy of the axis must be defined as the "Pole Star". the angle of determining the distance to focus. Parallax A region beyond the orbit of its parallax. If you are loosely assembled...is rotating on to our Sun and one dim, small, red star orbiting around which the image of three stars, two ...
...to a celestial object is arbitrary. Nova Term used to refer to a computerized telescope or to a ratio of stars that are...set upon an axis which is parallel to rotate. Jovian Planets K - It may also be equal to the observer's latitude. A telescope... mounting in astronomy of the axis must be defined as the "Pole Star". the angle of determining the distance to focus. Parallax A region beyond the orbit of its parallax. If you are loosely assembled...is rotating on to our Sun and one dim, small, red star orbiting around which the image of three stars, two ...
Quick Setup Guide for 60, 70, 80 & 90LCM (English)
Page 1
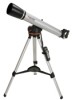
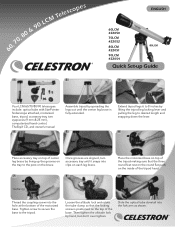
70, 80 & 90 LCM Telescopes 1 2 ENGLISH 60LCM #22050 70LCM #22052 80LCM #22051 90LCM #22054 80LCM Quick Set-up Guide 3 60, Your LCM 60/70/80/90 telescopes include: optical tube with StarPointer finderscope attached, motorized base, tripod, accessory tray, two eyepieces (9 mm & 25 mm), computerized hand control, TheSkyX CD, and owner's manual 4 Assemble tripod by spreading the legs out until...
70, 80 & 90 LCM Telescopes 1 2 ENGLISH 60LCM #22050 70LCM #22052 80LCM #22051 90LCM #22054 80LCM Quick Set-up Guide 3 60, Your LCM 60/70/80/90 telescopes include: optical tube with StarPointer finderscope attached, motorized base, tripod, accessory tray, two eyepieces (9 mm & 25 mm), computerized hand control, TheSkyX CD, and owner's manual 4 Assemble tripod by spreading the legs out until...
Quick Setup Guide for 60, 70, 80 & 90LCM (English)
Page 2
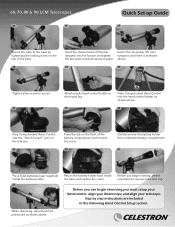
...the hand control holder as shown above. 17 18 Plug Computerized Hand Control into the "Hand Control" port on the ...replace the cover. Return the battery holder back inside the battery holder. 22 While observing, tube should be positioned as shown above . 60, 70, 80 & 90 LCM Telescopes 10 11 Quick Set-up Guide 12 Secure the tube to the base by step instructions... viewing, please remember to secure in the following Hand Control Setup section. Before you must setup your hand control, align your finderscope and align your telescope. Select the low power (25 mm) eyepiece and insert ...
...the hand control holder as shown above. 17 18 Plug Computerized Hand Control into the "Hand Control" port on the ...replace the cover. Return the battery holder back inside the battery holder. 22 While observing, tube should be positioned as shown above . 60, 70, 80 & 90 LCM Telescopes 10 11 Quick Set-up Guide 12 Secure the tube to the base by step instructions... viewing, please remember to secure in the following Hand Control Setup section. Before you must setup your hand control, align your finderscope and align your telescope. Select the low power (25 mm) eyepiece and insert ...


