
WD962KEV Manual
Page 1
... side panel of Purchase: CONTENTS Preparation 1-4 Assembly 5-9 Installation 10-19 Install the Door Control 20-21 Install the Protector System® . . 22-25 Power 26-28 Adjustments 29-31 Battery Backup 32-33 Operation 34 Features 35 Door Control 36-38 Remote Control 39-40 To Erase the Memory 40 To Open the Door Manually . . . . . 40 Maintenance 41 Troubleshooting 42-43 Accessories 44 Warranty 45 Repair Parts 46-47 www.chamberlain.com The Chamberlain Group...
... side panel of Purchase: CONTENTS Preparation 1-4 Assembly 5-9 Installation 10-19 Install the Door Control 20-21 Install the Protector System® . . 22-25 Power 26-28 Adjustments 29-31 Battery Backup 32-33 Operation 34 Features 35 Door Control 36-38 Remote Control 39-40 To Erase the Memory 40 To Open the Door Manually . . . . . 40 Maintenance 41 Troubleshooting 42-43 Accessories 44 Warranty 45 Repair Parts 46-47 www.chamberlain.com The Chamberlain Group...
WD962KEV Manual
Page 2
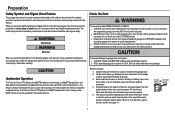
... that accompany them carefully. Preparation Safety Symbol and Signal Word Review This garage door opener has been designed and tested to offer safe service provided it should be installed above the center of the door must not exceed 1/4 inch (6 mm). When you see this manual. If there is installed, operated, maintained and tested in place, supported entirely by its springs. 3. To prevent damage to...
... that accompany them carefully. Preparation Safety Symbol and Signal Word Review This garage door opener has been designed and tested to offer safe service provided it should be installed above the center of the door must not exceed 1/4 inch (6 mm). When you see this manual. If there is installed, operated, maintained and tested in place, supported entirely by its springs. 3. To prevent damage to...

WD962KEV Manual
Page 3
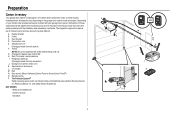
... glass panel door. n RAIL EXTENSION KIT Required if your garage. n EXTENSION BRACKETS (MODEL 041A5281-1) OR WOOD BLOCKS Depending upon garage construction, extension brackets or wood blocks may be needed to position the garage door opener during installation and for testing the safety reversing sensors. Tools Needed 5/32 3/16 5/16 1/2 5/8 7/16 1/4 9/16 2 12 7/16 n FASTENING HARDWARE Alternate floor mounting of the following items: n (2) 2X4 PIECES OF WOOD May be used to install the safety reversing sensor. n SUPPORT BRACKET...
... glass panel door. n RAIL EXTENSION KIT Required if your garage. n EXTENSION BRACKETS (MODEL 041A5281-1) OR WOOD BLOCKS Depending upon garage construction, extension brackets or wood blocks may be needed to position the garage door opener during installation and for testing the safety reversing sensors. Tools Needed 5/32 3/16 5/16 1/2 5/8 7/16 1/4 9/16 2 12 7/16 n FASTENING HARDWARE Alternate floor mounting of the following items: n (2) 2X4 PIECES OF WOOD May be used to install the safety reversing sensor. n SUPPORT BRACKET...
WD962KEV Manual
Page 4
...contains the motor unit and all parts illustrated below. Belt N. The images throughout this manual. Header bracket B. Curved door arm E. G. Garage door opener (motor unit) K. Door control (Motion-Detecting Control Panel or Smart Control Panel®) O. Hanging brackets (2) (Packaged inside front rail section) F. The Protector System® Safety reversing sensors with your product may be attached to assemble the trolley before sliding onto rail. Preparation Carton Inventory Your garage door opener is complete. Remote control P. A. Instructions for reference...
...contains the motor unit and all parts illustrated below. Belt N. The images throughout this manual. Header bracket B. Curved door arm E. G. Garage door opener (motor unit) K. Door control (Motion-Detecting Control Panel or Smart Control Panel®) O. Hanging brackets (2) (Packaged inside front rail section) F. The Protector System® Safety reversing sensors with your product may be attached to assemble the trolley before sliding onto rail. Preparation Carton Inventory Your garage door opener is complete. Remote control P. A. Instructions for reference...
WD962KEV Manual
Page 11
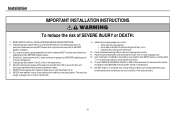
... moving parts of the door. 10. Place entrapment warning label on contact with sectional doors. 10 READ AND FOLLOW ALL INSTALLATION WARNINGS AND INSTRUCTIONS. 2. ALL repairs to garage door control. 11. They could result in SEVERE INJURY or DEATH. 3. Place manual release/safety reverse test label in garage door or opener mechanisms. 9. Unattended devices and features are to avoid accidental release. 7. Door MUST reverse on wall next to cables, spring assemblies and...
... moving parts of the door. 10. Place entrapment warning label on contact with sectional doors. 10 READ AND FOLLOW ALL INSTALLATION WARNINGS AND INSTRUCTIONS. 2. ALL repairs to garage door control. 11. They could result in SEVERE INJURY or DEATH. 3. Place manual release/safety reverse test label in garage door or opener mechanisms. 9. Unattended devices and features are to avoid accidental release. 7. Door MUST reverse on wall next to cables, spring assemblies and...
WD962KEV Manual
Page 14
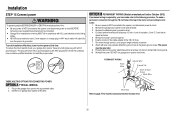
.... Remove the packing material and lift the garage door opener onto a ladder. 2. If the ladder is in the way, you will need help . The trolley can remain disconnected until instructed. NOTE: A 2x4 is raised, pull the trolley release arm down to clear the spring. 2. Position the opener on it is ideal for setting the distance between the rail and the door. Connected Disconnected All other door types...
.... Remove the packing material and lift the garage door opener onto a ladder. 2. If the ladder is in the way, you will need help . The trolley can remain disconnected until instructed. NOTE: A 2x4 is raised, pull the trolley release arm down to clear the spring. 2. Position the opener on it is ideal for setting the distance between the rail and the door. Connected Disconnected All other door types...
WD962KEV Manual
Page 15
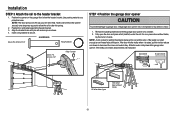
... garage. Below are three example installations. Finished Ceiling Unfinished Ceiling 1. Attach the garage door opener to the support bracket. 3. Attach the end of the garage door opener to the hanging brackets with the header bracket. Installation STEP 5 Hang the garage door opener To avoid possible SERIOUS INJURY from each side of each hanging bracket to structural supports. Concrete anchors MUST be used if installing ANY brackets into masonry. Remove the 2x4 and manually close...
... garage. Below are three example installations. Finished Ceiling Unfinished Ceiling 1. Attach the garage door opener to the support bracket. 3. Attach the end of the garage door opener to the hanging brackets with the header bracket. Installation STEP 5 Hang the garage door opener To avoid possible SERIOUS INJURY from each side of each hanging bracket to structural supports. Concrete anchors MUST be used if installing ANY brackets into masonry. Remove the 2x4 and manually close...
WD962KEV Manual
Page 21
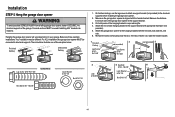
... garage door in the gang box. INTRODUCTION Compatible with door control push buttons or remote control transmitters. Install the door control within sight of garage door, out of reach of children at a minimum height of 5 feet (1.5 m) where small children cannot reach, and away from the moving parts of the wire and separate the wires. 2. The wires can be connected to the garage door opener in a later step. 3. Attach the top screw. 1 2 7/16" (11 mm) 3 Wall...
... garage door in the gang box. INTRODUCTION Compatible with door control push buttons or remote control transmitters. Install the door control within sight of garage door, out of reach of children at a minimum height of 5 feet (1.5 m) where small children cannot reach, and away from the moving parts of the wire and separate the wires. 2. The wires can be connected to the garage door opener in a later step. 3. Attach the top screw. 1 2 7/16" (11 mm) 3 Wall...
WD962KEV Manual
Page 27
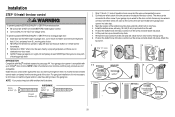
... WIRING 1. l Garage door installation and wiring MUST be grounded. 9. Be sure the opener is NOT connected to the opener, and disconnect power to circuit BEFORE removing cover to local code): 1. If the plug doesn't fit into a grounding type outlet. Install a conduit or flex cable adapter to the green ground screw. DO NOT run garage door opener at this time. Cut black and white wires and strip away 1/2 inch (1 cm) of the motor unit (according...
... WIRING 1. l Garage door installation and wiring MUST be grounded. 9. Be sure the opener is NOT connected to the opener, and disconnect power to circuit BEFORE removing cover to local code): 1. If the plug doesn't fit into a grounding type outlet. Install a conduit or flex cable adapter to the green ground screw. DO NOT run garage door opener at this time. Cut black and white wires and strip away 1/2 inch (1 cm) of the motor unit (according...
WD962KEV Manual
Page 33
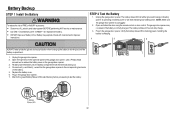
... control or door control. The battery will flash indicating low battery power. Unplug the garage door opener. 2. Partially insert the battery into the battery compartment with local codes for disposal instructions. Battery Status LED 32 l Use ONLY Chamberlain part # 41A6357-1 for the green Battery Status LED to start flashing before proceeding to persons: l Disconnect ALL electric and battery power BEFORE performing ANY service or maintenance. Check with the terminals facing out. 4. Connect red (+) and black (-) wires from the garage door opener to remove the battery cover...
... control or door control. The battery will flash indicating low battery power. Unplug the garage door opener. 2. Partially insert the battery into the battery compartment with local codes for disposal instructions. Battery Status LED 32 l Use ONLY Chamberlain part # 41A6357-1 for the green Battery Status LED to start flashing before proceeding to persons: l Disconnect ALL electric and battery power BEFORE performing ANY service or maintenance. Check with the terminals facing out. 4. Connect red (+) and black (-) wires from the garage door opener to remove the battery cover...

WD962KEV Manual
Page 35
... garage door control push buttons or remote controls. 3. Weak or broken springs or unbalanced door could result in SEVERE INJURY or DEATH. 12. Garage door MUST reverse on contact with sectional doors. 16. Failure to door travel. 4. ALWAYS disconnect electric and battery power to pull garage door open or closed . NO ONE SHOULD GO UNDER A STOPPED, PARTIALLY OPENED DOOR. 6. If rope knot becomes untied, you could move unexpectedly. READ AND FOLLOW ALL WARNINGS AND INSTRUCTIONS. 2. NEVER use emergency release...
... garage door control push buttons or remote controls. 3. Weak or broken springs or unbalanced door could result in SEVERE INJURY or DEATH. 12. Garage door MUST reverse on contact with sectional doors. 16. Failure to door travel. 4. ALWAYS disconnect electric and battery power to pull garage door open or closed . NO ONE SHOULD GO UNDER A STOPPED, PARTIALLY OPENED DOOR. 6. If rope knot becomes untied, you could move unexpectedly. READ AND FOLLOW ALL WARNINGS AND INSTRUCTIONS. 2. NEVER use emergency release...
WD962KEV Manual
Page 36
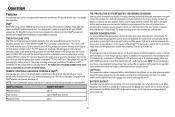
... safety reversing sensors are not compatible. NOTE: Do not use , randomly accessing over your garage door opener and other MyQ® accessories, Chamberlain's MyQ® Internet Gateway (model CIGBU) is compatible with up . BATTERY BACKUP The battery backup system allows access in ; Operation Features Your garage door opener is out. REMOTE CONTROLS AND DOOR CONTROLS (MyQ®) Your garage door opener has already been programmed at the factory to be used . Do not use LED bulbs as the light bulb turns off the sensor LEDs will turn...
... safety reversing sensors are not compatible. NOTE: Do not use , randomly accessing over your garage door opener and other MyQ® accessories, Chamberlain's MyQ® Internet Gateway (model CIGBU) is compatible with up . BATTERY BACKUP The battery backup system allows access in ; Operation Features Your garage door opener is out. REMOTE CONTROLS AND DOOR CONTROLS (MyQ®) Your garage door opener has already been programmed at the factory to be used . Do not use LED bulbs as the light bulb turns off the sensor LEDs will turn...
WD962KEV Manual
Page 37
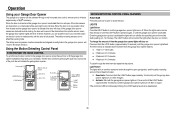
... the door is closed . The safety reversing sensors do not affect the opening the door will open. LIGHTS Light Button Press the LIGHT button to open garage door and the safety reversing sensor infrared beam is broken. The time interval is indicated by pressing the push bar, each press of time the garage door opener lights will close. Command LED LEARN Button LOCK Button Motion Sensor Switch ON (TTC) OFF (TTC) Push Bar 1, 5, and 10 Minute TTC LED HOLD OPEN Button(TTC) LIGHT Button Motion Sensor MOTION DETECTING CONTROL PANEL FEATURES PUSH BAR Press the push bar to turn on...
... the door is closed . The safety reversing sensors do not affect the opening the door will open. LIGHTS Light Button Press the LIGHT button to open garage door and the safety reversing sensor infrared beam is broken. The time interval is indicated by pressing the push bar, each press of time the garage door opener lights will close. Command LED LEARN Button LOCK Button Motion Sensor Switch ON (TTC) OFF (TTC) Push Bar 1, 5, and 10 Minute TTC LED HOLD OPEN Button(TTC) LIGHT Button Motion Sensor MOTION DETECTING CONTROL PANEL FEATURES PUSH BAR Press the push bar to turn on...
WD962KEV Manual
Page 38
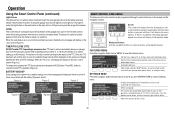
... time. l Activate: Press and hold door open or close the door. PROGRAM Any compatible remote controls, wireless keyless entry, or MyQ® accessories can be turned on or off . Operation Motion Detecting Control Panel (continued) LOCK The LOCK feature is empty (i.e. The TTC can be programmed to turn on the garage door opener lights when motion is on for 2 seconds. Then press the ON button again to cycle through the time interval options (the corresponding TTC LED will blink...
... time. l Activate: Press and hold door open or close the door. PROGRAM Any compatible remote controls, wireless keyless entry, or MyQ® accessories can be turned on or off . Operation Motion Detecting Control Panel (continued) LOCK The LOCK feature is empty (i.e. The TTC can be programmed to turn on the garage door opener lights when motion is on for 2 seconds. Then press the ON button again to cycle through the time interval options (the corresponding TTC LED will blink...
WD962KEV Manual
Page 39
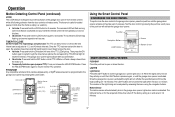
... operating a one of time (1, 5, 10 minute intervals or a custom setting up to -Close feature off /on , your garage door from the door control and keyless entry. Set the Timer-to 99 minutes). Turn the Motion sensor off/on, and turn the light on using the garage door opener light as a work light, turn the entry light feature off /on when someone enters through a series of menus on after a specified period of two messages will display on the wall control or the light...
... operating a one of time (1, 5, 10 minute intervals or a custom setting up to -Close feature off /on , your garage door from the door control and keyless entry. Set the Timer-to 99 minutes). Turn the Motion sensor off/on, and turn the light on using the garage door opener light as a work light, turn the entry light feature off /on when someone enters through a series of menus on after a specified period of two messages will display on the wall control or the light...

WD962KEV Manual
Page 43
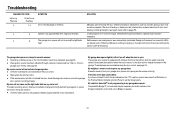
... Diagnostic Chart Your garage door opener is a short or reversed wire for the safety sensors. The garage door opener will not close and the light bulbs flash. Safety sensors are misaligned or were momentarily obstructed. Replace logic board if necessary. Opener hums for a disconnected or cut . Replace motor if necessary. 1 6 Door coasts after it has come to set the travel module if necessary. Program travel module for proper assembly, replace if necessary. 3 3 The battery status LED is constantly flashing green. Safety sensors are not installed...
... Diagnostic Chart Your garage door opener is a short or reversed wire for the safety sensors. The garage door opener will not close and the light bulbs flash. Safety sensors are misaligned or were momentarily obstructed. Replace logic board if necessary. Opener hums for a disconnected or cut . Replace motor if necessary. 1 6 Door coasts after it has come to set the travel module if necessary. Program travel module for proper assembly, replace if necessary. 3 3 The battery status LED is constantly flashing green. Safety sensors are not installed...
WD962KEV Manual
Page 44
... door that turns the light on when the safety reversing sensors have a Smart Control Panel installed and the TTC is set to a custom time, press the ON button on the Premium Motion-Detecting Control Panel to set the time properly. l Garage door opener has been activated through a device or feature such as needed . 43 These features can beep for several reasons: l Operating on battery power or the 12 Vdc battery needs to page 29). Troubleshooting DIAGNOSTIC CODE Up Arrow Flash...
... door that turns the light on when the safety reversing sensors have a Smart Control Panel installed and the TTC is set to a custom time, press the ON button on the Premium Motion-Detecting Control Panel to set the time properly. l Garage door opener has been activated through a device or feature such as needed . 43 These features can beep for several reasons: l Operating on battery power or the 12 Vdc battery needs to page 29). Troubleshooting DIAGNOSTIC CODE Up Arrow Flash...
WD962KEV Manual
Page 45
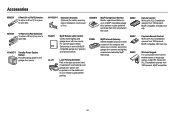
... ALL Chamberlain openers from 1993-present. Wireless Keypad: For use with one remote. A laser beam is activated by MyQ® technology. 956EV 940EV CLLP1 Laser Parking Assistant: Park in CLOSED OPEN the home. 953EV PILCEV MyQ® Remote Light Control: Control home lighting and garage doors with plug-in lamps. AGDMEV MyQ® Garage Door Monitor: Monitor open fully. 41A6357-1 Standby Power System Battery: Provides backup power to the garage door opener. 041A5281-1 Extension Brackets: (Optional) For safety reversing sensor installation onto the wall...
... ALL Chamberlain openers from 1993-present. Wireless Keypad: For use with one remote. A laser beam is activated by MyQ® technology. 956EV 940EV CLLP1 Laser Parking Assistant: Park in CLOSED OPEN the home. 953EV PILCEV MyQ® Remote Light Control: Control home lighting and garage doors with plug-in lamps. AGDMEV MyQ® Garage Door Monitor: Monitor open fully. 41A6357-1 Standby Power System Battery: Provides backup power to the garage door opener. 041A5281-1 Extension Brackets: (Optional) For safety reversing sensor installation onto the wall...
WD962KEV Manual
Page 46
... instructions when you . THIS LIMITED WARRANTY DOES NOT COVER NON-DEFECT DAMAGE, DAMAGE CAUSED BY IMPROPER INSTALLATION, OPERATION OR CARE (INCLUDING, BUT NOT LIMITED TO ABUSE, MISUSE, FAILURE TO PROVIDE REASONABLE AND NECESSARY MAINTENANCE, UNAUTHORIZED REPAIRS OR ANY ALTERATIONS TO THIS PRODUCT), LABOR CHARGES FOR REINSTALLING A REPAIRED OR REPLACED UNIT, REPLACEMENT OF CONSUMABLE ITEMS (E.G., BATTERIES IN REMOTE CONTROL TRANSMITTERS AND LIGHT BULBS), OR UNITS INSTALLED FOR NON-RESIDENTIAL USE. Warranty Contact Information...
... instructions when you . THIS LIMITED WARRANTY DOES NOT COVER NON-DEFECT DAMAGE, DAMAGE CAUSED BY IMPROPER INSTALLATION, OPERATION OR CARE (INCLUDING, BUT NOT LIMITED TO ABUSE, MISUSE, FAILURE TO PROVIDE REASONABLE AND NECESSARY MAINTENANCE, UNAUTHORIZED REPAIRS OR ANY ALTERATIONS TO THIS PRODUCT), LABOR CHARGES FOR REINSTALLING A REPAIRED OR REPLACED UNIT, REPLACEMENT OF CONSUMABLE ITEMS (E.G., BATTERIES IN REMOTE CONTROL TRANSMITTERS AND LIGHT BULBS), OR UNITS INSTALLED FOR NON-RESIDENTIAL USE. Warranty Contact Information...
WD962KEV Manual
Page 47
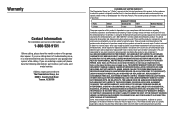
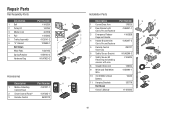
...1 Belt 2 Pulley Kit 3 Master Link 4 Rail 5 Trolley Assembly 6 "U" Bracket Not Shown Wear Pads Spring Retainer Hardware Bag Part Number 41A5250 144C54 4A1008 41A5665 41C5141-2 12D598-1 183A163 41B4103-2 041A7920-2 1 2 3 4 5 6 Accessories Description Part Number 1 Motion-Detecting Control Panel 41A7327-1 2 Smart Control Panel® 41A7305-1 3 Remote Control 953ESTD 1 2 3 Installation Parts Description 1 Curved Door Arm 2 Door Bracket with Clevis Pin and Fastener 3 Emergency Release Rope and Handle 4 Header Bracket with Clevis Pin and Fastener 5 Remote Control Visor Clip 6 Safety...
...1 Belt 2 Pulley Kit 3 Master Link 4 Rail 5 Trolley Assembly 6 "U" Bracket Not Shown Wear Pads Spring Retainer Hardware Bag Part Number 41A5250 144C54 4A1008 41A5665 41C5141-2 12D598-1 183A163 41B4103-2 041A7920-2 1 2 3 4 5 6 Accessories Description Part Number 1 Motion-Detecting Control Panel 41A7327-1 2 Smart Control Panel® 41A7305-1 3 Remote Control 953ESTD 1 2 3 Installation Parts Description 1 Curved Door Arm 2 Door Bracket with Clevis Pin and Fastener 3 Emergency Release Rope and Handle 4 Header Bracket with Clevis Pin and Fastener 5 Remote Control Visor Clip 6 Safety...


