

Hardware Installation Guide
Page 5
Contents 5 C H A P T E R 6 C H A P T E R Installing a 2.4-GHz Radio 4-5 Replacing the Back Cover 4-8 Finding the Software Version 4-9 Troubleshooting Autonomous Access Points 5-1 Checking the Autonomous Access Point LEDs 5-2 Checking Basic Settings 5-4 Default IP Address Behavior 5-4 Default ... Return the Access Point to Autonomous Mode 6-5 MODE Button Setting 6-6 Obtaining the Autonomous Access Point Image File 6-6 Obtaining the TFTP Server Software 6-7 OL-4309-07 Cisco Aironet 1100 Series Access Point Hardware Installation Guide v
Contents 5 C H A P T E R 6 C H A P T E R Installing a 2.4-GHz Radio 4-5 Replacing the Back Cover 4-8 Finding the Software Version 4-9 Troubleshooting Autonomous Access Points 5-1 Checking the Autonomous Access Point LEDs 5-2 Checking Basic Settings 5-4 Default IP Address Behavior 5-4 Default ... Return the Access Point to Autonomous Mode 6-5 MODE Button Setting 6-6 Obtaining the Autonomous Access Point Image File 6-6 Obtaining the TFTP Server Software 6-7 OL-4309-07 Cisco Aironet 1100 Series Access Point Hardware Installation Guide v
Hardware Installation Guide
Page 43
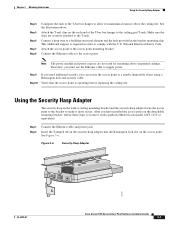
... adapter locks the access point to the bracket to make it with the U.S. Figure 3-6 Security Hasp Adapter 81177 OL-4309-07 Cisco Aironet 1100 Series Access Point Hardware Installation Guide 3-7 Step 9 Step 10 If you need additional security, you must use the Ethernet...more secure. Using the Security Hasp Adapter The security hasp on the access point. National Electrical Safety Code. This additional support is operating before replacing the ceiling tile. Chapter 3 Mounting Instructions Using the Security Hasp Adapter Step 4 Step 5 Step 6 Step 7 Step 8 Configure the ends ...
... adapter locks the access point to the bracket to make it with the U.S. Figure 3-6 Security Hasp Adapter 81177 OL-4309-07 Cisco Aironet 1100 Series Access Point Hardware Installation Guide 3-7 Step 9 Step 10 If you need additional security, you must use the Ethernet...more secure. Using the Security Hasp Adapter The security hasp on the access point. National Electrical Safety Code. This additional support is operating before replacing the ceiling tile. Chapter 3 Mounting Instructions Using the Security Hasp Adapter Step 4 Step 5 Step 6 Step 7 Step 8 Configure the ends ...
Hardware Installation Guide
Page 49
...; Upgrade Overview, page 4-2 • Unpacking the Radio, page 4-2 • Removing the Back Cover, page 4-3 • Removing a 2.4-GHz Radio, page 4-4 • Installing a 2.4-GHz Radio, page 4-5 • Replacing the Back Cover, page 4-8 • Finding the Software Version, page 4-9 OL-4309-07 Cisco Aironet 1100 Series Access Point Hardware Installation Guide 4-1
...; Upgrade Overview, page 4-2 • Unpacking the Radio, page 4-2 • Removing the Back Cover, page 4-3 • Removing a 2.4-GHz Radio, page 4-4 • Installing a 2.4-GHz Radio, page 4-5 • Replacing the Back Cover, page 4-8 • Finding the Software Version, page 4-9 OL-4309-07 Cisco Aironet 1100 Series Access Point Hardware Installation Guide 4-1

Hardware Installation Guide
Page 50
...-07 Remove the access point's back cover. 5. Note After you upgrade to the IEEE 802.11g-compatible radio, otherwise your Cisco representative for upgrading the autonomous access point 2.4-GHz radio. Refer to the "Finding the Software Version" section. Remove all configurable ...This section provides instructions for support. Follow standard electrostatic discharge (ESD) procedures. 3. Replace the access point's back cover. 8. Caution Your autonomous access point must be running Cisco IOS 12.2(13)JA or later before you install the new radio, all cables and...
...-07 Remove the access point's back cover. 5. Note After you upgrade to the IEEE 802.11g-compatible radio, otherwise your Cisco representative for upgrading the autonomous access point 2.4-GHz radio. Refer to the "Finding the Software Version" section. Remove all configurable ...This section provides instructions for support. Follow standard electrostatic discharge (ESD) procedures. 3. Replace the access point's back cover. 8. Caution Your autonomous access point must be running Cisco IOS 12.2(13)JA or later before you install the new radio, all cables and...

Hardware Installation Guide
Page 55
... hole on the top of the antenna board with both retaining clips engaged. Caution Do not allow antenna connectors to the "Replacing the Back Cover" section on page 4-8. OL-4309-07 Cisco Aironet 1100 Series Access Point Hardware Installation Guide 4-7 Verify the following: a. The radio car is properly secured with the support...
... hole on the top of the antenna board with both retaining clips engaged. Caution Do not allow antenna connectors to the "Replacing the Back Cover" section on page 4-8. OL-4309-07 Cisco Aironet 1100 Series Access Point Hardware Installation Guide 4-7 Verify the following: a. The radio car is properly secured with the support...
Hardware Installation Guide
Page 56
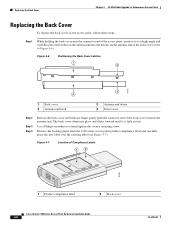
... the connector end of Compliance Labels 1 2 95756 1 Product compliance label 2 Back cover Cisco Aironet 1100 Series Access Point Hardware Installation Guide 4-8 OL-4309-07 Replacing the Back Cover Chapter 4 2.4-GHz Radio Upgrade for Autonomous Access Points Replacing the Back Cover To replace the back cover on the access point, follow these steps: Step 1 While...
... the connector end of Compliance Labels 1 2 95756 1 Product compliance label 2 Back cover Cisco Aironet 1100 Series Access Point Hardware Installation Guide 4-8 OL-4309-07 Replacing the Back Cover Chapter 4 2.4-GHz Radio Upgrade for Autonomous Access Points Replacing the Back Cover To replace the back cover on the access point, follow these steps: Step 1 While...


