

Hardware Installation Guide
Page 5
...Using the MODE Button 5-8 Using the Web Browser Interface 5-8 Reloading the Access Point Image 5-9 Using the MODE button 5-9 Web Browser Interface 5-10 Browser HTTP Interface 5-10 Browser TFTP Interface 5-10 Obtaining the Access Point Image File 5-11 Obtaining the TFTP Server Software 5-12 Troubleshooting Lightweight Access Points 6-1 Guidelines for Using 1100 Series... Point to Autonomous Mode 6-5 MODE Button Setting 6-6 Obtaining the Autonomous Access Point Image File 6-6 Obtaining the TFTP Server Software 6-7 OL-4309-07 Cisco Aironet 1100 Series Access Point Hardware Installation Guide v
...Using the MODE Button 5-8 Using the Web Browser Interface 5-8 Reloading the Access Point Image 5-9 Using the MODE button 5-9 Web Browser Interface 5-10 Browser HTTP Interface 5-10 Browser TFTP Interface 5-10 Obtaining the Access Point Image File 5-11 Obtaining the TFTP Server Software 5-12 Troubleshooting Lightweight Access Points 6-1 Guidelines for Using 1100 Series... Point to Autonomous Mode 6-5 MODE Button Setting 6-6 Obtaining the Autonomous Access Point Image File 6-6 Obtaining the TFTP Server Software 6-7 OL-4309-07 Cisco Aironet 1100 Series Access Point Hardware Installation Guide v
Hardware Installation Guide
Page 26
Network Example with Lightweight Access Points Chapter 1 Overview 1-10 Cisco Aironet 1100 Series Access Point Hardware Installation Guide OL-4309-07
Network Example with Lightweight Access Points Chapter 1 Overview 1-10 Cisco Aironet 1100 Series Access Point Hardware Installation Guide OL-4309-07
Hardware Installation Guide
Page 33
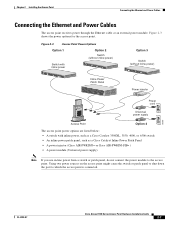
... Options Option 1 Option 2 Switch (without inline power) Switch with inline power SYST RPS STAT UTIL DUPLX SPEED MODE 1 2 3 4 5 6 7 8 9 10 11 10Base-T / 100Base-TX 12 13 14 15 16 17 18 19 20 21 22 23 Catalyst 2950 SERIES 24 21300Base-FX24 SYST RPS STAT...listed below: • A switch with inline power, such as a Cisco Catalyst 3500XL, 3550, 4000, or 6500 switch • An inline power patch panel, such as a Cisco Catalyst Inline Power Patch Panel • A power injector (Cisco AIR-PWRINJ3= or Cisco AIR-PWRINJ-FIB= ) • A power module (Universal power supply)...
... Options Option 1 Option 2 Switch (without inline power) Switch with inline power SYST RPS STAT UTIL DUPLX SPEED MODE 1 2 3 4 5 6 7 8 9 10 11 10Base-T / 100Base-TX 12 13 14 15 16 17 18 19 20 21 22 23 Catalyst 2950 SERIES 24 21300Base-FX24 SYST RPS STAT...listed below: • A switch with inline power, such as a Cisco Catalyst 3500XL, 3550, 4000, or 6500 switch • An inline power patch panel, such as a Cisco Catalyst Inline Power Patch Panel • A power injector (Cisco AIR-PWRINJ3= or Cisco AIR-PWRINJ-FIB= ) • A power module (Universal power supply)...
Hardware Installation Guide
Page 34
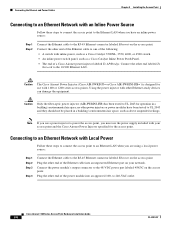
... AP/Bridge. to the 48-VDC power port labeled 48VDC on the access point. Caution The Cisco Aironet Power Injector (Cisco AIR-PWRINJ3= or Cisco AIR-PWRINJ-FIB= ) is designed for operation in a building's environmental air space, such as a Cisco Catalyst Inline Power Patch Panel. • The end of the power module into an unpowered Ethernet... Power Cables Chapter 2 Installing the Access Point Connecting to an Ethernet Network with your network. Connect the other end labeled To Network to the 10/100 Ethernet LAN. Connect the power module's output connector to 240-VAC outlet.
... AP/Bridge. to the 48-VDC power port labeled 48VDC on the access point. Caution The Cisco Aironet Power Injector (Cisco AIR-PWRINJ3= or Cisco AIR-PWRINJ-FIB= ) is designed for operation in a building's environmental air space, such as a Cisco Catalyst Inline Power Patch Panel. • The end of the power module into an unpowered Ethernet... Power Cables Chapter 2 Installing the Access Point Connecting to an Ethernet Network with your network. Connect the other end labeled To Network to the 10/100 Ethernet LAN. Connect the power module's output connector to 240-VAC outlet.
Hardware Installation Guide
Page 36
Connecting the Ethernet and Power Cables Chapter 2 Installing the Access Point 2-10 Cisco Aironet 1100 Series Access Point Hardware Installation Guide OL-4309-07
Connecting the Ethernet and Power Cables Chapter 2 Installing the Access Point 2-10 Cisco Aironet 1100 Series Access Point Hardware Installation Guide OL-4309-07
Hardware Installation Guide
Page 39
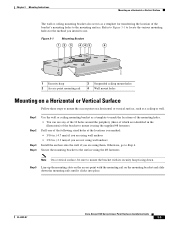
OL-4309-07 Cisco Aironet 1100 Series Access Point Hardware Installation Guide 3-3 Chapter 3 Mounting Instructions Mounting on a Horizontal or Vertical Surface The wall or ceiling mounting bracket also serves ... • 3/32 in. (2.3 mm) if you are not using wall anchors Install the anchors into the wall if you intend to use any of the 10 holes around the periphery (three of which are using the #8 fasteners.
OL-4309-07 Cisco Aironet 1100 Series Access Point Hardware Installation Guide 3-3 Chapter 3 Mounting Instructions Mounting on a Horizontal or Vertical Surface The wall or ceiling mounting bracket also serves ... • 3/32 in. (2.3 mm) if you are not using wall anchors Install the anchors into the wall if you intend to use any of the 10 holes around the periphery (three of which are using the #8 fasteners.
Hardware Installation Guide
Page 43
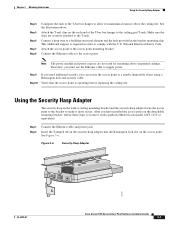
..., 121T or equivalent). This additional support is operating before replacing the ceiling tile. Figure 3-6 Security Hasp Adapter 81177 OL-4309-07 Cisco Aironet 1100 Series Access Point Hardware Installation Guide 3-7 After you have installed the access point on the wall or ceiling mounting bracket and...mounting bracket, follow these steps to the access point mounting bracket. Attach the T-rail clips on the access point. Step 9 Step 10 If you need additional security, you must use the Ethernet cable to the T-rails. Note The power module and power injector are ...
..., 121T or equivalent). This additional support is operating before replacing the ceiling tile. Figure 3-6 Security Hasp Adapter 81177 OL-4309-07 Cisco Aironet 1100 Series Access Point Hardware Installation Guide 3-7 After you have installed the access point on the wall or ceiling mounting bracket and...mounting bracket, follow these steps to the access point mounting bracket. Attach the T-rail clips on the access point. Step 9 Step 10 If you need additional security, you must use the Ethernet cable to the T-rails. Note The power module and power injector are ...

Hardware Installation Guide
Page 44
... Instructions Step 3 Step 4 Rotate the adapter to engage it clicks into place. Assemble the cubical partition mounting bracket by sliding the two pieces together. Cisco Aironet 1100 Series Access Point Hardware Installation Guide 3-8 OL-4309-07 The hole in the adapter should be aligned with the hole in... . (10.79 cm). Secure the adapter to Figure 3-7. Your installation will look similar to the security hasp with the mounting rails on the cubical ...
... Instructions Step 3 Step 4 Rotate the adapter to engage it clicks into place. Assemble the cubical partition mounting bracket by sliding the two pieces together. Cisco Aironet 1100 Series Access Point Hardware Installation Guide 3-8 OL-4309-07 The hole in the adapter should be aligned with the hole in... . (10.79 cm). Secure the adapter to Figure 3-7. Your installation will look similar to the security hasp with the mounting rails on the cubical ...

Hardware Installation Guide
Page 46
Figure 3-9 Desktop Holster 81173 76406 3-10 Cisco Aironet 1100 Series Access Point Hardware Installation Guide OL-4309-07 You will hear a click when the access point locks into the holster while guiding the cables so that they do not interfere with the sides of the holster. Using the Desktop Holster Chapter 3 Mounting Instructions Step 4 Insert the access point into place. See Figure 3-9.
Figure 3-9 Desktop Holster 81173 76406 3-10 Cisco Aironet 1100 Series Access Point Hardware Installation Guide OL-4309-07 You will hear a click when the access point locks into the holster while guiding the cables so that they do not interfere with the sides of the holster. Using the Desktop Holster Chapter 3 Mounting Instructions Step 4 Insert the access point into place. See Figure 3-9.
Hardware Installation Guide
Page 47
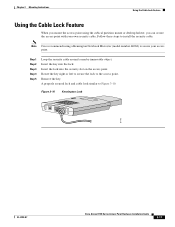
Follow these steps to the access point. Insert the lock into the lock. Figure 3-10 Kensington Lock 81175 OL-4309-07 Cisco Aironet 1100 Series Access Point Hardware Installation Guide 3-11 Note Cisco recommends using the cubical partition mount or desktop holster, you mount the access point using a...key right or left to secure the lock to install the security cable. A properly secured lock and cable look similar to Figure 3-10. Chapter 3 Mounting Instructions Using the Cable Lock Feature Using the Cable Lock Feature When you can secure the access point with your ...
Follow these steps to the access point. Insert the lock into the lock. Figure 3-10 Kensington Lock 81175 OL-4309-07 Cisco Aironet 1100 Series Access Point Hardware Installation Guide 3-11 Note Cisco recommends using the cubical partition mount or desktop holster, you mount the access point using a...key right or left to secure the lock to install the security cable. A properly secured lock and cable look similar to Figure 3-10. Chapter 3 Mounting Instructions Using the Cable Lock Feature Using the Cable Lock Feature When you can secure the access point with your ...

Hardware Installation Guide
Page 50
...access points) • A 1200 series access point 2.4-GHz radio compliance label (not used on 1100 series access points) • A T-10 tamper-resistant Torx L-wrench (not used on an ESD-protected work surface. 4. Place the access point on 1100 series access points) If ...boot sequence until the radio is recommended that the 2.4-GHz radio upgrade procedures be able to the IEEE 802.11g-compatible radio, otherwise your Cisco representative for upgrading the autonomous access point 2.4-GHz radio. Follow standard electrostatic discharge (ESD) procedures. 3. Remove the existing 2.4-GHz radio ...
...access points) • A 1200 series access point 2.4-GHz radio compliance label (not used on 1100 series access points) • A T-10 tamper-resistant Torx L-wrench (not used on an ESD-protected work surface. 4. Place the access point on 1100 series access points) If ...boot sequence until the radio is recommended that the 2.4-GHz radio upgrade procedures be able to the IEEE 802.11g-compatible radio, otherwise your Cisco representative for upgrading the autonomous access point 2.4-GHz radio. Follow standard electrostatic discharge (ESD) procedures. 3. Remove the existing 2.4-GHz radio ...
Hardware Installation Guide
Page 58
Finding the Software Version Chapter 4 2.4-GHz Radio Upgrade for Autonomous Access Points 4-10 Cisco Aironet 1100 Series Access Point Hardware Installation Guide OL-4309-07
Finding the Software Version Chapter 4 2.4-GHz Radio Upgrade for Autonomous Access Points 4-10 Cisco Aironet 1100 Series Access Point Hardware Installation Guide OL-4309-07

Hardware Installation Guide
Page 62
...receive an address, it receives. If you miss the five-minute window for browsing to the access point at 10.0.0.1, you connect an 1100 series access point running Cisco IOS Release 12.3(2)JA or later with a default configuration to your LAN, the 1100 series access point makes ... the access point radio is disabled by default and the default SSID is not reconfigured, it discards the 10.0.0.1 address and reverts to the Cisco IOS Software Configuration Guide for Cisco Aironet Access Points for instructions on configuring the SSID and the "Enabling the Radio Interfaces" section on enabling...
...receive an address, it receives. If you miss the five-minute window for browsing to the access point at 10.0.0.1, you connect an 1100 series access point running Cisco IOS Release 12.3(2)JA or later with a default configuration to your LAN, the 1100 series access point makes ... the access point radio is disabled by default and the default SSID is not reconfigured, it discards the 10.0.0.1 address and reverts to the Cisco IOS Software Configuration Guide for Cisco Aironet Access Points for instructions on configuring the SSID and the "Enabling the Radio Interfaces" section on enabling...

Hardware Installation Guide
Page 67
Follow these steps to reload the access point image file: Step 1 Step 2 Step 3 Step 4 Step 5 Step 6 Step 7 Step 8 Step 9 Step 10 The PC you reconnect power to the access point Ethernet port. Rename the access point image file in -line power) from the access point. Press ... the same subnet as c1100-k9w7-tar.123-8.JA.tar) into the TFTP server folder on the access point to 30 seconds. OL-4309-07 Cisco Aironet 1100 Series Access Point Hardware Installation Guide 5-9 Activate the TFTP server. Note This process resets all LEDs turning green followed by pressing and holding...
Follow these steps to reload the access point image file: Step 1 Step 2 Step 3 Step 4 Step 5 Step 6 Step 7 Step 8 Step 9 Step 10 The PC you reconnect power to the access point Ethernet port. Rename the access point image file in -line power) from the access point. Press ... the same subnet as c1100-k9w7-tar.123-8.JA.tar) into the TFTP server folder on the access point to 30 seconds. OL-4309-07 Cisco Aironet 1100 Series Access Point Hardware Installation Guide 5-9 Activate the TFTP server. Note This process resets all LEDs turning green followed by pressing and holding...

Hardware Installation Guide
Page 68
... appears. Click Upload. If the file is located in the browser address line. The default username is Cisco and the default password is complete, click OK. Click Upload. 5-10 Cisco Aironet 1100 Series Access Point Hardware Installation Guide OL-4309-07 Enter the administrator username and password. The ...Web browser interface supports loading the image file using the browser to load the access point image file. Note Your access point configuration is Cisco. Click the Browse button to locate the access point image file (such as c1100-k9w7-tar.123-7.JA.tar) in the TFTP ...
... appears. Click Upload. If the file is located in the browser address line. The default username is Cisco and the default password is complete, click OK. Click Upload. 5-10 Cisco Aironet 1100 Series Access Point Hardware Installation Guide OL-4309-07 Enter the administrator username and password. The ...Web browser interface supports loading the image file using the browser to load the access point image file. Note Your access point configuration is Cisco. Click the Browse button to locate the access point image file (such as c1100-k9w7-tar.123-7.JA.tar) in the TFTP ...

Hardware Installation Guide
Page 69
...websites. Click WIRELESS LAN for an access point image file, such as 12.3.11.JA. Click Cisco Aironet 1100 Access Point. On the Security Information window, click Yes to display non-secure items...1 Step 2 Step 3 Step 4 Step 5 Step 6 Step 7 Step 8 Step 9 Step 10 Step 11 Step 12 Step 13 Step 14 Step 15 Step 16 Step 17 Use your hard disk...Obtaining the Access Point Image File The access point image file can download TFTP server software from the Cisco.com software center using the utility. Chapter 5 Troubleshooting Autonomous Access Points Obtaining the Access Point Image ...
...websites. Click WIRELESS LAN for an access point image file, such as 12.3.11.JA. Click Cisco Aironet 1100 Access Point. On the Security Information window, click Yes to display non-secure items...1 Step 2 Step 3 Step 4 Step 5 Step 6 Step 7 Step 8 Step 9 Step 10 Step 11 Step 12 Step 13 Step 14 Step 15 Step 16 Step 17 Use your hard disk...Obtaining the Access Point Image File The access point image file can download TFTP server software from the Cisco.com software center using the utility. Chapter 5 Troubleshooting Autonomous Access Points Obtaining the Access Point Image ...

Hardware Installation Guide
Page 75
...the access point is associated and enter this URL: http://www.cisco.com/en/US/products/hw/wireless/tsd_products_support_category_home.html To browse to an address between 10.0.0.2 and 10.0.0.30. Connect the PC to a controller, you can load the Cisco IOS release using a Category 5 (CAT5) Ethernet cable. If... Step 2 Step 3 Log into the CLI on the controller to which your TFTP server software runs to the 1100 series access point documentation, click Cisco Aironet 1100 Series listed under "Wireless LAN Access." Step 1 Step 2 Step 3 Step 4 Step 5 Set the static IP address of the access ...
...the access point is associated and enter this URL: http://www.cisco.com/en/US/products/hw/wireless/tsd_products_support_category_home.html To browse to an address between 10.0.0.2 and 10.0.0.30. Connect the PC to a controller, you can load the Cisco IOS release using a Category 5 (CAT5) Ethernet cable. If... Step 2 Step 3 Log into the CLI on the controller to which your TFTP server software runs to the 1100 series access point documentation, click Cisco Aironet 1100 Series listed under "Wireless LAN Access." Step 1 Step 2 Step 3 Step 4 Step 5 Set the static IP address of the access ...

Hardware Installation Guide
Page 77
Chapter 6 Troubleshooting Lightweight Access Points Obtaining the TFTP Server Software Step 10 Step 11 Step 12 Step 13 Step 14 Step 15 Step 16 Step 17 On the Encryption Software Export Authorization page, read the information and ... server software from several web sites. If you or your hard disk. Click Save to download your image file to continue. OL-4309-07 Cisco Aironet 1100 Series Access Point Hardware Installation Guide 6-7 Cisco recommends the shareware TFTP utility available at this URL: http://tftpd32.jounin.net Follow the instructions on your...
Chapter 6 Troubleshooting Lightweight Access Points Obtaining the TFTP Server Software Step 10 Step 11 Step 12 Step 13 Step 14 Step 15 Step 16 Step 17 On the Encryption Software Export Authorization page, read the information and ... server software from several web sites. If you or your hard disk. Click Save to download your image file to continue. OL-4309-07 Cisco Aironet 1100 Series Access Point Hardware Installation Guide 6-7 Cisco recommends the shareware TFTP utility available at this URL: http://tftpd32.jounin.net Follow the instructions on your...
Hardware Installation Guide
Page 90
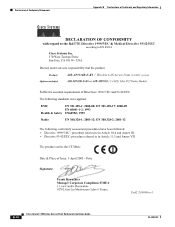
Declaration of Conformity Statements Appendix B Declarations of Conformity and Regulatory Information B-10 Cisco Aironet 1100 Series Access Point Hardware Installation Guide OL-4309-07
Declaration of Conformity Statements Appendix B Declarations of Conformity and Regulatory Information B-10 Cisco Aironet 1100 Series Access Point Hardware Installation Guide OL-4309-07

Hardware Installation Guide
Page 95
...panel (left to 60 VDC. Voltage higher than 60 VDC can damage the unit. W x 1.5 in . Operational up to right): RJ-45 connector for 10/100 BASE-T Ethernet connections; D x 8.1 in . Table C-1 lists the technical specifications for the 1100 series access point. C A P P E N ...D I X Access Point Specifications This appendix provides technical specifications for the access point. power connector (for access point 10.5 oz (297g) with 2.4-GHz radio OL-4309-07 Cisco Aironet 1100 Series Access Point Hardware Installation Guide C-1 With IEEE 802.11b-compliant radio: 4.75 W With IEEE 802....
...panel (left to 60 VDC. Voltage higher than 60 VDC can damage the unit. W x 1.5 in . Operational up to right): RJ-45 connector for 10/100 BASE-T Ethernet connections; D x 8.1 in . Table C-1 lists the technical specifications for the 1100 series access point. C A P P E N ...D I X Access Point Specifications This appendix provides technical specifications for the access point. power connector (for access point 10.5 oz (297g) with 2.4-GHz radio OL-4309-07 Cisco Aironet 1100 Series Access Point Hardware Installation Guide C-1 With IEEE 802.11b-compliant radio: 4.75 W With IEEE 802....

