Quick Start Guide
Page 4
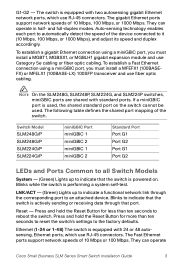
...Cisco Small Business SLM Series Smart Switch Installation Guide 3 NOTE On the SLM248G, SLM248P, SLM224G, and SLM224P switches, miniGBIC ports are shared with two autosensing gigabit Ethernet network ports, which use RJ-45 connectors. The following table defines the shared port mapping of 10 Mbps or 100 Mbps. Reset...for more than ten seconds to indicate that the switch is actively sending or receiving data through the corresponding port to the factory defaults. and full-duplex modes. Auto-sensing technology enables each port to automatically detect the speed of 10 Mbps, 100 ...
...Cisco Small Business SLM Series Smart Switch Installation Guide 3 NOTE On the SLM248G, SLM248P, SLM224G, and SLM224P switches, miniGBIC ports are shared with two autosensing gigabit Ethernet network ports, which use RJ-45 connectors. The following table defines the shared port mapping of 10 Mbps or 100 Mbps. Reset...for more than ten seconds to indicate that the switch is actively sending or receiving data through the corresponding port to the factory defaults. and full-duplex modes. Auto-sensing technology enables each port to automatically detect the speed of 10 Mbps, 100 ...
Quick Start Guide
Page 8
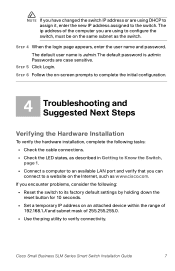
...to the switch. STEP 5 Click Login. NOTE If you have changed the switch IP address or are case sensitive. The default password is admin. Cisco Small Business SLM Series Smart Switch Installation Guide 7 Passwords are using to configure the switch, must be on an attached device within the range of... 192.168.1.X and subnet mask of 255.255.255.0. • Use the ping utility to its factory default settings by holding down the reset button for 10 seconds. • Set a temporary IP address on the same subnet as the switch. STEP 6 Follow the on-...
...to the switch. STEP 5 Click Login. NOTE If you have changed the switch IP address or are case sensitive. The default password is admin. Cisco Small Business SLM Series Smart Switch Installation Guide 7 Passwords are using to configure the switch, must be on an attached device within the range of... 192.168.1.X and subnet mask of 255.255.255.0. • Use the ping utility to its factory default settings by holding down the reset button for 10 seconds. • Set a temporary IP address on the same subnet as the switch. STEP 6 Follow the on-...

Quick Start Guide
Page 9
..., you need help resolving a problem, visit the Cisco Small Business Support Community at http:// www.cisco.com/en/US/products/ps9994/ tsd_products_support_series_home.html 8 Cisco Small Business SLM Series Smart Switch Installation Guide Returning the Switch to the Factory Default Settings The Factory Default window allows network managers to reset the switch to protect it from the...
..., you need help resolving a problem, visit the Cisco Small Business Support Community at http:// www.cisco.com/en/US/products/ps9994/ tsd_products_support_series_home.html 8 Cisco Small Business SLM Series Smart Switch Installation Guide Returning the Switch to the Factory Default Settings The Factory Default window allows network managers to reset the switch to protect it from the...


