User Guide
Page 8
... Ethernet Figure 5-61: Spanning Tree - IGMP Conf 77 Figure 5-65: IGMP - IP Multicast Reg Table 79 Figure 5-68: IGMP - SNMP Config 75 Figure 5-64: IGMP - Reset 80 Figure 5-70: Maintenance - IGMP Member Conf 79 Figure 5-69: Maintenance -
... Ethernet Figure 5-61: Spanning Tree - IGMP Conf 77 Figure 5-65: IGMP - IP Multicast Reg Table 79 Figure 5-68: IGMP - SNMP Config 75 Figure 5-64: IGMP - Reset 80 Figure 5-70: Maintenance - IGMP Member Conf 79 Figure 5-69: Maintenance -
User Guide
Page 16
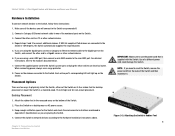
... devices connected to the Switch's power port, and plug the other network device. 6. Power on the Switch. 3. Each active port's corresponding LED will connect to reset the Switch, remove the power cord from the back of the Switch. 2. For detailed instructions, refer to use a surge protector. 8. Chapter 3: Connecting the Switch Hardware...
... devices connected to the Switch's power port, and plug the other network device. 6. Power on the Switch. 3. Each active port's corresponding LED will connect to reset the Switch, remove the power cord from the back of the Switch. 2. For detailed instructions, refer to use a surge protector. 8. Chapter 3: Connecting the Switch Hardware...

User Guide
Page 27
... or the "n" key to reboot the Switch, select Reboot System and press Enter. A confirmation message will appear stating that All User Configuration data will be reset to the factory default settings, select Restore System Default Setting and press Enter. 24-Port 10/100 + 2-Port Gigabit Switch with Webview and Power over...
... or the "n" key to reboot the Switch, select Reboot System and press Enter. A confirmation message will appear stating that All User Configuration data will be reset to the factory default settings, select Restore System Default Setting and press Enter. 24-Port 10/100 + 2-Port Gigabit Switch with Webview and Power over...

User Guide
Page 66
... 18, control bitmask 18 • - Specifies the protocol type to ignore a bit. Decimal number representing the code bits to the control code. Finish • 2 (syn) - Reset • 8 (psh) - The following flags set: • - Both SYN and ACK valid, use control-code 2, control bitmask 18 58 Chapter 5: Configuring the Switch through the...
... 18, control bitmask 18 • - Specifies the protocol type to ignore a bit. Decimal number representing the code bits to the control code. Finish • 2 (syn) - Reset • 8 (psh) - The following flags set: • - Both SYN and ACK valid, use control-code 2, control bitmask 18 58 Chapter 5: Configuring the Switch through the...

User Guide
Page 88
...The Maintenance tab includes links to the following screens. • Reset • File Download • File Upload • Restore Defaults • Save Config • Integrated Cable Test Reset To restart the switch, click the Reset the Device link, then click Yes to download and select ...the destination file name using the radio buttons. File Download 80 Select Firmware of the software to restart the switch. Reset Chapter 5: Configuring the Switch through the Web Utility Maintenance Figure 5-70: Maintenance - To cancel the restart, click No or Cancel, ...
...The Maintenance tab includes links to the following screens. • Reset • File Download • File Upload • Restore Defaults • Save Config • Integrated Cable Test Reset To restart the switch, click the Reset the Device link, then click Yes to download and select ...the destination file name using the radio buttons. File Download 80 Select Firmware of the software to restart the switch. Reset Chapter 5: Configuring the Switch through the Web Utility Maintenance Figure 5-70: Maintenance - To cancel the restart, click No or Cancel, ...


