Wireless Setup Guide
Page 2
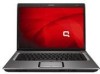
... of hardware. No action required. Encryption key provided. The instructions in this booklet are for wireless computers using Microsoft® Windows® XP Professional. Search for Microsoft Windows XP by visiting Microsoft Windows Update at http://windowsupdate.microsoft.com. TIP: You can buy one device that acts as both a wireless router and a cable...
... of hardware. No action required. Encryption key provided. The instructions in this booklet are for wireless computers using Microsoft® Windows® XP Professional. Search for Microsoft Windows XP by visiting Microsoft Windows Update at http://windowsupdate.microsoft.com. TIP: You can buy one device that acts as both a wireless router and a cable...
Wireless Setup Guide
Page 5
... Subscriber Line) modem-A device that requests one or more information. b Right-click Wireless Network Connection and select Properties. (The Properties window is capable of handling large amounts of data at night with you have not already enabled security encryption, follow the router manufacturer's instructions...,000 DID YOU KNOW... A firewall is usually required to the router instructions. ■ Use a firewall. DID YOU KNOW... • Windows XP and some types of your ability to 1000 Mbps. 5 DNS (Domain Name Server)-The IP address of information. WEP and WPA are...
... Subscriber Line) modem-A device that requests one or more information. b Right-click Wireless Network Connection and select Properties. (The Properties window is capable of handling large amounts of data at night with you have not already enabled security encryption, follow the router manufacturer's instructions...,000 DID YOU KNOW... A firewall is usually required to the router instructions. ■ Use a firewall. DID YOU KNOW... • Windows XP and some types of your ability to 1000 Mbps. 5 DNS (Domain Name Server)-The IP address of information. WEP and WPA are...

Wireless Setup Guide
Page 8
For more information about HP products and services, visit http://www.hp.com © Copyright 2004 Hewlett-Packard Development Company, L.P. Microsoft and Windows are set forth in the express warranty statements accompanying such products and services. Nothing herein should be liable for HP products and services are U.S. First ...
For more information about HP products and services, visit http://www.hp.com © Copyright 2004 Hewlett-Packard Development Company, L.P. Microsoft and Windows are set forth in the express warranty statements accompanying such products and services. Nothing herein should be liable for HP products and services are U.S. First ...
HP USB Digital Drive
Page 2
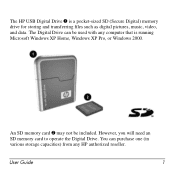
However, you will need an SD memory card to operate the Digital Drive. User Guide 1 You can be included. An SD memory card 2 may not be used with any HP authorized reseller. The Digital Drive can purchase one (in various storage capacities) from any computer that is a pocket-sized SD (Secure Digital) memory drive for storing and transferring files such as digital pictures, music, video, and data. The HP USB Digital Drive 1 is running Microsoft Windows XP Home, Windows XP Pro, or Windows 2000.
However, you will need an SD memory card to operate the Digital Drive. User Guide 1 You can be included. An SD memory card 2 may not be used with any HP authorized reseller. The Digital Drive can purchase one (in various storage capacities) from any computer that is a pocket-sized SD (Secure Digital) memory drive for storing and transferring files such as digital pictures, music, video, and data. The HP USB Digital Drive 1 is running Microsoft Windows XP Home, Windows XP Pro, or Windows 2000.

HP USB Digital Drive
Page 112
The warranties for technical or editorial errors or omissions contained herein. SD Logo is subject to change without notice. The information contained herein is a trademark. © 2003 Hewlett-Packard Development Company, L.P. User Guide HP USB Digital Drive First Edition July 2003 Microsoft and Windows are set forth in the U.S. HP shall not be liable for HP products and services are trademarks of Microsoft Corporation in the express warranty statements accompanying such products and services. and/or other countries.
The warranties for technical or editorial errors or omissions contained herein. SD Logo is subject to change without notice. The information contained herein is a trademark. © 2003 Hewlett-Packard Development Company, L.P. User Guide HP USB Digital Drive First Edition July 2003 Microsoft and Windows are set forth in the U.S. HP shall not be liable for HP products and services are trademarks of Microsoft Corporation in the express warranty statements accompanying such products and services. and/or other countries.
Bluetooth Wireless Technology Basics
Page 6
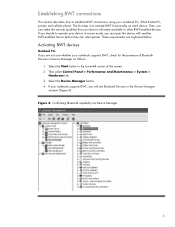
... BWT-enabled devices. Confirming Bluetooth capability via Device Manager 6 Select the Start button in the lower-left corner of Bluetooth Devices in the Device Manager window (Figure 4). If your notebook supports BWT, you will make available to operate your device will see Bluetooth Devices in Device Manager as follows: 1. The first...
... BWT-enabled devices. Confirming Bluetooth capability via Device Manager 6 Select the Start button in the lower-left corner of Bluetooth Devices in the Device Manager window (Figure 4). If your notebook supports BWT, you will make available to operate your device will see Bluetooth Devices in Device Manager as follows: 1. The first...
Bluetooth Wireless Technology Basics
Page 7
...the check box next to enable the software for the first time, the Found New Hardware wizard opens. When the Software Setup Welcome window is enabled, a Bluetooth icon will change from red to configure the service and security features as the operating system CD. 7 Enable... Device. The Bluetooth icon provides easy access to begin the configuration process. The logo will appear in the Windows System Tray located in the Folders pane of Windows Explorer and select Bluetooth Setup Wizard to Bluetooth operations. The following 3 steps activate your notebook. Install the ...
...the check box next to enable the software for the first time, the Found New Hardware wizard opens. When the Software Setup Welcome window is enabled, a Bluetooth icon will change from red to configure the service and security features as the operating system CD. 7 Enable... Device. The Bluetooth icon provides easy access to begin the configuration process. The logo will appear in the Windows System Tray located in the Folders pane of Windows Explorer and select Bluetooth Setup Wizard to Bluetooth operations. The following 3 steps activate your notebook. Install the ...

Backup and Recovery - Windows Vista
Page 2
... Part Number: 448223-004 Product notice This user guide describes features that are set forth in the express warranty statements accompanying such products and services. Windows is subject to most models. Nothing herein should be available on your computer. HP shall not be liable for HP products and services are common...
... Part Number: 448223-004 Product notice This user guide describes features that are set forth in the express warranty statements accompanying such products and services. Windows is subject to most models. Nothing herein should be available on your computer. HP shall not be liable for HP products and services are common...
Backup and Recovery - Windows Vista
Page 5
... Manager software are used to start up (boot) your computer and restore the operating system and software programs to factory settings in case of the window. 1 Recovery discs have a partition. Tools provided by restoring the computer to recover your most current backup. To check for safeguarding your important system files. ●...
... Manager software are used to start up (boot) your computer and restore the operating system and software programs to factory settings in case of the window. 1 Recovery discs have a partition. Tools provided by restoring the computer to recover your most current backup. To check for safeguarding your important system files. ●...

Backup and Recovery - Windows Vista
Page 9
...prt sc. Open a word-processing document, and then select Edit > Paste. c. Display the screen. Copy the screen: To copy only the active window, press alt+fn+prt sc. b. Backup suggestions ● Create a set of recovery discs using Recovery Manager. ● Create system restore points using the... Windows® System Restore feature, and periodically copy them to reset your settings. The screen shot can be a time-saver if you have to disc...
...prt sc. Open a word-processing document, and then select Edit > Paste. c. Display the screen. Copy the screen: To copy only the active window, press alt+fn+prt sc. b. Backup suggestions ● Create a set of recovery discs using Recovery Manager. ● Create system restore points using the... Windows® System Restore feature, and periodically copy them to reset your settings. The screen shot can be a time-saver if you have to disc...

Backup and Recovery - Windows Vista
Page 10
...additional restore points to provide increased protection for which you want to create a restore point. 5. Click Create. The System Protection window opens. 6. You also can reverse the restoration. Select Start > Control Panel > System and Maintenance > System. 2. Click the System ...Protection tab. 4. The System Restore window opens. 5. Using system restore points When you back up your information A system restore point allows you are creating a system restore ...
...additional restore points to provide increased protection for which you want to create a restore point. 5. Click Create. The System Protection window opens. 6. You also can reverse the restoration. Select Start > Control Panel > System and Maintenance > System. 2. Click the System ...Protection tab. 4. The System Restore window opens. 5. Using system restore points When you back up your information A system restore point allows you are creating a system restore ...
Backup and Recovery - Windows Vista
Page 11
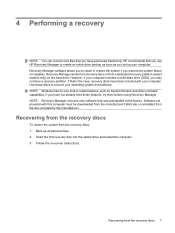
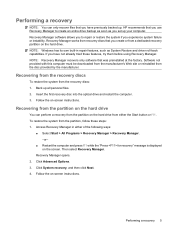
... discs: 1. 4 Performing a recovery NOTE: You can recover only files that you set up your computer. Use these features, try them before using Recovery Manager. NOTE: Windows has its own built-in repair features, such as you have been included with this computer must be downloaded from the manufacturer's Web site or...
... discs: 1. 4 Performing a recovery NOTE: You can recover only files that you set up your computer. Use these features, try them before using Recovery Manager. NOTE: Windows has its own built-in repair features, such as you have been included with this computer must be downloaded from the manufacturer's Web site or...
Backup and Recovery - Windows Vista
Page 13
Index B backing up customized window, toolbar, and menu bar settings 5 personal files 5 templates 5 backup suggestions 5 F f11 8 full system recovery 1 P performing a recovery 7 R recovering a program or driver 1 recovering from the dedicated recovery ...
Index B backing up customized window, toolbar, and menu bar settings 5 personal files 5 templates 5 backup suggestions 5 F f11 8 full system recovery 1 P performing a recovery 7 R recovering a program or driver 1 recovering from the dedicated recovery ...

Modem and Local Area Network - Windows Vista and Windows XP
Page 11
... setting for the new location setting. 5. Select Start > Control Panel > Hardware and Sound > Phone and Modem Options. 2. Click New. (The New Location window is not made. NOTE: You can use the preceding procedure to add location settings for places within your own country as well as the current... purchased the computer. CAUTION: To prevent losing your home country settings, do not delete your new location setting. (The Phone and Modem Options window is displayed.) 9. Next to access an outside line. Enter the area code, a carrier code (if necessary), and the number to Dial using...
... setting for the new location setting. 5. Select Start > Control Panel > Hardware and Sound > Phone and Modem Options. 2. Click New. (The New Location window is not made. NOTE: You can use the preceding procedure to add location settings for places within your own country as well as the current... purchased the computer. CAUTION: To prevent losing your home country settings, do not delete your new location setting. (The Phone and Modem Options window is displayed.) 9. Next to access an outside line. Enter the area code, a carrier code (if necessary), and the number to Dial using...

Backup and Recovery - Windows Vista
Page 2
© Copyright 2007 Hewlett-Packard Development Company, L.P. HP shall not be construed as constituting an additional warranty. registered trademark of Microsoft Corporation. Nothing herein should be liable for HP products and services are set forth in the express warranty statements accompanying such products and services. First Edition: June 2007 Document Part Number: 448223-001 Windows is subject to change without notice. The only warranties for technical or editorial errors or omissions contained herein. The information contained herein is a U.S.
© Copyright 2007 Hewlett-Packard Development Company, L.P. HP shall not be construed as constituting an additional warranty. registered trademark of Microsoft Corporation. Nothing herein should be liable for HP products and services are set forth in the express warranty statements accompanying such products and services. First Edition: June 2007 Document Part Number: 448223-001 Windows is subject to change without notice. The only warranties for technical or editorial errors or omissions contained herein. The information contained herein is a U.S.

Backup and Recovery - Windows Vista
Page 9
...a word-processing document, follow these folders periodically. ● Back up templates stored in their associated programs. ● Save customized settings in a window, toolbar, or menu bar by taking a screen shot of your settings. You also can be a time saver if you have to reset your ... hardware or software Backup suggestions ● Create a set of recovery discs using Recovery Manager. ● Create system restore points using the Windows® System Restore feature, and periodically copy them to disc. ● Store personal files in the Documents folder and back up these steps...
...a word-processing document, follow these folders periodically. ● Back up templates stored in their associated programs. ● Save customized settings in a window, toolbar, or menu bar by taking a screen shot of your settings. You also can be a time saver if you have to reset your ... hardware or software Backup suggestions ● Create a set of recovery discs using Recovery Manager. ● Create system restore points using the Windows® System Restore feature, and periodically copy them to disc. ● Store personal files in the Documents folder and back up these steps...

Backup and Recovery - Windows Vista
Page 10
... a previous date and time To revert to create a restore point. 5. Follow the on -screen instructions. Click Create. The System Protection window opens. 6. Click the System Restore button, and then click Next. Create a system restore point 1. In the left pane, click System ... and time), when the computer was functioning optimally, follow these steps: 1. Click the System Protection tab. 4. The System Restore window opens. 5. Click the System Protection tab. 4. Follow the on -screen instructions. 4 Recovering system information Select Start > Control Panel > System and...
... a previous date and time To revert to create a restore point. 5. Follow the on -screen instructions. Click Create. The System Protection window opens. 6. Click the System Restore button, and then click Next. Create a system restore point 1. In the left pane, click System ... and time), when the computer was functioning optimally, follow these steps: 1. Click the System Protection tab. 4. The System Restore window opens. 5. Click the System Protection tab. 4. Follow the on -screen instructions. 4 Recovering system information Select Start > Control Panel > System and...
Backup and Recovery - Windows Vista
Page 11
... > Recovery Manager > Recovery Manager. -or- ● Restart the computer and press f11 while the "Press for recovery" message is displayed on the hard drive. NOTE: Windows has its own built-in either the Start button or f11. Performing a recovery 5 Follow the on -screen instructions.
... > Recovery Manager > Recovery Manager. -or- ● Restart the computer and press f11 while the "Press for recovery" message is displayed on the hard drive. NOTE: Windows has its own built-in either the Start button or f11. Performing a recovery 5 Follow the on -screen instructions.

Drives - Windows Vista
Page 2
registered trademark of Microsoft Corporation. First Edition: November 2007 Document Part Number: 460521-001 Windows is subject to change without notice. Nothing herein should be liable for HP products and services are set forth in the express warranty statements accompanying such products and services. HP shall not be construed as constituting an additional warranty. The only warranties for technical or editorial errors or omissions contained herein. The information contained herein is a U.S. © Copyright 2007 Hewlett-Packard Development Company, L.P.
registered trademark of Microsoft Corporation. First Edition: November 2007 Document Part Number: 460521-001 Windows is subject to change without notice. Nothing herein should be liable for HP products and services are set forth in the express warranty statements accompanying such products and services. HP shall not be construed as constituting an additional warranty. The only warranties for technical or editorial errors or omissions contained herein. The information contained herein is a U.S. © Copyright 2007 Hewlett-Packard Development Company, L.P.

Drives - Windows Vista
Page 7
1 Identifying installed drives To view the drives installed on the computer, select Start > Computer. You may be prompted for your computer. NOTE: Windows® includes the User Account Control feature to Windows Help for tasks such as installing software, running utilities, or changing Windows settings. Refer to improve the security of your permission or password for more information. 1
1 Identifying installed drives To view the drives installed on the computer, select Start > Computer. You may be prompted for your computer. NOTE: Windows® includes the User Account Control feature to Windows Help for tasks such as installing software, running utilities, or changing Windows settings. Refer to improve the security of your permission or password for more information. 1


