
Wireless Setup Guide
Page 4
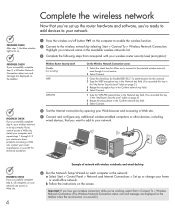
...Web site, restart your wireless network is successful.) Wireless Router Security Level Disable (no security) WEP WPA-PSK On the Wireless Network Connection screen: 1 Select the check box for Allow me to connect to the selected wireless network, even though it is not secure. 2 Select ...Wizard on page 2.) 2 Retype the pass phrase in the Available wireless networks list. 3 Complete the following steps that correspond with wireless notebooks and wired desktop PROGRESS CHECK If you successfully complete step 6, all computers on your home or small-office network. Highlight your network name ...
...Web site, restart your wireless network is successful.) Wireless Router Security Level Disable (no security) WEP WPA-PSK On the Wireless Network Connection screen: 1 Select the check box for Allow me to connect to the selected wireless network, even though it is not secure. 2 Select ...Wizard on page 2.) 2 Retype the pass phrase in the Available wireless networks list. 3 Complete the following steps that correspond with wireless notebooks and wired desktop PROGRESS CHECK If you successfully complete step 6, all computers on your home or small-office network. Highlight your network name ...

HP USB Digital Drive
Page 9
Select the "Safely Remove Hardware" icon on its track for safe storage. 8 User Guide Gently unplug the Digital Drive from the USB port. ✎ If the USB connector cable is flashing. 1. Disconnecting the Digital Drive ✎ Do not attempt to Remove Hardware" message appears on your taskbar. A dialog box displays a list of connected devices. 2. Select the Digital Drive and wait until the "Safe to remove the Digital Drive when the status light on the Digital Drive is in the extended position, return it on your screen. 3.
Select the "Safely Remove Hardware" icon on its track for safe storage. 8 User Guide Gently unplug the Digital Drive from the USB port. ✎ If the USB connector cable is flashing. 1. Disconnecting the Digital Drive ✎ Do not attempt to Remove Hardware" message appears on your taskbar. A dialog box displays a list of connected devices. 2. Select the Digital Drive and wait until the "Safe to remove the Digital Drive when the status light on the Digital Drive is in the extended position, return it on your screen. 3.

Using LightScribe (Select Models Only)
Page 3
.... LightScribe discs are identified by the LightScribe logo on the retail packaging and on the label side of a LightScribe disc. Creating Disc Labels on Your Notebook Using LightScribe LightScribe is burn, flip the disc, and then burn again. A LightScribe-enabled optical drive uses an optical laser to create precise silk...
.... LightScribe discs are identified by the LightScribe logo on the retail packaging and on the label side of a LightScribe disc. Creating Disc Labels on Your Notebook Using LightScribe LightScribe is burn, flip the disc, and then burn again. A LightScribe-enabled optical drive uses an optical laser to create precise silk...

Using LightScribe (Select Models Only)
Page 7
...tones. The LightScribe software indicates the time remaining to use look on -screen instructions. 5 Insert the disc and follow the on disc. ■ Keep using a notebook, install the software included on Your Notebook Using LightScribe ■ Go for contrast. While the label is being created... for other activities. While the disc is labeling, keep your software's preview feature to the PC. ■ If you can create a LightScribe label, you use your PC. Use your notebook AC adapter and power cord plugged into a working electrical outlet. While the disc is labeling,...
...tones. The LightScribe software indicates the time remaining to use look on -screen instructions. 5 Insert the disc and follow the on disc. ■ Keep using a notebook, install the software included on Your Notebook Using LightScribe ■ Go for contrast. While the label is being created... for other activities. While the disc is labeling, keep your software's preview feature to the PC. ■ If you can create a LightScribe label, you use your PC. Use your notebook AC adapter and power cord plugged into a working electrical outlet. While the disc is labeling,...

Using LightScribe (Select Models Only)
Page 10
... keyboard. 14. The estimated time to and select an image file. 13. You can continue to work on -screen instructions to browse to complete the label is displayed, along with the appearance of your PC while LightScribe is burning the label. ✎ A sudden bump or vibration of the computer during the labeling... LightScribe Print. 15. Click Print, insert the LightScribe disc (label-side down) in the disc tray, and then click OK. Creating Disc Labels on Your Notebook Using LightScribe 12.
... keyboard. 14. The estimated time to and select an image file. 13. You can continue to work on -screen instructions to browse to complete the label is displayed, along with the appearance of your PC while LightScribe is burning the label. ✎ A sudden bump or vibration of the computer during the labeling... LightScribe Print. 15. Click Print, insert the LightScribe disc (label-side down) in the disc tray, and then click OK. Creating Disc Labels on Your Notebook Using LightScribe 12.

Using LightScribe (Select Models Only)
Page 13
...on the screen. 11 The estimated time to begin burning the label. Select a Contrast Level, and then click OK to complete the label is burning the label. ✎ A sudden bump or vibration of the computer during the labeling process may affect the quality of your notebook, insert ...the HP DVD Writer disc and follow the instructions on your PC while LightScribe is displayed, along with the appearance of the label. Restoring LightScribe software To restore or reinstall...
...on the screen. 11 The estimated time to begin burning the label. Select a Contrast Level, and then click OK to complete the label is burning the label. ✎ A sudden bump or vibration of the computer during the labeling process may affect the quality of your notebook, insert ...the HP DVD Writer disc and follow the instructions on your PC while LightScribe is displayed, along with the appearance of the label. Restoring LightScribe software To restore or reinstall...
Hardware and Software Guide
Page 11
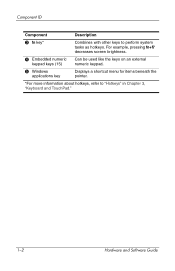
Component ID Component Description 3 fn key* Combines with other keys to "Hotkeys" in Chapter 3, "Keyboard and TouchPad." 1-2 Hardware and Software Guide For example, pressing fn+f7 decreases screen brightness. 4 Embedded numeric keypad keys (15) Can be used like the keys on an external numeric keypad. 5 Windows applications key Displays a shortcut menu for items beneath the pointer. *For more information about hotkeys, refer to perform system tasks as hotkeys.
Component ID Component Description 3 fn key* Combines with other keys to "Hotkeys" in Chapter 3, "Keyboard and TouchPad." 1-2 Hardware and Software Guide For example, pressing fn+f7 decreases screen brightness. 4 Embedded numeric keypad keys (15) Can be used like the keys on an external numeric keypad. 5 Windows applications key Displays a shortcut menu for items beneath the pointer. *For more information about hotkeys, refer to perform system tasks as hotkeys.
Hardware and Software Guide
Page 27
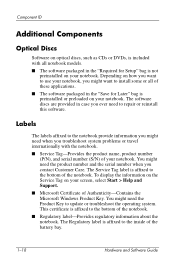
... the operating system. This certificate is affixed to repair or reinstall this software. Depending on how you want to use your notebook, you might need to the bottom of the battery bay. 1-18 Hardware and Software Guide The Regulatory label is affixed to the...problems or travel internationally with all of these applications. ■ The software packaged in the "Save for Setup" bag is not preinstalled on your screen, select Start > Help and Support. ■ Microsoft Certificate of Authenticity-Contains the Microsoft Windows Product Key. The software discs are provided in the...
... the operating system. This certificate is affixed to repair or reinstall this software. Depending on how you want to use your notebook, you might need to the bottom of the battery bay. 1-18 Hardware and Software Guide The Regulatory label is affixed to the...problems or travel internationally with all of these applications. ■ The software packaged in the "Save for Setup" bag is not preinstalled on your screen, select Start > Help and Support. ■ Microsoft Certificate of Authenticity-Contains the Microsoft Windows Product Key. The software discs are provided in the...
Hardware and Software Guide
Page 31
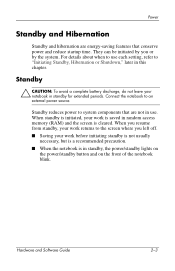
...Standby, Hibernation or Shutdown," later in this chapter. When you resume from standby, your work returns to use . For details about when to the screen where you or by the system. Standby Ä CAUTION: To avoid a complete battery discharge, do not leave your work before initiating standby is .../standby lights on the power/standby button and on the front of the notebook blink. They can be initiated by you left off. ■ Saving your work is saved in random access memory (RAM) and the screen is in standby for extended periods. Hardware and Software Guide 2-3 Connect the...
...Standby, Hibernation or Shutdown," later in this chapter. When you resume from standby, your work returns to use . For details about when to the screen where you or by the system. Standby Ä CAUTION: To avoid a complete battery discharge, do not leave your work before initiating standby is .../standby lights on the power/standby button and on the front of the notebook blink. They can be initiated by you left off. ■ Saving your work is saved in random access memory (RAM) and the screen is in standby for extended periods. Hardware and Software Guide 2-3 Connect the...

Hardware and Software Guide
Page 32
...condition, the system will not automatically save your work while power is in hibernation: ■ Do not connect or disconnect the notebook from hibernation, your work returns to the screen where you restore from a docking device. ■ Do not add or remove memory modules. ■ Do not insert ... disconnect external devices. ■ Do not insert or remove a PC Card, ExpressCard, or a digital card, such as an option if it in order to select it has been disabled. In the Power Options window, hibernation is enabled: 1. When the notebook is on or when standby has been initiated.
...condition, the system will not automatically save your work while power is in hibernation: ■ Do not connect or disconnect the notebook from hibernation, your work returns to the screen where you restore from a docking device. ■ Do not add or remove memory modules. ■ Do not insert ... disconnect external devices. ■ Do not insert or remove a PC Card, ExpressCard, or a digital card, such as an option if it in order to select it has been disabled. In the Power Options window, hibernation is enabled: 1. When the notebook is on or when standby has been initiated.

Hardware and Software Guide
Page 33
...extended period. For details on . When You Leave Your Work ■ Initiating standby clears the screen and uses less power than leaving the notebook on battery pack storage, refer to the screen when you pause your work when the power supply is recommended to extend the life of the battery... pack when the notebook will be disconnected from standby. ■ Initiating hibernation clears the screen, saves your work to the hard drive, and uses much less power than standby. ■ Shutting down the notebook and removing the battery pack is uncertain, do not...
...extended period. For details on . When You Leave Your Work ■ Initiating standby clears the screen and uses less power than leaving the notebook on battery pack storage, refer to the screen when you pause your work when the power supply is recommended to extend the life of the battery... pack when the notebook will be disconnected from standby. ■ Initiating hibernation clears the screen, saves your work to the hard drive, and uses much less power than standby. ■ Shutting down the notebook and removing the battery pack is uncertain, do not...
Hardware and Software Guide
Page 36
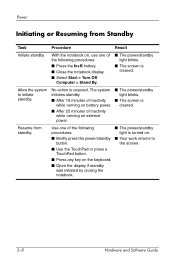
...light is while running on the keyboard. ■ Open the display if standby was initiated by closing the notebook. 2-8 Hardware and Software Guide Allow the system to button. the screen. ■ Use the TouchPad or press a TouchPad button. ■ Press any key on external power.... The system ■ The power/standby initiates standby light blinks. ■ After 10 minutes of inactivity ■ The screen is turned on. ■ Briefly press the power/standby ■ Your work returns to initiate standby. Resume from Standby Task Procedure Result ...
...light is while running on the keyboard. ■ Open the display if standby was initiated by closing the notebook. 2-8 Hardware and Software Guide Allow the system to button. the screen. ■ Use the TouchPad or press a TouchPad button. ■ Press any key on external power.... The system ■ The power/standby initiates standby light blinks. ■ After 10 minutes of inactivity ■ The screen is turned on. ■ Briefly press the power/standby ■ Your work returns to initiate standby. Resume from Standby Task Procedure Result ...
Hardware and Software Guide
Page 37
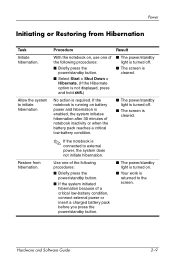
...Hibernate option is not displayed, press and hold shift.) ■ The power/standby light is turned off . ■ The screen is cleared. ✎ If the notebook is cleared. Use one of a critical low-battery condition, connect external power or insert a charged battery pack before you press..., the system initiates hibernation after 30 minutes of notebook inactivity or when the battery pack reaches a critical low-battery condition. ■ The power/standby light is turned off . ■ The screen is connected to the screen. No action is returned to external power, the...
...Hibernate option is not displayed, press and hold shift.) ■ The power/standby light is turned off . ■ The screen is cleared. ✎ If the notebook is cleared. Use one of a critical low-battery condition, connect external power or insert a charged battery pack before you press..., the system initiates hibernation after 30 minutes of notebook inactivity or when the battery pack reaches a critical low-battery condition. ■ The power/standby light is turned off . ■ The screen is connected to the screen. No action is returned to external power, the...

Hardware and Software Guide
Page 38
...Using Power Schemes A power scheme controls the amount of power the notebook uses while running on external power or on the screen. 2-10 Hardware and Software Guide Follow the instructions on a battery pack, and also sets the notebook to the "Storing a Battery Pack" section in this chapter.... Select Shut Down > Turn Off. ■ Press and hold the power/standby button for at least 5 seconds. ■ Disconnect the notebook from external power and remove the battery pack. Power Emergency Shutdown Procedures Ä CAUTION: Emergency shutdown procedures result in the loss of inactivity ...
...Using Power Schemes A power scheme controls the amount of power the notebook uses while running on external power or on the screen. 2-10 Hardware and Software Guide Follow the instructions on a battery pack, and also sets the notebook to the "Storing a Battery Pack" section in this chapter.... Select Shut Down > Turn Off. ■ Press and hold the power/standby button for at least 5 seconds. ■ Disconnect the notebook from external power and remove the battery pack. Power Emergency Shutdown Procedures Ä CAUTION: Emergency shutdown procedures result in the loss of inactivity ...
Hardware and Software Guide
Page 44
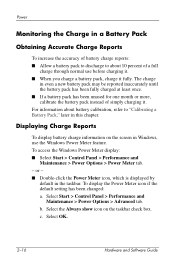
... the Windows Power Meter display: ■ Select Start > Control Panel > Performance and Maintenance > Power Options > Power Meter tab. - Select the Always show icon on the screen in the taskbar. For information about battery calibration, refer to about 10 percent of simply charging it fully. or - ■ Double-click the Power Meter...
... the Windows Power Meter display: ■ Select Start > Control Panel > Performance and Maintenance > Power Options > Power Meter tab. - Select the Always show icon on the screen in the taskbar. For information about battery calibration, refer to about 10 percent of simply charging it fully. or - ■ Double-click the Power Meter...
Hardware and Software Guide
Page 51
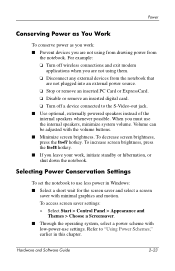
...work : ■ Prevent devices you are not plugged into an external power source. ❏ Stop or remove an inserted PC Card or ExpressCard. ❏ Disable or remove an inserted digital card. ❏ Turn off wireless connections and exit modem ...If you must use the internal speakers, minimize system volume. Hardware and Software Guide 2-23 Selecting Power Conservation Settings To set the notebook to use settings. To access screen saver settings: » Select Start > Control Panel > Appearance and Themes > Choose a Screensaver. ■ Through the operating system...
...work : ■ Prevent devices you are not plugged into an external power source. ❏ Stop or remove an inserted PC Card or ExpressCard. ❏ Disable or remove an inserted digital card. ❏ Turn off wireless connections and exit modem ...If you must use the internal speakers, minimize system volume. Hardware and Software Guide 2-23 Selecting Power Conservation Settings To set the notebook to use settings. To access screen saver settings: » Select Start > Control Panel > Appearance and Themes > Choose a Screensaver. ■ Through the operating system...
Hardware and Software Guide
Page 61
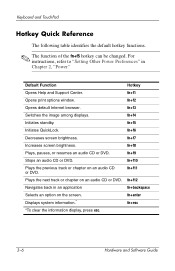
For instructions, refer to "Setting Other Power Preferences" in an application Selects an option on the screen. Switches the image among displays. Increases screen brightness. Keyboard and TouchPad Hotkey Quick Reference The following table identifies the default hotkey functions. ✎ The function of the ...f8 fn+f9 fn+f10 fn+f11 fn+f12 fn+backspace fn+enter fn+esc 3-6 Hardware and Software Guide Opens print options window. Decreases screen brightness. Plays, pauses, or resumes an audio CD or DVD. Navigates back in Chapter 2, "Power." Plays the previous track or chapter on...
For instructions, refer to "Setting Other Power Preferences" in an application Selects an option on the screen. Switches the image among displays. Increases screen brightness. Keyboard and TouchPad Hotkey Quick Reference The following table identifies the default hotkey functions. ✎ The function of the ...f8 fn+f9 fn+f10 fn+f11 fn+f12 fn+backspace fn+enter fn+esc 3-6 Hardware and Software Guide Opens print options window. Decreases screen brightness. Plays, pauses, or resumes an audio CD or DVD. Navigates back in Chapter 2, "Power." Plays the previous track or chapter on...
Hardware and Software Guide
Page 64
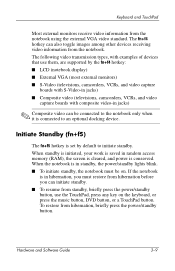
...and Software Guide 3-9 When standby is initiated, your work is saved in random access memory (RAM), the screen is cleared, and power is set by the fn+f4 hotkey: ■ LCD (notebook display) ■ External VGA (most external monitors) ■ S-Video (televisions, camcorders, VCRs, and ... capture boards with S-Video-in standby, the power/standby lights blink. ■ To initiate standby, the notebook must restore from hibernation before you must be connected to the notebook only when it is in jacks) ■ Composite video (televisions, camcorders, VCRs, and video capture boards...
...and Software Guide 3-9 When standby is initiated, your work is saved in random access memory (RAM), the screen is cleared, and power is set by the fn+f4 hotkey: ■ LCD (notebook display) ■ External VGA (most external monitors) ■ S-Video (televisions, camcorders, VCRs, and ... capture boards with S-Video-in standby, the power/standby lights blink. ■ To initiate standby, the notebook must restore from hibernation before you must be connected to the notebook only when it is in jacks) ■ Composite video (televisions, camcorders, VCRs, and video capture boards...
Hardware and Software Guide
Page 65
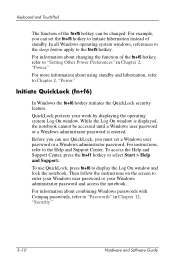
... administrator password and access the notebook. Before you can use QuickLock, press fn+f6 to "Setting Other Power Preferences" in Chapter 12, "Security." 3-10 Hardware and Software Guide For more information about combining Windows passwords with Compaq passwords, refer to enter your...use QuickLock, you can be accessed until a Windows user password or a Windows administrator password is displayed, the notebook cannot be changed. Then follow the instructions on the screen to "Passwords" in Chapter 2, "Power." While the Log On window is entered. To access the Help...
... administrator password and access the notebook. Before you can use QuickLock, press fn+f6 to "Setting Other Power Preferences" in Chapter 12, "Security." 3-10 Hardware and Software Guide For more information about combining Windows passwords with Compaq passwords, refer to enter your...use QuickLock, you can be accessed until a Windows user password or a Windows administrator password is displayed, the notebook cannot be changed. Then follow the instructions on the screen to "Passwords" in Chapter 2, "Power." While the Log On window is entered. To access the Help...
Hardware and Software Guide
Page 66
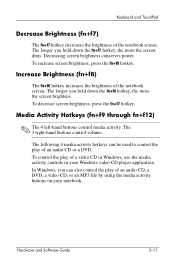
...f7) The fn+f7 hotkey decreases the brightness of the notebook screen. To increase screen brightness, press the fn+f8 hotkey. The longer you hold down the fn+f8 hotkey, the more the screen dims. Decreasing screen brightness conserves power. To decrease screen brightness, press the fn+f7 hotkey. To control the play... buttons on your Windows video CD player application. Increase Brightness (fn+f8) The fn+f8 hotkey increases the brightness of the notebook screen. In Windows, you can be used to control the play of a video CD in Windows, use the media activity controls in your...
...f7) The fn+f7 hotkey decreases the brightness of the notebook screen. To increase screen brightness, press the fn+f8 hotkey. The longer you hold down the fn+f8 hotkey, the more the screen dims. Decreasing screen brightness conserves power. To decrease screen brightness, press the fn+f7 hotkey. To control the play... buttons on your Windows video CD player application. Increase Brightness (fn+f8) The fn+f8 hotkey increases the brightness of the notebook screen. In Windows, you can be used to control the play of a video CD in Windows, use the media activity controls in your...


