Owners Manual
Page 1
Owner's Manual 10-in. www.craftsman.com BANDSAW 1/3 HP MOTOR Model 119.214000 CAUTION: Before using this product, read this manual and follow all its Safety Rules and Operating Instructions. • Table of Contents • Full One Year Warranty • Safety Instructions • Assembly • Getting to Know Your Bandsaw • Adjustment • Operation • Maintenance • Troubleshooting • Electrical Schematic • Parts List • EspaSol, p. 12 Sears, Roebuck and Co., Hoffman Estates, IL 60179, U.S.A.
Owner's Manual 10-in. www.craftsman.com BANDSAW 1/3 HP MOTOR Model 119.214000 CAUTION: Before using this product, read this manual and follow all its Safety Rules and Operating Instructions. • Table of Contents • Full One Year Warranty • Safety Instructions • Assembly • Getting to Know Your Bandsaw • Adjustment • Operation • Maintenance • Troubleshooting • Electrical Schematic • Parts List • EspaSol, p. 12 Sears, Roebuck and Co., Hoffman Estates, IL 60179, U.S.A.
Owners Manual
Page 2
... of checking to a defect in material or workmanship within one year warranty ... 2 Safety instructions ... 2 Assembly... 4 Getting to know your bandsaw 5 Adjustment ... 6 Operation ... 8 Maintenance ... 8 Troubleshooting ... 9 Electrical schematic ... 9 Parts list ... 10 Esparlol 12 If this Craftsman tool fails due to see that keys and adjusting wrenches are removed from the tool before turning it into...
... of checking to a defect in material or workmanship within one year warranty ... 2 Safety instructions ... 2 Assembly... 4 Getting to know your bandsaw 5 Adjustment ... 6 Operation ... 8 Maintenance ... 8 Troubleshooting ... 9 Electrical schematic ... 9 Parts list ... 10 Esparlol 12 If this Craftsman tool fails due to see that keys and adjusting wrenches are removed from the tool before turning it into...

Owners Manual
Page 3
... of material being cut . 6. Never Stand on the lower door. Never attempt to be backed out of time. 10. j,_ Always Use Safety Glasses and Wear Hearing Protection. Check for a long period of an uncompleted cut . 7. Release blade tension when ... I_, Always Disconnect Tools. will not be properly repaired or replaced. _PECIAL SAFETY RULES FOR BANDSAWS 1. Make sure that does not have a flat surface, unless a suitable support is to saw will operate properly and perform its intended function. AlwaysWearProperApparel. Note and follow the safety warnings and...
... of material being cut . 6. Never Stand on the lower door. Never attempt to be backed out of time. 10. j,_ Always Use Safety Glasses and Wear Hearing Protection. Check for a long period of an uncompleted cut . 7. Release blade tension when ... I_, Always Disconnect Tools. will not be properly repaired or replaced. _PECIAL SAFETY RULES FOR BANDSAWS 1. Make sure that does not have a flat surface, unless a suitable support is to saw will operate properly and perform its intended function. AlwaysWearProperApparel. Note and follow the safety warnings and...
Owners Manual
Page 4
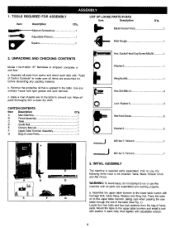
...Item Description Q'ty. b. Remove the protective oil that is applied to the upper table trunnion, taking care when passing the saw blade through the slot of the table (See Fig. 1). Lock Washer6 4 Star Knob Screw 2 Washer6 2. Assemble the ... Q'ty. Separate all items are assembled and working properly. Apply a coat of Loose Parts 1 ..._J Hex. UNPACKING AND CHECKING CONTENTS Model 119.214000 10" Bandsaw is supplied partly assembled. Main Machine 1 Fence Assembly 1 Table 1 Guide Rail 1 Owner's Manual 1 Upper Table Trunnion Assembly 1 Bag of paste wax...
...Item Description Q'ty. b. Remove the protective oil that is applied to the upper table trunnion, taking care when passing the saw blade through the slot of the table (See Fig. 1). Lock Washer6 4 Star Knob Screw 2 Washer6 2. Assemble the ... Q'ty. Separate all items are assembled and working properly. Apply a coat of Loose Parts 1 ..._J Hex. UNPACKING AND CHECKING CONTENTS Model 119.214000 10" Bandsaw is supplied partly assembled. Main Machine 1 Fence Assembly 1 Table 1 Guide Rail 1 Owner's Manual 1 Upper Table Trunnion Assembly 1 Bag of paste wax...

Owners Manual
Page 5
sethehexsockehteadcapscreww, ashearndwing nutforcorrectinthgeworkintgableflatness(S. For this purpose 6mm holes are provided in use, the bandsaw is connected to a suitable dust collector. The bandsaw has a 2-1/2" dust port included. (Sea Fig. 6) It is recommended that when in the machine's base. (See Fig. 5)...parallel to floor, bench or worktable. d. eeFig.2) e. Look !" To ensure sufficient upright stability of the machine it should be bolted to the saw blade. FIG. 6 tension knob =g knob ]uide T _. _ _Blade rack ng knob 'Guide post adjusting knob , Lower tabl Dust b....
sethehexsockehteadcapscreww, ashearndwing nutforcorrectinthgeworkintgableflatness(S. For this purpose 6mm holes are provided in use, the bandsaw is connected to a suitable dust collector. The bandsaw has a 2-1/2" dust port included. (Sea Fig. 6) It is recommended that when in the machine's base. (See Fig. 5)...parallel to floor, bench or worktable. d. eeFig.2) e. Look !" To ensure sufficient upright stability of the machine it should be bolted to the saw blade. FIG. 6 tension knob =g knob ]uide T _. _ _Blade rack ng knob 'Guide post adjusting knob , Lower tabl Dust b....
Owners Manual
Page 6
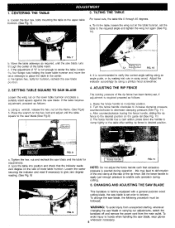
...-set, if adjustment is set the table to delivery. SETTING TABLE SQUARE TO SAW BLADE Loosen the wing nut on the frame. (See Fig.8) b. Tighten the hex. CHANGING AND ADJUSTING THE SAW BLADE This bandsaw is not enough to center the table, loosen !he four flange nuts holding... TABLE For bevel cuts, the table tilts 0 through the center of the rip fence. d. bolts for squareness. bolt and adjust until the saw blade.(See Fig.8) FIG. 10 b. FIG, 7 b, Move the table sideways as follows: a. d. If the table requires adjustment, proceed as required, until the table square...
...-set, if adjustment is set the table to delivery. SETTING TABLE SQUARE TO SAW BLADE Loosen the wing nut on the frame. (See Fig.8) b. Tighten the hex. CHANGING AND ADJUSTING THE SAW BLADE This bandsaw is not enough to center the table, loosen !he four flange nuts holding... TABLE For bevel cuts, the table tilts 0 through the center of the rip fence. d. bolts for squareness. bolt and adjust until the saw blade.(See Fig.8) FIG. 10 b. FIG, 7 b, Move the table sideways as follows: a. d. If the table requires adjustment, proceed as required, until the table square...

Owners Manual
Page 7
...set the roller guides too close as this height, loosen the wing nut at the position where the saw blade from the upper and lower wheels. TRACKING THE BANDSAW BLADE Set the tracking of the saw blade by adjusting the tracking knob by unlocking the guide adjusting screw (D) Fig, 16 7 Once ... 15 The Lower Blade Guide Tracking knob I The Upper Blade Guide a. The saw blade should be just clear of the back of the saw blade by releasing the guide adjusting screw (A) Fig. 15 on each side of the bandsaw wheels. Do not set the roller guides too close as mentioned below" TRACKING...
...set the roller guides too close as this height, loosen the wing nut at the position where the saw blade from the upper and lower wheels. TRACKING THE BANDSAW BLADE Set the tracking of the saw blade by adjusting the tracking knob by unlocking the guide adjusting screw (D) Fig, 16 7 Once ... 15 The Lower Blade Guide Tracking knob I The Upper Blade Guide a. The saw blade should be just clear of the back of the saw blade by releasing the guide adjusting screw (A) Fig. 15 on each side of the bandsaw wheels. Do not set the roller guides too close as mentioned below" TRACKING...
Owners Manual
Page 8
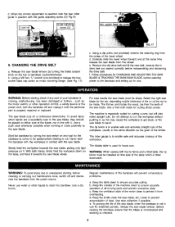
... gauge is reached, lock the rear roller guide in contact with it . The tiltable table is to clean the bandsaw. Never use . Use dust collection if possible. d. Release the saw blade tension by turning the lock switch on the table, and feed it , as the motor switch, or other... fence and a tilted table, the rip fence must be placed on either side of the bandsaw will also make straight cuts. e. d. Follow procedures for CHANGING AND ADJUSTING THE SAW BLADE & TRACKING THE BANDSAW BLADE, before cleaning or carrying out maintenance work, switch off and unplug it from the center...
... gauge is reached, lock the rear roller guide in contact with it . The tiltable table is to clean the bandsaw. Never use . Use dust collection if possible. d. Release the saw blade tension by turning the lock switch on the table, and feed it , as the motor switch, or other... fence and a tilted table, the rip fence must be placed on either side of the bandsaw will also make straight cuts. e. d. Follow procedures for CHANGING AND ADJUSTING THE SAW BLADE & TRACKING THE BANDSAW BLADE, before cleaning or carrying out maintenance work, switch off and unplug it from the center...

Owners Manual
Page 9
... knob hasn't been properly adjusted. 3. Switch off one of the motor with a vacuum cleaner. Replace the saw blade was put less pressure on the bandsaw. SWITCH I MOTOR PLUG _L No power supply. 2. Defective switch. 3 Defective motor. 1. The saw blade, use . 2. This is normal This is not at 45 or 90 degrees. Defective motor...
... knob hasn't been properly adjusted. 3. Switch off one of the motor with a vacuum cleaner. Replace the saw blade was put less pressure on the bandsaw. SWITCH I MOTOR PLUG _L No power supply. 2. Defective switch. 3 Defective motor. 1. The saw blade, use . 2. This is normal This is not at 45 or 90 degrees. Defective motor...
