Owners Manual
Page 4
...is operating. 7. READ the entire Owner's Manual. DO NOT remove the 3rd prong. ALWAYS UNPLUG THE TOOL FROM THE ELEC= TRICAL RECEPTACLE when making adjustments, changing parts or performing any way. REMOVE ALL MAINTENANCE TOOLS from the table saw. Any power tool can get caught in any... Read this manual to the electrical receptacle. 13. GROUND ALL TOOLS. These items can throw debris into the moving parts. 10. USE ONLY RECOMMENDED ACCESSORIES. DO NOT work area clean, well lit, and organized. If in the power cord to understand this Table Saw in the ...
...is operating. 7. READ the entire Owner's Manual. DO NOT remove the 3rd prong. ALWAYS UNPLUG THE TOOL FROM THE ELEC= TRICAL RECEPTACLE when making adjustments, changing parts or performing any way. REMOVE ALL MAINTENANCE TOOLS from the table saw. Any power tool can get caught in any... Read this manual to the electrical receptacle. 13. GROUND ALL TOOLS. These items can throw debris into the moving parts. 10. USE ONLY RECOMMENDED ACCESSORIES. DO NOT work area clean, well lit, and organized. If in the power cord to understand this Table Saw in the ...

Owners Manual
Page 7
...particles. Unplug Table Saw from chemically-treated lumber. All electrical connections and wiring should always be made by Sears. 10. USE accessories only recommended by qualified personnel only. 8. If the Table Saw is not...Table Saw. 6. No adapter is spinning. Do not expose to cause cancer, birth defects or other masonry products, and • arsenic and chromium from the outlet when not in use outdoors. READ and understand the instruction manual before operating the Table Saw. 2. TO REDUCE THE RISK OF ELECTRICAL SHOCK, do this type of this manual. The table saw...
...particles. Unplug Table Saw from chemically-treated lumber. All electrical connections and wiring should always be made by Sears. 10. USE accessories only recommended by qualified personnel only. 8. If the Table Saw is not...Table Saw. 6. No adapter is spinning. Do not expose to cause cancer, birth defects or other masonry products, and • arsenic and chromium from the outlet when not in use outdoors. READ and understand the instruction manual before operating the Table Saw. 2. TO REDUCE THE RISK OF ELECTRICAL SHOCK, do this type of this manual. The table saw...

Owners Manual
Page 8
... alongthefence. • Usingfeatherboardwshenthebladeguardand splitterassemblycannotbeused. oldtheworkpiecefirmlyagainsthe mitergaugeor fence. 21. KEEP arms, hands and fingers away from power source. Clean off the table/work area before table saw blade. 25. Please also refer to the power source. 33. Aftercuttingt,urnthesawoff. NEVER attempt to instruct other users. PROPERLY SUPPORT long or... NY 10036 www.ansi.org Institute ANSi 01.1 Safety Requirements for Industrial Operation and also in the Accident Prevention Manual for Woodworking Machines, and the U.S.
... alongthefence. • Usingfeatherboardwshenthebladeguardand splitterassemblycannotbeused. oldtheworkpiecefirmlyagainsthe mitergaugeor fence. 21. KEEP arms, hands and fingers away from power source. Clean off the table/work area before table saw blade. 25. Please also refer to the power source. 33. Aftercuttingt,urnthesawoff. NEVER attempt to instruct other users. PROPERLY SUPPORT long or... NY 10036 www.ansi.org Institute ANSi 01.1 Safety Requirements for Industrial Operation and also in the Accident Prevention Manual for Woodworking Machines, and the U.S.

Owners Manual
Page 9
... Department or Sears Power and Hand Tool Catalog for this manual. Dado 29885 * Table Insert - lO-in, x 40 tooth variable pitch blade * Fence Guide System 29887 29888 32371 Sears may cause serious injury and cause damage to keep the work in this table saw . See your Sears Hardware Department or see the Sears Power...
... Department or Sears Power and Hand Tool Catalog for this manual. Dado 29885 * Table Insert - lO-in, x 40 tooth variable pitch blade * Fence Guide System 29887 29888 32371 Sears may cause serious injury and cause damage to keep the work in this table saw . See your Sears Hardware Department or see the Sears Power...

Owners Manual
Page 16
...to the next step. 1. Note: Two blade wrenches and five hex wrenches are sure the tool is unplugged. • DO NOT assemble the table saw is a heavy machine; hex wrench 13mm wrench 10mm wrench #2 Phillips screwdriver #3 Phillips screwdriver 8mm wrench 1/2-in . two people may be permanently ...If you read and understand this operation. The remaining tools are typical shop tools and are required for this entire Owner's Manual. With two people, tip the front of the cabinet. CAUTION: The table saw until you are needed for certain assembly operations. See figure 5-1. 16
...to the next step. 1. Note: Two blade wrenches and five hex wrenches are sure the tool is unplugged. • DO NOT assemble the table saw is a heavy machine; hex wrench 13mm wrench 10mm wrench #2 Phillips screwdriver #3 Phillips screwdriver 8mm wrench 1/2-in . two people may be permanently ...If you read and understand this operation. The remaining tools are typical shop tools and are required for this entire Owner's Manual. With two people, tip the front of the cabinet. CAUTION: The table saw until you are needed for certain assembly operations. See figure 5-1. 16

Owners Manual
Page 19
... outer flange (J) from the blade arbor (I ); Figure 10=6 T \\\ \ \ \. 8. Note: The arbor has a right hand thread; See figure 10-5. Lay a straight edge (R) against the splitter assembly (0) behind the kickback fingers (P). Place 10" saw table. make sure the teeth of the blade are pointing down...mounting splitter rod. See figure 10-4. to fit the blade guard and splitter assembly on top of this manual. 19 Place a square (N) onto the saw table and against the left side of the table saw blade (S). Replace table insert and tighten table insert retaining bolt removed in ...
... outer flange (J) from the blade arbor (I ); Figure 10=6 T \\\ \ \ \. 8. Note: The arbor has a right hand thread; See figure 10-5. Lay a straight edge (R) against the splitter assembly (0) behind the kickback fingers (P). Place 10" saw table. make sure the teeth of the blade are pointing down...mounting splitter rod. See figure 10-4. to fit the blade guard and splitter assembly on top of this manual. 19 Place a square (N) onto the saw table and against the left side of the table saw blade (S). Replace table insert and tighten table insert retaining bolt removed in ...
Owners Manual
Page 32
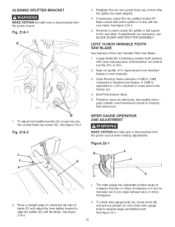
...splitter bracket (A), loosen the two hex socket head cap screws (B). See figure 21A-2. 5. LEITZ 10=INCH VARIABLE TOOTH SAW BLADE Key features of 5dB to lOdB compared to standard saw blades. Best Performance Value 5. See figure 21A-2. To rotate miter gauge body (A), loosen knob ...saw table. Figure 22=1 A B 2. See figure 22-1. 32 Fig. 21A-2 D 3. If necessary, adjust the rear splitter bracket (F). Place a straight edge (C) along the left side of blade (D) and adjust the front splitter bracket to align the splitter (E) with noise reducing laser ornamentation can be manually...
...splitter bracket (A), loosen the two hex socket head cap screws (B). See figure 21A-2. 5. LEITZ 10=INCH VARIABLE TOOTH SAW BLADE Key features of 5dB to lOdB compared to standard saw blades. Best Performance Value 5. See figure 21A-2. To rotate miter gauge body (A), loosen knob ...saw table. Figure 22=1 A B 2. See figure 22-1. 32 Fig. 21A-2 D 3. If necessary, adjust the rear splitter bracket (F). Place a straight edge (C) along the left side of blade (D) and adjust the front splitter bracket to align the splitter (E) with noise reducing laser ornamentation can be manually...
Owners Manual
Page 35
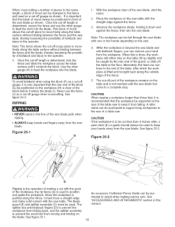
...ckthe fenceandslidetheworkpieceacrossthetable surfaceuntilit contactstheblock.Usethe miter gauge(K)to position and guide the workpiece. When this manual. 35 Figure 25=2 A C Ripping is to keep it from the workpiece. ...saw . An accessory Craftsman Fence Guide can be used to a complete stop. Note:Thisblockallowsthecut-ofsf crappiecetomove freelyalongthetablesurfacewithoutbindingbetween thefenceandtheblade,therebylesseningthepossibilityofkickbackandinjuryto theoperator. 2. Alternately, the feed can remove your hands away from the saw table with the grain of a table saw...
...ckthe fenceandslidetheworkpieceacrossthetable surfaceuntilit contactstheblock.Usethe miter gauge(K)to position and guide the workpiece. When this manual. 35 Figure 25=2 A C Ripping is to keep it from the workpiece. ...saw . An accessory Craftsman Fence Guide can be used to a complete stop. Note:Thisblockallowsthecut-ofsf crappiecetomove freelyalongthetablesurfacewithoutbindingbetween thefenceandtheblade,therebylesseningthepossibilityofkickbackandinjuryto theoperator. 2. Alternately, the feed can remove your hands away from the saw table with the grain of a table saw...

Owners Manual
Page 41
...OR91071 109 OR91072 110 OR91073 111 STD861004 112 OR91774 113 OR91076 114 OR91076 115 OR91077 116 OR91074 117 OR91118 118 OR91078 Description OWNER'S MANUAL - #22124 10" TaNe Saw BLADE GUARD ASSEMBLY, (NOT SHOWN) CONSISTS OF REF #: 1,2, 3, 3a, 3b 4, 6, 6, 7, 16, 24 & 25 SPLITTER BRACKET ...E188 1 RAISE/LOWER SLEEVE 1 RAISE/LOWER SPACER 1 POINTER 1 41 10-IN.TABLESAW MODEL NO.152.221240 When servicing, use only CRAFTSMAN replacement parts. Any attempt to repair or replace electrical parts on this table saw may create a HAZARD or cause product damage. Use of Key No's:...
...OR91071 109 OR91072 110 OR91073 111 STD861004 112 OR91774 113 OR91076 114 OR91076 115 OR91077 116 OR91074 117 OR91118 118 OR91078 Description OWNER'S MANUAL - #22124 10" TaNe Saw BLADE GUARD ASSEMBLY, (NOT SHOWN) CONSISTS OF REF #: 1,2, 3, 3a, 3b 4, 6, 6, 7, 16, 24 & 25 SPLITTER BRACKET ...E188 1 RAISE/LOWER SLEEVE 1 RAISE/LOWER SPACER 1 POINTER 1 41 10-IN.TABLESAW MODEL NO.152.221240 When servicing, use only CRAFTSMAN replacement parts. Any attempt to repair or replace electrical parts on this table saw may create a HAZARD or cause product damage. Use of Key No's:...

Owners Manual
Page 88
...the nearest SearsParts8,RepaiCr enter. 1-800-488-1222 Anytime, day or night (U.S.A. For the replacement parts, accessories and owner's manuals that you need to do-it ! and Canada) www.sears.ca iiiiiiiiiiiiiiiiiiiii 0 ur Home Forepaoirfcarry-pinroducltiskevacuumlasw, nequipment, and electronics,...purchase a protection agreement (U.S.A.) or maintenance agreement (Canada)on -line for the location of all major brand appliances l.a..w...n... For Sears professional installation of Sears, Roebuck and Co. ® Marca Registrada / TMMarca de F_brica / sMMarca de Servicio de Sears, Roebuck ...
...the nearest SearsParts8,RepaiCr enter. 1-800-488-1222 Anytime, day or night (U.S.A. For the replacement parts, accessories and owner's manuals that you need to do-it ! and Canada) www.sears.ca iiiiiiiiiiiiiiiiiiiii 0 ur Home Forepaoirfcarry-pinroducltiskevacuumlasw, nequipment, and electronics,...purchase a protection agreement (U.S.A.) or maintenance agreement (Canada)on -line for the location of all major brand appliances l.a..w...n... For Sears professional installation of Sears, Roebuck and Co. ® Marca Registrada / TMMarca de F_brica / sMMarca de Servicio de Sears, Roebuck ...


