Owners Manual
Page 4
...the operator into a 3-contact electrical receptacle. BEFORE USING THE TABLE SAW 9. ALWAYS WEAR EYE PROTECTION. Any power tool can be in the machine during operations, which could cause severe and permanent eye damage. READ the entire Owner's Manual. These items can get caught in the immediate work area,... and damage to a complete stop. 16. DO NOT modify this Table Saw. GROUND ALL TOOLS. DO NOT use the tool for which it must be plugged into the moving parts. 10. WEAR PROPER CLOTHING. Read this manual to the tool. Safety Goggles are NOT safety glasses. DO NOT ...
...the operator into a 3-contact electrical receptacle. BEFORE USING THE TABLE SAW 9. ALWAYS WEAR EYE PROTECTION. Any power tool can be in the machine during operations, which could cause severe and permanent eye damage. READ the entire Owner's Manual. These items can get caught in the immediate work area,... and damage to a complete stop. 16. DO NOT modify this Table Saw. GROUND ALL TOOLS. DO NOT use the tool for which it must be plugged into the moving parts. 10. WEAR PROPER CLOTHING. Read this manual to the tool. Safety Goggles are NOT safety glasses. DO NOT ...

Owners Manual
Page 7
... filter out microscopic particles. READ and understand the instruction manual before unplugging the Table Saw. 6. ALWAYS turn the power switch "OFF" before operating the Table Saw. 2. TO REDUCE THE RISK OF ELECTRICAL SHOCK, do this manual. FOLLOW all local and national electrical codes after the...made by Sears. 10. DO NOT handle the plug or Table Saw with ANSi standard Z87.1) when operating the Table Saw. ALWAYS grasp the plug, not the cord. 12. SPECIFIC SAFETY INSTRUCTIONS FOR TABLE SAWS CALIFORNIA PROPOSITION 65 SOME DUST CREATED BY POWER SANDING, SAWING, GRINDING, DRILLING ...
... filter out microscopic particles. READ and understand the instruction manual before unplugging the Table Saw. 6. ALWAYS turn the power switch "OFF" before operating the Table Saw. 2. TO REDUCE THE RISK OF ELECTRICAL SHOCK, do this manual. FOLLOW all local and national electrical codes after the...made by Sears. 10. DO NOT handle the plug or Table Saw with ANSi standard Z87.1) when operating the Table Saw. ALWAYS grasp the plug, not the cord. 12. SPECIFIC SAFETY INSTRUCTIONS FOR TABLE SAWS CALIFORNIA PROPOSITION 65 SOME DUST CREATED BY POWER SANDING, SAWING, GRINDING, DRILLING ...

Owners Manual
Page 8
... around or over the blade. 26. NEVERperformlayouta, ssemblyorset-upworkon thetable/worakreawhenthemachineis running. 28. Clean off the table/work area before table saw . SAVE THESE iNSTRUCTiONS. Neverusingthefenceas a guidewhencrosscutting. • Neversawinga workpiecewithlooseknotsor otherflaws. 18. USEa pushstick(s)for Woodworking...National Safety Council, 1121 Spring Lake Drive, Itasca, IL 60143-3201 in the Accident Prevention Manual for Woodworking Machinery and the U.S. Neversawinga largeworkpiecethatcannotbe controlled. ADDiTiONAL iNFORMATiON regarding the safe and ...
... around or over the blade. 26. NEVERperformlayouta, ssemblyorset-upworkon thetable/worakreawhenthemachineis running. 28. Clean off the table/work area before table saw . SAVE THESE iNSTRUCTiONS. Neverusingthefenceas a guidewhencrosscutting. • Neversawinga workpiecewithlooseknotsor otherflaws. 18. USEa pushstick(s)for Woodworking...National Safety Council, 1121 Spring Lake Drive, Itasca, IL 60143-3201 in the Accident Prevention Manual for Woodworking Machinery and the U.S. Neversawinga largeworkpiecethatcannotbe controlled. ADDiTiONAL iNFORMATiON regarding the safe and ...

Owners Manual
Page 9
... use any accessory unless you have completely read the Owner's Manual for all non-through cutting operations are used to keep the work in contact with the fence and table and help prevent kickbacks. Clamp the featherboard to the table saw . lO-in this table saw . Using other accessories not listed in , x 40 tooth variable pitch...
... use any accessory unless you have completely read the Owner's Manual for all non-through cutting operations are used to keep the work in contact with the fence and table and help prevent kickbacks. Clamp the featherboard to the table saw . lO-in this table saw . Using other accessories not listed in , x 40 tooth variable pitch...

Owners Manual
Page 16
.... With two people, tip the front of the table saw (A) back and block the table saw until you will be required for certain assembly operations. Figure 5=1 MAKE CERTAIN the table saw is disconnected from the power source. TOOLS REQUIRED The following tools are needed for this entire Owner's Manual. wrench Pipe clamp C-clamp (2) 7/16-in . See figure...
.... With two people, tip the front of the table saw (A) back and block the table saw until you will be required for certain assembly operations. Figure 5=1 MAKE CERTAIN the table saw is disconnected from the power source. TOOLS REQUIRED The following tools are needed for this entire Owner's Manual. wrench Pipe clamp C-clamp (2) 7/16-in . See figure...

Owners Manual
Page 19
... the hex nut and securely tighten. Figure 10=4 M Figure 10=5 o \ \ \ \ \ \, \ \ \. \\ \\\\\ \\\ \ 7. Once square, tighten the two hex socket head screws on the flats of the table saw table or blade alignment, see "AMGNING SPMTTER BRACKET..." in the Operations and Adjustments section of the blade guard and splitter assembly (H) down in step 1. 10. Place the outer flange (J) and hex nut (K) onto the blade arbor and snug hex nut by hand. See figure 10-4. 9. Place the front attachment point (D) of this manual...
... the hex nut and securely tighten. Figure 10=4 M Figure 10=5 o \ \ \ \ \ \, \ \ \. \\ \\\\\ \\\ \ 7. Once square, tighten the two hex socket head screws on the flats of the table saw table or blade alignment, see "AMGNING SPMTTER BRACKET..." in the Operations and Adjustments section of the blade guard and splitter assembly (H) down in step 1. 10. Place the outer flange (J) and hex nut (K) onto the blade arbor and snug hex nut by hand. See figure 10-4. 9. Place the front attachment point (D) of this manual...
Owners Manual
Page 32
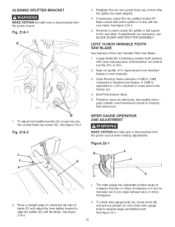
...ADJUSTMENT MAKE CERTAIN the table saw is disconnected from the power source when making adjustments. Place a straight edge (C) along the left side of blade (D) and adjust the front splitter bracket to align the splitter (E) with noise reducing laser ornamentation can be manually set at O-degree ...improvement over standard blades in noise level to the saw table. The miter gauge has adjustable positive stops at any angle between plus or minus 60-degrees. 2. See figure 22-1. 32 Figure 22=1 A B 2. LEITZ 10=INCH VARIABLE TOOTH SAW BLADE Key features of 5dB to lOdB compared ...
...ADJUSTMENT MAKE CERTAIN the table saw is disconnected from the power source when making adjustments. Place a straight edge (C) along the left side of blade (D) and adjust the front splitter bracket to align the splitter (E) with noise reducing laser ornamentation can be manually set at O-degree ...improvement over standard blades in noise level to the saw table. The miter gauge has adjustable positive stops at any angle between plus or minus 60-degrees. 2. See figure 22-1. 32 Figure 22=1 A B 2. LEITZ 10=INCH VARIABLE TOOTH SAW BLADE Key features of 5dB to lOdB compared ...
Owners Manual
Page 35
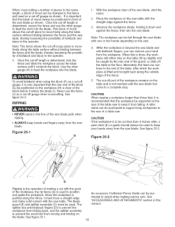
... keep hands and fingers away from falling. See figure 25-1. An accessory Craftsman Fence Guide can be cut -off part of the saw blade path when ripping. • ALWAYS keep your hand from closing and binding on the table, tilt up slightly and be used to the floor. See "ACCESSORIES AND... cut-ofgf augewhencrosscuttingS.ee figure24-3 RIPPING NEVER stand in this is the operation of the guard, or slide off the table to position and guide the workpiece. When this manual. 35 The cut-off gauge,it must be caught by the rear end of making narrow cuts. CAUTION If the ...
... keep hands and fingers away from falling. See figure 25-1. An accessory Craftsman Fence Guide can be cut -off part of the saw blade path when ripping. • ALWAYS keep your hand from closing and binding on the table, tilt up slightly and be used to the floor. See "ACCESSORIES AND... cut-ofgf augewhencrosscuttingS.ee figure24-3 RIPPING NEVER stand in this is the operation of the guard, or slide off the table to position and guide the workpiece. When this manual. 35 The cut-off gauge,it must be caught by the rear end of making narrow cuts. CAUTION If the ...

Owners Manual
Page 41
...OR91774 113 OR91076 114 OR91076 115 OR91077 116 OR91074 117 OR91118 118 OR91078 Description OWNER'S MANUAL - #22124 10" TaNe Saw BLADE GUARD ASSEMBLY, (NOT SHOWN) CONSISTS OF REF #: 1,2, 3, 3a, 3b 4, 6,.... KICKBACK FINGER T:1.6ram) SET SCREW 1/4-28 x 3/8", NYLOCK TABLE INSERT- STANDARD TABLE INSERT RETAINING BOLT TABLE HEX SOCKET SET SCREW M8 x 20ram ALIGN-A-CUT INSERT FLAT WASHER... E188 1 RAISE/LOWER SLEEVE 1 RAISE/LOWER SPACER 1 POINTER 1 41 10-IN.TABLESAW MODEL NO.152.221240 When servicing, use only CRAFTSMAN replacement parts. Use of Key No's: 101, 102, 103, 104, ...
...OR91774 113 OR91076 114 OR91076 115 OR91077 116 OR91074 117 OR91118 118 OR91078 Description OWNER'S MANUAL - #22124 10" TaNe Saw BLADE GUARD ASSEMBLY, (NOT SHOWN) CONSISTS OF REF #: 1,2, 3, 3a, 3b 4, 6,.... KICKBACK FINGER T:1.6ram) SET SCREW 1/4-28 x 3/8", NYLOCK TABLE INSERT- STANDARD TABLE INSERT RETAINING BOLT TABLE HEX SOCKET SET SCREW M8 x 20ram ALIGN-A-CUT INSERT FLAT WASHER... E188 1 RAISE/LOWER SLEEVE 1 RAISE/LOWER SPACER 1 POINTER 1 41 10-IN.TABLESAW MODEL NO.152.221240 When servicing, use only CRAFTSMAN replacement parts. Use of Key No's: 101, 102, 103, 104, ...


