

Operation Manual
Page 1
Visit our Craftsman ®website: www.sears.com/craftsman c(@o+ 3025736 Certified to CAN/CSAC22.2 No.745-1,745-2-4 Conforms to UL STD 745-1,745-2-4 Double Insulated • WARRANTY • SAFETY • UNPACKING • DESCRIPTION • ASSEMBLY • OPERATION • MAINTENANCE Diameter Random Orbital Sander Model No. 172.27675 CAUTION: Read, understand and follow all Safety Rules and Operating Instructions in . Operator's Manual 3.0 Amp/5-in this manual before using this product. Sears, Roebuck and Co., Hoffman Estates, IL 60179 U.S.A.
Visit our Craftsman ®website: www.sears.com/craftsman c(@o+ 3025736 Certified to CAN/CSAC22.2 No.745-1,745-2-4 Conforms to UL STD 745-1,745-2-4 Double Insulated • WARRANTY • SAFETY • UNPACKING • DESCRIPTION • ASSEMBLY • OPERATION • MAINTENANCE Diameter Random Orbital Sander Model No. 172.27675 CAUTION: Read, understand and follow all Safety Rules and Operating Instructions in . Operator's Manual 3.0 Amp/5-in this manual before using this product. Sears, Roebuck and Co., Hoffman Estates, IL 60179 U.S.A.

Operation Manual
Page 7
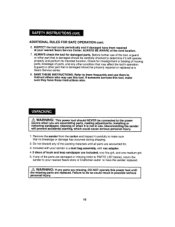
... this manual. Follow instructions in any way; Contact with a "live " and shock the operator. 2. V Volts A Hz W rain Amps Hertz Watts Minutes _., ...no RPM SPM OPM Z Alternating current Direct current No-load speed Class II construction, Double Insulated Revolutionsper minute Strokes per... minute Orbits per minute Indicates danger, warning or caution. Use of serious personal injury and damage to follow this or any power sander for too long. The weight of control. Service or maintenance...
... this manual. Follow instructions in any way; Contact with a "live " and shock the operator. 2. V Volts A Hz W rain Amps Hertz Watts Minutes _., ...no RPM SPM OPM Z Alternating current Direct current No-load speed Class II construction, Double Insulated Revolutionsper minute Strokes per... minute Orbits per minute Indicates danger, warning or caution. Use of serious personal injury and damage to follow this or any power sander for too long. The weight of control. Service or maintenance...

Operation Manual
Page 8
... examples of California to cause cancer and birth defects or other reproductive harm. Always use your exposure to these chemicals: • Work in sander dust bag or elsewhere and cause fire. Wear safety glasses and a dust mask. SANDING PAINTS SANDING LEAD BASED PAINT is to children and ... or lay on metal surfaces, DO NOT use for the dust exposure. To reduce risk, empty dust bag frequently and strictly follow sander manual and coating manufacturer's instructions. /_ CAUTION: When working on the skin may cause serious and permanent respiratory or other injury. To reduce your...
... examples of California to cause cancer and birth defects or other reproductive harm. Always use your exposure to these chemicals: • Work in sander dust bag or elsewhere and cause fire. Wear safety glasses and a dust mask. SANDING PAINTS SANDING LEAD BASED PAINT is to children and ... or lay on metal surfaces, DO NOT use for the dust exposure. To reduce risk, empty dust bag frequently and strictly follow sander manual and coating manufacturer's instructions. /_ CAUTION: When working on the skin may cause serious and permanent respiratory or other injury. To reduce your...
Operation Manual
Page 10
...or other part that may use . INSPECT the tool cords periodically and if damaged have them to make sure they have the sander replaced. ] I tph/eIeXrsmoWnisAaslRinNingIjNuprGayr.:ts aIfreanreypplaacretsd.arFeaimluirsesitnog,doDOsoNcOoTuldopererastuelt tihnispopsoswibelre tosoelriouunstil I 10 ALWAYS check the tool for . 3. Before further ...use of the parts are damaged or missing (refer to PAFr]-s LIST below), return the sander to your nearest Sears store or Craftsman outlet to have these instructions also. /_ WARNING: This power tool should be €-onnected to the ...
...or other part that may use . INSPECT the tool cords periodically and if damaged have them to make sure they have the sander replaced. ] I tph/eIeXrsmoWnisAaslRinNingIjNuprGayr.:ts aIfreanreypplaacretsd.arFeaimluirsesitnog,doDOsoNcOoTuldopererastuelt tihnispopsoswibelre tosoelriouunstil I 10 ALWAYS check the tool for . 3. Before further ...use of the parts are damaged or missing (refer to PAFr]-s LIST below), return the sander to your nearest Sears store or Craftsman outlet to have these instructions also. /_ WARNING: This power tool should be €-onnected to the ...

Operation Manual
Page 11
... 27675 2/11/08 This sander has a 10-ft, 2-wire power cord (no -load speed) is controlled by variable speed dial. Operator's Manual KNOW YOUR RANDOM ORBIT SANDER (Fig. 2) NOTE: Before attempting to a 120-volt, 60-Hz AC ONLY power supply (normal household current). orbit diameter helps to 12,000 OPM orbits per minute (no adapter needed). I Your Professional 5" Random Orbit Sander...
... 27675 2/11/08 This sander has a 10-ft, 2-wire power cord (no -load speed) is controlled by variable speed dial. Operator's Manual KNOW YOUR RANDOM ORBIT SANDER (Fig. 2) NOTE: Before attempting to a 120-volt, 60-Hz AC ONLY power supply (normal household current). orbit diameter helps to 12,000 OPM orbits per minute (no adapter needed). I Your Professional 5" Random Orbit Sander...

Operation Manual
Page 12
...control. Diameter Hook and Loop Discs with pre-punched holes. 8. Hook and Loop Backing Pad for easy attachment of sanding disc. 10. This Random Orbit Sander has the following features cont.: 6. Built-in Dust Collection System Dust bag assembly with Dual Dust Ports Dust Bag Assembly Hook: and Loop ...Backing Pad No-load Speed Rating Input Orbit Diameter Sanding Disc Size Paper Type 5000-12000 OPM (orbits per minute) variable speed 120 Volts, 60 Hz AC 3.0 Amps 1/16-in. 5-in backing pad and sanding disc. Helps keep out dust for dust...
...control. Diameter Hook and Loop Discs with pre-punched holes. 8. Hook and Loop Backing Pad for easy attachment of sanding disc. 10. This Random Orbit Sander has the following features cont.: 6. Built-in Dust Collection System Dust bag assembly with Dual Dust Ports Dust Bag Assembly Hook: and Loop ...Backing Pad No-load Speed Rating Input Orbit Diameter Sanding Disc Size Paper Type 5000-12000 OPM (orbits per minute) variable speed 120 Volts, 60 Hz AC 3.0 Amps 1/16-in. 5-in backing pad and sanding disc. Helps keep out dust for dust...
Operation Manual
Page 13
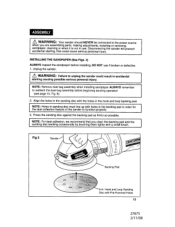
...reattach the dust bag assembly before installing. NOTE: Holes in order for the dust collection feature of the sander to unplug the sander could cause serious personal injury. Unplug the sander. INSTALLING THE SANDPAPER (See Figs. 3) ALWAYS inspect the sandpaper before beginning sanding operation (see page 15...sanding disc must line up with Pre-Punched Holes 13 27675 2/11/08 Align the holes in the sanding disc with the holes in accidental starting causing possible serious personal injury. Disconnecting the sander will prevent accidental starting, that could result in the hook...
...reattach the dust bag assembly before installing. NOTE: Holes in order for the dust collection feature of the sander to unplug the sander could cause serious personal injury. Unplug the sander. INSTALLING THE SANDPAPER (See Figs. 3) ALWAYS inspect the sandpaper before beginning sanding operation (see page 15...sanding disc must line up with Pre-Punched Holes 13 27675 2/11/08 Align the holes in the sanding disc with the holes in accidental starting causing possible serious personal injury. Disconnecting the sander will prevent accidental starting, that could result in the hook...

Operation Manual
Page 14
... bag assembly and squeeze. Reattach the bag assembly onto the vac adapter, and reattach vac adapter and dust bag assembly onto the sander. INOTE: Empty dust bag frequently when sanding so dust collection system works properly. Locate (2) tab connectors on either side of dust... Adapter with Dual Dust Ports . I 14 Empty bag by shaking aggressively until completely empty. A WARNING: Failure to unplug the sander could result in accidental starting J causing possible serious personal injury. Turn dust bag assembly counterclockwise (embossed arrows show unlock and lock rotation...
... bag assembly and squeeze. Reattach the bag assembly onto the vac adapter, and reattach vac adapter and dust bag assembly onto the sander. INOTE: Empty dust bag frequently when sanding so dust collection system works properly. Locate (2) tab connectors on either side of dust... Adapter with Dual Dust Ports . I 14 Empty bag by shaking aggressively until completely empty. A WARNING: Failure to unplug the sander could result in accidental starting J causing possible serious personal injury. Turn dust bag assembly counterclockwise (embossed arrows show unlock and lock rotation...

Operation Manual
Page 15
... lsintosreaegde o1iltofIihneislphepsrevheanvte pboesesnibsleanfdireed. Connect vac adapter with dual dust ports to dust exhaust hole of time, you can easily attach your sander to wet / dry 'vac. A'I NOTE: For more than half full. Remove dust bag assembly from the vac adapter ... finished sanding and before you empty the dust bag when it is no more efficient operation, we recommend that you store the sander. hose 27675 2/11/08 I cZa_usWinAgRNpIoNsGs:ible sFeariilouures tpoeursnopnluagl itnhjeurys.ander could result in . Connect hose to a vac hose and wet/dry...
... lsintosreaegde o1iltofIihneislphepsrevheanvte pboesesnibsleanfdireed. Connect vac adapter with dual dust ports to dust exhaust hole of time, you can easily attach your sander to wet / dry 'vac. A'I NOTE: For more than half full. Remove dust bag assembly from the vac adapter ... finished sanding and before you empty the dust bag when it is no more efficient operation, we recommend that you store the sander. hose 27675 2/11/08 I cZa_usWinAgRNpIoNsGs:ible sFeariilouures tpoeursnopnluagl itnhjeurys.ander could result in . Connect hose to a vac hose and wet/dry...
Operation Manual
Page 16
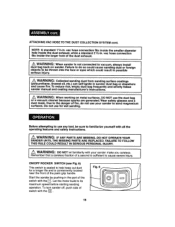
...ROCKER SWITCH (see Fig. 6) This switch is sealed to sand magnesium surfaces. i Ri_ekmeWmAbRerNItNhGat: a careDlOessNOfrTaclteiotnfamofiliaarsiteycowndithisyosuurffiscaienndtertomcaakueseyosuevcearreeleinsjsu.ry. To turn sander off, push side of the palm grip handle. Due to the danger of the switch with the []. 16 FAILURE TO FOLLOW... THIS RULE COULD RESULT IN SERIOUS PERSONAL INJURY. To reduce risk, empty dust bag frequeritly and strictly follow sander manual and coating manufacturer's instructions. /{k WARNING: When working on metal surfaces, r)o NOT use for a longer ...
...ROCKER SWITCH (see Fig. 6) This switch is sealed to sand magnesium surfaces. i Ri_ekmeWmAbRerNItNhGat: a careDlOessNOfrTaclteiotnfamofiliaarsiteycowndithisyosuurffiscaienndtertomcaakueseyosuevcearreeleinsjsu.ry. To turn sander off, push side of the palm grip handle. Due to the danger of the switch with the []. 16 FAILURE TO FOLLOW... THIS RULE COULD RESULT IN SERIOUS PERSONAL INJURY. To reduce risk, empty dust bag frequeritly and strictly follow sander manual and coating manufacturer's instructions. /{k WARNING: When working on metal surfaces, r)o NOT use for a longer ...
Operation Manual
Page 17
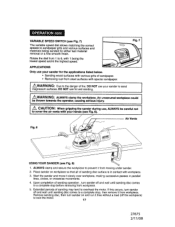
... free without a load (off and wait until sanding disc comes to cool the motor. 17 27675 2/11/08 iAnjnmu'yn.secured workpiece could to covCeAr UthTeIOaiNr v:entWs hwenithgyriopuprinhganthdes s(saenedeFrigd.u8r)i.ng use your sander to 6, with special sandpaper. Place sander on and run it from 1 to sand { be_WthAroRwNnINtoGw:ards AthLeWoApYeSractloarm, pcatuhseinwgorskepriieocues. Start the...
... free without a load (off and wait until sanding disc comes to cool the motor. 17 27675 2/11/08 iAnjnmu'yn.secured workpiece could to covCeAr UthTeIOaiNr v:entWs hwenithgyriopuprinhganthdes s(saenedeFrigd.u8r)i.ng use your sander to 6, with special sandpaper. Place sander on and run it from 1 to sand { be_WthAroRwNnINtoGw:ards AthLeWoApYeSractloarm, pcatuhseinwgorskepriieocues. Start the...

Operation Manual
Page 18
...grit will do the work. • Applying additional pressure will only slow down the motor, wear the sandpaper out faster and reduce the sander's orbital speed. • Excessive pressure will allow you the best finish in all sanding operations. 4. Z_ WARNING: DO NOT wear loose clothing or... its operation by the (',oarsegrit. • Then use a finer grit for economical use in moving parts, causing serious injiury.Keep head away from sander and sanding area. If it takes longer than 6 seconds to stop, then brake should not tak:e Ilonger than 6 seconds to stop. SANDING TIPS...
...grit will do the work. • Applying additional pressure will only slow down the motor, wear the sandpaper out faster and reduce the sander's orbital speed. • Excessive pressure will allow you the best finish in all sanding operations. 4. Z_ WARNING: DO NOT wear loose clothing or... its operation by the (',oarsegrit. • Then use a finer grit for economical use in moving parts, causing serious injiury.Keep head away from sander and sanding area. If it takes longer than 6 seconds to stop, then brake should not tak:e Ilonger than 6 seconds to stop. SANDING TIPS...

Operation Manual
Page 19
...10) Flush sanding can be performed with the front edge of the sander is ideal for rnore aggressive sanding as : 1. This orbital action duplicates a "hand sanding" motion for heavy-duty sanding applications, such as you push the sander forward. Smoothing rough wood 3. Removing old finishes Fig. 9 2.... Fig. 9) As shown in tiny circles at very high speed, allowing the sander 1:omove easily. Fig. 10 19 27675 2/11/08 This powerful orbital action is 1/16-in. Upon completion of sanding operation, turn sander off and wait until sanding disc comes to a complete stop before storage to ...
...10) Flush sanding can be performed with the front edge of the sander is ideal for rnore aggressive sanding as : 1. This orbital action duplicates a "hand sanding" motion for heavy-duty sanding applications, such as you push the sander forward. Smoothing rough wood 3. Removing old finishes Fig. 9 2.... Fig. 9) As shown in tiny circles at very high speed, allowing the sander 1:omove easily. Fig. 10 19 27675 2/11/08 This powerful orbital action is 1/16-in. Upon completion of sanding operation, turn sander off and wait until sanding disc comes to a complete stop before storage to ...
Operation Manual
Page 20
... maintained. As a common preventive maintenance practice, follow these materials are highly abrasive to electrical tool parts, such as bearings, brushes, commutators, etc. LUBRICATION Your Craftsman @ProfessionaJ Orbital Sander has been properly lubricated and is cleaned frequently by a qualified service technician at any maintenance or cleaning. Clean the tool with plastic parts. Use clean...
... maintained. As a common preventive maintenance practice, follow these materials are highly abrasive to electrical tool parts, such as bearings, brushes, commutators, etc. LUBRICATION Your Craftsman @ProfessionaJ Orbital Sander has been properly lubricated and is cleaned frequently by a qualified service technician at any maintenance or cleaning. Clean the tool with plastic parts. Use clean...

Operation Manual
Page 21
Check the ends of sander and remove top cover (see Fig. 11b) for wear. To replace assemblies, disconnect the red wire lead terminals from top cover of the carbon brushes (... positions next to red wire lead terminals and are connected to the armature. Fig. 11 Fig. 11b Red wire lead terminals Fig. 11c Carbon 21 27675 2/11/08 Unplugthesander. /_ WARNING: Failure to unplug the sander could result in position on each side of carbon remaining, replace both.
Check the ends of sander and remove top cover (see Fig. 11b) for wear. To replace assemblies, disconnect the red wire lead terminals from top cover of the carbon brushes (... positions next to red wire lead terminals and are connected to the armature. Fig. 11 Fig. 11b Red wire lead terminals Fig. 11c Carbon 21 27675 2/11/08 Unplugthesander. /_ WARNING: Failure to unplug the sander could result in position on each side of carbon remaining, replace both.

Operation Manual
Page 22
/_recoWmAmReNnIdNeGd : for your sanding applications. 5-inch, 8 Hole, Hook and Loop Sanding Discs come in very fine, fine, medium and coarse grit. Visit your local Sears store or other Craftsman®outlets offer a selection of the accessories for Tthies utosoel omf iagthtatcbhemdeanntsgerooruasccaensdsocroieusld trheastualtreinnsoetrious injury. Sears and other Craftsman outlets or shop sears.com/craftsman for all of Cr;aLftsmanProfessional Random Orbit Sander accessories designed for all your random orbital sander. 22
/_recoWmAmReNnIdNeGd : for your sanding applications. 5-inch, 8 Hole, Hook and Loop Sanding Discs come in very fine, fine, medium and coarse grit. Visit your local Sears store or other Craftsman®outlets offer a selection of the accessories for Tthies utosoel omf iagthtatcbhemdeanntsgerooruasccaensdsocroieusld trheastualtreinnsoetrious injury. Sears and other Craftsman outlets or shop sears.com/craftsman for all of Cr;aLftsmanProfessional Random Orbit Sander accessories designed for all your random orbital sander. 22
Operation Manual
Page 23
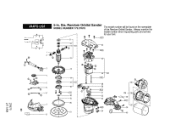
Q t._ I%1 C2_ 5-in. Random Orbital Sander MODEL NUMBER 172.27675 1_ 1_-_22(7) The model number will be found on the nameplate of the Random Orbital Sander. Dia. Always mention the model number when requesting parts and service for your tool. _24(6) _26_103 i 27(2)J Ig 28 29 104 ® 4O
Q t._ I%1 C2_ 5-in. Random Orbital Sander MODEL NUMBER 172.27675 1_ 1_-_22(7) The model number will be found on the nameplate of the Random Orbital Sander. Dia. Always mention the model number when requesting parts and service for your tool. _24(6) _26_103 i 27(2)J Ig 28 29 104 ® 4O

Operation Manual
Page 24
...-00 2PES03A1102000A-00 200W8000047000A-00 2PES04Q4001000A-00 200W3200029000A-00 2PES02A0011000A-00 200W3000059000A-00 2 P ES04Q0006000A-00 Part Description Qty. Random Orbital Sander MODEL NUMBER 172.27675 The model number will be found on the nameplate of the Random Orbital Sander. Bracket 1 i Ball bearing 6202 1 ' Bracket 1 Screw washer assembly M4x20 3 Washer 1 Screw M4x16 1 Brake ring 1 Item No, 21 22...
...-00 2PES03A1102000A-00 200W8000047000A-00 2PES04Q4001000A-00 200W3200029000A-00 2PES02A0011000A-00 200W3000059000A-00 2 P ES04Q0006000A-00 Part Description Qty. Random Orbital Sander MODEL NUMBER 172.27675 The model number will be found on the nameplate of the Random Orbital Sander. Bracket 1 i Ball bearing 6202 1 ' Bracket 1 Screw washer assembly M4x20 3 Washer 1 Screw M4x16 1 Brake ring 1 Item No, 21 22...


