Product Manual
Page 1
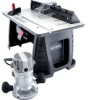
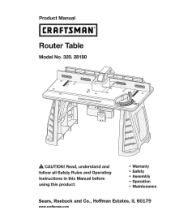
Read, understand and follow all Safety Rules and Operating Instructions in this Manual before using this product. • Warranty • Safety • Assembly ° Operation o Maintenance Sears, Roebuck and Co., Hoffman Estates, IL 60179 www.craftsman.com Product Manual Router Table Model No. 320. 28180 CAUTION!
Read, understand and follow all Safety Rules and Operating Instructions in this Manual before using this product. • Warranty • Safety • Assembly ° Operation o Maintenance Sears, Roebuck and Co., Hoffman Estates, IL 60179 www.craftsman.com Product Manual Router Table Model No. 320. 28180 CAUTION!
Product Manual
Page 2
... to any Sears store or parts & repair center or other reproductive harm. SAVE THESE INSTRUCTIONS! Warranty Safety Symbols Safety Instructions Know Your Router Table Unpacking and Checking Contents Parts list Assembly Operation Maintenance Troubleshooting Page 2 Page 3-4 Page 5-10 Page 11-12 Page 12 Page 13 Page... 14-17 Page 17-21 Pages 22 Pages 22 ONE YEAR FULL WARRANTY ON CRAFTSMAN® TOOL If this product is ever used for commercial or rental purposes. READ ALL INSTRUCTIONSI 28180 Manual Revlsed_07-0228 Page 2 Sears, Roebuck and Co., Hoffman Estates, IL 60179 _, WARNING...
... to any Sears store or parts & repair center or other reproductive harm. SAVE THESE INSTRUCTIONS! Warranty Safety Symbols Safety Instructions Know Your Router Table Unpacking and Checking Contents Parts list Assembly Operation Maintenance Troubleshooting Page 2 Page 3-4 Page 5-10 Page 11-12 Page 12 Page 13 Page... 14-17 Page 17-21 Pages 22 Pages 22 ONE YEAR FULL WARRANTY ON CRAFTSMAN® TOOL If this product is ever used for commercial or rental purposes. READ ALL INSTRUCTIONSI 28180 Manual Revlsed_07-0228 Page 2 Sears, Roebuck and Co., Hoffman Estates, IL 60179 _, WARNING...
Product Manual
Page 5
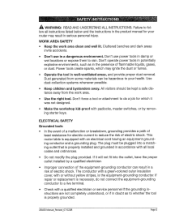
...sparks, which it will not fit into a matching outlet that is properly grounded. 28180 ManuaLRevised_07©228 Page 5 All visitors should be kept a safe distance away from...is necessary, do a job for your health. WARNING: READ AND UNDERSTAND ALL INSTRUCTIONS. Failure to your router may ignite the dust or fumes. The plug must be hazardous to follow all local codes and ordinances... locations or expose them to reduce the risk of electric shock, This router table is equipped with padlocks, master switches, or by a qualified electrician. Use the right tool. If ...
...sparks, which it will not fit into a matching outlet that is properly grounded. 28180 ManuaLRevised_07©228 Page 5 All visitors should be kept a safe distance away from...is necessary, do a job for your health. WARNING: READ AND UNDERSTAND ALL INSTRUCTIONS. Failure to your router may ignite the dust or fumes. The plug must be hazardous to follow all local codes and ordinances... locations or expose them to reduce the risk of electric shock, This router table is equipped with padlocks, master switches, or by a qualified electrician. Use the right tool. If ...

Product Manual
Page 6
... outlet box. \ Grounding Pin Metal ",, / Cover of power and overheating. 28180 Manual Revised_0743228 Page 6 This tool is wider than the other). A temporary adapter, which looks like the one blade is intended for the fixed-base router before operating the tool • Replacement parts: When servicing use one way. ...outlet, Do not change the plug in any way, Use the proper extension cord, • Make sure that is included with the router table is in the outlet, reverse the plug. The temporary adapter should be used to carry the current your extension cord is a double-...
... outlet box. \ Grounding Pin Metal ",, / Cover of power and overheating. 28180 Manual Revised_0743228 Page 6 This tool is wider than the other). A temporary adapter, which looks like the one blade is intended for the fixed-base router before operating the tool • Replacement parts: When servicing use one way. ...outlet, Do not change the plug in any way, Use the proper extension cord, • Make sure that is included with the router table is in the outlet, reverse the plug. The temporary adapter should be used to carry the current your extension cord is a double-...
Product Manual
Page 9
...tools before making adjustments or changing accessories, such as blades, bits, cutters, and the like. SPECIFIC SAFETY FOR THE ROUTER TABLE = Read and understand the router table and the instructions and warnings in the product manuals for damaged parts. SERVICE SAFETY = Tool service MUST be carefully checked ...will do the job better and more safely at the rate for mounting the router to control. o Never leave the tool running unattended; when changing accessories, such as bits or cutters. 28180 ManuaLRev_sed_07-0228 Page 9 turn the power off_ Don't leave the tool until...
...tools before making adjustments or changing accessories, such as blades, bits, cutters, and the like. SPECIFIC SAFETY FOR THE ROUTER TABLE = Read and understand the router table and the instructions and warnings in the product manuals for damaged parts. SERVICE SAFETY = Tool service MUST be carefully checked ...will do the job better and more safely at the rate for mounting the router to control. o Never leave the tool running unattended; when changing accessories, such as bits or cutters. 28180 ManuaLRev_sed_07-0228 Page 9 turn the power off_ Don't leave the tool until...
Product Manual
Page 10
...material is placed on the ouffeed side of auxiliary infeed and ouffeed supports is designed to kickback. It must be plugged into the router table switch. Use of the bit. Remove all dust, chips, and any cuts. Be sure the work pieces. Damaged bits can affect... its function. The router table is necessary for cutting or shaping metals. The cutting edge may cause kickback and pull your hand back into a wall outlet. Never hold the work piece. 28180 Manual_Revlsed_07-022S Page10 Cutting the material with the concave side...
...material is placed on the ouffeed side of auxiliary infeed and ouffeed supports is designed to kickback. It must be plugged into the router table switch. Use of the bit. Remove all dust, chips, and any cuts. Be sure the work pieces. Damaged bits can affect... its function. The router table is necessary for cutting or shaping metals. The cutting edge may cause kickback and pull your hand back into a wall outlet. Never hold the work piece. 28180 Manual_Revlsed_07-022S Page10 Cutting the material with the concave side...
Product Manual
Page 11
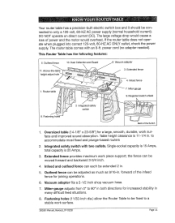
... fence provides maximum work surface. 28180 Manual Revised 0743228 Page 11 forward of power and the motor would overheat. to a stable work piece support; Fastening holes (11/32-inch dia.) allow the Router Table to be fixed to accommodate most fixed and plunge-based routers 2_ Integrated safety switch with an 8-ft. Your router table has a precision-built electric...
... fence provides maximum work surface. 28180 Manual Revised 0743228 Page 11 forward of power and the motor would overheat. to a stable work piece support; Fastening holes (11/32-inch dia.) allow the Router Table to be fixed to accommodate most fixed and plunge-based routers 2_ Integrated safety switch with an 8-ft. Your router table has a precision-built electric...
Product Manual
Page 12
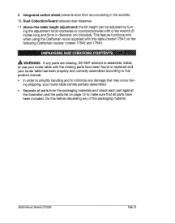
...that may occur dur- Do this table (model 17541) or the following Craftsman routers: models 17542 and 17543. _, WARNING: If any of the packaging material. 28180 Manual_Revised_07-0228 Page12 This feature functions only when using the Craftsman router supplied with a hex wrench (5 inches... long and 5mm in the sockets. 10. ing shipping, your router table comes partially assembled. * Separate all parts ...
...that may occur dur- Do this table (model 17541) or the following Craftsman routers: models 17542 and 17543. _, WARNING: If any of the packaging material. 28180 Manual_Revised_07-0228 Page12 This feature functions only when using the Craftsman router supplied with a hex wrench (5 inches... long and 5mm in the sockets. 10. ing shipping, your router table comes partially assembled. * Separate all parts ...
Product Manual
Page 13
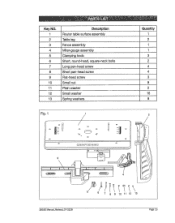
Key NO. 1 2 3 4 5 6 7 8 9 10 11 12 13 Description Router table surface assembly "Table leg Fence assembly Miter-gauge assembly Clamping knob Short, round-head, square-neck bolts Long pan-head screw Short pan-head screw Flat-head screw Small nut Plain washer Small washer Spring washers Quantity 1 2 1 1 3 2 4 4 3 8 16 8 Fig, 1 Q /1 / 1" o-=_ 3 28180 Manual Revlsed 07-0228 6 7 8 9 10 11 12 la Page13
Key NO. 1 2 3 4 5 6 7 8 9 10 11 12 13 Description Router table surface assembly "Table leg Fence assembly Miter-gauge assembly Clamping knob Short, round-head, square-neck bolts Long pan-head screw Short pan-head screw Flat-head screw Small nut Plain washer Small washer Spring washers Quantity 1 2 1 1 3 2 4 4 3 8 16 8 Fig, 1 Q /1 / 1" o-=_ 3 28180 Manual Revlsed 07-0228 6 7 8 9 10 11 12 la Page13

Product Manual
Page 14
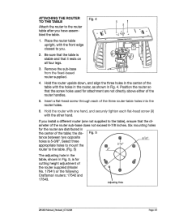
ATTACHING THE LEGS TO THE TABLE TOP . Place the router table surface upside down on a flat, level surface, with the underside of the screw. (Fig. 3) 7. Insert the long, pan-head screws up through the other leg, 28180 ManuaLRevisad_074:)228 Page 14 and small nut (10) on the table top and through the holes ...in that it extends beyond the edge of your work surface far enough to gain access to the router table as shown in Fig, 2. 3_ Position one ...
ATTACHING THE LEGS TO THE TABLE TOP . Place the router table surface upside down on a flat, level surface, with the underside of the screw. (Fig. 3) 7. Insert the long, pan-head screws up through the other leg, 28180 ManuaLRevisad_074:)228 Page 14 and small nut (10) on the table top and through the holes ...in that it extends beyond the edge of your work surface far enough to gain access to the router table as shown in Fig, 2. 3_ Position one ...
Product Manual
Page 15
...router supplied (Model No. 17541) or the following Craftsman reuters: 17542 and 17543. Fig, 5 tance between two opposite holes is 5-3/8"o Select three 6 71e" appropriate holes to mount the router to the table), ensure that the diameter of the table with the other hand. Adjusting Hole 28180... ROUTER TO THE TABLE Attach the router to you. 2_ Be sure that the table is stable and that it rests on all four legs, . Place the router table upright, with the front edge closest to the router table after you have assembled the table. Remove the sub-base from the fixed-based router...
...router supplied (Model No. 17541) or the following Craftsman reuters: 17542 and 17543. Fig, 5 tance between two opposite holes is 5-3/8"o Select three 6 71e" appropriate holes to mount the router to the table), ensure that the diameter of the table with the other hand. Adjusting Hole 28180... ROUTER TO THE TABLE Attach the router to you. 2_ Be sure that the table is stable and that it rests on all four legs, . Place the router table upright, with the front edge closest to the router table after you have assembled the table. Remove the sub-base from the fixed-based router...

Product Manual
Page 16
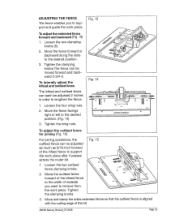
... 7) The miter gauge has been shipped completely assembled. Fig. 7 MOUNTING THE TABLE TO A WORK SURFACE (See Fig. 8) 1. Place the router table, upright, on the table. Fig. 8 28180 ManuaLRevlsed_07_9228 Page 16 While holding the router table in place, mark on the work stand, workbench, or counter top. .... Place the fence assembly on the table with the four wing nuts facing toward you....
... 7) The miter gauge has been shipped completely assembled. Fig. 7 MOUNTING THE TABLE TO A WORK SURFACE (See Fig. 8) 1. Place the router table, upright, on the table. Fig. 8 28180 ManuaLRevlsed_07_9228 Page 16 While holding the router table in place, mark on the work stand, workbench, or counter top. .... Place the fence assembly on the table with the four wing nuts facing toward you....

Product Manual
Page 17
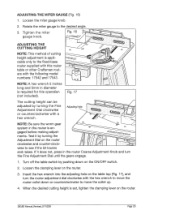
... completely inserted into the switch. (Fig. 9) 2. Secure the router table to the work surface. . To turn the router ON, pull out the ON/OFF switch. (Fig. 10) Safety Key Fig. 10 28180 Manual_Revised_07 Place the router table on the work surface, and align the holes in the table legs with the holes in the work surface using...
... completely inserted into the switch. (Fig. 9) 2. Secure the router table to the work surface. . To turn the router ON, pull out the ON/OFF switch. (Fig. 10) Safety Key Fig. 10 28180 Manual_Revised_07 Place the router table on the work surface, and align the holes in the table legs with the holes in the work surface using...

Product Manual
Page 18
...12). select the vacuum accordingly. Fig. 12 28/80 ManuatRevised_07-0228 Dust Shield Page/8 Use one receptacle in the router. The other may be less than 20 Amps. To turn the router OFF, push the ON/OFF switch down to turn the switch OFF, and remove the safety key from the switch.... Two receptacles are used to plug in the OFF position, push the ON/ OFF switch down . (Fig, 11) Fig. 11 WARNING: Never leave the router unattended while it is 2-1/2 in diameter; in . NOTE: The vacuum adapter in the fence assembly is running or before it comes to protect the receptacles...
...12). select the vacuum accordingly. Fig. 12 28/80 ManuatRevised_07-0228 Dust Shield Page/8 Use one receptacle in the router. The other may be less than 20 Amps. To turn the router OFF, push the ON/OFF switch down to turn the switch OFF, and remove the safety key from the switch.... Two receptacles are used to plug in the OFF position, push the ON/ OFF switch down . (Fig, 11) Fig. 11 WARNING: Never leave the router unattended while it is 2-1/2 in diameter; in . NOTE: The vacuum adapter in the fence assembly is running or before it comes to protect the receptacles...
Product Manual
Page 19
... cutting edge of material you to support and guide the work piece. Move the fence facings right or left to the width of the bit. 28180 ManuaLRevised 07.0228 Page 19 ADJUSTING THE FENCE The fence enables you want to remove from the work piece,. To laterally adjust the infeed and... fence can each be adjusted as much as 9/16-inch forward of the infeed fence to support the work piece after it passes across the router bit. ° Loosen the two outfeed fence clamping knobs. 2_ Move the outfeed fence forward of the infeed fence to the desired position. (Fig°...
... cutting edge of material you to support and guide the work piece. Move the fence facings right or left to the width of the bit. 28180 ManuaLRevised 07.0228 Page 19 ADJUSTING THE FENCE The fence enables you want to remove from the work piece,. To laterally adjust the infeed and... fence can each be adjusted as much as 9/16-inch forward of the infeed fence to support the work piece after it passes across the router bit. ° Loosen the two outfeed fence clamping knobs. 2_ Move the outfeed fence forward of the infeed fence to the desired position. (Fig°...
Product Manual
Page 20
...Adjustment Dial clockwise or counterclockwise with the following model numbers: 17542 and 17543. Turn off the table switch by turning the Adjustment Dial on the router. 28180 ManuaLRevised_07-0228 Page 20 If it by pushing down on the ON/OFF switch. 2_ Loosen...router clockwise and counter-clockwise to the fixed-base router supplied with this operation (not included). ADJUSTING THE MITER GAUGE (Fig. 16) 1, Loosen the miter gauge knob, 2, Rotate the miter gauge to move the collet up. 4, When the desired cutting height is required for this router table or other Craftsman routers...
...Adjustment Dial clockwise or counterclockwise with the following model numbers: 17542 and 17543. Turn off the table switch by turning the Adjustment Dial on the router. 28180 ManuaLRevised_07-0228 Page 20 If it by pushing down on the ON/OFF switch. 2_ Loosen...router clockwise and counter-clockwise to the fixed-base router supplied with this operation (not included). ADJUSTING THE MITER GAUGE (Fig. 16) 1, Loosen the miter gauge knob, 2, Rotate the miter gauge to move the collet up. 4, When the desired cutting height is required for this router table or other Craftsman routers...

Product Manual
Page 21
... serious personal injury. 28180 Manual_Revised_07-0228 Page21 Lock-on the power to be held tight against the sharp edges of the cutter and into the rotation of feed for the router. 2. Read the and understand entire Product Manual for the work piece must always be cut. USING THE ROUTER WITH THE ROUTER TABLE 1. NOTE: The...
... serious personal injury. 28180 Manual_Revised_07-0228 Page21 Lock-on the power to be held tight against the sharp edges of the cutter and into the rotation of feed for the router. 2. Read the and understand entire Product Manual for the work piece must always be cut. USING THE ROUTER WITH THE ROUTER TABLE 1. NOTE: The...
Product Manual
Page 22
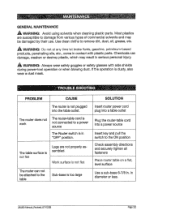
...28:$80 Manual_Revlsed_07-O228 Page 22 Use clean cloths to the table Sub-base is not flat. The router does not work The router-table cord is not connected to a power source The Router switch is in "OFF" position, The table surface is not flat Legs are susceptible to the ON position ...Check assembly directions and securely tighten all fasteners Place router table on a flat, level surface Use a sub-base 6-7/8 in contact with side shields during power-tool operation or when blowing dust. Most plastics are not properly assembled, ...
...28:$80 Manual_Revlsed_07-O228 Page 22 Use clean cloths to the table Sub-base is not flat. The router does not work The router-table cord is not connected to a power source The Router switch is in "OFF" position, The table surface is not flat Legs are susceptible to the ON position ...Check assembly directions and securely tighten all fasteners Place router table on a flat, level surface Use a sub-base 6-7/8 in contact with side shields during power-tool operation or when blowing dust. Most plastics are not properly assembled, ...


