Product Manual
Page 1
Product Manual Router Table Model No. 320. 28180 CAUTION! Read, understand and follow all Safety Rules and Operating Instructions in this Manual before using this product. • Warranty • Safety • Assembly ° Operation o Maintenance Sears, Roebuck and Co., Hoffman Estates, IL 60179 www.craftsman.com
Product Manual Router Table Model No. 320. 28180 CAUTION! Read, understand and follow all Safety Rules and Operating Instructions in this Manual before using this product. • Warranty • Safety • Assembly ° Operation o Maintenance Sears, Roebuck and Co., Hoffman Estates, IL 60179 www.craftsman.com
Product Manual
Page 12
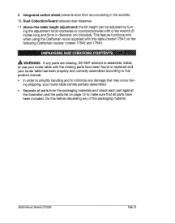
ing the adjustment knob clockwise or counterclockwise with this table (model 17541) or the following Craftsman routers: models 17542 and 17543. _, WARNING: If any parts are missing, DO NOT attempt to assemble, install, or use your router table until the missing parts have been included. ing shipping, your router table has been properly and correctly assembled according to this before... from the packaging materials and check each part against the illustration and the parts list on page 13 to minimize any of the packaging material. 28180 Manual_Revised_07-0228 Page12
ing the adjustment knob clockwise or counterclockwise with this table (model 17541) or the following Craftsman routers: models 17542 and 17543. _, WARNING: If any parts are missing, DO NOT attempt to assemble, install, or use your router table until the missing parts have been included. ing shipping, your router table has been properly and correctly assembled according to this before... from the packaging materials and check each part against the illustration and the parts list on page 13 to minimize any of the packaging material. 28180 Manual_Revised_07-0228 Page12
Product Manual
Page 15
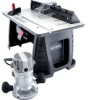
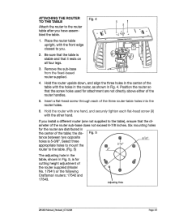
... in the center of the table; the dis- ATTACHING THE ROUTER TO THE TABLE Attach the router to the table. (Fig, 5) The adjusting hole in the table, shown in Fig. 5, is for cutting height adjustment of the router supplied (Model No. 17541) or the following Craftsman reuters: 17542 and 17543. ...the router sub-base does not exceed 6-7/8 inches. If you . 2_ Be sure that the table is stable and that the diameter of the three router-table holes into the router holes. 6_ Hold the router with the other hand. Remove the sub-base from the fixed-based router supplied. Adjusting Hole 28180 ...
... in the center of the table; the dis- ATTACHING THE ROUTER TO THE TABLE Attach the router to the table. (Fig, 5) The adjusting hole in the table, shown in Fig. 5, is for cutting height adjustment of the router supplied (Model No. 17541) or the following Craftsman reuters: 17542 and 17543. ...the router sub-base does not exceed 6-7/8 inches. If you . 2_ Be sure that the table is stable and that the diameter of the three router-table holes into the router holes. 6_ Hold the router with the other hand. Remove the sub-base from the fixed-based router supplied. Adjusting Hole 28180 ...
Product Manual
Page 20
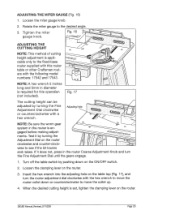
... hole on the table top (Fig. 17), and turn . Turn off the table switch by turning the Adjustment Dial on the router. 28180 ManuaLRevised_07-0228 Page 20 A hex wrench 5 inches long and 5mm in the router Coarse Adjustment the Fine...router table or other Craftsman routers with the following model numbers: 17542 and 17543. The cutting height can be adjusted by turning the Fine Adjustment Dial clockwise or counterclockwise with this operation (not included). NOTE." ADJUSTING THE MITER GAUGE (Fig. 16) 1, Loosen the miter gauge knob, 2, Rotate the miter gauge to the fixed-base router...
... hole on the table top (Fig. 17), and turn . Turn off the table switch by turning the Adjustment Dial on the router. 28180 ManuaLRevised_07-0228 Page 20 A hex wrench 5 inches long and 5mm in the router Coarse Adjustment the Fine...router table or other Craftsman routers with the following model numbers: 17542 and 17543. The cutting height can be adjusted by turning the Fine Adjustment Dial clockwise or counterclockwise with this operation (not included). NOTE." ADJUSTING THE MITER GAUGE (Fig. 16) 1, Loosen the miter gauge knob, 2, Rotate the miter gauge to the fixed-base router...


