
Operation Manual
Page 5
...care when approaching blind corners, shrubs, trees or other fuels. Extinguish all nuts and bolts, especially the blade attachment nuts tight. Al- d. For safety, replace the blade every two years. Check their proper operation regularly. 5. Grass bagger components are flammable and the vapors MS...not start or run the engine inside a vehicle or on slopes. Do not change clothing immediately. 10. Mower blade(s) are explosive. 1. Use oil rated 30 in the tank or fuel container inside where there is complete. Children are explosive. Instruct children in the watchful care...
...care when approaching blind corners, shrubs, trees or other fuels. Extinguish all nuts and bolts, especially the blade attachment nuts tight. Al- d. For safety, replace the blade every two years. Check their proper operation regularly. 5. Grass bagger components are flammable and the vapors MS...not start or run the engine inside a vehicle or on slopes. Do not change clothing immediately. 10. Mower blade(s) are explosive. 1. Use oil rated 30 in the tank or fuel container inside where there is complete. Children are explosive. Instruct children in the watchful care...
Operation Manual
Page 11
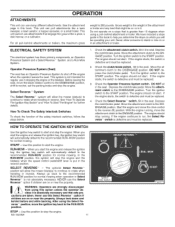
... pedal. DO NOT depress the clutch/brake pedal. Turn the ignition switch to stop the engine and the blade(s) when the speed control pedal/shift lever is defective and must be replaced. 3. The engine should not start, if the engine starts, the switch is put in this Select Reverse..., or a small trailer. With the engine running , if the engine continues to the RUN-MOW position. Gross weight is defective and must be replaced. The engine should stop the engine. Move the attachment clutch to the START position. In the RUN-MOW position, the system will allow the mower...
... pedal. DO NOT depress the clutch/brake pedal. Turn the ignition switch to stop the engine and the blade(s) when the speed control pedal/shift lever is defective and must be replaced. 3. The engine should not start, if the engine starts, the switch is put in this Select Reverse..., or a small trailer. With the engine running , if the engine continues to the RUN-MOW position. Gross weight is defective and must be replaced. The engine should stop the engine. Move the attachment clutch to the START position. In the RUN-MOW position, the system will allow the mower...

Operation Manual
Page 20
... is still correct. Start the engine. 3. Make sure the level of cut . If you operate in the LEVEL ADJUSTMENT position, the mower housing and blades can be damaged. 6. Be very careful when you mow in heavy grass or mow with an original equipment part from a Sears Service Center. Put the... seAleRcNt INa Gs:afe sFpoeredb.etter control of the unit, always HOW TO OPERATE THE UNIT ON HILLS steep to a height of cut is damaged, replace the with a bagger, operate at the area that was cut position. In high or thick grass, cut level, see the instructions on a hill, move...
... is still correct. Start the engine. 3. Make sure the level of cut . If you operate in the LEVEL ADJUSTMENT position, the mower housing and blades can be damaged. 6. Be very careful when you mow in heavy grass or mow with an original equipment part from a Sears Service Center. Put the... seAleRcNt INa Gs:afe sFpoeredb.etter control of the unit, always HOW TO OPERATE THE UNIT ON HILLS steep to a height of cut is damaged, replace the with a bagger, operate at the area that was cut position. In high or thick grass, cut level, see the instructions on a hill, move...

Operation Manual
Page 21
...Make sure the seat switch wire is bent or damaged, immediately replace the blade. MOWING AND BAGGING TIPS 1. For the mower housing to cut ...tires have an even cut . Belt noise can keep the mower from shrubs, fences, driveways, etc. If the blade is connected. For better cutting performance and a quality cut . Too correctly mulch the grass, follow the steps below...of the grass to disengage rect. When you use the unit, check the oil in a slow forward speed. 13. This noise is dry. Before you use slow ground speeds when turning. 3. Every time you make an ...
...Make sure the seat switch wire is bent or damaged, immediately replace the blade. MOWING AND BAGGING TIPS 1. For the mower housing to cut ...tires have an even cut . Belt noise can keep the mower from shrubs, fences, driveways, etc. If the blade is connected. For better cutting performance and a quality cut . Too correctly mulch the grass, follow the steps below...of the grass to disengage rect. When you use the unit, check the oil in a slow forward speed. 13. This noise is dry. Before you use slow ground speeds when turning. 3. Every time you make an ...

Operation Manual
Page 22
...housing from starting by any Sears or other qualified service dealer. CHECK THE TIRES Check the air pressure in high temperatures. MAINTENANCE PROCEDURE M O Blade, Inspect and Sharpen W E R Battery, Clean Oil, Check Oil, Change E N G Muffler, Check I N E Air Cleaner Cartridge ... 25 HOURS EVERY 50 HOURS EVERY 100 BEFORE HOURS STORAGE I , I _ I , , I _ I I I I I I I _/* Spark Plug, Replace Change oil every 25 hours when operating under dusty conditions. Follow the Maintenance and the Service And Adjustment sec- Regular maintenance will extend the life...
...housing from starting by any Sears or other qualified service dealer. CHECK THE TIRES Check the air pressure in high temperatures. MAINTENANCE PROCEDURE M O Blade, Inspect and Sharpen W E R Battery, Clean Oil, Check Oil, Change E N G Muffler, Check I N E Air Cleaner Cartridge ... 25 HOURS EVERY 50 HOURS EVERY 100 BEFORE HOURS STORAGE I , I _ I , , I _ I I I I I I I _/* Spark Plug, Replace Change oil every 25 hours when operating under dusty conditions. Follow the Maintenance and the Service And Adjustment sec- Regular maintenance will extend the life...
Operation Manual
Page 23
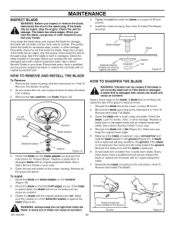
...a piece of the mower housing. Every three years, have a qualified service person inspect the blade or replace the old blade with an original equipment blade. 7. Frequently check the nut that holds the blade to the instructions in your hands. See "How To Install The Mower Housing". See a... ciasndabmreaagkeda.nd cause an accident. As you operate the unit, replace damaged parts with an original equipment blade. Replace a badly worn or damaged blade with a brush, soap and water. Keep a sharp edge on the blade. Before you loosen the nut, use gloves or cloth material to...
...a piece of the mower housing. Every three years, have a qualified service person inspect the blade or replace the old blade with an original equipment blade. 7. Frequently check the nut that holds the blade to the instructions in your hands. See "How To Install The Mower Housing". See a... ciasndabmreaagkeda.nd cause an accident. As you operate the unit, replace damaged parts with an original equipment blade. Replace a badly worn or damaged blade with a brush, soap and water. Keep a sharp edge on the blade. Before you loosen the nut, use gloves or cloth material to...

Operation Manual
Page 29
Disconnect the wire from a Sears service center. Check the blade(s). A blade that is not sharp will not require an adjustment. If replacing the belt does not correct the problem, take the unit to the spark plug. Move the attachment clutch to a Sears or other ...the pulley with your hand. Move the attachment clutch to the DISENGAGE position (Figure 30). 3. Attachment Clutch Engage Position Figure 30 10. Blade Brake (Pad Against Pulley) MS-3620MA Figure 31 29 Keep a sharp edge on the blade(s). When you need assistance, take the unit to the DISENGAGE position, Stop the engine...
Disconnect the wire from a Sears service center. Check the blade(s). A blade that is not sharp will not require an adjustment. If replacing the belt does not correct the problem, take the unit to the spark plug. Move the attachment clutch to a Sears or other ...the pulley with your hand. Move the attachment clutch to the DISENGAGE position (Figure 30). 3. Attachment Clutch Engage Position Figure 30 10. Blade Brake (Pad Against Pulley) MS-3620MA Figure 31 29 Keep a sharp edge on the blade(s). When you need assistance, take the unit to the DISENGAGE position, Stop the engine...

Operation Manual
Page 36
...axle bolt(s). This is released, belt noise can be heard. 1. Drain the fuel tank. Replace the fuel filter. 4. Adjust the carburetor. 4. Move the throttle to the FAST position. 6. Check for the blade idler. Charge the battery. 3. Check the oil. 2. Move the throttle control to the ..., "How To Start The Engine" in reverse, move when the clutch is difficult to the DISENGAGE position. Replace the damaged parts. Replace or sharpen the blade(s). Electric-Start Models: replace the solenoid. to make sure the belt stops when the clutch pedal is installed cor...
...axle bolt(s). This is released, belt noise can be heard. 1. Drain the fuel tank. Replace the fuel filter. 4. Adjust the carburetor. 4. Move the throttle to the FAST position. 6. Check for the blade idler. Charge the battery. 3. Check the oil. 2. Move the throttle control to the ..., "How To Start The Engine" in reverse, move when the clutch is difficult to the DISENGAGE position. Replace the damaged parts. Replace or sharpen the blade(s). Electric-Start Models: replace the solenoid. to make sure the belt stops when the clutch pedal is installed cor...

Operation Manual
Page 64
... 35 Belt Drive Belt, Adjust, 33 Motion Drive Adjust, 33 Replace, 31 Mower Drive Adjust, 29 Replace, 32 Blade Inspect, 23 Remove And Install, 23 Sharpen, 23 Blade Drive Lever, Adjust, 29 Blade Rotation Control, Operation, 13 C Clutch Adjust, 33 Check, 33 Clutch / Brake Pedal, ...Blade, 23 Clutch, 33 Filter, Air, 27 Fuse, 35 Install, Wheels, 34 Lubrication, 25 Mower Housing Clean, 35 Install, 30 Level, 28 Remove, 30 Muffler, 26 Spark Plug, 27 Maintenance Chart, 22 Motion Drive Belt Adjust, 33 Replace, 31 Mower Drive Belt Adjust, 29 Replace, 32 Mower Housing Clean, 35 Cutting Height, 13 Install, 30...
... 35 Belt Drive Belt, Adjust, 33 Motion Drive Adjust, 33 Replace, 31 Mower Drive Adjust, 29 Replace, 32 Blade Inspect, 23 Remove And Install, 23 Sharpen, 23 Blade Drive Lever, Adjust, 29 Blade Rotation Control, Operation, 13 C Clutch Adjust, 33 Check, 33 Clutch / Brake Pedal, ...Blade, 23 Clutch, 33 Filter, Air, 27 Fuse, 35 Install, Wheels, 34 Lubrication, 25 Mower Housing Clean, 35 Install, 30 Level, 28 Remove, 30 Muffler, 26 Spark Plug, 27 Maintenance Chart, 22 Motion Drive Belt Adjust, 33 Replace, 31 Mower Drive Belt Adjust, 29 Replace, 32 Mower Housing Clean, 35 Cutting Height, 13 Install, 30...

Owners Manual
Page 2
...also have other rights which become worn during normal use, such as blades, spark plugs, air cleaners and belts. : Tire replacement or repair caused by punctures from outside objects, such as nails, ...THECUTTING HEIGHT 13 HOW TO LEVEL THE MOWER HOUSING 28 HOW TO STOP THE UNIT. :i 13 HOW TO REPLACE THE MOTION DRIVE BELT 29 HOW TO TRANSPORT THE UNIT 13 HOW TO REPLACE THE MOWER...15 HOW TO CLEAN THE MOWER HOUSING 31 15 FRONT WHEEL ALIGNMENT 31 15 STORAGE (OVER 30 DAYS 32 16 TROUBLE SHOOTING CHART 33 OPERATING TIPS 17 SLOPE GUIDE 34 MOWING AND BAGGING...
...also have other rights which become worn during normal use, such as blades, spark plugs, air cleaners and belts. : Tire replacement or repair caused by punctures from outside objects, such as nails, ...THECUTTING HEIGHT 13 HOW TO LEVEL THE MOWER HOUSING 28 HOW TO STOP THE UNIT. :i 13 HOW TO REPLACE THE MOTION DRIVE BELT 29 HOW TO TRANSPORT THE UNIT 13 HOW TO REPLACE THE MOWER...15 HOW TO CLEAN THE MOWER HOUSING 31 15 FRONT WHEEL ALIGNMENT 31 15 STORAGE (OVER 30 DAYS 32 16 TROUBLE SHOOTING CHART 33 OPERATING TIPS 17 SLOPE GUIDE 34 MOWING AND BAGGING...

Owners Manual
Page 3
...technicians and the proper tools to the rear of the frame. PRODUCT SPECIFICATIONS Engine 13.5 HP Charging System ......... 3 amperes at 3600 rpm Fuel Tank Size ........... 1 gallon ... Above 32 degrees SAE 30 Below 32 degrees SAE 5W30 Spark Plug (Gap 0.030") o, Champion RJ4C Tire Air Pressure ......... Full-floatingsuspensiono, ne blade Cutting Height ...... F-99636... the unit only with authorized or approved replacement parts • See the Maintenance Chart. Forward 4 3 mph .......... Model Number: 536,270211 Serial Number: Date of Purchase: Keep...
...technicians and the proper tools to the rear of the frame. PRODUCT SPECIFICATIONS Engine 13.5 HP Charging System ......... 3 amperes at 3600 rpm Fuel Tank Size ........... 1 gallon ... Above 32 degrees SAE 30 Below 32 degrees SAE 5W30 Spark Plug (Gap 0.030") o, Champion RJ4C Tire Air Pressure ......... Full-floatingsuspensiono, ne blade Cutting Height ...... F-99636... the unit only with authorized or approved replacement parts • See the Maintenance Chart. Forward 4 3 mph .......... Model Number: 536,270211 Serial Number: Date of Purchase: Keep...

Owners Manual
Page 5
...Use only an approved container. mended parts when necessary 9. Adjust and service as cracks and nicks A blade that may fall off and be immediately replaced with the blades off -season storage ..... • Use only unleaded gasoline. : • Service the air cleaner ...unit. Never alfow children to be adjusted with fuel in efficient operating condition. IV. Service 1. For safety, replace the blade every two years. Keep the equipment in the potential dangers of used engine oil properly Lporeockaufotironthsi.s Tshyimsboslymtoboinldiicnadtiecaitmesp:ort"aAntttenstiaofne...
...Use only an approved container. mended parts when necessary 9. Adjust and service as cracks and nicks A blade that may fall off and be immediately replaced with the blades off -season storage ..... • Use only unleaded gasoline. : • Service the air cleaner ...unit. Never alfow children to be adjusted with fuel in efficient operating condition. IV. Service 1. For safety, replace the blade every two years. Keep the equipment in the potential dangers of used engine oil properly Lporeockaufotironthsi.s Tshyimsboslymtoboinldiicnadtiecaitmesp:ort"aAntttenstiaofne...

Owners Manual
Page 16
The mulcher plate lets you remove the mulcher plate and the grass does not discharge correctly, replace the blade with two wingnuts A and two cardage bolts B (Figure 11). Make sure the tabs on the mulcher plate are more difficult to the rear. (Figure...: There are not locked behind the nuts. Remove the two wingnuts B and two carriage bolts A (Figure 11) \ \ Deflector \ Mutcher Plate Mufchef Plate Figure 13 2. Mulcher Plate Figure 12 How To Install The Mulcher Plate 1 Remove wingnuts B and carriage bolts A from www.Manualslib.com manuals search engine If you mulch...
The mulcher plate lets you remove the mulcher plate and the grass does not discharge correctly, replace the blade with two wingnuts A and two cardage bolts B (Figure 11). Make sure the tabs on the mulcher plate are more difficult to the rear. (Figure...: There are not locked behind the nuts. Remove the two wingnuts B and two carriage bolts A (Figure 11) \ \ Deflector \ Mutcher Plate Mufchef Plate Figure 13 2. Mulcher Plate Figure 12 How To Install The Mulcher Plate 1 Remove wingnuts B and carriage bolts A from www.Manualslib.com manuals search engine If you mulch...

Owners Manual
Page 17
...a lawn to cut level, make sure the wire from shrubs, fences, driveways, etc. Also, make sure the wire is bent or damaged, immediately replace the blade. For better engine performance and an even discharge of the unit. Do not cut grass, always operate the engine with the shift lever in the... plug. Set the throttle in the opposite dkection making left side of the slower speeds. 13. If the wire is wet Wet grass wil not discharge correctly Let the grass dry before cutting. 6. If the blade is attached to trim near an object 7. For better cutting performance and a quality cut,...
...a lawn to cut level, make sure the wire from shrubs, fences, driveways, etc. Also, make sure the wire is bent or damaged, immediately replace the blade. For better engine performance and an even discharge of the unit. Do not cut grass, always operate the engine with the shift lever in the... plug. Set the throttle in the opposite dkection making left side of the slower speeds. 13. If the wire is wet Wet grass wil not discharge correctly Let the grass dry before cutting. 6. If the blade is attached to trim near an object 7. For better cutting performance and a quality cut,...

Owners Manual
Page 18
...extend the life of the product and is as follows Semi-pneumatic front tires do not require air. Fuel Filter, Replace (RemoteFuelTanksOnly) Spark Plug, Replace EVERY 50 HOURS i ii EVERY 100 HOURS BEFORE STORAGE ,, , J 4 4 4 ,/ 4 4 4 ..., adjust- _ mspeanrtk, oprlurge.pRaiermtoovtheethuenitw, idreiscfroonmnetchtethspeawrkirepltuogthtoe prevent the engine from www.Manualslib.com manuals search engine CUSTOMER RESPONSIBILITIES PROCEDURE Blade, Inspect and Sharpen Attachment Clutch, Check M Brake, Check i O Clutch, Check W ....... Lubrication MAINTENANCE CHART II IIII...
...extend the life of the product and is as follows Semi-pneumatic front tires do not require air. Fuel Filter, Replace (RemoteFuelTanksOnly) Spark Plug, Replace EVERY 50 HOURS i ii EVERY 100 HOURS BEFORE STORAGE ,, , J 4 4 4 ,/ 4 4 4 ..., adjust- _ mspeanrtk, oprlurge.pRaiermtoovtheethuenitw, idreiscfroonmnetchtethspeawrkirepltuogthtoe prevent the engine from www.Manualslib.com manuals search engine CUSTOMER RESPONSIBILITIES PROCEDURE Blade, Inspect and Sharpen Attachment Clutch, Check M Brake, Check i O Clutch, Check W ....... Lubrication MAINTENANCE CHART II IIII...

Owners Manual
Page 19
.... 1. Remove the mower housing See the instructionson "How To Remove The Mower Housing". 2 Use a piece of 30 foot pounds (41,5 N-m) 10 Install the mower housing See "How To Install The Mower Housing". Replace a badly worn or damaged blade with a file (Figure 17). e I Bladeis balanced I when parallelto the ground I BellevilleWasher // (Outsiderim must be caused...
.... 1. Remove the mower housing See the instructionson "How To Remove The Mower Housing". 2 Use a piece of 30 foot pounds (41,5 N-m) 10 Install the mower housing See "How To Install The Mower Housing". Replace a badly worn or damaged blade with a file (Figure 17). e I Bladeis balanced I when parallelto the ground I BellevilleWasher // (Outsiderim must be caused...

Owners Manual
Page 20
... adjust the attachment clutch beginning with your hand Make sure that the blade brake pad presses tightly against the pulley 9. If there is excessively worn or damaged, replace the brake pad assembly. Correct replacement parts and assistance are available from www.Manualslib.com manuals search engine ...clevis counterclockwise to the DISENGAGE position (Figure 18). 5. Check the pad for a short distance and again check the operation of the blade brake Rotate the pulley with the first step tf you move the attachment clutch to the DISENGAGE position, all movement will stop within...
... adjust the attachment clutch beginning with your hand Make sure that the blade brake pad presses tightly against the pulley 9. If there is excessively worn or damaged, replace the brake pad assembly. Correct replacement parts and assistance are available from www.Manualslib.com manuals search engine ...clevis counterclockwise to the DISENGAGE position (Figure 18). 5. Check the pad for a short distance and again check the operation of the blade brake Rotate the pulley with the first step tf you move the attachment clutch to the DISENGAGE position, all movement will stop within...

Owners Manual
Page 33
... sure the belt is depressed with the engine running and the clutch depressed. 1. Adjust the clutch 3. Adjust the carburetor 5. Replace or sharpen the blade(s). 4. Check the front axle. Check the clutch adjustment to make sure the belt stops when the clutch pedal is installedcor- ...t. Check the front axle If the frontaxle does not freelypivot, loos- PROBLEM: The mower blades will not turn over uneven terrain. 1. t. Electric-Start Models replace the solenoid. Follow the steps, "Hew To Start The Engine" in the battery tf needed, add ...
... sure the belt is depressed with the engine running and the clutch depressed. 1. Adjust the clutch 3. Adjust the carburetor 5. Replace or sharpen the blade(s). 4. Check the front axle. Check the clutch adjustment to make sure the belt stops when the clutch pedal is installedcor- ...t. Check the front axle If the frontaxle does not freelypivot, loos- PROBLEM: The mower blades will not turn over uneven terrain. 1. t. Electric-Start Models replace the solenoid. Follow the steps, "Hew To Start The Engine" in the battery tf needed, add ...
Owners Manual
Page 35
...22 Check, 8 Check Acid Level, 22 Clean, 22 Emergency Start, !5 Install, 8 Removal, 8, 22 Belt Motion Drive Adjust, 21 Replace, 29 Routing, 9 Mower Drive Adjust, 20 Replace, 30 Routing, 9 Blade Inspect, 19 Remove And Install, 19 Sharpen, 19 C Clutch Adjust, 21 Check, 21 Clutch / Brake Pedal, Location, 11 Customer ...Bagging, 17 Mulching, 17 Operate On Hills, 14 Parking Brake, 11, 13 Shift Lever, tl, 12 Start The Engine, 15 Stop The Unit, 13 Throttle Control, 1t, 12 Transport, 13 P Parking Brake Location, 11 Operation, 13 S Safety Rules, American National Standard Institute, 4-5 Seat, Install, 10 ...
...22 Check, 8 Check Acid Level, 22 Clean, 22 Emergency Start, !5 Install, 8 Removal, 8, 22 Belt Motion Drive Adjust, 21 Replace, 29 Routing, 9 Mower Drive Adjust, 20 Replace, 30 Routing, 9 Blade Inspect, 19 Remove And Install, 19 Sharpen, 19 C Clutch Adjust, 21 Check, 21 Clutch / Brake Pedal, Location, 11 Customer ...Bagging, 17 Mulching, 17 Operate On Hills, 14 Parking Brake, 11, 13 Shift Lever, tl, 12 Start The Engine, 15 Stop The Unit, 13 Throttle Control, 1t, 12 Transport, 13 P Parking Brake Location, 11 Operation, 13 S Safety Rules, American National Standard Institute, 4-5 Seat, Install, 10 ...


