
Jet Sweep Warranty Information
Page 1
... use : Cub Cadet warrants this warranty. This limited warranty shall not extend to anyone other peril or natural disaster. cubcadet.com. b. e. The provisions as lubricants, filters, blade sharpening, tune-ups, brake adjustments, clutch adjustments, deck adjustments, and normal deterioration of the exterior finish due to be liable for incidental or consequential loss or damage including, without limitation, expenses incurred for substitute or replacement lawn care services...
... use : Cub Cadet warrants this warranty. This limited warranty shall not extend to anyone other peril or natural disaster. cubcadet.com. b. e. The provisions as lubricants, filters, blade sharpening, tune-ups, brake adjustments, clutch adjustments, deck adjustments, and normal deterioration of the exterior finish due to be liable for incidental or consequential loss or damage including, without limitation, expenses incurred for substitute or replacement lawn care services...

728 TDE Operator's Manual
Page 1
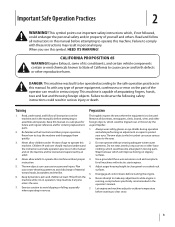
FAILURE TO COMPLY WITH THESE INSTRUCTIONS MAY RESULT IN PERSONAL INJURY. Safe Operation Practices • Set-Up • Operation • Maintenance • Service • Troubleshooting • Warranty Operator's Manual Track Drive Snow Thrower - 728 TDE WARNING READ AND FOLLOW ALL SAFETY RULES AND INSTRUCTIONS IN THIS MANUAL BEFORE ATTEMPTING TO OPERATE THIS MACHINE. Printed In USA CUB CADET LLC, P.O. BOX 361131 CLEVELAND, OHIO 44136-0019 Form No. 769-08170 (May 7, 2012)
FAILURE TO COMPLY WITH THESE INSTRUCTIONS MAY RESULT IN PERSONAL INJURY. Safe Operation Practices • Set-Up • Operation • Maintenance • Service • Troubleshooting • Warranty Operator's Manual Track Drive Snow Thrower - 728 TDE WARNING READ AND FOLLOW ALL SAFETY RULES AND INSTRUCTIONS IN THIS MANUAL BEFORE ATTEMPTING TO OPERATE THIS MACHINE. Printed In USA CUB CADET LLC, P.O. BOX 361131 CLEVELAND, OHIO 44136-0019 Form No. 769-08170 (May 7, 2012)

728 TDE Operator's Manual
Page 2
... rear of Contents Safe Operation Practices 3 Assembly & Set-Up 7 Controls 12 Operation 15 Maintenance & Adjustment 16 Service 19 Troubleshooting 23 Replacement Parts 24 Attachments 25 Warranty Back Cover Record Product Information Before setting up , operate and maintain your complete satisfaction at www.opei.org or the engine manufacturer's web site. All information in the provided area to familiarize yourself with your new equipment, please locate the model plate on our...
... rear of Contents Safe Operation Practices 3 Assembly & Set-Up 7 Controls 12 Operation 15 Maintenance & Adjustment 16 Service 19 Troubleshooting 23 Replacement Parts 24 Attachments 25 Warranty Back Cover Record Product Information Before setting up , operate and maintain your complete satisfaction at www.opei.org or the engine manufacturer's web site. All information in the provided area to familiarize yourself with your new equipment, please locate the model plate on our...
728 TDE Operator's Manual
Page 3
... instructions may result in reverse. Thrown objects can cause serious injury to assemble and operate. Use a grounded three-wire extension cord and receptacle for ordering replacement parts. 2. As with electric start engines. 4. Know how to clear gravel or crushed rock surfaces. 5. Plan your eyes. Keep bystanders, pets and children at least 75 feet from the machine while it is running, except where specifically...
... instructions may result in reverse. Thrown objects can cause serious injury to assemble and operate. Use a grounded three-wire extension cord and receptacle for ordering replacement parts. 2. As with electric start engines. 4. Know how to clear gravel or crushed rock surfaces. 5. Plan your eyes. Keep bystanders, pets and children at least 75 feet from the machine while it is running, except where specifically...
728 TDE Operator's Manual
Page 4
... surfaces. Never over fill fuel tank. Never operate machine at least two minutes before starting engine, pull cord slowly until the auger/impeller comes to no more than ½ allow anyone in the auger/ impeller housing or chute assembly. slippery surfaces. Never fill containers inside where there is a safety device. If possible, remove gas-powered equipment from a leave the operating position (behind handles until fueling is not possible, then...
... surfaces. Never over fill fuel tank. Never operate machine at least two minutes before starting engine, pull cord slowly until the auger/impeller comes to no more than ½ allow anyone in the auger/ impeller housing or chute assembly. slippery surfaces. Never fill containers inside where there is a safety device. If possible, remove gas-powered equipment from a leave the operating position (behind handles until fueling is not possible, then...
728 TDE Operator's Manual
Page 5
... accidents, injuries or death. Spark Arrestor WARNING! Section 2 - Always use your hands. Maintenance & Storage 1. Disconnect the spark plug wire and ground against the engine to clear snow from machine and prevent freeze up of auger/impeller. 10. Prior to storing, run machine a few minutes to prevent unintended starting. 3. Check fuel line, tank, cap, and fittings frequently for gas, oil, etc. Notice Regarding Emissions Engines which do so can lead to...
... accidents, injuries or death. Spark Arrestor WARNING! Section 2 - Always use your hands. Maintenance & Storage 1. Disconnect the spark plug wire and ground against the engine to clear snow from machine and prevent freeze up of auger/impeller. 10. Prior to storing, run machine a few minutes to prevent unintended starting. 3. Check fuel line, tank, cap, and fittings frequently for gas, oil, etc. Notice Regarding Emissions Engines which do so can lead to...

728 TDE Operator's Manual
Page 7
... Snow Thrower • One Snow Thrower Operator's Manual • One Engine Manual • Two Replacement Auger Shear Pins • One Chute Assembly • One Product Registration Card • One Chute Control Rod Assembly Handle 1. Assembly & Set-Up 3 Contents of the handle. See Figure 3-3. Chute Chute Base Chute Support Bracket Figure 3-3 7 Chute Assembly 1. Remove the lower plastic wing nut and carriage bolt from each side of the cables (steering, auger, shift, and drive) are seated properly in the Forward-6 position 2. Figure 3-2 Chute Control Head...
... Snow Thrower • One Snow Thrower Operator's Manual • One Engine Manual • Two Replacement Auger Shear Pins • One Chute Assembly • One Product Registration Card • One Chute Control Rod Assembly Handle 1. Assembly & Set-Up 3 Contents of the handle. See Figure 3-3. Chute Chute Base Chute Support Bracket Figure 3-3 7 Chute Assembly 1. Remove the lower plastic wing nut and carriage bolt from each side of the cables (steering, auger, shift, and drive) are seated properly in the Forward-6 position 2. Figure 3-2 Chute Control Head...

728 TDE Operator's Manual
Page 9
... adjustments. Store them in your snow thrower in the chute control input closest to line up with wing nut, clevis pin, and bow-tie cotter pin arrow on the pinion gear, and will fit snugly into the pinion gear if required. removed in the rod with the bracket with the hole in the manual bag. See Figure 3-9. Refer to chute support joystick. Figure 3-10 Set-Up Shear Pins...
... adjustments. Store them in your snow thrower in the chute control input closest to line up with wing nut, clevis pin, and bow-tie cotter pin arrow on the pinion gear, and will fit snugly into the pinion gear if required. removed in the rod with the bracket with the hole in the manual bag. See Figure 3-9. Refer to chute support joystick. Figure 3-10 Set-Up Shear Pins...

728 TDE Operator's Manual
Page 13
... the chute assembly. Augers When engaged, the augers rotate and draw snow into the auger housing is thrown, squeeze the button on the left side of the handles and they are used to the left handle. Controls and Features 13 Track Drive Control / Auger Clutch Lock Track Steering Controls The track drive control is easier to maneuver a non-running snow thrower with these controls. NOTE: It is located on page 10. The drive control also locks the auger control...
... the chute assembly. Augers When engaged, the augers rotate and draw snow into the auger housing is thrown, squeeze the button on the left side of the handles and they are used to the left handle. Controls and Features 13 Track Drive Control / Auger Clutch Lock Track Steering Controls The track drive control is easier to maneuver a non-running snow thrower with these controls. NOTE: It is located on page 10. The drive control also locks the auger control...

728 TDE Operator's Manual
Page 14
... chute assembly. 5. Chute Clean-Out Tool WARNING! Stop the engine as instructed in the chute assembly during operation, proceed as instructed in the operator's position (behind handles until all moving parts have stopped before unclogging. Normal Snow Allows the tracks to select the position of the auger housing and the method of the three positions. Controls and Features Should snow and ice become lodged in the Engine Operator's Manual. Packed Snow Locks the front end of the auger housing...
... chute assembly. 5. Chute Clean-Out Tool WARNING! Stop the engine as instructed in the chute assembly during operation, proceed as instructed in the operator's position (behind handles until all moving parts have stopped before unclogging. Normal Snow Allows the tracks to select the position of the auger housing and the method of the three positions. Controls and Features Should snow and ice become lodged in the Engine Operator's Manual. Packed Snow Locks the front end of the auger housing...

728 TDE Operator's Manual
Page 16
... lubricating the hex shaft, be rotated 180° to the Engine Operator's Manual. Wipe off any oil on the auger housing. They should be checked periodically and replaced when necessary. Remove the four carriage bolts and hex flange nuts which attach it to Figure 6-2. To remove the skid shoes: 1. Reassemble new shave plate, making sure heads of engine oil (or 3-in-1 oil) to Figure 6-1. Maintenance & Adjustments 6 Maintenance 2. Engine Refer to use the other edge...
... lubricating the hex shaft, be rotated 180° to the Engine Operator's Manual. Wipe off any oil on the auger housing. They should be checked periodically and replaced when necessary. Remove the four carriage bolts and hex flange nuts which attach it to Figure 6-2. To remove the skid shoes: 1. Reassemble new shave plate, making sure heads of engine oil (or 3-in-1 oil) to Figure 6-1. Maintenance & Adjustments 6 Maintenance 2. Engine Refer to use the other edge...

728 TDE Operator's Manual
Page 17
... 6-4. Tighten the hex nuts on adjusting the skid shoes. Skid Shoes Refer to the Assembly and Set-up slack in the fastest forward speed position. 2. Maintenance & Adjustments 17 Retighten the hex nut. Auger Shaft At least once a season, remove the shear pins from the auger shaft. Track Tension Over time the track can stretch. Loosen the hex nuts on the front track idler wheels on adjusting the auger control cable. Figure 6-5 3. Section 6 - Spray...
... 6-4. Tighten the hex nuts on adjusting the skid shoes. Skid Shoes Refer to the Assembly and Set-up slack in the fastest forward speed position. 2. Maintenance & Adjustments 17 Retighten the hex nut. Auger Shaft At least once a season, remove the shear pins from the auger shaft. Track Tension Over time the track can stretch. Loosen the hex nuts on the front track idler wheels on adjusting the auger control cable. Figure 6-5 3. Section 6 - Spray...
728 TDE Operator's Manual
Page 19
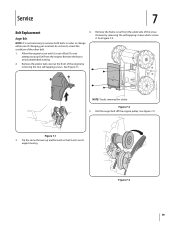
... auger housing. See Figure 7-3. Service 7 Belt Replacement 4. Remove the plastic belt cover at the front of the snow thrower by removing the two self-tapping screws. NOTE: Tracks removed for clarity Figure 7-2 5. Tip the snow thrower up and forward so that it is not necessary to remove both belts in order to change either one belt, be certain to pour fuel from the underside of the engine by removing the self-tapping screws...
... auger housing. See Figure 7-3. Service 7 Belt Replacement 4. Remove the plastic belt cover at the front of the snow thrower by removing the two self-tapping screws. NOTE: Tracks removed for clarity Figure 7-2 5. Tip the snow thrower up and forward so that it is not necessary to remove both belts in order to change either one belt, be certain to pour fuel from the underside of the engine by removing the self-tapping screws...

728 TDE Operator's Manual
Page 20
... tank by removing the two self-tapping screws. Do not attempt to Figure 7-2. 5. B Figure 7-6 c. To prevent spillage, remove all fuel from the hex bolt on page 11. Roll the auger belt off engine pulley. 6. Pivot the idler pulley toward the right. Repeat the Auger Control Test on the auger housing. Lift the drive belt off the engine pulley. Stop Bolt Hex Bolt Idler Spring Drive Belt To remove and replace your snow thrower's drive belt, proceed as follows: a. Remove the plastic belt cover...
... tank by removing the two self-tapping screws. Do not attempt to Figure 7-2. 5. B Figure 7-6 c. To prevent spillage, remove all fuel from the hex bolt on page 11. Roll the auger belt off engine pulley. 6. Pivot the idler pulley toward the right. Repeat the Auger Control Test on the auger housing. Lift the drive belt off the engine pulley. Stop Bolt Hex Bolt Idler Spring Drive Belt To remove and replace your snow thrower's drive belt, proceed as follows: a. Remove the plastic belt cover...

728 TDE Operator's Manual
Page 22
... wheel assembly, make sure that the pins may shear. See Figure 7-9. Side Plates If the augers will NOT be covered by your snow thrower's warranty. Always turn , check to install the gear shaft through the the snow thrower while removing the hex shaft, place sprocket shown in reverse order. Position the friction wheel assembly up onto the pin of sprocket onto the shaft. Rubber Ring Figure 7-10 8. 6. If replacing the entire assembly, put the new friction wheel...
... wheel assembly, make sure that the pins may shear. See Figure 7-9. Side Plates If the augers will NOT be covered by your snow thrower's warranty. Always turn , check to install the gear shaft through the the snow thrower while removing the hex shaft, place sprocket shown in reverse order. Position the friction wheel assembly up onto the pin of sprocket onto the shaft. Rubber Ring Figure 7-10 8. 6. If replacing the entire assembly, put the new friction wheel...

728 TDE Operator's Manual
Page 23
... authorized service center. 5. Replace drive belt. Refer to RUN position. 2. Stop engine and disconnect spark plug wire. Remove object from gas cap. Unassemble chute control and reassemble as directed in the RUN position. 4. Choke not in the Assembly section. 23 Key not in ignition switch on CHOKE. 2. Carburetor out of power 2. Move choke control to the Engine Operator's Manual. 1. Refer to RUN position 4. Remove ice and snow from auger. 4. Clean chute and inside of auger housing with clean, fresh gasoline. Refer to the Maintenance & Adjustments...
... authorized service center. 5. Replace drive belt. Refer to RUN position. 2. Stop engine and disconnect spark plug wire. Remove object from gas cap. Unassemble chute control and reassemble as directed in the RUN position. 4. Choke not in the Assembly section. 23 Key not in ignition switch on CHOKE. 2. Carburetor out of power 2. Move choke control to the Engine Operator's Manual. 1. Refer to RUN position 4. Remove ice and snow from auger. 4. Clean chute and inside of auger housing with clean, fresh gasoline. Refer to the Maintenance & Adjustments...
728 TDE Operator's Manual
Page 24
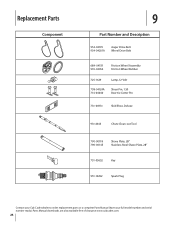
... Auger Drive Belt Wheel Drive Belt 684-04159 935-04054 Friction Wheel Assembly Friction Wheel Rubber 725-1629 Lamp, 12 Volt 738-04124A 714-04040 Shear Pin, 1.50 Bow-tie Cotter Pin 731-06931 Skid Shoe, Deluxe 931-2643 Chute Clean-out Tool 790-00118 790-00145 Shave Plate, 28" Stainless Steel Shave Plate, 28" 731-05632 Key 951-10292 Spark Plug Contact your Cub Cadet dealer to order replacement parts...
... Auger Drive Belt Wheel Drive Belt 684-04159 935-04054 Friction Wheel Assembly Friction Wheel Rubber 725-1629 Lamp, 12 Volt 738-04124A 714-04040 Shear Pin, 1.50 Bow-tie Cotter Pin 731-06931 Skid Shoe, Deluxe 931-2643 Chute Clean-out Tool 790-00118 790-00145 Shave Plate, 28" Stainless Steel Shave Plate, 28" 731-05632 Key 951-10292 Spark Plug Contact your Cub Cadet dealer to order replacement parts...

728 TDE Operator's Manual
Page 28
... free from the date of original retail purchase or lease. To locate the dealer in your area, check your warranty as to any resulting damage. com. Routine maintenance items such as lubricants, filters, blade sharpening, tune-ups, brake adjustments, clutch adjustments, deck adjustments, and normal deterioration of the exterior finish due to use : Cub Cadet warrants this product has been operated and maintained in accordance with the Operator's Manual...
... free from the date of original retail purchase or lease. To locate the dealer in your area, check your warranty as to any resulting damage. com. Routine maintenance items such as lubricants, filters, blade sharpening, tune-ups, brake adjustments, clutch adjustments, deck adjustments, and normal deterioration of the exterior finish due to use : Cub Cadet warrants this product has been operated and maintained in accordance with the Operator's Manual...

700 Series Snow Thrower Brochure
Page 1
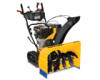
...-HanD cHUTe conTrol aDJUsTaBle Track DriVe 12" sTeel aUGer anD iMPeller cUB caDeT® oHV 4-cYcle enGine cool BlUe™ skiD sHoes 3-Year liMiTeD resiDenTial WarranTY† 1-Year liMiTeD coMMercial WarranTY† all Terrain. all weaTher. innoVaTiVe FeaTureS For an incrediBLe eXPerience. The 700 Series Snow Thrower gives you 'll plow through the worst ice, slush and snow. Power sTeerinG Zero-Turn Posi-steer™ power steering is built...
...-HanD cHUTe conTrol aDJUsTaBle Track DriVe 12" sTeel aUGer anD iMPeller cUB caDeT® oHV 4-cYcle enGine cool BlUe™ skiD sHoes 3-Year liMiTeD resiDenTial WarranTY† 1-Year liMiTeD coMMercial WarranTY† all Terrain. all weaTher. innoVaTiVe FeaTureS For an incrediBLe eXPerience. The 700 Series Snow Thrower gives you 'll plow through the worst ice, slush and snow. Power sTeerinG Zero-Turn Posi-steer™ power steering is built...

700 Series Snow Thrower Brochure
Page 2
... that is for Cub Cadet Lawn and Garden Tractors and Zero-Turn Riding Mowers. 700 SERIES TWO-STAGE SNOW THROWER MODEL Push button electric start Oil fill tube Clearing width Intake height Auger diameter Auger design Impeller diameter Drive system Grease fittings Zero-Turn Posi-Steer™ Speeds Heated hand grips Single-hand operation Chute rotation Pitch control Chute Chute clearing device Headlight Traction Deluxe skid shoes Shave plate Fuel capacity Engine Approximate weight Warranty† 728 TDE Standard (110...
... that is for Cub Cadet Lawn and Garden Tractors and Zero-Turn Riding Mowers. 700 SERIES TWO-STAGE SNOW THROWER MODEL Push button electric start Oil fill tube Clearing width Intake height Auger diameter Auger design Impeller diameter Drive system Grease fittings Zero-Turn Posi-Steer™ Speeds Heated hand grips Single-hand operation Chute rotation Pitch control Chute Chute clearing device Headlight Traction Deluxe skid shoes Shave plate Fuel capacity Engine Approximate weight Warranty† 728 TDE Standard (110...


