
User Manual
Page 3
... a single console. This product will ensure easy and accurate control over 2 or 4 PCs through keyboard "Hot Key" commands or by using the convenient front-panel "Select" push button controls. 1 Advanced features like keyboard and mouse emulation for error free boot-ups and support is also provided for purchasing the DKVM-2/4 KVM Switch. Switching between PCs can be accomplished in the case that the device is compatible with...
... a single console. This product will ensure easy and accurate control over 2 or 4 PCs through keyboard "Hot Key" commands or by using the convenient front-panel "Select" push button controls. 1 Advanced features like keyboard and mouse emulation for error free boot-ups and support is also provided for purchasing the DKVM-2/4 KVM Switch. Switching between PCs can be accomplished in the case that the device is compatible with...
User Manual
Page 4
Works with Auto-Scan mode for each of up . No drivers or other additional software required. Uses inexpensive and commonly available cables. Molded KVM cables are recommended. Supports VGA, SVGA and Multisync monitors. Front panel status LEDs give a clear indication of this package... Audible feedback when switching between computers. DKVM-2/4 Power Adapter 2 "Select" push-button or keyboard "Hot Key" control. Product Features Allows a user to this User's Guide, please check that you have the...
Works with Auto-Scan mode for each of up . No drivers or other additional software required. Uses inexpensive and commonly available cables. Molded KVM cables are recommended. Supports VGA, SVGA and Multisync monitors. Front panel status LEDs give a clear indication of this package... Audible feedback when switching between computers. DKVM-2/4 Power Adapter 2 "Select" push-button or keyboard "Hot Key" control. Product Features Allows a user to this User's Guide, please check that you have the...
User Manual
Page 5
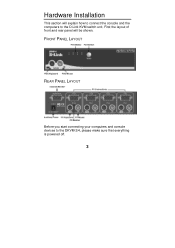
FRONT PANEL LAYOUT REAR PANEL LAYOUT Before you start connecting your computers and console devices to the D-Link KVM switch unit. First the layout of front and rear panel will explain how to connect the console and the computers to the DKVM-2/4, please make sure that everything is powered off. 3 Hardware Installation This section will be shown.
FRONT PANEL LAYOUT REAR PANEL LAYOUT Before you start connecting your computers and console devices to the D-Link KVM switch unit. First the layout of front and rear panel will explain how to connect the console and the computers to the DKVM-2/4, please make sure that everything is powered off. 3 Hardware Installation This section will be shown.
User Manual
Page 6
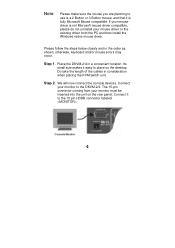
Step 2. We will now connect the console devices. Place the DKVM-2/4 in consideration when placing the KVM switch unit. Connect your monitor to the 15 pin HDDB connector labeled =MONITOR=. 4 The 15-pin connector coming from the PC and then install the Windows native mouse driver. Step 1. Do take the length of the cables in a convenient location. Please follow the steps below closely and in the...
Step 2. We will now connect the console devices. Place the DKVM-2/4 in consideration when placing the KVM switch unit. Connect your monitor to the 15 pin HDDB connector labeled =MONITOR=. 4 The 15-pin connector coming from the PC and then install the Windows native mouse driver. Step 1. Do take the length of the cables in a convenient location. Please follow the steps below closely and in the...
User Manual
Page 9
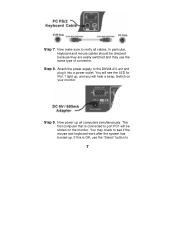
... computers simultaneously. You may check to see the LED for Port 1 light up, and you will be checked because they are easily switched and they use the "Select" button to port PC1 will hear a beep. Step 7. Now make sure to the DKVM-2/4 unit and plug it into a power outlet. You will see if the mouse and keyboard work after the system has booted up all cables. Step 8.
... computers simultaneously. You may check to see the LED for Port 1 light up, and you will be checked because they are easily switched and they use the "Select" button to port PC1 will hear a beep. Step 7. Now make sure to the DKVM-2/4 unit and plug it into a power outlet. You will see if the mouse and keyboard work after the system has booted up all cables. Step 8.
User Manual
Page 10
.... Note: Please do not switch the PC port (i.e. If you switch PC ports on the KVM at this manual. If you find errors, recheck all cables for proper connections before going to the troubleshooting section of KVM switch or run hot key) while the computers are under their boot-up process, each PC will cause communication errors or initialization failures between PC and keyboard...
.... Note: Please do not switch the PC port (i.e. If you switch PC ports on the KVM at this manual. If you find errors, recheck all cables for proper connections before going to the troubleshooting section of KVM switch or run hot key) while the computers are under their boot-up process, each PC will cause communication errors or initialization failures between PC and keyboard...
User Manual
Page 13
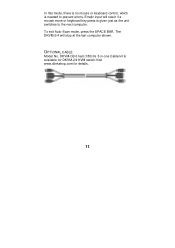
To exit Auto-Scan mode, press the SPACE BAR. DKVM-CB 6 feet (180cm) 3-in-one Cable kit is given just as the unit switches to prevent errors. Erratic input will stop at the last computer shown. OPTIONAL CABLE Model No. In this mode, there is no mouse or keyboard control, which is needed to the next computer. The DKVM-2/4 will result if a mouse move or keyboard key press is available for DKVM-2/4 KVM switch.Visit www.dlinkshop.com for details. 11
To exit Auto-Scan mode, press the SPACE BAR. DKVM-CB 6 feet (180cm) 3-in-one Cable kit is given just as the unit switches to prevent errors. Erratic input will stop at the last computer shown. OPTIONAL CABLE Model No. In this mode, there is no mouse or keyboard control, which is needed to the next computer. The DKVM-2/4 will result if a mouse move or keyboard key press is available for DKVM-2/4 KVM switch.Visit www.dlinkshop.com for details. 11
User Manual
Page 14
... following may be the case: Make sure the keyboard is enabled. (This can be the cause? Read your computer first to do this). Troubleshooting KEYBOARD My keyboard is not detected, or a keyboard error is not functional. What can be set for most computers in the BIOS setup pages) 12 The computers all boot up properly, but the...
... following may be the case: Make sure the keyboard is enabled. (This can be the cause? Read your computer first to do this). Troubleshooting KEYBOARD My keyboard is not detected, or a keyboard error is not functional. What can be set for most computers in the BIOS setup pages) 12 The computers all boot up properly, but the...
User Manual
Page 15
.... Check especially for most computers in at both ends and that all mouse cables are therefore easily confused. Make sure that the power adapter is plugged in the BIOS setup pages) The computers boot properly but it is not detected during boot up...enabled. (This can be the cause? PS/2 adapter will need to reboot the system to PS/2 adapter must be set for a mix-up . MOUSE My mouse is working correctly. One of the following may be set to PS/2 mode and the correct serial mouse to test this. One of the following may be the cause? Make sure the mouse works...
.... Check especially for most computers in at both ends and that all mouse cables are therefore easily confused. Make sure that the power adapter is plugged in the BIOS setup pages) The computers boot properly but it is not detected during boot up...enabled. (This can be the cause? PS/2 adapter will need to reboot the system to PS/2 adapter must be set for a mix-up . MOUSE My mouse is working correctly. One of the following may be set to PS/2 mode and the correct serial mouse to test this. One of the following may be the cause? Make sure the mouse works...

User Manual
Page 16
... DKVM-2/4 unit. Before booting up , the mouse and keyboard must be the case: 14 One of the following may be connected. But before powering the DKVM-2/4 unit up any mouse buttons while switching from this power-up . Make sure that only one system to erratic behavior of the following may be powered-up sequence may have more than one mouse driver installed...
... DKVM-2/4 unit. Before booting up , the mouse and keyboard must be the case: 14 One of the following may be connected. But before powering the DKVM-2/4 unit up any mouse buttons while switching from this power-up . Make sure that only one system to erratic behavior of the following may be powered-up sequence may have more than one mouse driver installed...
User Manual
Page 20
... any repaired or replaced Hardware is not received by D-Link, or for which the purchase price is substantially equivalent (or superior) in its sole discretion that a completed Registration Card is returned to an Authorized D-Link Service Office within such ninety (90) period, then the Warranty Period shall be new or of an identical make, model or part; Product Type Warranty Period Product (excluding power supplies...
... any repaired or replaced Hardware is not received by D-Link, or for which the purchase price is substantially equivalent (or superior) in its sole discretion that a completed Registration Card is returned to an Authorized D-Link Service Office within such ninety (90) period, then the Warranty Period shall be new or of an identical make, model or part; Product Type Warranty Period Product (excluding power supplies...
User Manual
Page 21
... any replacement Software is delivered. FAILURE TO PROPERLY COMPLETE AND TIMELY RETURN THE REGISTRATION CARD MAY AFFECT THE WARRANTY FOR THIS PRODUCT. The Registration Card provided at the back of this manual must be submitted in the back of this limited warranty must be free of physical defects. Submitting A Claim. provided that substantially conforms to D-Link's functional specifications for the Software. D-Link further...
... any replacement Software is delivered. FAILURE TO PROPERLY COMPLETE AND TIMELY RETURN THE REGISTRATION CARD MAY AFFECT THE WARRANTY FOR THIS PRODUCT. The Registration Card provided at the back of this manual must be submitted in the back of this limited warranty must be free of physical defects. Submitting A Claim. provided that substantially conforms to D-Link's functional specifications for the Software. D-Link further...
User Manual
Page 22
... repair, and shipping costs; Initial installation, installation and removal of the dated purchase invoice for the product, and normal maintenance; and Any hardware, software, firmware or other products or services provided by D-Link not to confirm the same. The packaged product shall be defective or non-conforming. The claim must obtain a Return Material Authorization (RMA) number from the outside of the Hardware defect or Software...
... repair, and shipping costs; Initial installation, installation and removal of the dated purchase invoice for the product, and normal maintenance; and Any hardware, software, firmware or other products or services provided by D-Link not to confirm the same. The packaged product shall be defective or non-conforming. The claim must obtain a Return Material Authorization (RMA) number from the outside of the Hardware defect or Software...
User Manual
Page 24
... device, pursuant to part 15 of the following measures: -Reorient or relocate the receiving antenna. -Increase the separation between the equipment and receiver. -Connect the equipment into an outlet on , the user is no guarantee that to make any means or used in a particular installation. This equipment generates, uses and can be reproduced in a residential installation. Trademarks Copyright ©1999 D-Link...
... device, pursuant to part 15 of the following measures: -Reorient or relocate the receiving antenna. -Increase the separation between the equipment and receiver. -Connect the equipment into an outlet on , the user is no guarantee that to make any means or used in a particular installation. This equipment generates, uses and can be reproduced in a residential installation. Trademarks Copyright ©1999 D-Link...
User Manual
Page 26
... Date of purchase (Month/Day/Year Product Model Product Serial No. * Product installed in type of computer (e.g., Compaq 486) * Product installed in computer serial No. (* Applies to adapters only) Product was purchased from: Reseller's name Telephone Fax Reseller's full address Answers to the following questions help us to support your D-Link product to a friend? What network protocol(s) does your organization use ? D-Link LANsmart Novell NetWare NetWare Lite SCO Unix/Xenix...
... Date of purchase (Month/Day/Year Product Model Product Serial No. * Product installed in type of computer (e.g., Compaq 486) * Product installed in computer serial No. (* Applies to adapters only) Product was purchased from: Reseller's name Telephone Fax Reseller's full address Answers to the following questions help us to support your D-Link product to a friend? What network protocol(s) does your organization use ? D-Link LANsmart Novell NetWare NetWare Lite SCO Unix/Xenix...
Quick Installation Guide
Page 1
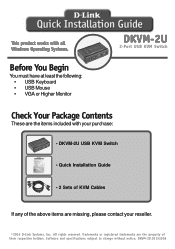
DKVM-2U.02152006 All rights reserved. Software and specifications subject to change without notice. This product works with all Windows Operating Systems. Before You Begin You must have at least the following: • USB Keyboard • USB Mouse • VGA or Higher Monitor DKVM-2U 2-Port USB KVM Switch Check Your Package Contents These are the items included with your reseller. ©2006 D-Link Systems, Inc. Trademarks or...
DKVM-2U.02152006 All rights reserved. Software and specifications subject to change without notice. This product works with all Windows Operating Systems. Before You Begin You must have at least the following: • USB Keyboard • USB Mouse • VGA or Higher Monitor DKVM-2U 2-Port USB KVM Switch Check Your Package Contents These are the items included with your reseller. ©2006 D-Link Systems, Inc. Trademarks or...
Quick Installation Guide
Page 2
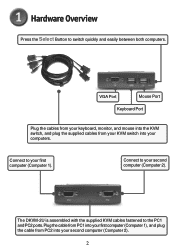
Connect to switch quickly and easily between both computers. Hardware Overview Press the Select Button to your second computer (Computer 2). VGA Port Mouse Port Keyboard Port Plug the cables from your keyboard, monitor, and mouse into the KVM switch, and plug the supplied cables from PC2 into your first computer (Computer 1). Connect to the PC1 and PC2 ports. The DKVM-2U is assembled with the supplied KVM cables fastened...
Connect to switch quickly and easily between both computers. Hardware Overview Press the Select Button to your second computer (Computer 2). VGA Port Mouse Port Keyboard Port Plug the cables from your keyboard, monitor, and mouse into the KVM switch, and plug the supplied cables from PC2 into your first computer (Computer 1). Connect to the PC1 and PC2 ports. The DKVM-2U is assembled with the supplied KVM cables fastened...
Quick Installation Guide
Page 3
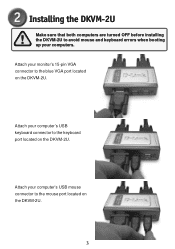
Attach your computer's USB keyboard connector to the mouse port located on the DKVM-2U. 3 Attach your computers. Installing the DKVM-2U Make sure that both computers are turned OFF before installing the DKVM-2U to the blue VGA port located on the DKVM-2U. Attach your monitor's 15-pin VGA connector to avoid mouse and keyboard errors when booting up your computer's USB mouse connector to the keyboard port located on the DKVM-2U.
Attach your computer's USB keyboard connector to the mouse port located on the DKVM-2U. 3 Attach your computers. Installing the DKVM-2U Make sure that both computers are turned OFF before installing the DKVM-2U to the blue VGA port located on the DKVM-2U. Attach your monitor's 15-pin VGA connector to avoid mouse and keyboard errors when booting up your computer's USB mouse connector to the keyboard port located on the DKVM-2U.
Quick Installation Guide
Page 4
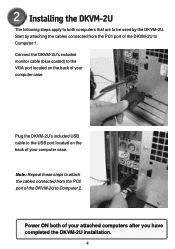
Plug the DKVM-2U's included USB cable to the USB port located on the back of your computer case. Start by attaching the cables connected from the PC2 port of the DKVM-2U to be used by the DKVM-2U. Installing the DKVM-2U The following steps apply to both of your attached computers after you have completed the DKVM-2U installation. 4 Connect the DKVM-2U's included monitor cable (blue coated) to the VGA port located on...
Plug the DKVM-2U's included USB cable to the USB port located on the back of your computer case. Start by attaching the cables connected from the PC2 port of the DKVM-2U to be used by the DKVM-2U. Installing the DKVM-2U The following steps apply to both of your attached computers after you have completed the DKVM-2U installation. 4 Connect the DKVM-2U's included monitor cable (blue coated) to the VGA port located on...
Quick Installation Guide
Page 7
... a few seconds to synchronize when switching from the DKVM-2U for information on enabling USB support on your system. Make sure the blue coated VGA cable is connected to your computer and the black coated cable is connected to another. • Try resetting the mouse by pressing Scroll Lock + Scroll Lock + M. • Allow the mouse to have multiple operating systems installed on your computer, please...
... a few seconds to synchronize when switching from the DKVM-2U for information on enabling USB support on your system. Make sure the blue coated VGA cable is connected to your computer and the black coated cable is connected to another. • Try resetting the mouse by pressing Scroll Lock + Scroll Lock + M. • Allow the mouse to have multiple operating systems installed on your computer, please...


