
Quick Installation Guide
Page 1
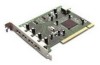
This product can be used with the following operating systems: Windows XP, Me, 2000, 98SE Macintosh OS v10.1 DU-520 5-Port Hi-Speed USB 2.0 PCI Adapter Before You Begin You must have at least the following: • Windows XP/Me/2000/98SE or Macintosh OS v10... purchase: If any of the below items are missing, please contact your reseller. • DU-520 Hi-Speed USB 2.0 PCI Adapter • CD-ROM (containing Drivers, Installation Guide and Warranty) Windows Users Run the Driver CD before you install the DU-520. The Driver CD contains an installation program that significantly simplifies the...
This product can be used with the following operating systems: Windows XP, Me, 2000, 98SE Macintosh OS v10.1 DU-520 5-Port Hi-Speed USB 2.0 PCI Adapter Before You Begin You must have at least the following: • Windows XP/Me/2000/98SE or Macintosh OS v10... purchase: If any of the below items are missing, please contact your reseller. • DU-520 Hi-Speed USB 2.0 PCI Adapter • CD-ROM (containing Drivers, Installation Guide and Warranty) Windows Users Run the Driver CD before you install the DU-520. The Driver CD contains an installation program that significantly simplifies the...
Quick Installation Guide
Page 2
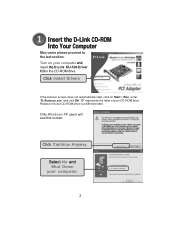
Insert the D-Link CD-ROM Into Your Computer Mac users please proceed to the last section. "D" represents the letter of your CD-ROM drive is a different letter. Replace it if your CD-ROM drive. Only Windows XP users will see this screen. Turn on Start > Run, enter "D:\Autorun.exe" and click OK. Click Continue Anyway Select No and Shut Down your computer and insert the D-Link DU-520 Driver CD in the CD-ROM drive. Click Install Drivers If the Autorun screen does not automatically start, click on your computer. 2
Insert the D-Link CD-ROM Into Your Computer Mac users please proceed to the last section. "D" represents the letter of your CD-ROM drive is a different letter. Replace it if your CD-ROM drive. Only Windows XP users will see this screen. Turn on Start > Run, enter "D:\Autorun.exe" and click OK. Click Continue Anyway Select No and Shut Down your computer and insert the D-Link DU-520 Driver CD in the CD-ROM drive. Click Install Drivers If the Autorun screen does not automatically start, click on your computer. 2

Quick Installation Guide
Page 3
Turn On your computer is turned OFF before installing the DU-520. Installing The DU-520 Hi-Speed USB 2.0 PCI Adapter Into Your Computer Make sure that covers the opening for the PCI card). Remove the backplate. (The small piece of your computer. Refer to your computer's cover and plug in the power cord. Remove the outer cover of metal that your computer. 3 Locate an available PCI slot and insert the DU-520 carefully into the PCI slot. PCI Slot Secure the DU-520 with the screw from the backplate. Replace your computer manual as needed.
Turn On your computer is turned OFF before installing the DU-520. Installing The DU-520 Hi-Speed USB 2.0 PCI Adapter Into Your Computer Make sure that covers the opening for the PCI card). Remove the backplate. (The small piece of your computer. Refer to your computer's cover and plug in the power cord. Remove the outer cover of metal that your computer. 3 Locate an available PCI slot and insert the DU-520 carefully into the PCI slot. PCI Slot Secure the DU-520 with the screw from the backplate. Replace your computer manual as needed.
Quick Installation Guide
Page 4
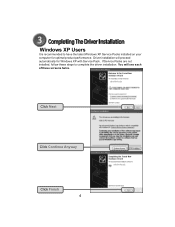
Click Next Click Continue Anyway Click Finish 4 Driver installation will see each of these steps to have the latest Windows XP Service Packs installed on your computer for Windows XP with Service Pack. If Service Packs are not installed, follow these screens twice. You will proceed automatically for optimal product performance. Completing The Driver Installation Windows XP Users It is recommended to complete the driver installation.
Click Next Click Continue Anyway Click Finish 4 Driver installation will see each of these steps to have the latest Windows XP Service Packs installed on your computer for Windows XP with Service Pack. If Service Packs are not installed, follow these screens twice. You will proceed automatically for optimal product performance. Completing The Driver Installation Windows XP Users It is recommended to complete the driver installation.
Quick Installation Guide
Page 5
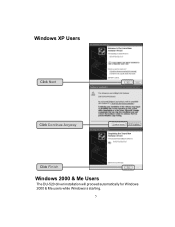
Windows XP Users Click Next Click Continue Anyway Click Finish Windows 2000 & Me Users The DU-520 driver installation will proceed automatically for Windows 2000 & Me users while Windows is starting. 5
Windows XP Users Click Next Click Continue Anyway Click Finish Windows 2000 & Me Users The DU-520 driver installation will proceed automatically for Windows 2000 & Me users while Windows is starting. 5

Quick Installation Guide
Page 6
Windows 98SE Users Follow these screens twice. Click Next 6 Click Next Click Next Make sure all boxes are unchecked and Click Next. You will see each of these steps to complete installation under Windows 98SE for each device that Windows propmpts you to install.
Windows 98SE Users Follow these screens twice. Click Next 6 Click Next Click Next Make sure all boxes are unchecked and Click Next. You will see each of these steps to complete installation under Windows 98SE for each device that Windows propmpts you to install.

Quick Installation Guide
Page 7
Click Finish When prompted, Restart Your Computer to complete the installation. 7 Windows 98SE Users Click Next Click Next Windows 98 may prompt you for the Windows 98 Setup disk. If prompted, insert the Windows 98 Setup disk and select OK.
Click Finish When prompted, Restart Your Computer to complete the installation. 7 Windows 98SE Users Click Next Click Next Windows 98 may prompt you for the Windows 98 Setup disk. If prompted, insert the Windows 98 Setup disk and select OK.
Quick Installation Guide
Page 10
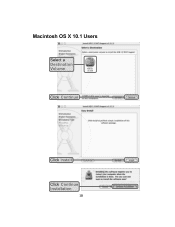
Macintosh OS X 10.1 Users Select a Destination Volume Click Continue Click Install Click Continue Installation 10
Macintosh OS X 10.1 Users Select a Destination Volume Click Continue Click Install Click Continue Installation 10

Quick Installation Guide
Page 11
Macintosh OS X 10.1 Users Click Restart Typical DU-520 Installation Once properly installed, the DU-520 Hi-Speed USB 2.0 5-Port PCI Adapter can be used to connect both USB 2.0 and USB 1.1 devices to any of its five USB ports. The diagram below shows a typical installation using the DU-520 and other USB devices. 11
Macintosh OS X 10.1 Users Click Restart Typical DU-520 Installation Once properly installed, the DU-520 Hi-Speed USB 2.0 5-Port PCI Adapter can be used to connect both USB 2.0 and USB 1.1 devices to any of its five USB ports. The diagram below shows a typical installation using the DU-520 and other USB devices. 11

