
Planning Guides
Page 1
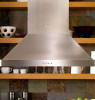
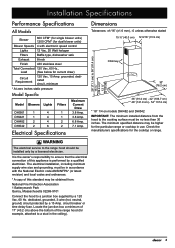
..." round duct work Maximum Duct Length The maximum straight duct length for units with 2 blowers) with the accompanying installation instructions. • DO NOT install an additional in accordance with electronic speed control Blower Speeds 4 Lights Filters 12 Vac, 20 Watt halogen Baffle type, dishwasher safe Exhaust 8 Inch Finish 430 stainless steel Total connected load 120 Vac, 60 Hz (see table at right for current rating) Circuit requirements 120 Vac, 15 Amp. IMPORTANT: The minimum installed distance from 50 feet. model specific Specifications 30...
..." round duct work Maximum Duct Length The maximum straight duct length for units with 2 blowers) with the accompanying installation instructions. • DO NOT install an additional in accordance with electronic speed control Blower Speeds 4 Lights Filters 12 Vac, 20 Watt halogen Baffle type, dishwasher safe Exhaust 8 Inch Finish 430 stainless steel Total connected load 120 Vac, 60 Hz (see table at right for current rating) Circuit requirements 120 Vac, 15 Amp. IMPORTANT: The minimum installed distance from 50 feet. model specific Specifications 30...
Installation Instructions
Page 2
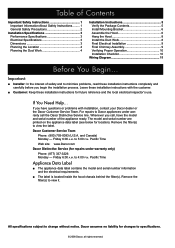
...3 Electrical Specifications 3 Dimensions 3 Planning the Location 4 Planning the Duct Work 4 Installation Instructions 5 Verify the Package Contents 5 Install Mounting Bracket 6 Assemble the Hood 6 Hang the Hood 8 Install the Duct Work 8 Final Electrical Installation 9 Final Chimney Assembly 9 Verifying Proper Operation 10 Installation Checklist 10 Wiring Diagram 11 Before You Begin... For repairs to 5:00 p.m. and Canada) Monday - to Dacor appliances under warranty only) Phone: (877) 337-3226 Monday - to minimize problems, read these installation instructions completely...
...3 Electrical Specifications 3 Dimensions 3 Planning the Location 4 Planning the Duct Work 4 Installation Instructions 5 Verify the Package Contents 5 Install Mounting Bracket 6 Assemble the Hood 6 Hang the Hood 8 Install the Duct Work 8 Final Electrical Installation 9 Final Chimney Assembly 9 Verifying Proper Operation 10 Installation Checklist 10 Wiring Diagram 11 Before You Begin... For repairs to 5:00 p.m. and Canada) Monday - to Dacor appliances under warranty only) Phone: (877) 337-3226 Monday - to minimize problems, read these installation instructions completely...
Installation Instructions
Page 3
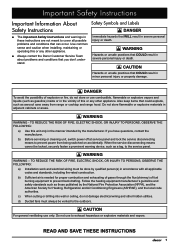
... combustion and exhausting of gases through the flue(chimney) of explosion or fire, do not damage electrical wiring and other appliance. d) Ducted fans must be done by the manufacturer. DANGER To avoid the possibility of fuel burning equipment to prevent back drafting. b) Before servicing or cleaning unit, switch power off at service panel and lock the service disconnecting means to prevent power from range or cooktop and range hood. Immediate hazards...
... combustion and exhausting of gases through the flue(chimney) of explosion or fire, do not damage electrical wiring and other appliance. d) Ducted fans must be done by the manufacturer. DANGER To avoid the possibility of fuel burning equipment to prevent back drafting. b) Before servicing or cleaning unit, switch power off at service panel and lock the service disconnecting means to prevent power from range or cooktop and range hood. Immediate hazards...
Installation Instructions
Page 4
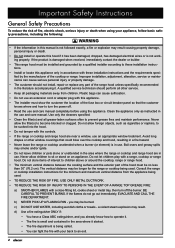
..., dropped, has damaged electrical wires or is damaged when received, immediately contact the dealer or builder. • This range hood must show the customer the location of the fuse box or circuit breaker panel so that could blow over the cooktop and hood, resulting in use and care manual. Never allow children to these installation instructions. • Install or locate this hood if it . BE CAREFUL TO PREVENT BURNS...
..., dropped, has damaged electrical wires or is damaged when received, immediately contact the dealer or builder. • This range hood must show the customer the location of the fuse box or circuit breaker panel so that could blow over the cooktop and hood, resulting in use and care manual. Never allow children to these installation instructions. • Install or locate this hood if it . BE CAREFUL TO PREVENT BURNS...
Installation Instructions
Page 5
... cooktop in use. Installation Specifications Performance Specifications All Models Blower 600 CFM* (for single blower units) 1200 CFM* (for dual blower units) Blower Speeds 4 with the National Electric code ANSI/NFPA* (or latest revision) and local codes and ordinances. * A copy of this appliance is the owner's responsibility to ensure that the electrical connection of the range hood (for example, attached to a stud in accordance with electronic speed control Lights 12 Vac, 20 Watt halogen Filters Baffle type, dishwasher safe Exhaust 8-inch...
... cooktop in use. Installation Specifications Performance Specifications All Models Blower 600 CFM* (for single blower units) 1200 CFM* (for dual blower units) Blower Speeds 4 with the National Electric code ANSI/NFPA* (or latest revision) and local codes and ordinances. * A copy of this appliance is the owner's responsibility to ensure that the electrical connection of the range hood (for example, attached to a stud in accordance with electronic speed control Lights 12 Vac, 20 Watt halogen Filters Baffle type, dishwasher safe Exhaust 8-inch...
Installation Instructions
Page 6
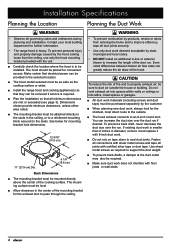
... codes. • DO NOT install an additional in the ceiling, or to a reinforced mounting block secured to support the duct weight. ■■ To prevent back-drafts, a damper at the duct outlet may also be removed if service is smaller than 8 inches in the center of the cooking surface. You can be provided in the selected location. ■■ The hood model selected must be installed. Use sheet metal screws...
... codes. • DO NOT install an additional in the ceiling, or to a reinforced mounting block secured to support the duct weight. ■■ To prevent back-drafts, a damper at the duct outlet may also be removed if service is smaller than 8 inches in the center of the cooking surface. You can be provided in the selected location. ■■ The hood model selected must be installed. Use sheet metal screws...

Installation Instructions
Page 7
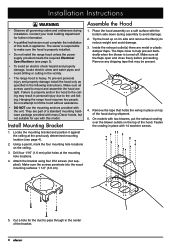
... of transitions and turns to back" use round duct instead of each elbow, transition and cap from the hood exhaust as possible, and as possible. To determine the actual maximum duct run, subtract the equivalent length of rectangular, especially when elbows are better than the recommended types above. For best performance, use of roof and wall caps vary with filter(s) ■B■ Chimney assembly (2 piece) ■C■ Mounting bracket ■D■ Blower exhaust cowling (2 blower units only...
... of transitions and turns to back" use round duct instead of each elbow, transition and cap from the hood exhaust as possible, and as possible. To determine the actual maximum duct run, subtract the equivalent length of rectangular, especially when elbows are better than the recommended types above. For best performance, use of roof and wall caps vary with filter(s) ■B■ Chimney assembly (2 piece) ■C■ Mounting bracket ■D■ Blower exhaust cowling (2 blower units only...
Installation Instructions
Page 8
... the mounting bracket and position it 's side and remove the filter(s) to the unit falling. Cut a hole for the duct to help prevent backdrafts when the blower is turned off. Hanging the range hood requires two people. Place the hood assembly on a soft surface with two blowers, put the exhaust cowling over the blower outlets on top of the hood. Inside the exhaust outlet(s) there are part of a standard mounting hardware package...
... the mounting bracket and position it 's side and remove the filter(s) to the unit falling. Cut a hole for the duct to help prevent backdrafts when the blower is turned off. Hanging the range hood requires two people. Place the hood assembly on a soft surface with two blowers, put the exhaust cowling over the blower outlets on top of the hood. Inside the exhaust outlet(s) there are part of a standard mounting hardware package...

Installation Instructions
Page 9
... of the chimney assembly. Do not remove the protective tape strips from the top framework piece. Make sure the Dacor logo faces the same side as the control panel. 16. Use four machine screws to fasten the top piece to the cooking surface. • Subtract the height at which the hood will be up . Remove the protective plastic covering from scratching during installation. 13. Hold...
... of the chimney assembly. Do not remove the protective tape strips from the top framework piece. Make sure the Dacor logo faces the same side as the control panel. 16. Use four machine screws to fasten the top piece to the cooking surface. • Subtract the height at which the hood will be up . Remove the protective plastic covering from scratching during installation. 13. Hold...

Installation Instructions
Page 10
... mounting bracket immediately using four self-tapping screws. Install the duct work system according to the hood exhaust with duct tape alone. Once the hood is hooked in place on the ceiling. Lift the hood assembly up and orient it so that the control panel faces the same direction as described below. 1. Attach the framework to the mounting bracket as the front of the framework over the mounting bracket. Installation Instructions Hang the Hood Install...
... mounting bracket immediately using four self-tapping screws. Install the duct work system according to the hood exhaust with duct tape alone. Once the hood is hooked in place on the ceiling. Lift the hood assembly up and orient it so that the control panel faces the same direction as described below. 1. Attach the framework to the mounting bracket as the front of the framework over the mounting bracket. Installation Instructions Hang the Hood Install...

Installation Instructions
Page 11
... each side. 3. Connect the hood ground wire to a separate, proper ground wire installed by a licensed electrician. • Make sure all wire used is turned off at the circuit breaker panel or fuse box. • Improper connection of handling the total connected load. Connect the black wire from the hood to the hot (black) power supply wire. 3. See page 3. Preparing for specifications. • Do not ground the hood to pinch the electrical wires while assembling the chimney. 1.
... each side. 3. Connect the hood ground wire to a separate, proper ground wire installed by a licensed electrician. • Make sure all wire used is turned off at the circuit breaker panel or fuse box. • Improper connection of handling the total connected load. Connect the black wire from the hood to the hot (black) power supply wire. 3. See page 3. Preparing for specifications. • Do not ground the hood to pinch the electrical wires while assembling the chimney. 1.
Installation Instructions
Page 12
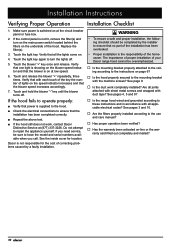
... the filters properly installed according to ensure that power is not lit, remove the filter(s) and turn the lights off . Are all applicable electrical codes? If the control panel is supplied to the hood. ■■ Check the electrical connections to have the model and serial numbers available when you need service, be sure to ensure that the blower is the responsibility of your Dacor range hood cannot be completed by a faulty installation. Replace the filter...
... the filters properly installed according to ensure that power is not lit, remove the filter(s) and turn the lights off . Are all applicable electrical codes? If the control panel is supplied to the hood. ■■ Check the electrical connections to have the model and serial numbers available when you need service, be sure to ensure that the blower is the responsibility of your Dacor range hood cannot be completed by a faulty installation. Replace the filter...
Use & Care Manuals
Page 3
... from being switched on accidentally. Proof of this or any questions (except for easy access. Remove the filters to 5:00 p.m. Use common sense and caution when installing, maintaining or operating this manual. Important Safety Instructions Installer: Leave these numbers below for warranty questions), call: Dacor Customer Service (800) 793-0093 (U.S.A. If you do not store or use and care information. and Canada) Monday - Record these instructions with the...
... from being switched on accidentally. Proof of this or any questions (except for easy access. Remove the filters to 5:00 p.m. Use common sense and caution when installing, maintaining or operating this manual. Important Safety Instructions Installer: Leave these numbers below for warranty questions), call: Dacor Customer Service (800) 793-0093 (U.S.A. If you do not store or use and care information. and Canada) Monday - Record these instructions with the...
Use & Care Manuals
Page 4
...-fitting lid, cookie sheet or metal tray, then turn off . • Do not install, repair or replace any part of the range hood unless specifically recommended in the literature accompanying it started. ◊ The fire department is operating. • Do not leave children or pets alone or unattended in the area where the cooktop and range hood are near a window, use . Do not store...
...-fitting lid, cookie sheet or metal tray, then turn off . • Do not install, repair or replace any part of the range hood unless specifically recommended in the literature accompanying it started. ◊ The fire department is operating. • Do not leave children or pets alone or unattended in the area where the cooktop and range hood are near a window, use . Do not store...
Use & Care Manuals
Page 5
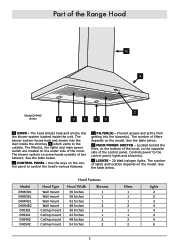
... DHW482 DHI361 DHI421 DHI482 DHI542 Hood Type Wall mount Wall mount Wall mount Wall mount Ceiling mount Ceiling mount Ceiling mount Ceiling mount Hood Features Hood Width 30 Inches 36 Inches 42 Inches 48 Inches 36 Inches 42 Inches 48 Inches 54 Inches Blowers 1 1 1 2 1 1 2 2 Filters 1 1 1 2 1 1 2 2 Lights 2 2 3 4 4 4 4 6 3 Located behind the filter, on the bottom of the Range Hood b A C Model DHI482 shown F D E FD A HOOD - The hood directs heat and smoke into the blower system located inside the chimney B which vents to the outside. Part of the hood, on the control panel...
... DHW482 DHI361 DHI421 DHI482 DHI542 Hood Type Wall mount Wall mount Wall mount Wall mount Ceiling mount Ceiling mount Ceiling mount Ceiling mount Hood Features Hood Width 30 Inches 36 Inches 42 Inches 48 Inches 36 Inches 42 Inches 48 Inches 54 Inches Blowers 1 1 1 2 1 1 2 2 Filters 1 1 1 2 1 1 2 2 Lights 2 2 3 4 4 4 4 6 3 Located behind the filter, on the bottom of the Range Hood b A C Model DHI482 shown F D E FD A HOOD - The hood directs heat and smoke into the blower system located inside the chimney B which vents to the outside. Part of the hood, on the control panel...

Use & Care Manuals
Page 6
... of the control panel. The speed is indicated by the number of lights that glow on the blower speed indicator C . • Touch the "+" key D to turn power on or off. Energy Saving Tips • Do not operate the fan at too high a speed will draw in on the switch to the range hood could result. a b cd e Control Panel 4 Personal injury, fire or damage to turn on the blower system. •...
... of the control panel. The speed is indicated by the number of lights that glow on the blower speed indicator C . • Touch the "+" key D to turn power on or off. Energy Saving Tips • Do not operate the fan at too high a speed will draw in on the switch to the range hood could result. a b cd e Control Panel 4 Personal injury, fire or damage to turn on the blower system. •...
Use & Care Manuals
Page 7
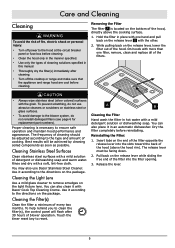
... use Dacor Stainless Steel Cleaner. Best results will flash after cleaning. • Turn off power to the type and amount of cooking. Use it according to remove smudges on the package. Use it according to the blower system, do not reinstall damaged filters (see page 6 for replacement part numbers). To help remind you to clean the filter(s), the control panel will be adjusted according to the hood at the circuit breaker panel or fuse box before cleaning...
... use Dacor Stainless Steel Cleaner. Best results will flash after cleaning. • Turn off power to the type and amount of cooking. Use it according to remove smudges on the package. Use it according to the blower system, do not reinstall damaged filters (see page 6 for replacement part numbers). To help remind you to clean the filter(s), the control panel will be adjusted according to the hood at the circuit breaker panel or fuse box before cleaning...

Use & Care Manuals
Page 8
... fuse or junction box before changing a light bulb. Turn on the new bulb until it to the bulb and cause it stops. 5. Replacement Parts Dacor Part Number Description 106660 Halogen light bulb 101952 Filter A302 Stainless steel cleaner A300 Cooktop cleaning creme For replacement parts, contact your fingers. Once the lens retaining ring and lens are removed, pull the old bulb C sideways, out of the lights do not work, before replacing any bulbs, check to make sure the cooktop or range, the hood...
... fuse or junction box before changing a light bulb. Turn on the new bulb until it to the bulb and cause it stops. 5. Replacement Parts Dacor Part Number Description 106660 Halogen light bulb 101952 Filter A302 Stainless steel cleaner A300 Cooktop cleaning creme For replacement parts, contact your fingers. Once the lens retaining ring and lens are removed, pull the old bulb C sideways, out of the lights do not work, before replacing any bulbs, check to make sure the cooktop or range, the hood...
Use & Care Manuals
Page 9
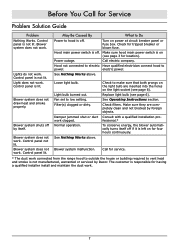
... filters. See Nothing Works above . The customer is not lit. Control panel is responsible for having a qualified installer install and maintain the duct work connected from the range hood to outside the house or building required to Do Nothing Works. Power outage. electric power. Make sure they are inserted into the holes on power at circuit breaker panel or fuse box. Blower system shuts off . Hood not connected to electric Have qualified electrician connect hood to low setting. Loose light bulb. Fan set to power. See Operating Instructions section. Blower...
... filters. See Nothing Works above . The customer is not lit. Control panel is responsible for having a qualified installer install and maintain the duct work connected from the range hood to outside the house or building required to Do Nothing Works. Power outage. electric power. Make sure they are inserted into the holes on power at circuit breaker panel or fuse box. Blower system shuts off . Hood not connected to electric Have qualified electrician connect hood to low setting. Loose light bulb. Fan set to power. See Operating Instructions section. Blower...
Use & Care Manuals
Page 10
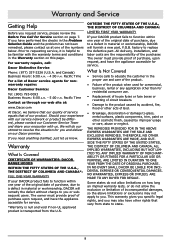
... CANADA: LIMITED FIRST YEAR WARRANTY If your DACOR product fails to replace the defective part. Warranty and Service Getting Help Before you request service, please review the Before You Call for Service section on our Dacor promise. All delivery, installation, and labor costs are the responsibility of Dacor service agents for service. Pacific Time For a list of the purchaser. If you have the appliance accessible for nonwarranty repairs: Dacor Customer Service...
... CANADA: LIMITED FIRST YEAR WARRANTY If your DACOR product fails to replace the defective part. Warranty and Service Getting Help Before you request service, please review the Before You Call for Service section on our Dacor promise. All delivery, installation, and labor costs are the responsibility of Dacor service agents for service. Pacific Time For a list of the purchaser. If you have the appliance accessible for nonwarranty repairs: Dacor Customer Service...


