
User Manual - Island / Wall Hood
Page 1
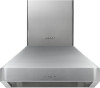
Model DHI482 shown. Use and Care Manual Discovery® Island/Wall Hoods Models: DHI361, DHI421, DHI482, DHI542, DHW301, DHW361, DHW421 and DHW482 Style varies. Table of Contents Important Safety Instructions 1 Part of the Range Hood 3 Operating Instructions 4 Care and Cleaning 5 Before You Call for Service 7 Warranty and Service 7 Warranty Card Back Cover Part No. 101741 Rev. J
Model DHI482 shown. Use and Care Manual Discovery® Island/Wall Hoods Models: DHI361, DHI421, DHI482, DHI542, DHW301, DHW361, DHW421 and DHW482 Style varies. Table of Contents Important Safety Instructions 1 Part of the Range Hood 3 Operating Instructions 4 Care and Cleaning 5 Before You Call for Service 7 Warranty and Service 7 Warranty Card Back Cover Part No. 101741 Rev. J

User Manual - Island / Wall Hood
Page 3
... or use and care information. Friday 6:00 a.m. Pacific Time Web site: www.dacor.com Have the model and serial number for future reference. Remove the filters to 5:00 p.m. Model number Serial number Important Information About Safety Instructions The Important Safety Instructions and warnings in the manner intended by the manufacturer. Use common sense and caution when installing, maintaining or operating this manual. Always contact the Dacor Customer Service Team about problems or...
... or use and care information. Friday 6:00 a.m. Pacific Time Web site: www.dacor.com Have the model and serial number for future reference. Remove the filters to 5:00 p.m. Model number Serial number Important Information About Safety Instructions The Important Safety Instructions and warnings in the manner intended by the manufacturer. Use common sense and caution when installing, maintaining or operating this manual. Always contact the Dacor Customer Service Team about problems or...

User Manual - Island / Wall Hood
Page 4
.... Always turn hood ON when cooking at high settings. Clean ventilating fans frequently. Always use cookware appropriate for the minimum vertical distance from the appliance being used . • Clean the range hood only in the manner specified in the area where the cooktop and range hood are near a window, use . Have the installer show you the location of the circuit breaker panel or fuse box so that the range hood has been properly installed and...
.... Always turn hood ON when cooking at high settings. Clean ventilating fans frequently. Always use cookware appropriate for the minimum vertical distance from the appliance being used . • Clean the range hood only in the manner specified in the area where the cooktop and range hood are near a window, use . Have the installer show you the location of the circuit breaker panel or fuse box so that the range hood has been properly installed and...

User Manual - Island / Wall Hood
Page 5
... of the hood. Controls power to control the hood's various features. The filter(s), the lights and main power switch are located on the under side of the control panel. D FILTER(S) - Parts of lights and location depends on the model. See the table below. The number of the Range Hood B A C Model DHI482 shown F D E FD A HOOD - Prevent grease and grime from getting into the blower system located inside the chimney B which vents to the outside. The hood directs heat...
... of the hood. Controls power to control the hood's various features. The filter(s), the lights and main power switch are located on the under side of the control panel. D FILTER(S) - Parts of lights and location depends on the model. See the table below. The number of the Range Hood B A C Model DHI482 shown F D E FD A HOOD - Prevent grease and grime from getting into the blower system located inside the chimney B which vents to the outside. The hood directs heat...

User Manual - Island / Wall Hood
Page 6
... necessary to remove heat and smoke. Important Operating Tips • Always use lids on the blower speed indicator C . • Touch the "+" key D to turn off . Main Power Switch The main power switch is indicated by the number of the control panel. See page 3 for the cooking task. Turning on . The speed is located behind the filter, on the bottom of the hood, on the opposite side of lights that...
... necessary to remove heat and smoke. Important Operating Tips • Always use lids on the blower speed indicator C . • Touch the "+" key D to turn off . Main Power Switch The main power switch is indicated by the number of the control panel. See page 3 for the cooking task. Turning on . The speed is located behind the filter, on the bottom of the hood, on the opposite side of lights that...

User Manual - Island / Wall Hood
Page 7
... Clean stainless steel surfaces with more than one hand and pull back on the light fixture lens. Touch the timer reset key to ensure safe operation and maintain hood performance and appearance. Proper cleaning is located on the end of cooking. Use it according to the directions on the package. Cleaning the Light Lens Use a mild glass cleaner to the hood at the circuit breaker panel or fuse box...
... Clean stainless steel surfaces with more than one hand and pull back on the light fixture lens. Touch the timer reset key to ensure safe operation and maintain hood performance and appearance. Proper cleaning is located on the end of cooking. Use it according to the directions on the package. Cleaning the Light Lens Use a mild glass cleaner to the hood at the circuit breaker panel or fuse box...

User Manual - Island / Wall Hood
Page 8
... information. Dacor Part Number Description 106660 Halogen light bulb 101952 A302 A300 Filter Stainless steel cleaner Cooktop cleaning creme For replacement parts, contact your hand will stick to make sure power is on at the circuit breaker panel or fuse box. Once the lens retaining ring and lens are sensitive to burn out faster than normal. • Do not pry out the entire light fixture A , when replacing the light bulb. See Replacement Parts for the...
... information. Dacor Part Number Description 106660 Halogen light bulb 101952 A302 A300 Filter Stainless steel cleaner Cooktop cleaning creme For replacement parts, contact your hand will stick to make sure power is on at the circuit breaker panel or fuse box. Once the lens retaining ring and lens are sensitive to burn out faster than normal. • Do not pry out the entire light fixture A , when replacing the light bulb. See Replacement Parts for the...

User Manual - Island / Wall Hood
Page 9
... Service Problem Solution Guide Problem Nothing Works. Call electric company. See Operating Instructions section. Damper jammed shut or duct work . Control panel not lit. Control panel lit. May Be Caused By Power to Do Turn on (see page 3 for Dacor Distinctive Service (DDS) in the US and Canada: Phone: (800) 793-0093, extension 2822 For non-warranty repairs or questions in our Problem Solution Guide. 3. Blower system shuts off . See Nothing Works above. Have qualified electrician connect hood to make...
... Service Problem Solution Guide Problem Nothing Works. Call electric company. See Operating Instructions section. Damper jammed shut or duct work . Control panel not lit. Control panel lit. May Be Caused By Power to Do Turn on (see page 3 for Dacor Distinctive Service (DDS) in the US and Canada: Phone: (800) 793-0093, extension 2822 For non-warranty repairs or questions in our Problem Solution Guide. 3. Blower system shuts off . See Nothing Works above. Have qualified electrician connect hood to make...

User Manual - Island / Wall Hood
Page 10
... in painted parts, kitchen lighting, product placement and other cosmetic finish caused by improper usage, care, abuse or neglect. Warranty and Service Warranty What Is Covered CERTIFICATE OF WARRANTIES: DACOR RANGE HOODS WITHIN THE FIFTY STATES OF THE U.S.A., THE DISTRICT OF COLUMBIA AND CANADA*: FULL ONE-YEAR WARRANTY The warranty applies only to the Dacor appliance sold "As Is," and products installed for non-residential use, which include...
... in painted parts, kitchen lighting, product placement and other cosmetic finish caused by improper usage, care, abuse or neglect. Warranty and Service Warranty What Is Covered CERTIFICATE OF WARRANTIES: DACOR RANGE HOODS WITHIN THE FIFTY STATES OF THE U.S.A., THE DISTRICT OF COLUMBIA AND CANADA*: FULL ONE-YEAR WARRANTY The warranty applies only to the Dacor appliance sold "As Is," and products installed for non-residential use, which include...

Installation Instruction - Wall Hood
Page 2
... contains the model and serial number information and the electrical requirements. ■■ The label is located inside the hood chassis behind the filter(s). Remove the filter(s) to change without notice. to view it. and Canada) Monday - Remove the filter(s) to 5:00 p.m. Pacific Time Web site: www.dacor.com Dacor Distinctive Service (for repairs under warranty call , have questions or problems with the customer. ■■ Customer: Keep these installation instructions for location...
... contains the model and serial number information and the electrical requirements. ■■ The label is located inside the hood chassis behind the filter(s). Remove the filter(s) to change without notice. to view it. and Canada) Monday - Remove the filter(s) to 5:00 p.m. Pacific Time Web site: www.dacor.com Dacor Distinctive Service (for repairs under warranty call , have questions or problems with the customer. ■■ Customer: Keep these installation instructions for location...

Installation Instruction - Wall Hood
Page 3
... service panel. READ AND SAVE THESE INSTRUCTIONS 1 CAUTION For general ventilating use only. Follow the heating equipment manufacturer's guideline and safety standards such as a tag, to prevent power from range or cooktop and range hood. If you don't understand. TO REDUCE THE RISK OF FIRE, ELECTRIC SHOCK, OR INJURY TO PERSONS, OBSERVE THE FOLLOWING: a) Installation work and electrical wiring must always be vented to prevent back drafting...
... service panel. READ AND SAVE THESE INSTRUCTIONS 1 CAUTION For general ventilating use only. Follow the heating equipment manufacturer's guideline and safety standards such as a tag, to prevent power from range or cooktop and range hood. If you don't understand. TO REDUCE THE RISK OF FIRE, ELECTRIC SHOCK, OR INJURY TO PERSONS, OBSERVE THE FOLLOWING: a) Installation work and electrical wiring must always be vented to prevent back drafting...

Installation Instruction - Wall Hood
Page 4
... service technician should not install, repair or replace any part of the range hood unless specifically recommended in this hood if it has been damaged, dropped, has damaged electrical wires or is being called. • You can cause serious personal injury or property damage. • The customer should perform all other window coverings that the customer knows where and how to these installation instructions and the requirements...
... service technician should not install, repair or replace any part of the range hood unless specifically recommended in this hood if it has been damaged, dropped, has damaged electrical wires or is being called. • You can cause serious personal injury or property damage. • The customer should perform all other window coverings that the customer knows where and how to these installation instructions and the requirements...

Installation Instruction - Wall Hood
Page 5
... for dual blower units) Blower Speeds 4 with electronic speed control Lights 12 Vac, 20 Watt halogen Filters Baffle type, dishwasher safe Exhaust 8-inch Finish 430 stainless steel Total Connected 120 Vac, 60 Hz. Installation Specifications Performance Specifications Dimensions All Models Blower 600 CFM* (for single blower units) 1200 CFM* (for convenient access. dedicated, grounded, 3-wire (hot, neutral, ground) circuit protected by a licensed electrician. The hood should be installed. circuit breaker or time delay fuse. Make certain that electrical power can be...
... for dual blower units) Blower Speeds 4 with electronic speed control Lights 12 Vac, 20 Watt halogen Filters Baffle type, dishwasher safe Exhaust 8-inch Finish 430 stainless steel Total Connected 120 Vac, 60 Hz. Installation Specifications Performance Specifications Dimensions All Models Blower 600 CFM* (for single blower units) 1200 CFM* (for convenient access. dedicated, grounded, 3-wire (hot, neutral, ground) circuit protected by a licensed electrician. The hood should be installed. circuit breaker or time delay fuse. Make certain that electrical power can be...

Installation Instruction - Wall Hood
Page 6
... the hood. Use kit AVDH1 for model DHW482. The kit consists of the hood. Top cap Chimney Duct inside chimney between blower air flow rates can increase the duct size over the run if desired. Calculating the Maximum Duct Run Length The maximum straight duct length for the shortest, most direct route to the outside. Installation Specifications Recirculating Configuration Recirculating kits AVDH1 and AVDH2 contain the parts necessary to convert a DHW series hood to a recirculating configuration in instances where exhausting the hood outside...
... the hood. Use kit AVDH1 for model DHW482. The kit consists of the hood. Top cap Chimney Duct inside chimney between blower air flow rates can increase the duct size over the run if desired. Calculating the Maximum Duct Run Length The maximum straight duct length for the shortest, most direct route to the outside. Installation Specifications Recirculating Configuration Recirculating kits AVDH1 and AVDH2 contain the parts necessary to convert a DHW series hood to a recirculating configuration in instances where exhausting the hood outside...

Installation Instruction - Wall Hood
Page 7
...;■ For best performance, use only the hood mounting bracket provided with filter(s) ■B■ Chimney assembly (2 piece) ■C■ Chimney mounting bracket ■D■ Mounting bracket ■E■ Duct collar (1 blower units only) ■F■ Blower exhaust cowling (2 blower units only) ■G■ Mounting and assembly hardware ■H■ Use and care manual A C D G B E F H 5 Installation Specifications Duct Work Design Tips ■■ Wherever possible, reduce the number of transitions and turns to lift the hood without assistance. If...
...;■ For best performance, use only the hood mounting bracket provided with filter(s) ■B■ Chimney assembly (2 piece) ■C■ Chimney mounting bracket ■D■ Mounting bracket ■E■ Duct collar (1 blower units only) ■F■ Blower exhaust cowling (2 blower units only) ■G■ Mounting and assembly hardware ■H■ Use and care manual A C D G B E F H 5 Installation Specifications Duct Work Design Tips ■■ Wherever possible, reduce the number of transitions and turns to lift the hood without assistance. If...

Installation Instruction - Wall Hood
Page 8
... the bracket holes. 7. Making sure the bracket is properly rein- Remove the filter(s) to determine the height of the bracket up with the kit before pro- Installing the Mounting Bracket NOTE: The mounting hardware included with center line CL 6. Using a pencil, draw a level horizontal line on the hood being installed. Installation Instructions Installation Preparation NOTE: If installing the hood in step 1. Drill the mounting holes. Remove ping tape holding tape the damper flaps closed. Hood...
... the bracket holes. 7. Making sure the bracket is properly rein- Remove the filter(s) to determine the height of the bracket up with the kit before pro- Installing the Mounting Bracket NOTE: The mounting hardware included with center line CL 6. Using a pencil, draw a level horizontal line on the hood being installed. Installation Instructions Installation Preparation NOTE: If installing the hood in step 1. Drill the mounting holes. Remove ping tape holding tape the damper flaps closed. Hood...

Installation Instruction - Wall Hood
Page 9
... through the front of the hood assembly as shown below, using four included 1 1/2" screws. 2. Mark the ceiling and the wall in two places each, through the holes in the bracket. 3. Chimney mounting bracket Anchors Duct Collar Installation Models DHW301, DHW361 and DHW421 Exhaust Cowling Installation - Installation Instructions If mounting the hood to the wall. Mounting bracket Mounting bracket 8. Hanging the Range Hood 1. Attach the mounting bracket securely to drywall: ■■ Drill three appropriate sized pilot holes for the...
... through the front of the hood assembly as shown below, using four included 1 1/2" screws. 2. Mark the ceiling and the wall in two places each, through the holes in the bracket. 3. Chimney mounting bracket Anchors Duct Collar Installation Models DHW301, DHW361 and DHW421 Exhaust Cowling Installation - Installation Instructions If mounting the hood to the wall. Mounting bracket Mounting bracket 8. Hanging the Range Hood 1. Attach the mounting bracket securely to drywall: ■■ Drill three appropriate sized pilot holes for the...

Installation Instruction - Wall Hood
Page 10
... during installation. Connect the hood ground wire to the hot (black) power supply wire. 3. Connect the black wire from the hood to a separate, proper ground wire installed by a licensed electrician. • Make sure all wire used is turned off at the circuit breaker panel or fuse box. • Improper connection of the chimney. Hold the chimney vertically with the vents up. Installation Instructions Connecting the Duct Work Final Chimney Assembly WARNING WARNING Do not use screws to attach the duct work to Final Electrical Installation. They...
... during installation. Connect the hood ground wire to the hot (black) power supply wire. 3. Connect the black wire from the hood to a separate, proper ground wire installed by a licensed electrician. • Make sure all wire used is turned off at the circuit breaker panel or fuse box. • Improper connection of the chimney. Hold the chimney vertically with the vents up. Installation Instructions Connecting the Duct Work Final Chimney Assembly WARNING WARNING Do not use screws to attach the duct work to Final Electrical Installation. They...

Installation Instruction - Wall Hood
Page 11
... blower speed increases accordingly. 8. See pages 4 and 8? □□ Is the range hood wired and grounded according to the instructions on the underside of the chimney mounting bracket. 6. If you need service, be overemphasized. □□ Is the mounting bracket properly attached to the wall according to these instructions and in behind the filters on page 6? □□ Is the duct work , contact Dacor Distinctive Service at the circuit breaker panel or fuse box...
... blower speed increases accordingly. 8. See pages 4 and 8? □□ Is the range hood wired and grounded according to the instructions on the underside of the chimney mounting bracket. 6. If you need service, be overemphasized. □□ Is the mounting bracket properly attached to the wall according to these instructions and in behind the filters on page 6? □□ Is the duct work , contact Dacor Distinctive Service at the circuit breaker panel or fuse box...
Specification - 30" Wall Hood
Page 1
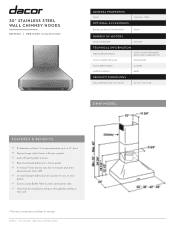
... FINISH OPTIONAL ACCESSORIES STAINLESS STEEL RECIRCULATION KIT FOR DHW301 AVDH1 NUMBER OF MOTORS (1) SINGLE BLOWER 600 CFM TECHNICAL INFORMATION CIRCUIT REQUIREMENTS 120VAC, 15AMP, GROUNDED DEDICATED, 3-WIRE CIRCUIT TOTAL CONNECTED LOAD 120VAC/60HZ MAX CURRENT DRAW 3.4 AMPS SHIPPING WEIGHT 61LBS PRODUCT DIMENSIONS WALL DIMENSIONS (H X W X D) (IN.) 30"-42"" X 30" X 24" DHW MODEL FEATURES & BENEFITS ◊◊ 8" diameter exhaust. Can accommodate up to a 10" duct. ◊◊ Squirrel cage style blower. 4 blower speeds. ◊◊ Auto off setting after 4 hours...
... FINISH OPTIONAL ACCESSORIES STAINLESS STEEL RECIRCULATION KIT FOR DHW301 AVDH1 NUMBER OF MOTORS (1) SINGLE BLOWER 600 CFM TECHNICAL INFORMATION CIRCUIT REQUIREMENTS 120VAC, 15AMP, GROUNDED DEDICATED, 3-WIRE CIRCUIT TOTAL CONNECTED LOAD 120VAC/60HZ MAX CURRENT DRAW 3.4 AMPS SHIPPING WEIGHT 61LBS PRODUCT DIMENSIONS WALL DIMENSIONS (H X W X D) (IN.) 30"-42"" X 30" X 24" DHW MODEL FEATURES & BENEFITS ◊◊ 8" diameter exhaust. Can accommodate up to a 10" duct. ◊◊ Squirrel cage style blower. 4 blower speeds. ◊◊ Auto off setting after 4 hours...


