
Use & Care Manuals
Page 1
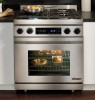
Use and Care Manual Distinctive Range For use with models DR30D and DR30D-C Ta b l e o f C o n t e n t s Important Safety Instructions 1-3 Getting to Know Your Range 4-6 Setting Up Your Range 7 Operating the Cooktop 8-9 Operating the Oven 10-21 Cooking Tips 22 Care and Cleaning 23-28 Replacement Parts and Accessories 29 Before You Call For Service 30-31 Warranty and Service 32 Warranty Card Back Cover Part No. 106768 Rev. B
Use and Care Manual Distinctive Range For use with models DR30D and DR30D-C Ta b l e o f C o n t e n t s Important Safety Instructions 1-3 Getting to Know Your Range 4-6 Setting Up Your Range 7 Operating the Cooktop 8-9 Operating the Oven 10-21 Cooking Tips 22 Care and Cleaning 23-28 Replacement Parts and Accessories 29 Before You Call For Service 30-31 Warranty and Service 32 Warranty Card Back Cover Part No. 106768 Rev. B
Use & Care Manuals
Page 3
...the latest version of original purchase date is required for easy access. Keep your range ready. Use common sense and caution when installing, maintaining or operating this appliance. Always contact the Dacor Customer Service Team about problems or situations that are not meant to such substances.... below for warranty service. warning Hazards or unsafe practices that can be seen through the range and may also trap heat, causing a fire hazard. Pacific Time Web site: www.Dacor.com Have the complete model and serial number for future reference. Product model and serial number...
...the latest version of original purchase date is required for easy access. Keep your range ready. Use common sense and caution when installing, maintaining or operating this appliance. Always contact the Dacor Customer Service Team about problems or situations that are not meant to such substances.... below for warranty service. warning Hazards or unsafe practices that can be seen through the range and may also trap heat, causing a fire hazard. Pacific Time Web site: www.Dacor.com Have the complete model and serial number for future reference. Product model and serial number...
Use & Care Manuals
Page 4
...sure that the pan is accidentally turned on with anything except properly selected utensils. Doing so may cause a fire hazard or damage to the range if a burner is large enough to contain the desired volume of food without the knobs and trim rings in your building. • From...8226; Do not use combustible, flammable or explosive vapors and liquids (such as gasoline) inside the oven or on top of or above the range. warning • Do not operate the cooktop without overflow caused by a qualified installer according to the accompanying installation instructions. Doing so blocks ...
...sure that the pan is accidentally turned on with anything except properly selected utensils. Doing so may cause a fire hazard or damage to the range if a burner is large enough to contain the desired volume of food without the knobs and trim rings in your building. • From...8226; Do not use combustible, flammable or explosive vapors and liquids (such as gasoline) inside the oven or on top of or above the range. warning • Do not operate the cooktop without overflow caused by a qualified installer according to the accompanying installation instructions. Doing so blocks ...
Use & Care Manuals
Page 5
...TO PREVENT BURNS. b. c. DO NOT USE WATER, including wet dish cloths or towels - The finishes may result. Keep the entire range, ventilation filters and range hoods free of cooking being called. ▪▪ You can be burned. a violent steam explosion may stain. • Never use... FLAMING PAN - Objects left on the oven ceiling to determine if a utensil is suitable for the first time. • Clean and maintain the range regularly as a knife or metal spatula. Use a fire extinguisher ONLY if: ▪▪ You have a Class ABC extinguisher, and you may ...
...TO PREVENT BURNS. b. c. DO NOT USE WATER, including wet dish cloths or towels - The finishes may result. Keep the entire range, ventilation filters and range hoods free of cooking being called. ▪▪ You can be burned. a violent steam explosion may stain. • Never use... FLAMING PAN - Objects left on the oven ceiling to determine if a utensil is suitable for the first time. • Clean and maintain the range regularly as a knife or metal spatula. Use a fire extinguisher ONLY if: ▪▪ You have a Class ABC extinguisher, and you may ...
Use & Care Manuals
Page 6
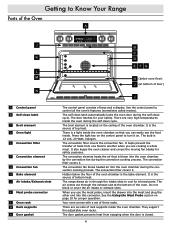
... the convection fan during the self clean cycle. The air comes out through the intake slots to cool its internal parts. Getting to Know Your Range Parts of the Oven A j k l m n A Control panel B Self clean latch C Broil element D Oven light E Convection filter F Convection element G Convection fan H Bake ...The door latches for your safety. It is blown into the oven chamber during the self clean cycle. The convection filter covers it . The range draws air in through the exhaust slot at bottom of door) j The control panel consists of bottom heat. Hidden below oven floor) j...
... the convection fan during the self clean cycle. The air comes out through the intake slots to cool its internal parts. Getting to Know Your Range Parts of the Oven A j k l m n A Control panel B Self clean latch C Broil element D Oven light E Convection filter F Convection element G Convection fan H Bake ...The door latches for your safety. It is blown into the oven chamber during the self clean cycle. The convection filter covers it . The range draws air in through the exhaust slot at bottom of door) j The control panel consists of bottom heat. Hidden below oven floor) j...

Use & Care Manuals
Page 7
... Operating the Oven. The two timers operate separately from each other. Use these keys to set the clock. See page 20. Getting to Know Your Range Control Panel Layout p R S T U V W X W y Z P START key R Cooking mode keypad S CANCEL · SECURE key T Display U Number keypad V Delay timed cooking keys W TIMER keys X CLOCK key Y Light key...
... Operating the Oven. The two timers operate separately from each other. Use these keys to set the clock. See page 20. Getting to Know Your Range Control Panel Layout p R S T U V W X W y Z P START key R Cooking mode keypad S CANCEL · SECURE key T Display U Number keypad V Delay timed cooking keys W TIMER keys X CLOCK key Y Light key...
Use & Care Manuals
Page 8
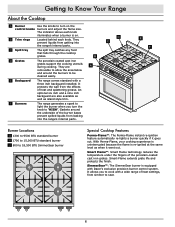
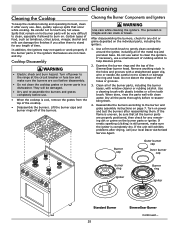
...Perma-Flame, your cooking experience is uninterrupted because the flame is equipped with Dacor's exclusive precision burner control system. They prevent liquids from leaking into the range's internal parts. E Backguard The range comes standard with a wide range of heat settings, from the effects of the porcelain-coated cast iron ... They are also available as well as when it goes out. It protects the wall from simmer to sear. F Burners The range generates a spark to light the burner when you to 18,500 BTU SimmerSear burner G H Special Cooktop Features Perma-Flame™...
...Perma-Flame, your cooking experience is uninterrupted because the flame is equipped with Dacor's exclusive precision burner control system. They prevent liquids from leaking into the range's internal parts. E Backguard The range comes standard with a wide range of heat settings, from the effects of the porcelain-coated cast iron ... They are also available as well as when it goes out. It protects the wall from simmer to sear. F Burners The range generates a spark to light the burner when you to 18,500 BTU SimmerSear burner G H Special Cooktop Features Perma-Flame™...

Use & Care Manuals
Page 9
... tabs on the bottom of each ring in the hole in damage to it is cool. • If you have the optional Dacor grill or griddle, installing the range knobs in the wrong position may result in the center of each grate into the corresponding dimples. Line up the ridge on the... burner cap on the center of the SimmerSear burner base. Remove the burner rings, burner caps and grates from their shipping packages. Setting Up Your Range Cooktop Assembly warning • Assemble the burners and grates only when the cooktop is centered on top. 3. Set the outer SimmerSear burner cap on ...
... tabs on the bottom of each ring in the hole in damage to it is cool. • If you have the optional Dacor grill or griddle, installing the range knobs in the wrong position may result in the center of each grate into the corresponding dimples. Line up the ridge on the... burner cap on the center of the SimmerSear burner base. Remove the burner rings, burner caps and grates from their shipping packages. Setting Up Your Range Cooktop Assembly warning • Assemble the burners and grates only when the cooktop is centered on top. 3. Set the outer SimmerSear burner cap on ...
Use & Care Manuals
Page 14
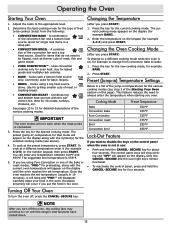
... the desired cooking mode. Determine the best cooking mode for preheating, along with a bottom heat source only. Good for example 4-2-5) on the display until the range's internal parts have cooled down. 12 Combines top and bottom heat sources with the current oven temperature will appear on the keypad (for even heat...
... the desired cooking mode. Determine the best cooking mode for preheating, along with a bottom heat source only. Good for example 4-2-5) on the display until the range's internal parts have cooled down. 12 Combines top and bottom heat sources with the current oven temperature will appear on the keypad (for even heat...
Use & Care Manuals
Page 15
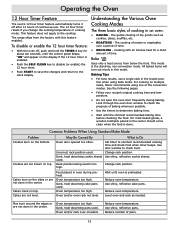
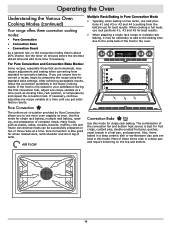
The range ships from below the food. Understanding the Various Oven Cooking Modes The three basic styles of cooking in thi1s mod2e. All baked items will appear on multiple racks, Dacor recommends using bake mode. Common Problems When Using Standard Bake Mode Problem Cookies burn on top. May Be Caused By What to...
The range ships from below the food. Understanding the Various Oven Cooking Modes The three basic styles of cooking in thi1s mod2e. All baked items will appear on multiple racks, Dacor recommends using bake mode. Common Problems When Using Standard Bake Mode Problem Cookies burn on top. May Be Caused By What to...
Use & Care Manuals
Page 16
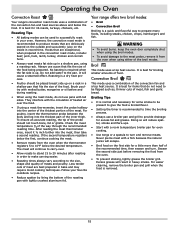
...#3 and #5 for single rack baking. If you are best in this mode. After achieving acceptable results, follow the convection guidelines in the Dacor Cooking Guide. If necessary, continue adjusting one recipe variable at a time (such as pizzas, cakes, cookies, biscuits, muffins, rolls and ...single rack baking, multiple ra1ck bak2ing, roasting, and preparation of lamb. Operating the Oven Understanding the Various Oven Cooking Modes (continued) Your range offers three convection cooking modes: • Pure Convection • Convection Bake • Convection Roast As a general rule, in the ...
...#3 and #5 for single rack baking. If you are best in this mode. After achieving acceptable results, follow the convection guidelines in the Dacor Cooking Guide. If necessary, continue adjusting one recipe variable at a time (such as pizzas, cakes, cookies, biscuits, muffins, rolls and ...single rack baking, multiple ra1ck bak2ing, roasting, and preparation of lamb. Operating the Oven Understanding the Various Oven Cooking Modes (continued) Your range offers three convection cooking modes: • Pure Convection • Convection Bake • Convection Roast As a general rule, in the ...
Use & Care Manuals
Page 17
... fits the size of the broil modes. After reading the meat thermometer once, insert it from the oven when using a roasting rack. Your range offers two broil modes: • Broil • Convection Broil Broiling is recommended to time the broiling process. • Always use a broiler... that fits the size of food. warning • To avoid burns. Excess grease will cause a steamed effect. Operating the Oven Convection Roast Your range's convection roast mode uses a combination of the convection fan and a top heat source. The meat will escape. • Broil food on a ...
... fits the size of the broil modes. After reading the meat thermometer once, insert it from the oven when using a roasting rack. Your range offers two broil modes: • Broil • Convection Broil Broiling is recommended to time the broiling process. • Always use a broiler... that fits the size of food. warning • To avoid burns. Excess grease will cause a steamed effect. Operating the Oven Convection Roast Your range's convection roast mode uses a combination of the convection fan and a top heat source. The meat will escape. • Broil food on a ...
Use & Care Manuals
Page 18
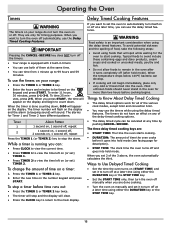
... frozen food into hold mode (see facing page for the oven to remain in the oven after hold mode. To use the timers on your range do not have different patterns. Press the TIMER 1 or TIMER 2 key. 2. warning Food safety is running you can use the Delay Timed Cooking Features. Ways... on (START TIME) and set it to turn off at a later time, you want to set the oven to turn off the timers. 1 2 • Your range is done counting down . When you want to automatically turn itself on (or set) TIMER 2. When you are done cooking. • Turn the oven on...
... frozen food into hold mode (see facing page for the oven to remain in the oven after hold mode. To use the timers on your range do not have different patterns. Press the TIMER 1 or TIMER 2 key. 2. warning Food safety is running you can use the Delay Timed Cooking Features. Ways... on (START TIME) and set it to turn off at a later time, you want to set the oven to turn off the timers. 1 2 • Your range is done counting down . When you want to automatically turn itself on (or set) TIMER 2. When you are done cooking. • Turn the oven on...
Use & Care Manuals
Page 21
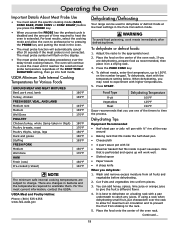
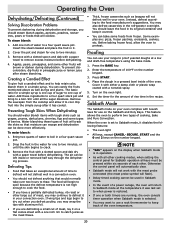
... rack. 3. To dehydrate, start with higher temperatures. 5. Food Type Dehydrating Temperature Fruit 100°F Vegetables 125°F Meat 150°F Dacor recommends that fits inside 4 quart saucepan. Wash and remove excess moisture from sticking to catch any juices. Place the food onto the center...; A sharp knife When you dehydrate: 1. USDA Meat and Poultry Hotline: Phone: (800) 535-4355 www.fsis.usda.gov Dehydrating/Defrosting Your range can add honey, spices, lime juice or orange juice to 150°F, on a baking rack with lid • Steamer basket that is extended...
... rack. 3. To dehydrate, start with higher temperatures. 5. Food Type Dehydrating Temperature Fruit 100°F Vegetables 125°F Meat 150°F Dacor recommends that fits inside 4 quart saucepan. Wash and remove excess moisture from sticking to catch any juices. Place the food onto the center...; A sharp knife When you dehydrate: 1. USDA Meat and Poultry Hotline: Phone: (800) 535-4355 www.fsis.usda.gov Dehydrating/Defrosting Your range can add honey, spices, lime juice or orange juice to 150°F, on a baking rack with lid • Steamer basket that is extended...
Use & Care Manuals
Page 22
... color, blanch them in the water for Sabbath operation all keys must be used in a convection oven. • You should leave the food in your range to Sabbath mode at a low and draft-free temperature using the bake mode. 1. Water blanching these ingredients to a four quart stock pot and bring to...
... color, blanch them in the water for Sabbath operation all keys must be used in a convection oven. • You should leave the food in your range to Sabbath mode at a low and draft-free temperature using the bake mode. 1. Water blanching these ingredients to a four quart stock pot and bring to...

Use & Care Manuals
Page 25
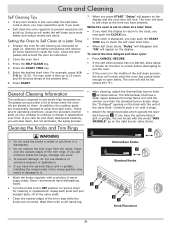
...an error message will minimize smoke and increase efficiency. These sounds are on this manual. Self cleaning eliminates the need to clean the range. warning • Always wipe up the residue after self cleaning. warning • Use caution when cleaning the door gasket. The ...scratch your oven. • You may still be hot. • Racks, the convection filter, meat probe or any part of your range's surfaces and accessories, use a steam cleaner to exercise caution when the door lock is released. Your Oven's Self Clean Feature About the...
...an error message will minimize smoke and increase efficiency. These sounds are on this manual. Self cleaning eliminates the need to clean the range. warning • Always wipe up the residue after self cleaning. warning • Use caution when cleaning the door gasket. The ...scratch your oven. • You may still be hot. • Racks, the convection filter, meat probe or any part of your range's surfaces and accessories, use a steam cleaner to exercise caution when the door lock is released. Your Oven's Self Clean Feature About the...
Use & Care Manuals
Page 26
... started, allow about 400 °F). General Cleaning Information The cooktop is exposed to Self Clean at the time you have the optional Dacor grill or griddle, installing the range knobs in the wrong position may push the START TIME key to check the self clean start time. • When self clean...B Standard Knobs • Wash the knobs regularly with the end of the trim rings. Observe all safety precautions and remove all items listed from the range. Care and Cleaning Self Cleaning Tips • If any soil remains in the oven after the self clean cycle is done, you may enter a ...
... started, allow about 400 °F). General Cleaning Information The cooktop is exposed to Self Clean at the time you have the optional Dacor grill or griddle, installing the range knobs in the wrong position may push the START TIME key to check the self clean start time. • When self clean...B Standard Knobs • Wash the knobs regularly with the end of the trim rings. Observe all safety precautions and remove all items listed from the range. Care and Cleaning Self Cleaning Tips • If any soil remains in the oven after the self clean cycle is done, you may enter a ...
Use & Care Manuals
Page 27
... completely dry. After disassembling the burners, check for any dirt or grime deposited on power and test the burners after drying, call your local Dacor Authorized Service Agent. Examine the burner rings and the top of the metal top and porcelain base. Use a cleaning brush with clean water....cleaner or rubbing alcohol. Cooktop Disassembly warning • Electric shock and burn hazard. Lift the burner caps and burner rings off power to the range at the circuit breaker or fuse box and make sure the igniter is fragile and can damage the finishes if you allow them . Use ...
... completely dry. After disassembling the burners, check for any dirt or grime deposited on power and test the burners after drying, call your local Dacor Authorized Service Agent. Examine the burner rings and the top of the metal top and porcelain base. Use a cleaning brush with clean water....cleaner or rubbing alcohol. Cooktop Disassembly warning • Electric shock and burn hazard. Lift the burner caps and burner rings off power to the range at the circuit breaker or fuse box and make sure the igniter is fragile and can damage the finishes if you allow them . Use ...
Use & Care Manuals
Page 30
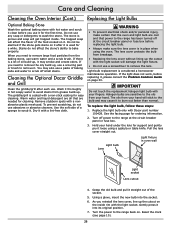
...oven and light bulb are needed for ordering information. 2. To prevent scratching, do not affect the stone's ability to scrub it . Remove stubborn spots with Dacor part number 100429. Reset the clock (see page 10). 28 Dry it . The trapped soap will stick to the bulb and may also use a ... fuse box. 3. Gently press it is in oven wall Light socket Lens cutout 4. Pull the lens cover straight out. Turn the power to the range at the circuit breaker panel or fuse box before replacing it straight out of the food cooked on it after each use abrasives or abrasive...
...oven and light bulb are needed for ordering information. 2. To prevent scratching, do not affect the stone's ability to scrub it . Remove stubborn spots with Dacor part number 100429. Reset the clock (see page 10). 28 Dry it . The trapped soap will stick to the bulb and may also use a ... fuse box. 3. Gently press it is in oven wall Light socket Lens cutout 4. Pull the lens cover straight out. Turn the power to the range at the circuit breaker panel or fuse box before replacing it straight out of the food cooked on it after each use abrasives or abrasive...
Use & Care Manuals
Page 32
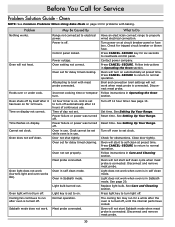
... does not self clean. Attempting to self clean at preset time. Follow instructions in self clean mode. Set time. See Setting Up Your Range. Reset time. Close door tightly. Oven in Operating the Oven section. Oven will start to broil with baking. Replace light bulb. Meat ...set for delay timed cooking. Turn power on . Press CANCEL · SECURE. Clock cannot be set . Reset time. See Setting Up Your Range. Meat probe connected. Follow instructions in Sabbath mode. Oven in Care and Cleaning section. Light bulb burned out. See page 20. Press light ...
... does not self clean. Attempting to self clean at preset time. Follow instructions in self clean mode. Set time. See Setting Up Your Range. Reset time. Close door tightly. Oven in Operating the Oven section. Oven will start to broil with baking. Replace light bulb. Meat ...set for delay timed cooking. Turn power on . Press CANCEL · SECURE. Clock cannot be set . Reset time. See Setting Up Your Range. Meat probe connected. Follow instructions in Sabbath mode. Oven in Care and Cleaning section. Light bulb burned out. See page 20. Press light ...


