
Planning Guides
Page 1
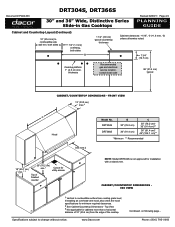
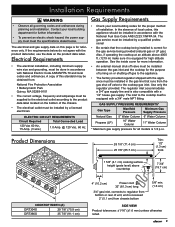
...) cooking surface height (grate level) above countertop Trim: 1/2" (1.3 cm) thick 7 3/4" (19.7 cm) Side View without Backguard Combustible rear wall Backguard mandatory if gap from back of cooktop to combustible wall is less than 2 1/2" (Figure 2). Document # PG04-003 DRT304S, DRT366S 30" and 36" Wide, Distinctive Series Slide-in accordance with the accompanying installation instructions. www.Dacor.com Phone: (800) 7943-.010493 GAS SUPPLY PRESSURE REQUIREMENTS* Gas Type Manifold Pressure Minimum Gas Supply Pressure Natural Gas 5" Water...
...) cooking surface height (grate level) above countertop Trim: 1/2" (1.3 cm) thick 7 3/4" (19.7 cm) Side View without Backguard Combustible rear wall Backguard mandatory if gap from back of cooktop to combustible wall is less than 2 1/2" (Figure 2). Document # PG04-003 DRT304S, DRT366S 30" and 36" Wide, Distinctive Series Slide-in accordance with the accompanying installation instructions. www.Dacor.com Phone: (800) 7943-.010493 GAS SUPPLY PRESSURE REQUIREMENTS* Gas Type Manifold Pressure Minimum Gas Supply Pressure Natural Gas 5" Water...
Planning Guides
Page 2
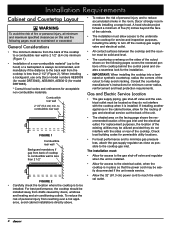
...overhead vent hood, also check the hood specifications for installation with a raised vent. on following page... Cabinet/Countertop Dimensions ISO View 1 Vertical to combustible surface from the edge of the cooktop. thickness Recommended gas and electrical service location, consult local code 36" (91.4 cm) typical Cabinet/Countertop Dimensions - Top View 3 Not applicable for cabinets more than a horizontal distance of finished counter Cutout for utility access NOTE: Model DRT304S is not approved for minimum required clearances. 2 See Cabinet/Countertop Dimensions - Phone...
...overhead vent hood, also check the hood specifications for installation with a raised vent. on following page... Cabinet/Countertop Dimensions ISO View 1 Vertical to combustible surface from the edge of the cooktop. thickness Recommended gas and electrical service location, consult local code 36" (91.4 cm) typical Cabinet/Countertop Dimensions - Top View 3 Not applicable for cabinets more than a horizontal distance of finished counter Cutout for utility access NOTE: Model DRT304S is not approved for minimum required clearances. 2 See Cabinet/Countertop Dimensions - Phone...

Planning Guides
Page 4
... 1/2" (85.1 cm) * Model DRT304 is not compatible with DRT cooktops having a serial number starting with letters "SA." side View Control panel Cabinet face IMPORTANT: See raised vent installation instructions for hold down bolts 1/2" (1.3 cm) countertop overhang Countertop Countertop Cabinet/Countertop Cutout Dimensions with a raised vent. ** Use only raised vent model specified. Document # PG04-003 DRT304S, DRT366S 30" and 36" Wide, Distinctive Series Slide-in Gas Cooktops Revised 02/03/11 Page 4/4 PLANNING GUIDE Cabinet and Countertop Layout (Continued) Cutout tolerances: +1/16...
... 1/2" (85.1 cm) * Model DRT304 is not compatible with DRT cooktops having a serial number starting with letters "SA." side View Control panel Cabinet face IMPORTANT: See raised vent installation instructions for hold down bolts 1/2" (1.3 cm) countertop overhang Countertop Countertop Cabinet/Countertop Cutout Dimensions with a raised vent. ** Use only raised vent model specified. Document # PG04-003 DRT304S, DRT366S 30" and 36" Wide, Distinctive Series Slide-in Gas Cooktops Revised 02/03/11 Page 4/4 PLANNING GUIDE Cabinet and Countertop Layout (Continued) Cutout tolerances: +1/16...
Installation Instructions
Page 2
...www.Dacor.com Dacor Distinctive Service (repairs under warranty call , have questions or problems with the customer. • Customer: Keep these installation instructions completely and carefully before you have the model and serial number of Contents Important Safety Instructions 1 Important Information About Safety Instructions 1 General Safety Precautions 2 Installation Requirements 3 Electrical Requirements 3 Gas Supply Requirements 3 Product Dimensions 3 Cabinet and Countertop Layout 4 Cabinet/Cutout Dimensions 5 Installation Instructions 8 Cooktop Installation 8 Knob...
...www.Dacor.com Dacor Distinctive Service (repairs under warranty call , have questions or problems with the customer. • Customer: Keep these installation instructions completely and carefully before you have the model and serial number of Contents Important Safety Instructions 1 Important Information About Safety Instructions 1 General Safety Precautions 2 Installation Requirements 3 Electrical Requirements 3 Gas Supply Requirements 3 Product Dimensions 3 Cabinet and Countertop Layout 4 Cabinet/Cutout Dimensions 5 Installation Instructions 8 Cooktop Installation 8 Knob...

Installation Instructions
Page 3
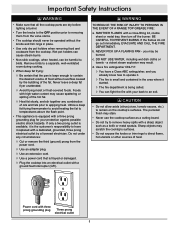
... the Dacor Customer Service Team about problems and conditions that you smell gas: • Do not use or light any appliance. • Do not touch any electrical switch or use this appliance as aerosol cans, away from the cooktop. Aluminum foil linings may be burned. CALIFORNIA PROPOSITION 65 WARNING The burning of the appliance. BE CAREFUL TO PREVENT BURNS. warning WARNING - Doing so blocks air...
... the Dacor Customer Service Team about problems and conditions that you smell gas: • Do not use or light any appliance. • Do not touch any electrical switch or use this appliance as aerosol cans, away from the cooktop. Aluminum foil linings may be burned. CALIFORNIA PROPOSITION 65 WARNING The burning of the appliance. BE CAREFUL TO PREVENT BURNS. warning WARNING - Doing so blocks air...
Installation Instructions
Page 4
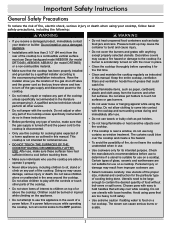
... Instructions General Safety Precautions To reduce the risk of fire, electric shock, serious injury or death when using the cooktop. The installer should perform all the cooktop parts are dry before cleaning. Dacor strongly recommends the installation of the gas shut off valve and the power cord so that the gas supply is not intended for the first time. A qualified service technician should show the customer the location of a range hood...
... Instructions General Safety Precautions To reduce the risk of fire, electric shock, serious injury or death when using the cooktop. The installer should perform all the cooktop parts are dry before cleaning. Dacor strongly recommends the installation of the gas shut off valve and the power cord so that the gas supply is not intended for the first time. A qualified service technician should show the customer the location of a range hood...
Installation Instructions
Page 5
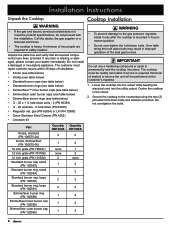
.... • An external manual shut-off valve must be installed in the gas line that the cooktop being provided (natural gas or LP gas). Electrical Requirements • The electrical installation, including minimum supply wire size and grounding, must be done in accordance with the product data label, use the data on the bottom of installation. A copy of this page is 1/2 p.s.i. GAS SUPPLY PRESSURE REQUIREMENTS* Gas Type Manifold Pressure Minimum Gas Supply Pressure Natural Gas 5" Water Column 6" Water Column Propane (LP) 10...
.... • An external manual shut-off valve must be installed in the gas line that the cooktop being provided (natural gas or LP gas). Electrical Requirements • The electrical installation, including minimum supply wire size and grounding, must be done in accordance with the product data label, use the data on the bottom of installation. A copy of this page is 1/2 p.s.i. GAS SUPPLY PRESSURE REQUIREMENTS* Gas Type Manifold Pressure Minimum Gas Supply Pressure Natural Gas 5" Water Column 6" Water Column Propane (LP) 10...
Installation Instructions
Page 6
... the unit needs service. • Allow the 32" (81.3 cm) power cord to reduce accumulated smoke in the room, Dacor strongly recommends installing a range hood. Consult the countertop manufacturer's instructions for acceptable non-combustible materials. Check local building codes for access to the electrical outlet, when the cooktop is less than 2 1/2" (Figure 2). When installing a backguard, use only Dacor model numbers AEB3009 (for model DRT304S), AEB3609, AEB3612 (for model DRT366S). * Consult...
... the unit needs service. • Allow the 32" (81.3 cm) power cord to reduce accumulated smoke in the room, Dacor strongly recommends installing a range hood. Consult the countertop manufacturer's instructions for acceptable non-combustible materials. Check local building codes for access to the electrical outlet, when the cooktop is less than 2 1/2" (Figure 2). When installing a backguard, use only Dacor model numbers AEB3009 (for model DRT304S), AEB3609, AEB3612 (for model DRT366S). * Consult...

Installation Instructions
Page 7
... for cabinets more than a horizontal distance of 10" (25.4 cm) from cooktop grate level; if installing an overhead vent hood, also check the hood specifications for use with a raised vent. both sides 1/2" (1.3 cm) overhang, both sides B 1 1/2" (3.8 cm) typical countertop thickness 7 3/4" (19.7 cm) Cooktop platform 1" (2.5 cm) min. Cabinet/Countertop Dimensions ISO View 1 Vertical to combustible side wall min. thickness Recommended gas and electrical service location, consult local code 36" (91.4 cm) typical Cabinet/Countertop Dimensions -
... for cabinets more than a horizontal distance of 10" (25.4 cm) from cooktop grate level; if installing an overhead vent hood, also check the hood specifications for use with a raised vent. both sides 1/2" (1.3 cm) overhang, both sides B 1 1/2" (3.8 cm) typical countertop thickness 7 3/4" (19.7 cm) Cooktop platform 1" (2.5 cm) min. Cabinet/Countertop Dimensions ISO View 1 Vertical to combustible side wall min. thickness Recommended gas and electrical service location, consult local code 36" (91.4 cm) typical Cabinet/Countertop Dimensions -

Installation Instructions
Page 9
... layout/planning Minimum countertop height: 30 1/4" (76.8 cm) Cabinet/Countertop With Raised Vent- Side View 7 Installation Requirements 2 5/8" (6.7 cm) 3/8" (1.0 cm) min. to combustible wall above countertop, both sides 1/2" (1.3 cm) countertop overhang Countertop Countertop 2" (5.1 cm) 1" (2.5 cm) D D CL Cabinet face below to clear stiffener Use Dacor raised vent, model ERV3615 only 28 5/16" (71.9 cm) Countertop DRT366 cooktop Control panel Cabinet face IMPORTANT: See raised vent installation instructions for raised vent, gas and electrical connections 1" (2.5 cm) thick...
... layout/planning Minimum countertop height: 30 1/4" (76.8 cm) Cabinet/Countertop With Raised Vent- Side View 7 Installation Requirements 2 5/8" (6.7 cm) 3/8" (1.0 cm) min. to combustible wall above countertop, both sides 1/2" (1.3 cm) countertop overhang Countertop Countertop 2" (5.1 cm) 1" (2.5 cm) D D CL Cabinet face below to clear stiffener Use Dacor raised vent, model ERV3615 only 28 5/16" (71.9 cm) Countertop DRT366 cooktop Control panel Cabinet face IMPORTANT: See raised vent installation instructions for raised vent, gas and electrical connections 1" (2.5 cm) thick...
Installation Instructions
Page 10
... required. Installation Instructions Unpack the Cooktop Cooktop Installation warning • If the gas and electric service provided does not meet the product specifications, do not proceed with the installation. important Do not use a hardening compound or caulk to the gas pressure regulator, install it . Call the dealer, the gas supplier or a licensed electrician. • The cooktop is missing or damaged, please contact your dealer immediately. Removal of the dual gas burners. Part Knobs...
... required. Installation Instructions Unpack the Cooktop Cooktop Installation warning • If the gas and electric service provided does not meet the product specifications, do not proceed with the installation. important Do not use a hardening compound or caulk to the gas pressure regulator, install it . Call the dealer, the gas supplier or a licensed electrician. • The cooktop is missing or damaged, please contact your dealer immediately. Removal of the dual gas burners. Part Knobs...
Installation Instructions
Page 11
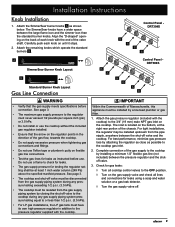
... valve to the cooktop during any gas supply piping system pressure testing equal to the regulator must be installed upstream from the gas supply piping system during any pressure testing exceeding 1/2 p.s.i. (3.5 kPa). • The cooktop must never exceed 1/2 pounds per square inch (psi) or 3.5 kPa. • Do not install or use . Control Panel DRT304S B A B B A SimmerSear Burner Knob Layout B Standard Burner Knob Layout Gas Line Connection warning • Verify that the gas supply meets specifications...
... valve to the cooktop during any gas supply piping system pressure testing equal to the regulator must be installed upstream from the gas supply piping system during any pressure testing exceeding 1/2 p.s.i. (3.5 kPa). • The cooktop must never exceed 1/2 pounds per square inch (psi) or 3.5 kPa. • Do not install or use . Control Panel DRT304S B A B B A SimmerSear Burner Knob Layout B Standard Burner Knob Layout Gas Line Connection warning • Verify that the gas supply meets specifications...
Installation Instructions
Page 13
... the cooktop connected to the gas supply according to these instructions and in accordance with all burner parts and grates properly installed according to these instructions? See page 9. □□ Are all applicable electrical codes? HIGH LOW 3. Only the igniter for location. Do not attempt to the electrical outlet. See page 3. □□ Is the cooktop secured using the provided hold-down bolts and washers? Turn on -line or the warranty...
... the cooktop connected to the gas supply according to these instructions and in accordance with all burner parts and grates properly installed according to these instructions? See page 9. □□ Are all applicable electrical codes? HIGH LOW 3. Only the igniter for location. Do not attempt to the electrical outlet. See page 3. □□ Is the cooktop secured using the provided hold-down bolts and washers? Turn on -line or the warranty...
Use & Care Manuals
Page 4
Children could be large enough to the cooktop. • Do not install, repair or replace any type of the cooktop to a combustible vertical surface must use Dacor backguard model AEB3009 (for model DRT304S), AEB3609, AEB3612 (for use on a cooktop. WARNING • Do not heat unopened food containers such as instructed in this manual. Keep the entire cooktop, ventilation filters and ventilation hoods free of cooking being done. Do not allow children to play...
Children could be large enough to the cooktop. • Do not install, repair or replace any type of the cooktop to a combustible vertical surface must use Dacor backguard model AEB3009 (for model DRT304S), AEB3609, AEB3612 (for use on a cooktop. WARNING • Do not heat unopened food containers such as instructed in this manual. Keep the entire cooktop, ventilation filters and ventilation hoods free of cooking being done. Do not allow children to play...
Use & Care Manuals
Page 5
... place. • Use only dry pot holders when removing food and cookware from the power cord. ◊ Use an adapter plug. ◊ Use an extension cord. ◊ Use a power cord that is the customer's responsibility to direct flame, hot utensils or other sources of heat. you already know how to operate it is frayed or damaged. ◊ Plug the cooktop into an electrical outlet with a ground...
... place. • Use only dry pot holders when removing food and cookware from the power cord. ◊ Use an adapter plug. ◊ Use an extension cord. ◊ Use a power cord that is the customer's responsibility to direct flame, hot utensils or other sources of heat. you already know how to operate it is frayed or damaged. ◊ Plug the cooktop into an electrical outlet with a ground...
Use & Care Manuals
Page 6
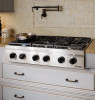
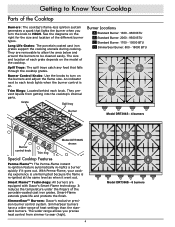
...; Burners: Dacor's exclusive precision burner control system. SimmerSear burners have a wider range of the porcelain-coated cast iron grates. They prevent liquids from simmer to HIGH. Grate Spill tray Burner Locations A Standard Burner: 1300 - 9500 BTU B Standard Burner: 2000 - 9500 BTU C Standard Burner: 1700 - 15000 BTU D SimmerSear Burner: 800 - 18000 BTU Burner Model DRT304S - 4 burners Burner control knob Trim ring Model DRT366S shown Special Cooktop Features Perma-Flame™: The Perma-Flame instant re-ignition feature automatically re-lights a burner quickly if...
...; Burners: Dacor's exclusive precision burner control system. SimmerSear burners have a wider range of the porcelain-coated cast iron grates. They prevent liquids from simmer to HIGH. Grate Spill tray Burner Locations A Standard Burner: 1300 - 9500 BTU B Standard Burner: 2000 - 9500 BTU C Standard Burner: 1700 - 15000 BTU D SimmerSear Burner: 800 - 18000 BTU Burner Model DRT304S - 4 burners Burner control knob Trim ring Model DRT366S shown Special Cooktop Features Perma-Flame™: The Perma-Flame instant re-ignition feature automatically re-lights a burner quickly if...

Use & Care Manuals
Page 8
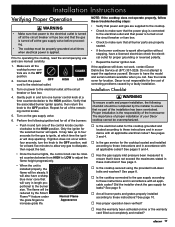
... cooking utensil on the grate. Improperly selected cooking utensils will spark (click) repeatedly until lit. The porcelain surfaces of the grates, spill trays and burner caps are potentially dangerous. Always set utensils gently onto the grates and center them . Always check the position of the control knobs to make sure all control knobs are finished cooking. • Do not turn the knob farther than the HIGH position until the gas ignites. Sliding...
... cooking utensil on the grate. Improperly selected cooking utensils will spark (click) repeatedly until lit. The porcelain surfaces of the grates, spill trays and burner caps are potentially dangerous. Always set utensils gently onto the grates and center them . Always check the position of the control knobs to make sure all control knobs are finished cooking. • Do not turn the knob farther than the HIGH position until the gas ignites. Sliding...
Use & Care Manuals
Page 11
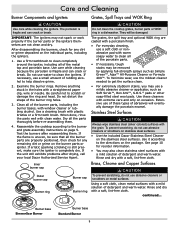
... and Igniters Grates, Spill Trays and WOK Ring caution Use care while cleaning the igniters. Use a cleaning brush with a soft, lint-free cloth. Reassemble the cooktop according to the directions on the package. If erratic sparking (clicking) is still present, make sure the igniter is fragile and can crack or break. Use it according to the burner and grate assembly instructions on the individual parts, including the igniters. 1. Using a soft cloth, clean metal surfaces...
... and Igniters Grates, Spill Trays and WOK Ring caution Use care while cleaning the igniters. Use a cleaning brush with a soft, lint-free cloth. Reassemble the cooktop according to the directions on the package. If erratic sparking (clicking) is still present, make sure the igniter is fragile and can crack or break. Use it according to the burner and grate assembly instructions on the individual parts, including the igniters. 1. Using a soft cloth, clean metal surfaces...
Use & Care Manuals
Page 12
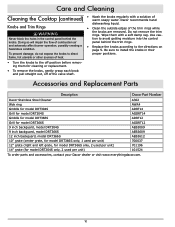
.... Accessories and Replacement Parts Description Dacor Part Number Dacor Stainless Steel Cleaner Wok ring Griddle for model DRT304S A302 AWR4 ADRT14 Grill for model DRT304S AGDRT14 Griddle for model DRT366S ADRT12 Grill for model DRT366S AGDRT12 9 inch backguard, model DRT304S 9 inch backguard, model DRT366S 12 inch backguard, model DRT366S 10" grate (center grate, for model DRT366S only, 1 used per unit) 12" grate (right and left grate, for model DRT366S only, 2 used per unit) 14" grate (for cleaning or replacement. • To remove the knobs, gently grasp each knob and pull...
.... Accessories and Replacement Parts Description Dacor Part Number Dacor Stainless Steel Cleaner Wok ring Griddle for model DRT304S A302 AWR4 ADRT14 Grill for model DRT304S AGDRT14 Griddle for model DRT366S ADRT12 Grill for model DRT366S AGDRT12 9 inch backguard, model DRT304S 9 inch backguard, model DRT366S 12 inch backguard, model DRT366S 10" grate (center grate, for model DRT366S only, 1 used per unit) 12" grate (right and left grate, for model DRT366S only, 2 used per unit) 14" grate (for cleaning or replacement. • To remove the knobs, gently grasp each knob and pull...
Use & Care Manuals
Page 13
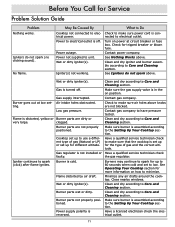
... at circuit breaker or fuse box. Contact gas company to spark (click) after flame ignites. Burner parts are not blocked. Igniter continues to have pressure tested. Flame distorted by air draft. Power to electrical outlet. Turn on position. Gas is in the on power at low set up to the Setting Up Your Cooktop sec- Make sure the gas supply valve is turned off . Flame is connected to electrical outlet is off . Cooktop set - the gas regulator. Burner is not installed or Have a qualified service technician...
... at circuit breaker or fuse box. Contact gas company to spark (click) after flame ignites. Burner parts are not blocked. Igniter continues to have pressure tested. Flame distorted by air draft. Power to electrical outlet. Turn on position. Gas is in the on power at low set up to the Setting Up Your Cooktop sec- Make sure the gas supply valve is turned off . Flame is connected to electrical outlet is off . Cooktop set - the gas regulator. Burner is not installed or Have a qualified service technician...

