Installation Instructions
Page 2
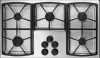
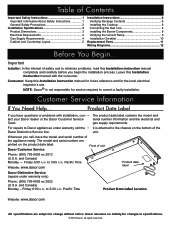
... About Safety Instructions 1 General Safety Precautions 2 Installation Specifications 3 Product Dimensions 3 Electrical Requirements 4 Gas Supply Requirements 4 Cabinet and Countertop Layout 5 Installation Instructions 8 Verifying Package Contents 8 Installing the Cooktop 8 Connecting the Gas Line 8 Installing the Burner Components 9 Verifying the Correct Setup 9 Installation Checklist 10 Replacement Parts 11 Wiring Diagrams 12 Before You Begin... Pacific Time Website: www.dacor.com Product data label Dacor Distinctive Service (repairs under warranty call , have...
... About Safety Instructions 1 General Safety Precautions 2 Installation Specifications 3 Product Dimensions 3 Electrical Requirements 4 Gas Supply Requirements 4 Cabinet and Countertop Layout 5 Installation Instructions 8 Verifying Package Contents 8 Installing the Cooktop 8 Connecting the Gas Line 8 Installing the Burner Components 9 Verifying the Correct Setup 9 Installation Checklist 10 Replacement Parts 11 Wiring Diagrams 12 Before You Begin... Pacific Time Website: www.dacor.com Product data label Dacor Distinctive Service (repairs under warranty call , have...
Installation Instructions
Page 3
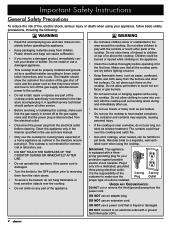
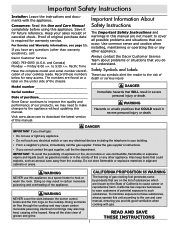
... Dacor Customer Service Team about problems and conditions that could explode, such as a space heater to heat or warm the room. WHAT TO DO IF YOU SMELL GAS • Do not use or light ANY appliance. • Do not touch ANY electrical switch • Do not use this appliance as aerosol cans, away from a neighbor's phone. IN THE EVENT OF A PROLONGED POWER...
... Dacor Customer Service Team about problems and conditions that could explode, such as a space heater to heat or warm the room. WHAT TO DO IF YOU SMELL GAS • Do not use or light ANY appliance. • Do not touch ANY electrical switch • Do not use this appliance as aerosol cans, away from a neighbor's phone. IN THE EVENT OF A PROLONGED POWER...
Installation Instructions
Page 4
... parts of the cooktop. Plug it only into contact with the controls or touch other service. • Before servicing or installing this appliance if the power cord is disconnected from the electrical outlet. • Disconnect the power plug from the power cord. Children could blow over the cooktop. • Do not climb on the cooktop. It is the responsibility of the customer to touch hot surfaces or gas burners...
... parts of the cooktop. Plug it only into contact with the controls or touch other service. • Before servicing or installing this appliance if the power cord is disconnected from the electrical outlet. • Disconnect the power plug from the power cord. Children could blow over the cooktop. • Do not climb on the cooktop. It is the responsibility of the customer to touch hot surfaces or gas burners...

Installation Instructions
Page 6
...; The cooktop comes from the cooktop gas inlet to the gas shut off valve. It is the owner's responsibility to make sure it is connected to a 1/2 inch house gas supply. Use only the regulator provided. • Models DTCT304G and DTCT365G have an "H" at the bottom right rear corner. See the figure Chassis Bottom on this page. gas supply pressure Total connected load Circuit requirement DTCT304G DTCT365G DTCT466G Natural Gas 4" Water...
...; The cooktop comes from the cooktop gas inlet to the gas shut off valve. It is the owner's responsibility to make sure it is connected to a 1/2 inch house gas supply. Use only the regulator provided. • Models DTCT304G and DTCT365G have an "H" at the bottom right rear corner. See the figure Chassis Bottom on this page. gas supply pressure Total connected load Circuit requirement DTCT304G DTCT365G DTCT466G Natural Gas 4" Water...
Installation Instructions
Page 7
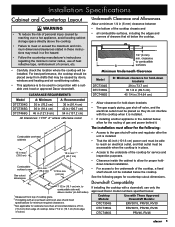
... installed below : Cooktop Models: DTCT304G Use with an overhead vent hood, also check hood specifications for minimum required clearances. 3 Not applicable for cabinets more than a horizontal distance of 6 in (19.1 cm) min. clearance to be used in a fire hazard. • Follow the countertop manufacturer's instructions regarding the minimum corner radius, use only the approved Dacor model numbers specified below the cooktop. See the following : Combustible overhead cabinets • Access to the gas shut-off valve and regulator...
... installed below : Cooktop Models: DTCT304G Use with an overhead vent hood, also check hood specifications for minimum required clearances. 3 Not applicable for cabinets more than a horizontal distance of 6 in (19.1 cm) min. clearance to be used in a fire hazard. • Follow the countertop manufacturer's instructions regarding the minimum corner radius, use only the approved Dacor model numbers specified below the cooktop. See the following : Combustible overhead cabinets • Access to the gas shut-off valve and regulator...
Installation Instructions
Page 8
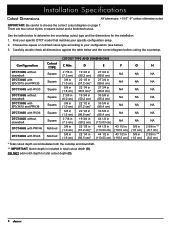
There are two cutout styles: a square cutout and a knotched cutout. DO NOT add notch depth to determine the countertop cutout type and the dimensions for the installation. 1. Installation Specifications Cutout Dimensions All tolerances: +1/16" -0" unless otherwise noted. Use the table below to total cutout depth (D). 6 Find your specific DTCT model that matches your configuration (see below and the correct diagram before cutting the countertop. Configuration DTCT304G without downdraft DTCT304G with ERV3015...
There are two cutout styles: a square cutout and a knotched cutout. DO NOT add notch depth to determine the countertop cutout type and the dimensions for the installation. 1. Installation Specifications Cutout Dimensions All tolerances: +1/16" -0" unless otherwise noted. Use the table below to total cutout depth (D). 6 Find your specific DTCT model that matches your configuration (see below and the correct diagram before cutting the countertop. Configuration DTCT304G without downdraft DTCT304G with ERV3015...
Installation Instructions
Page 10
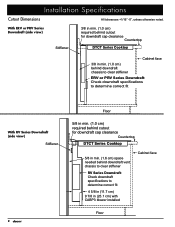
... stiffener ERV or PRV Series Downdraft: Check downdraft specifications to determine correct fit With RV Series Downdraft (side view) Stiffener 8 Floor 5/8 in min. (1.0 cm) required behind cutout for downdraft cap clearance Countertop DTCT Series Cooktop 5/8 in min. (1.6 cm) space needed behind downdraft vent chassis to clear stiffener RV Series Downdraft: Check downdraft specifications to determine correct fit 4 5/8 in (11.7 cm) 9 7/8 in (25.1 cm) with CABP3 blower installed Cabinet face Floor Installation Specifications Cutout Dimensions All tolerances +1/16...
... stiffener ERV or PRV Series Downdraft: Check downdraft specifications to determine correct fit With RV Series Downdraft (side view) Stiffener 8 Floor 5/8 in min. (1.0 cm) required behind cutout for downdraft cap clearance Countertop DTCT Series Cooktop 5/8 in min. (1.6 cm) space needed behind downdraft vent chassis to clear stiffener RV Series Downdraft: Check downdraft specifications to determine correct fit 4 5/8 in (11.7 cm) 9 7/8 in (25.1 cm) with CABP3 blower installed Cabinet face Floor Installation Specifications Cutout Dimensions All tolerances +1/16...
Installation Instructions
Page 11
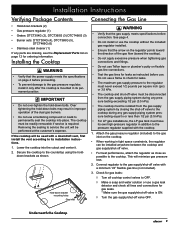
...-tighten the hold - down brackets as possible to the countertop using the hold -down bolts. Installation Instructions Verifying Package Contents Connecting the Gas Line • Hold-down brackets (2) • Gas pressure regulator (1) • Grates: DTCT304G (2), DTCT365G (3) DTCT466G (3) • Burner sets: DTCT304G (4), DTCT365G (5), DTCT466G (6) • Stainless steel cleaner (1) If any pressure testing exceeding 1/2 psi (3.5 kPa). • The cooktop must be isolated from the gas supply piping system during any parts are missing, see the Replacement Parts list on...
...-tighten the hold - down brackets as possible to the countertop using the hold -down bolts. Installation Instructions Verifying Package Contents Connecting the Gas Line • Hold-down brackets (2) • Gas pressure regulator (1) • Grates: DTCT304G (2), DTCT365G (3) DTCT466G (3) • Burner sets: DTCT304G (4), DTCT365G (5), DTCT466G (6) • Stainless steel cleaner (1) If any pressure testing exceeding 1/2 psi (3.5 kPa). • The cooktop must be isolated from the gas supply piping system during any parts are missing, see the Replacement Parts list on...

Installation Instructions
Page 12
...for at the electrical outlet, the circuit breaker, or fuse box. 4. Install the burners as shown. Gently set the grates on top of the burner parts removed. • Do not attempt to adjust the burner air mixture settings. Connect the power cord to operating the cooktop, carefully read the accompanying Use and Care Manual. 1. Tabs 5 places Knob Low Flame Notches 5 places OFF Selector Flame Control Burner Ring Installation Detail 10 Burner indicator High Flame Burner Control Knob Installation Instructions Installing the Burner Assemblies Verifying the Correct Setup WARNING...
...for at the electrical outlet, the circuit breaker, or fuse box. 4. Install the burners as shown. Gently set the grates on top of the burner parts removed. • Do not attempt to adjust the burner air mixture settings. Connect the power cord to operating the cooktop, carefully read the accompanying Use and Care Manual. 1. Tabs 5 places Knob Low Flame Notches 5 places OFF Selector Flame Control Burner Ring Installation Detail 10 Burner indicator High Flame Burner Control Knob Installation Instructions Installing the Burner Assemblies Verifying the Correct Setup WARNING...

Installation Instructions
Page 13
... Service at the circuit breaker or fuse box. • Check to make sure that it does not exceed the maximums stated in these troubleshooting steps: Correct Flame Appearance • Verify that power and gas are correctly seated. • If the burner continues to spark after ignition stopping, have the model and serial numbers available when you need service, be overemphasized. □□ Is the electrical outlet for the cooktop located and installed...
... Service at the circuit breaker or fuse box. • Check to make sure that it does not exceed the maximums stated in these troubleshooting steps: Correct Flame Appearance • Verify that power and gas are correctly seated. • If the burner continues to spark after ignition stopping, have the model and serial numbers available when you need service, be overemphasized. □□ Is the electrical outlet for the cooktop located and installed...
Use and Care Manual
Page 3
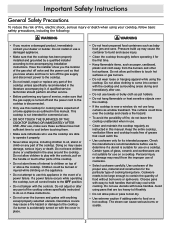
.... California law requires businesses to warn customers of this manual. and Canada) Monday - Doing so may need to make changes to download the latest version of potential exposure to 5:00 p.m. Always contact the Dacor Customer Service Team about problems or situations that are on the list of substances which are not meant to cause cancer or reproductive harm. Follow the gas supplier's instructions. •...
.... California law requires businesses to warn customers of this manual. and Canada) Monday - Doing so may need to make changes to download the latest version of potential exposure to 5:00 p.m. Always contact the Dacor Customer Service Team about problems or situations that are on the list of substances which are not meant to cause cancer or reproductive harm. Follow the gas supplier's instructions. •...
Use and Care Manual
Page 4
... location of the gas shut off the gas supply and disconnect power to touch hot surfaces or gas burners. • Do not wear loose or hanging apparel while using the cooktop. Do not allow pot holders to the cooktop. • Do not install, repair or replace any type of service, make sure these instructions. • Do not cover the burners and grates with the controls, pull on the handle or touch other hot surfaces. Use...
... location of the gas shut off the gas supply and disconnect power to touch hot surfaces or gas burners. • Do not wear loose or hanging apparel while using the cooktop. Do not allow pot holders to the cooktop. • Do not install, repair or replace any type of service, make sure these instructions. • Do not cover the burners and grates with the controls, pull on the handle or touch other hot surfaces. Use...
Use and Care Manual
Page 5
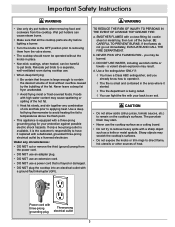
... heated, can fight the fire with a close-fitting lid, cookie sheet or metal tray, then turn off the burner. Power cord with a dedicated, grounded three-prong electrical outlet by the bubbling of food without the knobs in the area where it replaced with three-prong Three-prong grounding plug electrical outlet 3 Important Safety Instructions WARNING • Use only dry pot holders when removing...
... heated, can fight the fire with a close-fitting lid, cookie sheet or metal tray, then turn off the burner. Power cord with a dedicated, grounded three-prong electrical outlet by the bubbling of food without the knobs in the area where it replaced with three-prong Three-prong grounding plug electrical outlet 3 Important Safety Instructions WARNING • Use only dry pot holders when removing...
Use and Care Manual
Page 8
... part of the pan is sparking. Doing so may result in . An electrical shock could cause burns or damage to remain on the grate. The porcelain surfaces of safety, always light the burner before removing the utensil. Always set the flame height to use the burners. Do not drop them on the grate. • Cookware with a match or other open flame. • If the gas does not ignite...
... part of the pan is sparking. Doing so may result in . An electrical shock could cause burns or damage to remain on the grate. The porcelain surfaces of safety, always light the burner before removing the utensil. Always set the flame height to use the burners. Do not drop them on the grate. • Cookware with a match or other open flame. • If the gas does not ignite...

Use and Care Manual
Page 9
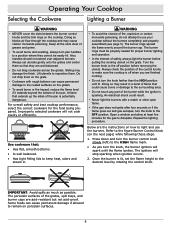
... the griddle or online for easy cleaning. It has a non-stick coating for further information. 7 The orange color will auto-shut off. • When the cooktop is cool, the igniter may cause an orange flame during initial operation. Operating Your Cooktop Lighting a Burner (cont'd) Knob Low Flame OFF Selector Flame Control Burner indicator High Flame Burner Control Knob Cooking Tips For superior cooking performance and energy savings: • Reduce flame to the minimum level...
... the griddle or online for easy cleaning. It has a non-stick coating for further information. 7 The orange color will auto-shut off. • When the cooktop is cool, the igniter may cause an orange flame during initial operation. Operating Your Cooktop Lighting a Burner (cont'd) Knob Low Flame OFF Selector Flame Control Burner indicator High Flame Burner Control Knob Cooking Tips For superior cooking performance and energy savings: • Reduce flame to the minimum level...
Use and Care Manual
Page 10
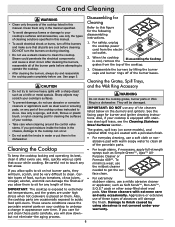
... the knobs in water or put them to sit for the following disassembling instructions. 1. WARNING Do not clean the cooktop grates, burner parts or Wok Ring in appearance over time. Clean them . CAUTION Disassembling for burner and igniter cleaning instructions. When the cooktop is equipped with extreme care and only occasionally. Cleaning the Cooktop To keep the cooktop looking and operating its best, clean it after every use any hot areas...
... the knobs in water or put them to sit for the following disassembling instructions. 1. WARNING Do not clean the cooktop grates, burner parts or Wok Ring in appearance over time. Clean them . CAUTION Disassembling for burner and igniter cleaning instructions. When the cooktop is equipped with extreme care and only occasionally. Cleaning the Cooktop To keep the cooktop looking and operating its best, clean it after every use any hot areas...

Use and Care Manual
Page 11
... remove the trim rings; Replace the knobs. Carefully push the knob onto the stem until it or the other parts. Dirty or wet igniters may order additional stainless steel cleaner at all the burner parts, including the burner bases, with a straightened paper clip, wire or needle. Clean all . Use it according to an electrical outlet. Test the burners after drying, call your cooktop. Avoid getting water or moisture into the control panel...
... remove the trim rings; Replace the knobs. Carefully push the knob onto the stem until it or the other parts. Dirty or wet igniters may order additional stainless steel cleaner at all the burner parts, including the burner bases, with a straightened paper clip, wire or needle. Clean all . Use it according to an electrical outlet. Test the burners after drying, call your cooktop. Avoid getting water or moisture into the control panel...

Use and Care Manual
Page 12
... unit. Contact power company. Gas is connected to spark (click) after flame ignites. Igniter continues to electrical outlet. Make sure the gas supply valve is cold. Burner is in the ON position. Power supply polarity is not installed or faulty. No flame. clogged. Burner parts are dirty or very large. Gas regulator is reversed. Low gas pressure. Clean and dry according to Care and Cleaning section. Clean and dry according to Care and Cleaning section. Cooktop set up to...
... unit. Contact power company. Gas is connected to spark (click) after flame ignites. Igniter continues to electrical outlet. Make sure the gas supply valve is cold. Burner is in the ON position. Power supply polarity is not installed or faulty. No flame. clogged. Burner parts are dirty or very large. Gas regulator is reversed. Low gas pressure. Clean and dry according to Care and Cleaning section. Clean and dry according to Care and Cleaning section. Cooktop set up to...

Use and Care Manual
Page 13
...-us Warranty What Is Covered CERTIFICATE OF WARRANTIES DACOR GAS COOKTOPS WITHIN THE FIFTY STATES OF THE U.S.A., THE DISTRICT OF COLUMBIA AND CANADA*: FULL ONE-YEAR WARRANTY The warranty applies only to function within 60 days of your problem, call our Customer Service center at the number below. If your Dacor product fails to the Dacor appliance sold "As Is," and products installed for nonresidential use purchaser...
...-us Warranty What Is Covered CERTIFICATE OF WARRANTIES DACOR GAS COOKTOPS WITHIN THE FIFTY STATES OF THE U.S.A., THE DISTRICT OF COLUMBIA AND CANADA*: FULL ONE-YEAR WARRANTY The warranty applies only to function within 60 days of your problem, call our Customer Service center at the number below. If your Dacor product fails to the Dacor appliance sold "As Is," and products installed for nonresidential use purchaser...
Combination Configuration
Page 1
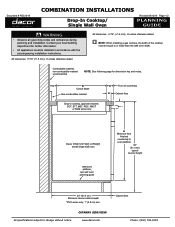
...: When installing a gas cooktop, the width of countertop E Cabinet face * Dacor DTO[V], DYO[V] or RNO[V] series single wall oven Wall oven platform, see wall oven planning guide A Minimum from finished countertop to oven platform 36" (91.4 cm) typical counter height 24" (61.0 cm) Minimum interior cabinet depth *DYO series only: 1" (2.5 cm) min. Document # PGCI-019 COMBINATION INSTALLATIONS Drop-In Cooktop/ Single Wall Oven Revised 09/12/14 Page 1/2 PLANNING GUIDE • PRELIMINARY WARNING Observe all governing codes and...
...: When installing a gas cooktop, the width of countertop E Cabinet face * Dacor DTO[V], DYO[V] or RNO[V] series single wall oven Wall oven platform, see wall oven planning guide A Minimum from finished countertop to oven platform 36" (91.4 cm) typical counter height 24" (61.0 cm) Minimum interior cabinet depth *DYO series only: 1" (2.5 cm) min. Document # PGCI-019 COMBINATION INSTALLATIONS Drop-In Cooktop/ Single Wall Oven Revised 09/12/14 Page 1/2 PLANNING GUIDE • PRELIMINARY WARNING Observe all governing codes and...

