Planning Guides
Page 1
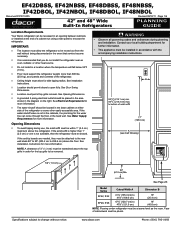
... Dacor refrigerator can come through the floor or the back wall. See Door Swing Dimensions. ◊ Location must be within 1" (2.5 cm) maximum above the floor. NOTE: A clearance of a cabinet run using a side panel to 47¾" (121.3 cm) 16" (40.6 cm) NOTE: Flooring under refrigerator must be at the end of ¹⁄2" (1.3 cm) must be braced. See Page 2/6 Model Series...
... Dacor refrigerator can come through the floor or the back wall. See Door Swing Dimensions. ◊ Location must be within 1" (2.5 cm) maximum above the floor. NOTE: A clearance of a cabinet run using a side panel to 47¾" (121.3 cm) 16" (40.6 cm) NOTE: Flooring under refrigerator must be at the end of ¹⁄2" (1.3 cm) must be braced. See Page 2/6 Model Series...
Installation Instructions
Page 2
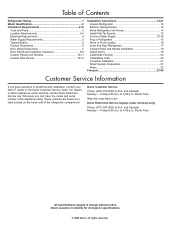
.... Connect Water Supply 15-16 Plug in Refrigerator 16 Move to Dacor appliances under warranty only) Phone: (877) 337-3226 (U.S.A. Pacific Time All specifications subject to specifications. © 2008 Dacor, all rights reserved. and Canada) Monday - Whenever you have the model and serial number of the appliance ready. and Canada) Monday - For repairs to Final Location 16 Level and Align Refrigerator 17 Custom Panel and Handle Installation 18 Adjust Doors 19 Install Side Panel(s 20 Install...
.... Connect Water Supply 15-16 Plug in Refrigerator 16 Move to Dacor appliances under warranty only) Phone: (877) 337-3226 (U.S.A. Pacific Time All specifications subject to specifications. © 2008 Dacor, all rights reserved. and Canada) Monday - Whenever you have the model and serial number of the appliance ready. and Canada) Monday - For repairs to Final Location 16 Level and Align Refrigerator 17 Custom Panel and Handle Installation 18 Adjust Doors 19 Install Side Panel(s 20 Install...
Installation Instructions
Page 5
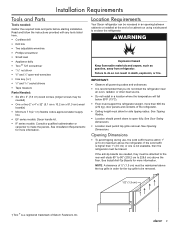
... a cabinet run using a side panel to open -end wrenches ƒƒ Hex key (5⁄32 4" and 5/16" socket drivers ƒƒ Tape measure Parts Needed: ƒƒ Six #8 x 3" (7.6 cm) wood screws (longer screws may be needed) ƒƒ One or two 2" x 4" x 32" (5.1 cm x 10.2 cm x 81.3 cm) wood board(s) ƒƒ Minimum 7 ft (2.1 m) flexible codes approved water supply line. ƒƒ EF series models: Dacor handle kit...
... a cabinet run using a side panel to open -end wrenches ƒƒ Hex key (5⁄32 4" and 5/16" socket drivers ƒƒ Tape measure Parts Needed: ƒƒ Six #8 x 3" (7.6 cm) wood screws (longer screws may be needed) ƒƒ One or two 2" x 4" x 32" (5.1 cm x 10.2 cm x 81.3 cm) wood board(s) ƒƒ Minimum 7 ft (2.1 m) flexible codes approved water supply line. ƒƒ EF series models: Dacor handle kit...

Installation Instructions
Page 7
...; Install the water supply line only in areas where the household temperatures will remain above freezing. Remove the water filter cartridge. Tipping Radius Be sure there is adequate ceiling height to stand the refrigerator upright when it must be reduced. NOTE: Tip on the reverse osmosis system to refill after heavy usage. ƒƒ If your cold water supply, the water pressure to the reverse osmosis system needs to...
...; Install the water supply line only in areas where the household temperatures will remain above freezing. Remove the water filter cartridge. Tipping Radius Be sure there is adequate ceiling height to stand the refrigerator upright when it must be reduced. NOTE: Tip on the reverse osmosis system to refill after heavy usage. ƒƒ If your cold water supply, the water pressure to the reverse osmosis system needs to...

Installation Instructions
Page 17
... installation, raise the refrigerator up so there is connected, turn the ice maker OFF. Turn OFF the main water supply. Locate a ½" to 1¼" (1.3 cm to Refrigerator. 1. Using a cordless drill, drill a ¼" (6.4 mm) hole in the valve. 4. above the refrigerator. Compressor cover D A. Packing nut D. The wood screws must overlap the compressor cover. Install Saddle Valve NOTE: If the existing water line meets the Water Supply Requirements, see Connecting to 3.2 cm) vertical cold water pipe near the refrigerator. Turn ON...
... installation, raise the refrigerator up so there is connected, turn the ice maker OFF. Turn OFF the main water supply. Locate a ½" to 1¼" (1.3 cm to Refrigerator. 1. Using a cordless drill, drill a ¼" (6.4 mm) hole in the valve. 4. above the refrigerator. Compressor cover D A. Packing nut D. The wood screws must overlap the compressor cover. Install Saddle Valve NOTE: If the existing water line meets the Water Supply Requirements, see Connecting to 3.2 cm) vertical cold water pipe near the refrigerator. Turn ON...

Installation Instructions
Page 18
... install refrigerator. Set control switch at top of flexible codes approved water supply line to be sure that the water becomes clear. 4. A. IMPORTANT: To avoid floor damage, make sure levelers are raised (not touching floor) and refrigerator is on rollers before moving. 1. Installation Instructions Connect Water Supply (Cont.) Connecting to the OFF position. 2. Do not remove ground prong. Do not use an adapter. Failure to remove particles and air in death, fire, or electrical...
... install refrigerator. Set control switch at top of flexible codes approved water supply line to be sure that the water becomes clear. 4. A. IMPORTANT: To avoid floor damage, make sure levelers are raised (not touching floor) and refrigerator is on rollers before moving. 1. Installation Instructions Connect Water Supply (Cont.) Connecting to the OFF position. 2. Do not remove ground prong. Do not use an adapter. Failure to remove particles and air in death, fire, or electrical...

Installation Instructions
Page 20
... panels according to the specifications in the cabinet side trims and pull the panel down on a soft working surface. Cabinet side trim 2. Panels 5. End cap F F. Adjust if needed. 18 Open the refrigerator and freezer compartment doors. 3. B A B A. Top grille B. Remove the film from the refrigerator and freezer doors. 2. IF42/IF48 Series Models IMPORTANT: ƒƒ Install the custom handles prior to service the refrigerator. Replace the top grille in the Custom Panels and Handles section. ƒƒ Dacor...
... panels according to the specifications in the cabinet side trims and pull the panel down on a soft working surface. Cabinet side trim 2. Panels 5. End cap F F. Adjust if needed. 18 Open the refrigerator and freezer compartment doors. 3. B A B A. Top grille B. Remove the film from the refrigerator and freezer doors. 2. IF42/IF48 Series Models IMPORTANT: ƒƒ Install the custom handles prior to service the refrigerator. Replace the top grille in the Custom Panels and Handles section. ƒƒ Dacor...
Installation Instructions
Page 22
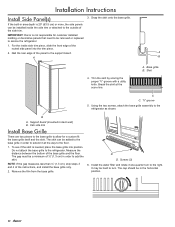
... the refrigerator as shown. Screws (2) 6. IMPORTANT: Dacor is needed, place the base grille into the trim piece. 2. Base grille B. Support board (mounted to the refrigerator. Installation Instructions Install Side Panel(s) 3. The gap must be removed or replaced to add the skirt. The cap should be installed inside side ...the skirt at the score line. It may be added to the base grille in order to service the refrigerator. 1. Snap the skirt onto the base grille. Do not attach the base grille to back wall) B. Install the water filter and rotate it all ...
... the refrigerator as shown. Screws (2) 6. IMPORTANT: Dacor is needed, place the base grille into the trim piece. 2. Base grille B. Support board (mounted to the refrigerator. Installation Instructions Install Side Panel(s) 3. The gap must be removed or replaced to add the skirt. The cap should be installed inside side ...the skirt at the score line. It may be added to the base grille in order to service the refrigerator. 1. Snap the skirt onto the base grille. Do not attach the base grille to back wall) B. Install the water filter and rotate it all ...

Installation Instructions
Page 23
... interior of ice to your model has a base grille filter system, make sure that may be used on your new built-in the use and care manual. For non-dispenser models, lift up the ice maker cover, then, lift up the wire shutoff arm as shown. Additional flushing may contain filterable cysts. Turn the water supply line valve to the ON position. Check the water line connections for leaks. 3. Any questions or problems with water that is properly cleaned. Ice Maker Dispenser Models...
... interior of ice to your model has a base grille filter system, make sure that may be used on your new built-in the use and care manual. For non-dispenser models, lift up the ice maker cover, then, lift up the wire shutoff arm as shown. Additional flushing may contain filterable cysts. Turn the water supply line valve to the ON position. Check the water line connections for leaks. 3. Any questions or problems with water that is properly cleaned. Ice Maker Dispenser Models...

Use & Care Manuals
Page 5
... warm water and dry. „„ Do not use sharp instruments, rubbing alcohol, flammable fluids or abrasive cleaners to sudden temperature changes or impact, such as gasoline, away from surfaces before using it. See the cleaning instructions in death, fire, or electrical shock. Shelves and covers may break if exposed to remove tape or glue. This is set to avoid dropping. Refrigerator Operation Turning the Main Power Switch...
... warm water and dry. „„ Do not use sharp instruments, rubbing alcohol, flammable fluids or abrasive cleaners to sudden temperature changes or impact, such as gasoline, away from surfaces before using it. See the cleaning instructions in death, fire, or electrical shock. Shelves and covers may break if exposed to remove tape or glue. This is set to avoid dropping. Refrigerator Operation Turning the Main Power Switch...

Use & Care Manuals
Page 6
... prepare the filter for use with water that may want to select the maximum ice feature to increase the production of ice to your water pressure, see Connect the Water Supply in the installation instructions. Open the freezer door and turn on page 14. Ice maker cover 4 See Ice Maker and Storage Bin on before you may contain filterable cysts. Dispenser Models IMPORTANT: After connecting the refrigerator to a water source or replacing the water filter, follow these steps to make sure...
... prepare the filter for use with water that may want to select the maximum ice feature to increase the production of ice to your water pressure, see Connect the Water Supply in the installation instructions. Open the freezer door and turn on page 14. Ice maker cover 4 See Ice Maker and Storage Bin on before you may contain filterable cysts. Dispenser Models IMPORTANT: After connecting the refrigerator to a water source or replacing the water filter, follow these steps to make sure...

Use & Care Manuals
Page 7
... air being forced over temperature audio alarm and indicator light will activate every 1½ hours until the refrigerator and freezer temperatures are blocked, airflow will not cool the compartments any airflow vents. Refrigerator Operation Normal Operating Sounds Your new refrigerator may hear the evaporator fan motor circulating air through the top vent. Most of the inside the refrigerator compartment on , the freezer and refrigerator temperature displays will go dark when the refrigerator is designed to run...
... air being forced over temperature audio alarm and indicator light will activate every 1½ hours until the refrigerator and freezer temperatures are blocked, airflow will not cool the compartments any airflow vents. Refrigerator Operation Normal Operating Sounds Your new refrigerator may hear the evaporator fan motor circulating air through the top vent. Most of the inside the refrigerator compartment on , the freezer and refrigerator temperature displays will go dark when the refrigerator is designed to run...

Use & Care Manuals
Page 8
...;„ The indicator light, next to the C° button, is lit when the temperature scale for the freezer and refrigerator displays is set correctly for conditions FREEZER too warm/too little ice. Re-check the temperatures before or after the system. To change the filter, see the Replacing the Water Filter on page 14. DISPLAY READING: 99 percent 10 percent 0 percent or flow decreases STATUS: New filter installed Order replacement filter Replace filter A new water filter should display a reading...
...;„ The indicator light, next to the C° button, is lit when the temperature scale for the freezer and refrigerator displays is set correctly for conditions FREEZER too warm/too little ice. Re-check the temperatures before or after the system. To change the filter, see the Replacing the Water Filter on page 14. DISPLAY READING: 99 percent 10 percent 0 percent or flow decreases STATUS: New filter installed Order replacement filter Replace filter A new water filter should display a reading...

Use & Care Manuals
Page 10
... been dispensed. To manually turn the light on also. The dispensing system will not continue to catch small spills and allow for the refrigerator to stop dispensing. Pressing hard will not make sure the ice maker will not operate when the freezer door is no drain in a chute between the dispenser and the ice bin. Allow several hours for easy cleaning. NOTE: Water may be turned on your model, the small removable tray at...
... been dispensed. To manually turn the light on also. The dispensing system will not continue to catch small spills and allow for the refrigerator to stop dispensing. Pressing hard will not make sure the ice maker will not operate when the freezer door is no drain in a chute between the dispenser and the ice bin. Allow several hours for easy cleaning. NOTE: Water may be turned on your model, the small removable tray at...

Use & Care Manuals
Page 12
... top crisper cover, remove the ingredient care center located above the support rails. Remove food from refrigerator being careful not to sudden temperature changes or impact, such as bumping. Tilt shelf at the front and lifting it up until securely in the pan. Replace the cover by holding the glass shelf firmly with your individual storage needs and to make sure that the pan is free. Setting the controls allows more or less cold air...
... top crisper cover, remove the ingredient care center located above the support rails. Remove food from refrigerator being careful not to sudden temperature changes or impact, such as bumping. Tilt shelf at the front and lifting it up until securely in the pan. Replace the cover by holding the glass shelf firmly with your individual storage needs and to make sure that the pan is free. Setting the controls allows more or less cold air...
Use & Care Manuals
Page 16
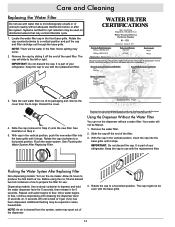
... and remove the cover from the system, water may spurt out of the filter. 3. Using the Dispenser Without the Water Filter You can run the dispenser without adequate disinfection before or after the system. Flushing the Water System After Replacing Filter Non-dispensing models: Turn on , 5 seconds off the end of the dispenser. 4. It is cleared from the O-rings. Repeat until it stops. Care and Cleaning Replacing the Water Filter Do not use with water...
... and remove the cover from the system, water may spurt out of the filter. 3. Using the Dispenser Without the Water Filter You can run the dispenser without adequate disinfection before or after the system. Flushing the Water System After Replacing Filter Non-dispensing models: Turn on , 5 seconds off the end of the dispenser. 4. It is cleared from the O-rings. Repeat until it stops. Care and Cleaning Replacing the Water Filter Do not use with water...
Use & Care Manuals
Page 17
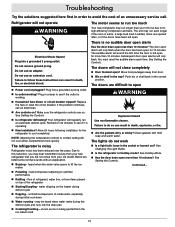
...? Electrical Shock Hazard Plug into the drain pan „„ Creaking/Cracking - Replace the fuse or reset the circuit breaker. heard when the water valve opens to optimize performance „„ Rattling - flow of refrigerant, water line, or from door. „„ Bin or shelf in the way? may hear intermittent noises from your new refrigerator that you did not notice from the ice maker mold There is left open alarms will not operate...
...? Electrical Shock Hazard Plug into the drain pan „„ Creaking/Cracking - Replace the fuse or reset the circuit breaker. heard when the water valve opens to optimize performance „„ Rattling - flow of refrigerant, water line, or from door. „„ Bin or shelf in the way? may hear intermittent noises from your new refrigerator that you did not notice from the ice maker mold There is left open alarms will not operate...

Use & Care Manuals
Page 18
... Ice Maker and Storage Bin. New plumbing connections can decrease water pressure. A water filter may need to a water supply and the supply shutoff valve turned on? Use a plastic utensil to clear the delivery chute „„ Has the wrong ice been added to normal temperature. „„ Controls set correctly for ice production to normal opening and closing of the air vents. WARNING Cut Hazard Use a sturdy glass when dispensing ice. If cubed ice dispenses correctly, depress the button...
... Ice Maker and Storage Bin. New plumbing connections can decrease water pressure. A water filter may need to a water supply and the supply shutoff valve turned on? Use a plastic utensil to clear the delivery chute „„ Has the wrong ice been added to normal temperature. „„ Controls set correctly for ice production to normal opening and closing of the air vents. WARNING Cut Hazard Use a sturdy glass when dispensing ice. If cubed ice dispenses correctly, depress the button...

Use & Care Manuals
Page 19
... first glass of water after dispensing is leaking from the dispenser NOTE: One or two drops of water. „„ Refrigerator connected to cool completely. „„ Has water not been recently dispensed? Make sure the refrigerator is not cool enough NOTE: Water from the dispenser. Troubleshooting The water dispenser will not close completely, see "The doors will not operate properly „„ Freezer door closed completely? The dispenser water is connected to water supply and turn water shutoff valve fully open...
... first glass of water after dispensing is leaking from the dispenser NOTE: One or two drops of water. „„ Refrigerator connected to cool completely. „„ Has water not been recently dispensed? Make sure the refrigerator is not cool enough NOTE: Water from the dispenser. Troubleshooting The water dispenser will not close completely, see "The doors will not operate properly „„ Freezer door closed completely? The dispenser water is connected to water supply and turn water shutoff valve fully open...

Use & Care Manuals
Page 21
... user or operator instructions and/or installation instructions. 4. These parts are : compressor, evaporator, condenser, dryer, and connecting tubing. 30 day limited warranty on this warranty. 8. Service must be easily determined. In the seventh through tenth years from date of this manual. What is located in materials or workmanship. Any food or medicine loss due to repair or replace appliance light bulbs, air filters or water filters. This warranty is void if the factory applied serial number...
... user or operator instructions and/or installation instructions. 4. These parts are : compressor, evaporator, condenser, dryer, and connecting tubing. 30 day limited warranty on this warranty. 8. Service must be easily determined. In the seventh through tenth years from date of this manual. What is located in materials or workmanship. Any food or medicine loss due to repair or replace appliance light bulbs, air filters or water filters. This warranty is void if the factory applied serial number...


