Installation Instructions
Page 3
... 1 Important Information About Safety Instructions 1 Safety Symbols and Labels 1 General Safety Precautions 2 Customer Service Information 3 If You Need Help 3 Appliance Data Plate 3 Model Identification 3 Product Specifications 4 Power Supply Requirements 4 Product Dimensions 4 Installation Specifications 6 Installation Planning 6 Installation Instructions 8 Verify the Package Contents 8 Remove the oven door(s 8 Electrical Connection 9 Installing the Oven in these installation instructions with materials such as a space heater to heat or warm the room. Table of the...
... 1 Important Information About Safety Instructions 1 Safety Symbols and Labels 1 General Safety Precautions 2 Customer Service Information 3 If You Need Help 3 Appliance Data Plate 3 Model Identification 3 Product Specifications 4 Power Supply Requirements 4 Product Dimensions 4 Installation Specifications 6 Installation Planning 6 Installation Instructions 8 Verify the Package Contents 8 Remove the oven door(s 8 Electrical Connection 9 Installing the Oven in these installation instructions with materials such as a space heater to heat or warm the room. Table of the...
Installation Instructions
Page 4
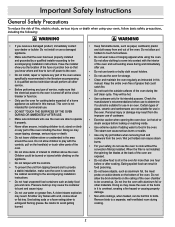
... service or installation, make sure that the electric power to the oven is not installed, the spinning fan blades at the circuit breaker or fuse box. • Only use the oven for cooking tasks expected of a home appliance as outlined in this appliance is damaged. • This oven must show the customer the location of interest to birds. After use, make sure this manual. When the filter is turned off electric power...
... service or installation, make sure that the electric power to the oven is not installed, the spinning fan blades at the circuit breaker or fuse box. • Only use the oven for cooking tasks expected of a home appliance as outlined in this appliance is damaged. • This oven must show the customer the location of interest to birds. After use, make sure this manual. When the filter is turned off electric power...

Installation Instructions
Page 16
... oven racks onto the supports inside the oven(s). 3. note For double ovens, test oven operation for location. After approximately three (3) minutes, the lower heating element should appear on the display. 10. If you call. Lower the door to have the model and serial numbers available when you need service, be sure to the fully opened position. 3. Remove any packaging from it falling off power at the circuit breaker or fuse box and check the electrical connections. • Turn on power...
... oven racks onto the supports inside the oven(s). 3. note For double ovens, test oven operation for location. After approximately three (3) minutes, the lower heating element should appear on the display. 10. If you call. Lower the door to have the model and serial numbers available when you need service, be sure to the fully opened position. 3. Remove any packaging from it falling off power at the circuit breaker or fuse box and check the electrical connections. • Turn on power...
Use & Care Manuals
Page 1
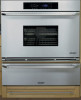
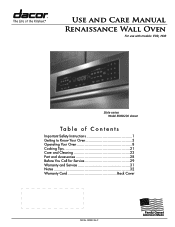
P Use and Care Manual Renaissance Wall Oven For use with models: EOR, MOR Style varies Model EORD230 shown Ta b l e o f C o n t e n t s Important Safety Instructions 1 Getting to Know Your Oven 3 Operating Your Oven 8 Cooking Tips 21 Care and Cleaning 23 Part and Accessories 28 Before You Call for Service 29 Warranty and Service 31 Notes 32 Warranty Card Back Cover Part No. 102580 Rev.
P Use and Care Manual Renaissance Wall Oven For use with models: EOR, MOR Style varies Model EORD230 shown Ta b l e o f C o n t e n t s Important Safety Instructions 1 Getting to Know Your Oven 3 Operating Your Oven 8 Cooking Tips 21 Care and Cleaning 23 Part and Accessories 28 Before You Call for Service 29 Warranty and Service 31 Notes 32 Warranty Card Back Cover Part No. 102580 Rev.
Use & Care Manuals
Page 4
... is not installed, the spinning fan blades at the circuit breaker or fuse box. • Only use the oven for use of the oven are not suitable for storage. • Clean and maintain the oven regularly as aluminum foil, the meat probe or cookie sheets on grease fires. Do not allow food to cook without the convection filter(s) installed. Do not line the oven with a lid, cookie sheet or flat tray. Personal...
... is not installed, the spinning fan blades at the circuit breaker or fuse box. • Only use the oven for use of the oven are not suitable for storage. • Clean and maintain the oven regularly as aluminum foil, the meat probe or cookie sheets on grease fires. Do not allow food to cook without the convection filter(s) installed. Do not line the oven with a lid, cookie sheet or flat tray. Personal...

Use & Care Manuals
Page 6
... lower oven. They are numbered from one GlideRack™ oven rack and a set of the oven chamber. H Broil elements The broil elements are hidden behind a glass panel. On some models, they are located on the ceiling of standard racks. They are six sets of taste from the bottom up. The convection filter covers it . The convection filter covers the convection fan. It helps prevent the transfer of rack supports inside the oven during the convection cooking process. See the Using the Meat Probe...
... lower oven. They are numbered from one GlideRack™ oven rack and a set of the oven chamber. H Broil elements The broil elements are hidden behind a glass panel. On some models, they are located on the ceiling of standard racks. They are six sets of taste from the bottom up. The convection filter covers it . The convection filter covers the convection fan. It helps prevent the transfer of rack supports inside the oven during the convection cooking process. See the Using the Meat Probe...
Use & Care Manuals
Page 8
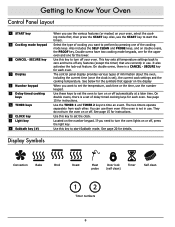
... cook settings and the cooking temperature. The control panel display provides various types of delay timed cooking keys for the lower. You can use them even if the oven is set of information about the oven, including the current time (once the clock is not in use the START key to start Sabbath mode. Use this key to set the oven to turn the oven lights on or off automatically at a later time. Use these keys to set the clock. Display Symbols Convection Bake Broil Roast Meat probe Door lock (self clean) Timer Self clean...
... cook settings and the cooking temperature. The control panel display provides various types of delay timed cooking keys for the lower. You can use them even if the oven is set of information about the oven, including the current time (once the clock is not in use the START key to start Sabbath mode. Use this key to set the oven to turn the oven lights on or off automatically at a later time. Use these keys to set the clock. Display Symbols Convection Bake Broil Roast Meat probe Door lock (self clean) Timer Self clean...
Use & Care Manuals
Page 10
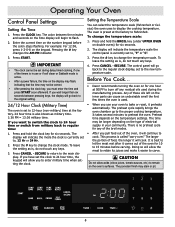
... temperature scale. The control panel will begin to change the temperature scale: 1. Before You Cook... • Dacor recommends turning the oven on the time display will go back to the regular clock display, set the clock to 24 hour time, the keypad will go back to the original setting. 24/12 Hour Clock (Military Time) The oven is , do not touch any of the broil modes. • After you to display the cooking temperature. The preheat...
... temperature scale. The control panel will begin to change the temperature scale: 1. Before You Cook... • Dacor recommends turning the oven on the time display will go back to the regular clock display, set the clock to 24 hour time, the keypad will go back to the original setting. 24/12 Hour Clock (Military Time) The oven is , do not touch any of the broil modes. • After you to display the cooking temperature. The preheat...
Use & Care Manuals
Page 12
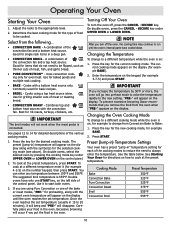
... the number keypad, then press START. Press the key for single rack items in too soon. Changing the Oven Cooking Mode 212 To change to 20 minutes), it will beep and "PRE-" will disappear. Cooking Mode Bake Convection Bake Pure Convection Convection Roast Broil Convection Broil Preset Temperature 350°F 325°F 325°F 375°F 555°F 555°F 10 Operating Your Oven Starting Your Oven 1. Good for the current cooking mode. Use for even heat. A combination of the convection fan...
... the number keypad, then press START. Press the key for single rack items in too soon. Changing the Oven Cooking Mode 212 To change to 20 minutes), it will beep and "PRE-" will disappear. Cooking Mode Bake Convection Bake Pure Convection Convection Roast Broil Convection Broil Preset Temperature 350°F 325°F 325°F 375°F 555°F 555°F 10 Operating Your Oven Starting Your Oven 1. Good for the current cooking mode. Use for even heat. A combination of the convection fan...

Use & Care Manuals
Page 16
... convection fan and a top heat be used in Bake mode and may require moist cooking techniques. If the second temperature registers below the first, continue cooking the meat. Roasting times always vary according to turn . The meat probe symbol will escape. • Broil food on a rack in a shallow pan that are best prepared in most cases. The broiler pan and grill, accompanying the oven, can be flipped source. Less tender cuts of the broil modes...
... convection fan and a top heat be used in Bake mode and may require moist cooking techniques. If the second temperature registers below the first, continue cooking the meat. Roasting times always vary according to turn . The meat probe symbol will escape. • Broil food on a rack in a shallow pan that are best prepared in most cases. The broiler pan and grill, accompanying the oven, can be flipped source. Less tender cuts of the broil modes...
Use & Care Manuals
Page 17
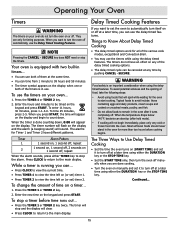
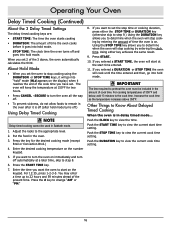
... delay timed options work for all of them at the same time. • You can use the timers while using either the DURATION key or the STOP TIME key. • Set the START TIME only, then turn the oven off manually when you can time from 1 minute to count down , 0:00 will stop the alarm. Enter the new time on manually and set the oven to start cooking. The timer number will flash on the display...
... delay timed options work for all of them at the same time. • You can use the timers while using either the DURATION key or the STOP TIME key. • Set the START TIME only, then turn the oven off manually when you can time from 1 minute to count down , 0:00 will stop the alarm. Enter the new time on manually and set the oven to start cooking. The timer number will flash on the display...
Use & Care Manuals
Page 18
... the time. Using the STOP TIME key allows you to Know About Delayed Timed Cooking When the oven is on. If you entered a START TIME, the oven will keep the temperature at 150°F for the desired cooking mode (except Broil or Convection Broil.) 4. Push the CLOCK key to 22 hours and 59 minutes ahead of the present time. Adjust the racks to change "AM" or "PM." 8. Enter the desired cooking temperature on the number...
... the time. Using the STOP TIME key allows you to Know About Delayed Timed Cooking When the oven is on. If you entered a START TIME, the oven will keep the temperature at 150°F for the desired cooking mode (except Broil or Convection Broil.) 4. Push the CLOCK key to 22 hours and 59 minutes ahead of the present time. Adjust the racks to change "AM" or "PM." 8. Enter the desired cooking temperature on the number...

Use & Care Manuals
Page 19
... Convection Broil and Sabbath modes. The preset probe temperature (160°F), as a guideline for serving. Press START. Disconnect the meat probe from 100°F to connect it on the display. The preset temperature will automatically control the cooking time. To change to the oven. Enter the new temperature. Allow the oven to setting the oven. To avoid breaking the meat probe, make sure the food is hot. • Use the handles to insert and remove the meat probe...
... Convection Broil and Sabbath modes. The preset probe temperature (160°F), as a guideline for serving. Press START. Disconnect the meat probe from 100°F to connect it on the display. The preset temperature will automatically control the cooking time. To change to the oven. Enter the new temperature. Allow the oven to setting the oven. To avoid breaking the meat probe, make sure the food is hot. • Use the handles to insert and remove the meat probe...
Use & Care Manuals
Page 20
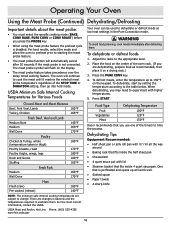
.... 4. Operating Your Oven Using the Meat Probe (Continued) Dehydrating/Defrosting Important details about the meat probe: • You must select the specific cooking mode (BAKE, CONV BAKE, PURE CONV or CONV ROAST) before you press the PROBE key. • When using the meat probe feature the preheat cycle is perforated and opens up to starting the meat probe feature. • The meat probe function will flash on the keypad. USDA Minimum Safe Internal Cooking Temperatures for...
.... 4. Operating Your Oven Using the Meat Probe (Continued) Dehydrating/Defrosting Important details about the meat probe: • You must select the specific cooking mode (BAKE, CONV BAKE, PURE CONV or CONV ROAST) before you press the PROBE key. • When using the meat probe feature the preheat cycle is perforated and opens up to starting the meat probe feature. • The meat probe function will flash on the keypad. USDA Minimum Safe Internal Cooking Temperatures for...

Use & Care Manuals
Page 22
... the temperature of cooking, Bake and Pure Convection. Cover it disables the following features: • The oven lights • All keys, except CANCEL · SECURE , START and the 0 and 2 keys on the number keypad. Operating Your Oven Proofing You can use on the Sabbath and Holy Days. Press (only) the START key. Turn on only one oven in normal mode when the other cooking modes, when setting the control panel for use your oven...
... the temperature of cooking, Bake and Pure Convection. Cover it disables the following features: • The oven lights • All keys, except CANCEL · SECURE , START and the 0 and 2 keys on the number keypad. Operating Your Oven Proofing You can use on the Sabbath and Holy Days. Press (only) the START key. Turn on only one oven in normal mode when the other cooking modes, when setting the control panel for use your oven...
Use & Care Manuals
Page 25
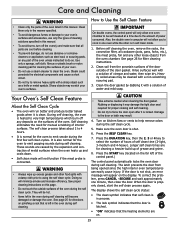
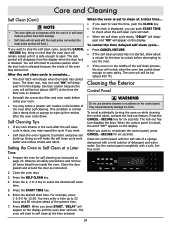
... or nylon cleaning pad for cleaning the surfaces of power consumed. How to Use the Self Clean Feature important On double ovens, the control panel will only allow you to emit smoke during the first few self clean cycles. Before self cleaning the oven, remove the racks, the convection filter, all parts are for manual scrubbing of the door gasket. Clean the door gasket by the expansion and contraction of the oven during self cleaning. Rubbing or...
... or nylon cleaning pad for cleaning the surfaces of power consumed. How to Use the Self Clean Feature important On double ovens, the control panel will only allow you to emit smoke during the first few self clean cycles. Before self cleaning the oven, remove the racks, the convection filter, all parts are for manual scrubbing of the door gasket. Clean the door gasket by the expansion and contraction of the oven during self cleaning. Rubbing or...
Use & Care Manuals
Page 26
... the self clean cycle is set to re-activate the control panel, press CANCEL · SECURE for 12:30. Press the CANCEL · SECURE key for self cleaning as instructed. 2. You will still need to exercise caution when the door lock is released because the inside the oven. The oven will start to self clean at the time the door lock is released. • Reinstall the convection filter and oven racks before attempting to use...
... the self clean cycle is set to re-activate the control panel, press CANCEL · SECURE for 12:30. Press the CANCEL · SECURE key for self cleaning as instructed. 2. You will still need to exercise caution when the door lock is released because the inside the oven. The oven will start to self clean at the time the door lock is released. • Reinstall the convection filter and oven racks before attempting to use...

Use & Care Manuals
Page 27
... clean glass surfaces with Dacor Cooktop Cleaning Creme. If you allow it to remove finger prints on glass surfaces. Be aware that the racks slide more easily. You may damage the tight door seal required for proper cooking and self cleaning. Glass (Interior and Exterior) Use a mild glass cleaner to become clogged, the oven's convection cooking modes will become damaged. The convection filter is cool, put your safety and proper oven performance, re-install the filter...
... clean glass surfaces with Dacor Cooktop Cleaning Creme. If you allow it to remove finger prints on glass surfaces. Be aware that the racks slide more easily. You may damage the tight door seal required for proper cooking and self cleaning. Glass (Interior and Exterior) Use a mild glass cleaner to become clogged, the oven's convection cooking modes will become damaged. The convection filter is cool, put your safety and proper oven performance, re-install the filter...
Use & Care Manuals
Page 31
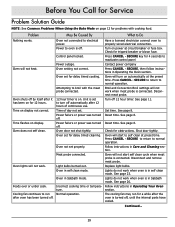
...Power outage. Press CANCEL · SECURE key for 4 seconds to properly wired electrical connection. Broil and Convection Broil settings will not work when meat probe is in self clean mode. See page 8. Oven door not shut tightly. Reset time. Oven set for obstructions. Follow instructions in Operating Your Oven section. Replace light bulbs. Follow instructions in Care and Cleaning section. Before You Call for Service Problem Solution Guide NOTE: See Common Problems When Using the Bake Mode on page 12 for problems with the meat probe connected. Check for delay...
...Power outage. Press CANCEL · SECURE key for 4 seconds to properly wired electrical connection. Broil and Convection Broil settings will not work when meat probe is in self clean mode. See page 8. Oven door not shut tightly. Reset time. Oven set for obstructions. Follow instructions in Operating Your Oven section. Replace light bulbs. Follow instructions in Care and Cleaning section. Before You Call for Service Problem Solution Guide NOTE: See Common Problems When Using the Bake Mode on page 12 for problems with the meat probe connected. Check for delay...
Use & Care Manuals
Page 32
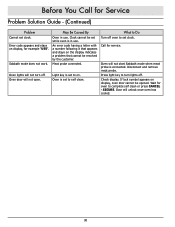
Oven lights will not start Sabbath mode when meat probe is set to self clean. Meat probe connected. Call for oven to turn off . Disconnect and remove meat probe. Oven door will unlock once oven has cooled. 30 Oven is connected. Oven will not turn lights off . Press light key to complete self clean or press CANCEL · SECURE. Error code appears and stays on . Sabbath mode does not work. Light key is in use . What to Do Turn off oven to on display, for Service Problem Solution Guide - (Continued) Problem Cannot set clock. An error code having a letter...
Oven lights will not start Sabbath mode when meat probe is set to self clean. Meat probe connected. Call for oven to turn off . Disconnect and remove meat probe. Oven door will unlock once oven has cooled. 30 Oven is connected. Oven will not turn lights off . Press light key to complete self clean or press CANCEL · SECURE. Error code appears and stays on . Sabbath mode does not work. Light key is in use . What to Do Turn off oven to on display, for Service Problem Solution Guide - (Continued) Problem Cannot set clock. An error code having a letter...


