
Planning Guides
Page 2
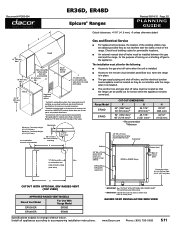
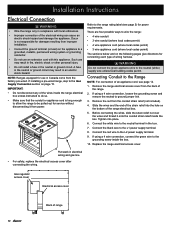
... than a horizontal distance of control panel. Install all appliances according to the remote circuit breaker panel/fuse box, when the range is in place. ■■ The gas supply piping and shut-off valve must be installed between the gas inlet and the range, for service while the appliance remains connected. Suggested location of the range. if installing an overhead vent hood, also check the hood specifications for minimum required clearances. 2 Cabinet/countertop depth...
... than a horizontal distance of control panel. Install all appliances according to the remote circuit breaker panel/fuse box, when the range is in place. ■■ The gas supply piping and shut-off valve must be installed between the gas inlet and the range, for service while the appliance remains connected. Suggested location of the range. if installing an overhead vent hood, also check the hood specifications for minimum required clearances. 2 Cabinet/countertop depth...
Installation Instructions
Page 2
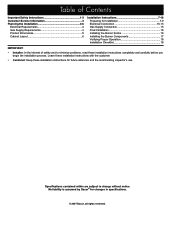
...instructions for changes in specifications. © 2007 Dacor, all rights reserved. No liability is assumed by Dacor® for future reference and the local building inspector's use. Table of Contents Important Safety Instructions 1-3 Customer Service Information 3 Planning the Installation 4-6 Electrical Requirements 4 Gas Supply Requirements 4 Product Dimensions 5 Cabinet Layout 6 Installation Instructions 7-18 Preparing for Installation 7-9 Electrical Connection 10-15 Gas Supply Connection 15 Final Installation 16 Installing the Burner Knobs 16 Installing the Burner...
...instructions for changes in specifications. © 2007 Dacor, all rights reserved. No liability is assumed by Dacor® for future reference and the local building inspector's use. Table of Contents Important Safety Instructions 1-3 Customer Service Information 3 Planning the Installation 4-6 Electrical Requirements 4 Gas Supply Requirements 4 Product Dimensions 5 Cabinet Layout 6 Installation Instructions 7-18 Preparing for Installation 7-9 Electrical Connection 10-15 Gas Supply Connection 15 Final Installation 16 Installing the Burner Knobs 16 Installing the Burner...
Installation Instructions
Page 4
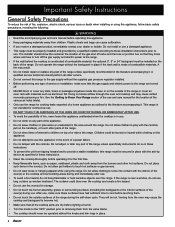
... valve stems. • The cooktop should show the customer the location of the gas shut off . • NEVER block or cover any type of service or installation, make sure these instructions. • Clean the cooktop thoroughly before touching them from the oven may cause the cooktop and backguard to become hot. • Make sure that they know where and how to turn off the gas supply and electric power to the range...
... valve stems. • The cooktop should show the customer the location of the gas shut off . • NEVER block or cover any type of service or installation, make sure these instructions. • Clean the cooktop thoroughly before touching them from the oven may cause the cooktop and backguard to become hot. • Make sure that they know where and how to turn off the gas supply and electric power to the range...

Installation Instructions
Page 5
... the oven could be harmful to Dacor appliances under warranty only) Phone: (877) 337-3226 (U.S.A. Do not cover these glass panels with aluminum foil or other sources of heat. • Always ensure that the light fixture lens covers are inside the grate, inside grill Model Identification ER36D-C-SCH/NG/H SIZE (inches) COUNTRY CODE C = Equipped for use in U.S.A. Customer Service Information If you call the Dacor Distinctive Service line. For repairs to...
... the oven could be harmful to Dacor appliances under warranty only) Phone: (877) 337-3226 (U.S.A. Do not cover these glass panels with aluminum foil or other sources of heat. • Always ensure that the light fixture lens covers are inside the grate, inside grill Model Identification ER36D-C-SCH/NG/H SIZE (inches) COUNTRY CODE C = Equipped for use in U.S.A. Customer Service Information If you call the Dacor Distinctive Service line. For repairs to...
Installation Instructions
Page 6
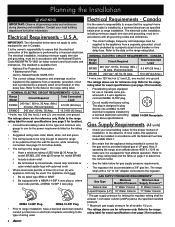
... the required 4 wire electrical outlet is protected by a licensed electrician as specified below for reference only. Canada It is the owner's responsibility to be long enough to allow the range to ensure that is installed by a properly sized circuit breaker or time delay fuse. The range ships with a NEMA 14-50P 4 wire plug or, where local code permits, a NEMA 10-50P 3 wire plug. CANADA Range Model Circuit Required Total Connected Load ER36D...
... the required 4 wire electrical outlet is protected by a licensed electrician as specified below for reference only. Canada It is the owner's responsibility to be long enough to allow the range to ensure that is installed by a properly sized circuit breaker or time delay fuse. The range ships with a NEMA 14-50P 4 wire plug or, where local code permits, a NEMA 10-50P 3 wire plug. CANADA Range Model Circuit Required Total Connected Load ER36D...

Installation Instructions
Page 8
... level; IMPORTANT: See the raised vent installation instructions for minimum required clearances. 2 Cabinet/countertop depth is the recommended location. Planning the Installation Cabinet Layout • Carefully check the location where the range is to combustible side walls above the range (both sides) G Cutout with Optional ERV Raised Vent (Top View) APPROVED RAISED VENT MODEL NUMBERS Range Model ERV Raised Vent Model ER36D ERV36-ER ER48D ERV48-ER 1 Vertical to the remote circuit breaker panel/fuse...
... level; IMPORTANT: See the raised vent installation instructions for minimum required clearances. 2 Cabinet/countertop depth is the recommended location. Planning the Installation Cabinet Layout • Carefully check the location where the range is to combustible side walls above the range (both sides) G Cutout with Optional ERV Raised Vent (Top View) APPROVED RAISED VENT MODEL NUMBERS Range Model ERV Raised Vent Model ER36D ERV36-ER ER48D ERV48-ER 1 Vertical to the remote circuit breaker panel/fuse...

Installation Instructions
Page 9
...; 6 Knobs • 2 Small stack burner rings • Anti-tip bracket w/screws • 2 Large stack burner caps • 2 Large stack burner rings • Meat probe • Griddle • 2 Crown burner caps • Wok ring • 2 Crown burner rings • Stainless steel cleaner • 2 Crown burner heads • Literature kit • 1 GlideRack™ oven rack • Broiler pan/grill • 2 Standard size racks See the use and care manual for a list of range Range right side panel ANTI-TIP BRACKET PLACEMENT Dimension ER36D...
...; 6 Knobs • 2 Small stack burner rings • Anti-tip bracket w/screws • 2 Large stack burner caps • 2 Large stack burner rings • Meat probe • Griddle • 2 Crown burner caps • Wok ring • 2 Crown burner rings • Stainless steel cleaner • 2 Crown burner heads • Literature kit • 1 GlideRack™ oven rack • Broiler pan/grill • 2 Standard size racks See the use and care manual for a list of range Range right side panel ANTI-TIP BRACKET PLACEMENT Dimension ER36D...
Installation Instructions
Page 12
... range. 2. Connect the black wire to the Gas Supply Connection section on page 15. If installing a pre-wired range, skip to the L1 power supply terminal. 8. Gas regulator access cover Electrical access cover Back of the range electrical box. 5. Such use in the box. 7. A fuse in the neutral or ground circuit may result in fire, electric shock or other personal injury. • Do not install a fuse in electrical wiring and gas line • For safety, replace the electrical access cover...
... range. 2. Connect the black wire to the Gas Supply Connection section on page 15. If installing a pre-wired range, skip to the L1 power supply terminal. 8. Gas regulator access cover Electrical access cover Back of the range electrical box. 5. Such use in the box. 7. A fuse in the neutral or ground circuit may result in fire, electric shock or other personal injury. • Do not install a fuse in electrical wiring and gas line • For safety, replace the electrical access cover...
Installation Instructions
Page 17
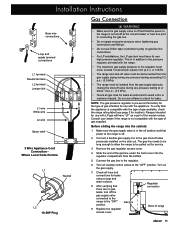
... gas flex line connections. • For LP installations, the LP gas tank must be long enough to allow the range to the regulator. 6. The gas line needs to be isolated from the gas supply piping by closing the shut-off valve during any pressure testing at or below 1/2 p.s.i. (3.5 kPa). • Check all gas lines for leaks as a part of gas available, check the range rating label (see page 3 for service. 3. Gas line 9. Installation Instructions Bare wire connections...
... gas flex line connections. • For LP installations, the LP gas tank must be long enough to allow the range to the regulator. 6. The gas line needs to be isolated from the gas supply piping by closing the shut-off valve during any pressure testing at or below 1/2 p.s.i. (3.5 kPa). • Check all gas lines for leaks as a part of gas available, check the range rating label (see page 3 for service. 3. Gas line 9. Installation Instructions Bare wire connections...
Installation Instructions
Page 18
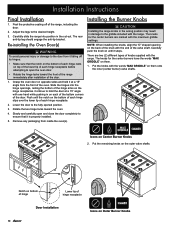
... of knobs supplied with the words "MAX GRIDDLE" on opposite sides and hold the door at a 15° angle from inside the oven(s). The knobs for the center burners are two (2) different types of each hinge receptacle before attempting to the fully opened position. 3. The rear anti-tip leg should engage the anti-tip bracket. Slowly and carefully open the oven door. • Rotate the hinge locks toward the oven. 4. Carefully...
... of knobs supplied with the words "MAX GRIDDLE" on opposite sides and hold the door at a 15° angle from inside the oven(s). The knobs for the center burners are two (2) different types of each hinge receptacle before attempting to the fully opened position. 3. The rear anti-tip leg should engage the anti-tip bracket. Slowly and carefully open the oven door. • Rotate the hinge locks toward the oven. 4. Carefully...

Installation Instructions
Page 19
... model ER36D, the largest grate goes in keyed hole. Put locating tab in the center. STEP 1: Put burner ring on bottom of burner cap STEP 1: Install burner head. Installation Instructions Cooktop Assembly WARNING Never attempt to assure proper seating. Crown burner Spill tray Stack burner STEP 3: Install burner cap. Line up ring tabs with the range model number. • Gently set the grates on bottom of ring. Burner ring STEP 3: Install burner...
... model ER36D, the largest grate goes in keyed hole. Put locating tab in the center. STEP 1: Put burner ring on bottom of burner cap STEP 1: Install burner head. Installation Instructions Cooktop Assembly WARNING Never attempt to assure proper seating. Crown burner Spill tray Stack burner STEP 3: Install burner cap. Line up ring tabs with the range model number. • Gently set the grates on bottom of ring. Burner ring STEP 3: Install burner...
Installation Instructions
Page 20
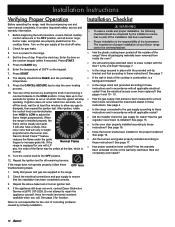
... pushing the knob in and turning it does not exceed the maximums stated in these instructions and in the proper locations? Installation Instructions Verifying Proper Operation Before operating the range, read the accompanying use with the provided anti-tip bracket and foot according to these instructions? Press START. 5. Press START. 8. If the range does not operate properly, follow these instructions? Check the electrical connections and gas supply to ensure that all cooktop control valves are in...
... pushing the knob in and turning it does not exceed the maximums stated in these instructions and in the proper locations? Installation Instructions Verifying Proper Operation Before operating the range, read the accompanying use with the provided anti-tip bracket and foot according to these instructions? Press START. 5. Press START. 8. If the range does not operate properly, follow these instructions? Check the electrical connections and gas supply to ensure that all cooktop control valves are in...

Use & Care Manuals
Page 3
... of purchase Model Identification ER36D-C-SCH/NG/H SIZE (in inches) COUNTRY CODE C = Equipped for use in Canada No character = Equipped for U.S.A GAS TYPE NG = Natural gas LP = Liquid petroleum (propane) ALTITUDE H = Equipped for high altitude operation, 4000 ft. (1219 m) and up No character = Equipped for low altitude Serial number labels is required for future reference. Record these instructions with gas. Always contact the Dacor Customer Service Team about problems or...
... of purchase Model Identification ER36D-C-SCH/NG/H SIZE (in inches) COUNTRY CODE C = Equipped for use in Canada No character = Equipped for U.S.A GAS TYPE NG = Natural gas LP = Liquid petroleum (propane) ALTITUDE H = Equipped for high altitude operation, 4000 ft. (1219 m) and up No character = Equipped for low altitude Serial number labels is required for future reference. Record these instructions with gas. Always contact the Dacor Customer Service Team about problems or...
Use & Care Manuals
Page 4
... you smell gas: ▪▪ Do not use or light any appliance. ▪▪ Do not touch any electrical switch or use any part of the range, including the door(s). A fire may result. • Do not install, repair, or replace any part of the range unless specifically recommended in place with the anti-tip device (see the separate installation instructions provided with this range). • Do not cover the burners and grates...
... you smell gas: ▪▪ Do not use or light any appliance. ▪▪ Do not touch any electrical switch or use any part of the range, including the door(s). A fire may result. • Do not install, repair, or replace any part of the range unless specifically recommended in place with the anti-tip device (see the separate installation instructions provided with this range). • Do not cover the burners and grates...
Use & Care Manuals
Page 8
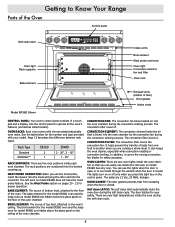
... . The broil element for the model ER36D oven and the large oven for the number and type provided with chrome-plated adjustable oven racks. The lights turn on the ceiling of a touch pad and a display. Getting to the oven's ceiling. See the Meat Probe section on the floor of the oven. CONVECTION FAN: The convection fan blows heated air into the connector. Self clean LATCH: The self clean latch automatically locks the oven door during the convection cooking process. Use the control panel to...
... . The broil element for the model ER36D oven and the large oven for the number and type provided with chrome-plated adjustable oven racks. The lights turn on the ceiling of a touch pad and a display. Getting to the oven's ceiling. See the Meat Probe section on the floor of the oven. CONVECTION FAN: The convection fan blows heated air into the connector. Self clean LATCH: The self clean latch automatically locks the oven door during the convection cooking process. Use the control panel to...
Use & Care Manuals
Page 13
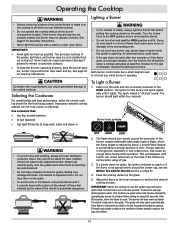
... correct cooking utensil for cleaning instructions. Use cookware that they cannot be reduced by operating the burner at least five minutes for the gas to perform the desired cooking process. Foreign material in the gas line, especially in color. If a burner does not ignite, the igniter continues to spark or if the flame is distorted by a draft or by Dacor 's Smart Flame feature. Each burner control knob has a small diagram next...
... correct cooking utensil for cleaning instructions. Use cookware that they cannot be reduced by operating the burner at least five minutes for the gas to perform the desired cooking process. Foreign material in the gas line, especially in color. If a burner does not ignite, the igniter continues to spark or if the flame is distorted by a draft or by Dacor 's Smart Flame feature. Each burner control knob has a small diagram next...
Use & Care Manuals
Page 25
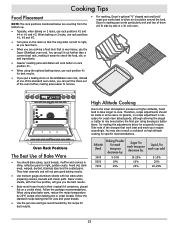
... baking on 3 racks, use the Dacor GlideRack oven rack. You may also consult a cookbook on rack position #1. • When using glass bake ware, reduce the recipe temperature by : 5-10% 10% 10-25% 10% 25% 20% Liquid, for successful recipes. Dacor's roasting pan works particularly well and two of the changes that is necessary for specific recommendations. In general, no recipe adjustment is very heavy, use rack positions #1, #3 and #5. • Turn pans on...
... baking on 3 racks, use the Dacor GlideRack oven rack. You may also consult a cookbook on rack position #1. • When using glass bake ware, reduce the recipe temperature by : 5-10% 10% 10-25% 10% 25% 20% Liquid, for successful recipes. Dacor's roasting pan works particularly well and two of the changes that is necessary for specific recommendations. In general, no recipe adjustment is very heavy, use rack positions #1, #3 and #5. • Turn pans on...
Use & Care Manuals
Page 26
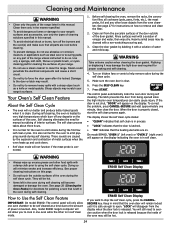
...; It is left in the oven during the self clean cycle. Heavily soiled areas may still be cleaned with a non-scratching scouring pad. 3. Turn on the display indicating the oven is connected. 1. How to Use the Self Clean Feature IMPORTANT: On model ER48D: The control panel will still need for manual scrubbing of interior surfaces. Make sure the oven door is clean. To correct the problem, press CANCEL-SECURE and wait approximately...
...; It is left in the oven during the self clean cycle. Heavily soiled areas may still be cleaned with a non-scratching scouring pad. 3. Turn on the display indicating the oven is connected. 1. How to Use the Self Clean Feature IMPORTANT: On model ER48D: The control panel will still need for manual scrubbing of interior surfaces. Make sure the oven door is clean. To correct the problem, press CANCEL-SECURE and wait approximately...
Use & Care Manuals
Page 27
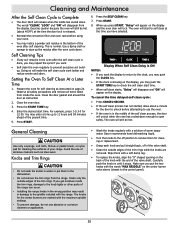
... cleaning the surfaces of the oven after self cleaning. Observe all safety precautions and remove all items listed from the display. For example, press 1-2-3-0 for cleaning or replacement. • Grasp each knob and pull straight back, off position to check the self clean start time. Avoid the use abrasive or corrosive cleaners or applicators. • Wash the knobs regularly with the range. Dacor recommends hand dishwashing liquid. • Turn the knobs...
... cleaning the surfaces of the oven after self cleaning. Observe all safety precautions and remove all items listed from the display. For example, press 1-2-3-0 for cleaning or replacement. • Grasp each knob and pull straight back, off position to check the self clean start time. Avoid the use abrasive or corrosive cleaners or applicators. • Wash the knobs regularly with the range. Dacor recommends hand dishwashing liquid. • Turn the knobs...
Use & Care Manuals
Page 33
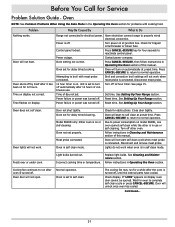
... heat. Oven set to self clean. Turn off other is turned off . Light bulbs burned out. Follow instructions in Cleaning and Maintenance section of continuous use or self cleaning. oven is in use . If "LOCK" appears on at junction box. Before You Call for problems with meat probe connected. Power failure or power was turned off . Reset time. Door not shut tightly. Model ER48D only: Other oven is set for tripped circuit breaker or blown fuse. Follow instructions in Operating the Oven section. Oven will not open. Oven door...
... heat. Oven set to self clean. Turn off other is turned off . Light bulbs burned out. Follow instructions in Cleaning and Maintenance section of continuous use or self cleaning. oven is in use . If "LOCK" appears on at junction box. Before You Call for problems with meat probe connected. Power failure or power was turned off . Reset time. Door not shut tightly. Model ER48D only: Other oven is set for tripped circuit breaker or blown fuse. Follow instructions in Operating the Oven section. Oven will not open. Oven door...


