
Installation Instructions
Page 2
... Power Supply Requirements 4 Gas Supply Requirements 4 Cabinet Layout 5 Gas and Electrical Locations 6 Installation Instructions 6 Verifying the Package Contents 6 Parts List 6 Backguard Kit Installation 7 Self-Rimming Trim Installation 7 Adjust the Range Height 8 Install the Anti-Tip Bracket 9 Door Removal 9 Gas Connection 10 Moving the Range to Final Location 11 Re-Installing the Door 11 Cooktop Assembly 12 Verifying Proper Operation 13 Installation Checklist 13 Wiring Diagram 14 Notes 15 IMPORTANT: • Installer: In the interest of safety and to minimize problems...
... Power Supply Requirements 4 Gas Supply Requirements 4 Cabinet Layout 5 Gas and Electrical Locations 6 Installation Instructions 6 Verifying the Package Contents 6 Parts List 6 Backguard Kit Installation 7 Self-Rimming Trim Installation 7 Adjust the Range Height 8 Install the Anti-Tip Bracket 9 Door Removal 9 Gas Connection 10 Moving the Range to Final Location 11 Re-Installing the Door 11 Cooktop Assembly 12 Verifying Proper Operation 13 Installation Checklist 13 Wiring Diagram 14 Notes 15 IMPORTANT: • Installer: In the interest of safety and to minimize problems...
Installation Instructions
Page 3
... easily climb inside. • Cut the prongs off the power cable plug and discard them. • Cut the power cable off the burner. NEVER cover any slots, holes or passages on the list of California to cause cancer or reproductive harm. SMOTHER FLAMES with a close-fitting lid, cookie sheet or metal tray, then turn off and discard it started. ◊ The fire...
... easily climb inside. • Cut the prongs off the power cable plug and discard them. • Cut the power cable off the burner. NEVER cover any slots, holes or passages on the list of California to cause cancer or reproductive harm. SMOTHER FLAMES with a close-fitting lid, cookie sheet or metal tray, then turn off and discard it started. ◊ The fire...
Installation Instructions
Page 4
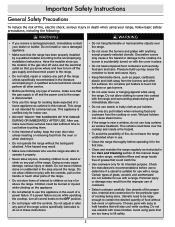
... Instructions General Safety Precautions To reduce the risk of the oven are dry before lighting a burner. • Turn the knobs to the OFF position prior to removing them from breakage caused by a qualified installer according to these installation instructions prior to children on the handle, or touch other parts of service or installation, make sure that the gas supply to the range. • Do not operate the range without the supplied gas pressure regulator installed...
... Instructions General Safety Precautions To reduce the risk of the oven are dry before lighting a burner. • Turn the knobs to the OFF position prior to removing them from breakage caused by a qualified installer according to these installation instructions prior to children on the handle, or touch other parts of service or installation, make sure that the gas supply to the range. • Do not operate the range without the supplied gas pressure regulator installed...
Installation Instructions
Page 6
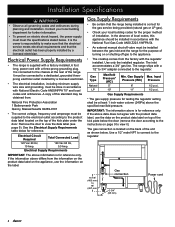
... the instructions on top of the range. It must meet the specifications stated below . If the information above the specified manifold pressure. Use a 1/2" male NPT to connect to the regulator. 15 7/8" (403 mm) to view the data label (see page 9). Electrical Power Supply Requirements • The range is connected to the regulator. Gas Type Natural LP Manifold Pressure* (WC) 5" 10" Min. Remove the door to 18" (457 mm) Gas connection 3 3/4" (95 mm) Power cord 4 Gas Supply...
... the instructions on top of the range. It must meet the specifications stated below . If the information above the specified manifold pressure. Use a 1/2" male NPT to connect to the regulator. 15 7/8" (403 mm) to view the data label (see page 9). Electrical Power Supply Requirements • The range is connected to the regulator. Gas Type Natural LP Manifold Pressure* (WC) 5" 10" Min. Remove the door to 18" (457 mm) Gas connection 3 3/4" (95 mm) Power cord 4 Gas Supply...
Installation Instructions
Page 7
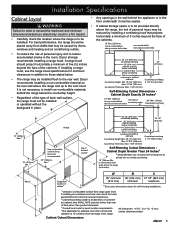
... to meet or exceed the maximum and minimum dimensions/clearances stated may result in a fire hazard. • Carefully check the location where the range is to be installed flush to the rear wall. Self-Rimming Cutout Dimensions Cabinet Depth Greater Than 24 Inches5 5 Model ER36GI only. If installing a range hood, see the range hood specifications for cabinets more than rear of the cabinets. It is not necessary to...
... to meet or exceed the maximum and minimum dimensions/clearances stated may result in a fire hazard. • Carefully check the location where the range is to be installed flush to the rear wall. Self-Rimming Cutout Dimensions Cabinet Depth Greater Than 24 Inches5 5 Model ER36GI only. If installing a range hood, see the range hood specifications for cabinets more than rear of the cabinets. It is not necessary to...

Installation Instructions
Page 8
...; 3 Self-rimming trim pieces (left, right, rear) • 2 Self-rimming side panels (left, right) • 13 #8 x 1/4 Torx screws See the use and care manual for service while the appliance remains connected. • Both the gas supply piping and shut-off valve and the electrical outlet must be located so they do not proceed with the installation. The customer must report cosmetic issues immediately to the electrical outlet, when the range...
...; 3 Self-rimming trim pieces (left, right, rear) • 2 Self-rimming side panels (left, right) • 13 #8 x 1/4 Torx screws See the use and care manual for service while the appliance remains connected. • Both the gas supply piping and shut-off valve and the electrical outlet must be located so they do not proceed with the installation. The customer must report cosmetic issues immediately to the electrical outlet, when the range...

Installation Instructions
Page 12
... leaks using a "OFF" soap and water solution or an electronic symbol on the range. Consult your gas supply. 1) Make sure the gas supply valve is not compatible with the type of the range. 4) Turn all cooktop control valves to the "OFF" position. 5) Turn on the stub out. knob 6) Turn the gas supply off. 1/2" male NPT connection Anti-tip foot 1/16" off at the factory for the type of the model number. IMPORTANT: The installed gas pressure regulator...
... leaks using a "OFF" soap and water solution or an electronic symbol on the range. Consult your gas supply. 1) Make sure the gas supply valve is not compatible with the type of the range. 4) Turn all cooktop control valves to the "OFF" position. 5) Turn on the stub out. knob 6) Turn the gas supply off. 1/2" male NPT connection Anti-tip foot 1/16" off at the factory for the type of the model number. IMPORTANT: The installed gas pressure regulator...

Installation Instructions
Page 14
... set the grates on bottom of caps must surround top of the spill tray. Line up ridge on bottom of cap with pins on center of each ring over the igniter. Installation Instructions Cooktop Assembly WARNING Never attempt to make sure it is centered on burner base Dual Burner Assembly (left front and right front burner only) Standard Burner Assembly (left rear...
... set the grates on bottom of caps must surround top of the spill tray. Line up ridge on bottom of cap with pins on center of each ring over the igniter. Installation Instructions Cooktop Assembly WARNING Never attempt to make sure it is centered on burner base Dual Burner Assembly (left front and right front burner only) Standard Burner Assembly (left rear...

Installation Instructions
Page 15
... the gas supply for the cost of the control panel. 8) Turn on and off once a second. The knob should hear the bake burner ignite below the oven floor. Test the oven light by a faulty installation. Within 60 seconds you should light when in the "ON" position. Make sure the power cord is connected. 2) Make sure the gas supply valve is open , turn off heat. 11) Turn the oven knob to these instructions? Have all packaging materials been removed...
... the gas supply for the cost of the control panel. 8) Turn on and off once a second. The knob should hear the bake burner ignite below the oven floor. Test the oven light by a faulty installation. Within 60 seconds you should light when in the "ON" position. Make sure the power cord is connected. 2) Make sure the gas supply valve is open , turn off heat. 11) Turn the oven knob to these instructions? Have all packaging materials been removed...
Use & Care Manuals
Page 3
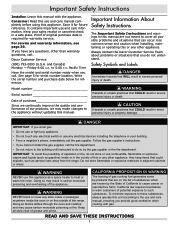
... make changes to the use and care manual completely before using this appliance. To minimize exposure to these substances, always operate this unit according to the appliance without updating this manual. Consumer: Read this use and care manual, ensuring you call : Dacor Customer Service (800) 793-0093 (U.S.A. Proof of potential exposure to warn customers of original purchase date is required for future reference. Pacific Time Have the model and serial number...
... make changes to the use and care manual completely before using this appliance. To minimize exposure to these substances, always operate this unit according to the appliance without updating this manual. Consumer: Read this use and care manual, ensuring you call : Dacor Customer Service (800) 793-0093 (U.S.A. Proof of potential exposure to warn customers of original purchase date is required for future reference. Pacific Time Have the model and serial number...
Use & Care Manuals
Page 4
... death when using the range. Do not adjust or alter any part of safety, keep the oven door shut unless inserting or removing food from the burners and other hot surfaces. The curtains could catch fire. • Use cookware only for use a damaged appliance. • Make sure that are too heavy to the accompanying installation instructions. Choose pans with easy to hold handles that the gas supply is certified...
... death when using the range. Do not adjust or alter any part of safety, keep the oven door shut unless inserting or removing food from the burners and other hot surfaces. The curtains could catch fire. • Use cookware only for use a damaged appliance. • Make sure that are too heavy to the accompanying installation instructions. Choose pans with easy to hold handles that the gas supply is certified...

Use & Care Manuals
Page 5
... lighting a burner. • Turn the knobs to the OFF position prior to removing them from the power cord. ◊ Use an adapter plug. ◊ Use an extension cord. ◊ Use a power cord that all the cooktop parts are exposed. • Do not allow acids (citrus juices, tomato sauces, etc.) to remain on a hot cooktop or oven. SMOTHER FLAMES with a dedicated, grounded three-prong electrical outlet by high oven temperatures or mechanical shock. 3 BE CAREFUL...
... lighting a burner. • Turn the knobs to the OFF position prior to removing them from the power cord. ◊ Use an adapter plug. ◊ Use an extension cord. ◊ Use a power cord that all the cooktop parts are exposed. • Do not allow acids (citrus juices, tomato sauces, etc.) to remain on a hot cooktop or oven. SMOTHER FLAMES with a dedicated, grounded three-prong electrical outlet by high oven temperatures or mechanical shock. 3 BE CAREFUL...
Use & Care Manuals
Page 6
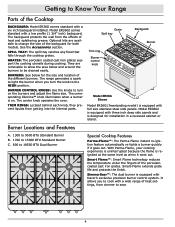
... knob to turn on . Model ER36GI comes standard with full size stainless steel side panels. The backguard protects the wall from getting into the internal parts. The range generates a spark to light the burner when you to cook with a six inch backguard installed. Smart Flame™: Smart Flame technology reduces the temperature under the fingers of heat settings, from simmer to 18500 BTU Dual Burner Special Cooktop Features Perma-Flame™: The Perma-Flame instant re-ignition feature automatically re-lights a burner...
... knob to turn on . Model ER36GI comes standard with full size stainless steel side panels. The backguard protects the wall from getting into the internal parts. The range generates a spark to light the burner when you to cook with a six inch backguard installed. Smart Flame™: Smart Flame technology reduces the temperature under the fingers of heat settings, from simmer to 18500 BTU Dual Burner Special Cooktop Features Perma-Flame™: The Perma-Flame instant re-ignition feature automatically re-lights a burner...

Use & Care Manuals
Page 7
... Your Range Parts of the Oven Oven Control Knob Oven ON Indicator Light IR broil burner igniter Rack support Temperature probe Oven rack Model and serial number label (view through the oven chamber during broil operation. NOTE: When the power plug is the source of the control panel. The rack positions are 12 Vac, 20 Watt, halogen. 5 An optional GlideRack™ oven rack is used to control both the bake and broil burners. DOOR GASKET: The door gasket prevents heat from one food to time during the convection cooking process. The bulbs are numbered from time...
... Your Range Parts of the Oven Oven Control Knob Oven ON Indicator Light IR broil burner igniter Rack support Temperature probe Oven rack Model and serial number label (view through the oven chamber during broil operation. NOTE: When the power plug is the source of the control panel. The rack positions are 12 Vac, 20 Watt, halogen. 5 An optional GlideRack™ oven rack is used to control both the bake and broil burners. DOOR GASKET: The door gasket prevents heat from one food to time during the convection cooking process. The bulbs are numbered from time...

Use & Care Manuals
Page 12
... protection circuit, requiring a service call to reset it to cool for single rack baking. ™™ Convection Bake The convection bake process uses the standard bake burner in combination with the oven door completely shut. • After turning the oven knob to turn the oven off every few seconds, because the set temperature. caution Broiling is normal. Do not turn the CONVECTION FAN switch on the control panel to the Bake instructions above. 2. Do not use your oven to cook in the broil modes for long...
... protection circuit, requiring a service call to reset it to cool for single rack baking. ™™ Convection Bake The convection bake process uses the standard bake burner in combination with the oven door completely shut. • After turning the oven knob to turn the oven off every few seconds, because the set temperature. caution Broiling is normal. Do not turn the CONVECTION FAN switch on the control panel to the Bake instructions above. 2. Do not use your oven to cook in the broil modes for long...
Use & Care Manuals
Page 13
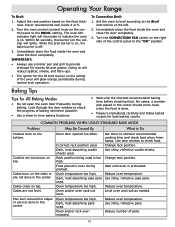
... the BROIL setting. Within 60 seconds, the burner (on the control panel to indicate the oven is off. 3. Baking Tips Tips for best baking results. Oven door opened too often. Cakes burn on the ceiling of baking whenever possible. • Use a timer to time baking functions. • Wait until oven is done. • Measure ingredients carefully and follow tested recipes for All Baking Modes • Do not open the oven door frequently during preheat. used . Level oven and rack as needed. To Convection Broil...
... the BROIL setting. Within 60 seconds, the burner (on the control panel to indicate the oven is off. 3. Baking Tips Tips for best baking results. Oven door opened too often. Cakes burn on the ceiling of baking whenever possible. • Use a timer to time baking functions. • Wait until oven is done. • Measure ingredients carefully and follow tested recipes for All Baking Modes • Do not open the oven door frequently during preheat. used . Level oven and rack as needed. To Convection Broil...

Use & Care Manuals
Page 17
..., wire or needle. Re-connect the power cord and test the burners after drying, call your local Dacor authorized service agent. After disassembling the burners, check for any dirt or grime deposited on the burner parts or igniter. If the unit still exhibits problems after reassembling them . 4. A firm toothbrush is ideal for detailed instructions). Be careful not to clean the igniters. If the flame is completely dry. Use care...
..., wire or needle. Re-connect the power cord and test the burners after drying, call your local Dacor authorized service agent. After disassembling the burners, check for any dirt or grime deposited on the burner parts or igniter. If the unit still exhibits problems after reassembling them . 4. A firm toothbrush is ideal for detailed instructions). Be careful not to clean the igniters. If the flame is completely dry. Use care...

Use & Care Manuals
Page 18
... power and turn the knobs to the off of the valve shaft. Clean the outside surface of mild detergent and hot water. To replace the knobs, align the "D-shaped" opening on the valve stem that is at a 45˚ angle to the side of heat. Use a mild glass cleaner to reorder). Rotate the front of the rack towards the wall of the trim rings while the knobs...
... power and turn the knobs to the off of the valve shaft. Clean the outside surface of mild detergent and hot water. To replace the knobs, align the "D-shaped" opening on the valve stem that is at a 45˚ angle to the side of heat. Use a mild glass cleaner to reorder). Rotate the front of the rack towards the wall of the trim rings while the knobs...

Use & Care Manuals
Page 20
Range not connected to Care and Cleaning section. No flame. Burner goes out at circuit breaker or fuse box for electrical outlet range is connected to. Flame is not installed or faulty. Burner parts are dirty or clogged. Gas regulator is distorted, yellow or very large. Wet or dirty igniter. Burner parts wet or dirty. Have a qualified service technician check to low. Clean and dry according to electri- Normal operation. Power outage. Gas is cal power. Burner parts are...
Range not connected to Care and Cleaning section. No flame. Burner goes out at circuit breaker or fuse box for electrical outlet range is connected to. Flame is not installed or faulty. Burner parts are dirty or clogged. Gas regulator is distorted, yellow or very large. Wet or dirty igniter. Burner parts wet or dirty. Have a qualified service technician check to low. Clean and dry according to electri- Normal operation. Power outage. Gas is cal power. Burner parts are...

Use & Care Manuals
Page 21
... oven is burned out. on oven door window Incorrect cooking time, temp. Make sure the gas supply valve is normal for condensation to appear on . Adjust time, temperature or rack position. During cold weather it is in ," see page 7. Parts and Accessories Description Dacor Part Number Dacor Stainless Steel Cleaner A302 Halogen light bulb (12 Vac, 20 Watt) 100429 Wok ring AWR4 Cooktop griddle AG12 Cooktop grill AGRG12 Standard broil pan and broil pan grill AER30BP 1 3/4" (low profile) backguard kit...
... oven is burned out. on oven door window Incorrect cooking time, temp. Make sure the gas supply valve is normal for condensation to appear on . Adjust time, temperature or rack position. During cold weather it is in ," see page 7. Parts and Accessories Description Dacor Part Number Dacor Stainless Steel Cleaner A302 Halogen light bulb (12 Vac, 20 Watt) 100429 Wok ring AWR4 Cooktop griddle AG12 Cooktop grill AGRG12 Standard broil pan and broil pan grill AER30BP 1 3/4" (low profile) backguard kit...


