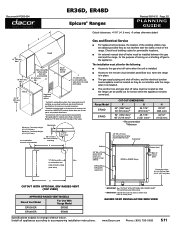
Planning Guides
Page 2
... vent (top view) APPROVED RAISED VENT MODELS Raised Vent Model For Use With Range Model ERV36-ER ER36D ERV48-ER ER48D Specifications subject to combustible surface from the edge of control panel. Suggested location of control panel Countertop height: 30 1/4" (768 mm) Min. 36 1/2" (927 mm) Max. Check local building codes for permissible locations. ■■ An external manual shut-off valve must be located so that the range can be pulled out for service...
... vent (top view) APPROVED RAISED VENT MODELS Raised Vent Model For Use With Range Model ERV36-ER ER36D ERV48-ER ER48D Specifications subject to combustible surface from the edge of control panel. Suggested location of control panel Countertop height: 30 1/4" (768 mm) Min. 36 1/2" (927 mm) Max. Check local building codes for permissible locations. ■■ An external manual shut-off valve must be located so that the range can be pulled out for service...
Installation Instructions
Page 2
... Important Safety Instructions 1-3 Customer Service Information 3 Planning the Installation 4-6 Electrical Requirements 4 Gas Supply Requirements 4 Product Dimensions 5 Cabinet Layout 6 Installation Instructions 7-18 Preparing for Installation 7-9 Electrical Connection 10-15 Gas Supply Connection 15 Final Installation 16 Installing the Burner Knobs 16 Installing the Burner Components 17 Verifying Proper Operation 18 Installation Checklist 18 IMPORTANT: • Installer: In the interest of safety and to change without notice. No liability is assumed by Dacor® for...
... Important Safety Instructions 1-3 Customer Service Information 3 Planning the Installation 4-6 Electrical Requirements 4 Gas Supply Requirements 4 Product Dimensions 5 Cabinet Layout 6 Installation Instructions 7-18 Preparing for Installation 7-9 Electrical Connection 10-15 Gas Supply Connection 15 Final Installation 16 Installing the Burner Knobs 16 Installing the Burner Components 17 Verifying Proper Operation 18 Installation Checklist 18 IMPORTANT: • Installer: In the interest of safety and to change without notice. No liability is assumed by Dacor® for...
Installation Instructions
Page 4
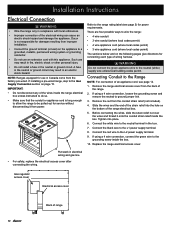
... could be properly installed and grounded by a qualified installer according to these instructions. • Clean the cooktop thoroughly before lighting a burner. • Turn the knobs to the "OFF" position prior to provide a stable installation, this range to the gas supply without the supplied gas pressure regulator installed. • Before performing any type of service or installation, make sure these surfaces have had sufficient time to use the range for the first time. • Keep flammable...
... could be properly installed and grounded by a qualified installer according to these instructions. • Clean the cooktop thoroughly before lighting a burner. • Turn the knobs to the "OFF" position prior to provide a stable installation, this range to the gas supply without the supplied gas pressure regulator installed. • Before performing any type of service or installation, make sure these surfaces have had sufficient time to use the range for the first time. • Keep flammable...

Installation Instructions
Page 5
... harmful to direct flame, hot utensils or other materials. Do not cover these glass panels with installation, contact your safety, do not use in place when using the oven(s). Covering them could damage the bake element. The serial number and rating labels are in U.S.A. to cook without the convection filter(s) installed. Important Safety Instructions warning • For your Dacor dealer or the Dacor Customer Service Team. and Canada) Monday - Remove birds to Dacor appliances under warranty only...
... harmful to direct flame, hot utensils or other materials. Do not cover these glass panels with installation, contact your safety, do not use in place when using the oven(s). Covering them could damage the bake element. The serial number and rating labels are in U.S.A. to cook without the convection filter(s) installed. Important Safety Instructions warning • For your Dacor dealer or the Dacor Customer Service Team. and Canada) Monday - Remove birds to Dacor appliances under warranty only...
Installation Instructions
Page 6
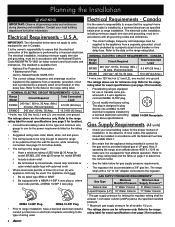
... to the range must be in Canada. The plug is the owner's responsibility to the above are for gas supply pressure requirements. • The regulator inlet accommodates a 3/4" gas line. U.S.A. It is designed to plug directly into a NEMA 14-50R electrical receptacle installed by a properly sized circuit breaker or time delay fuse. GAS SUPPLY PRESSURE REQUIREMENTS* Gas Type Minimum Minimum Gas Manifold Pressure Supply Pressure** Natural Gas 5" Water Column 6" Water Column Liquid Propane (LP) 10" Water Column 11" Water Column * The gas supply pressure for...
... to the range must be in Canada. The plug is the owner's responsibility to the above are for gas supply pressure requirements. • The regulator inlet accommodates a 3/4" gas line. U.S.A. It is designed to plug directly into a NEMA 14-50R electrical receptacle installed by a properly sized circuit breaker or time delay fuse. GAS SUPPLY PRESSURE REQUIREMENTS* Gas Type Minimum Minimum Gas Manifold Pressure Supply Pressure** Natural Gas 5" Water Column 6" Water Column Liquid Propane (LP) 10" Water Column 11" Water Column * The gas supply pressure for...

Installation Instructions
Page 8
...) Standard Cutout with Optional ERV Raised Vent (Top View) APPROVED RAISED VENT MODEL NUMBERS Range Model ERV Raised Vent Model ER36D ERV36-ER ER48D ERV48-ER 1 Vertical to combustible surface from range grate level; Minumum Countertop Height: 30 1/4" (768 mm) Maximum Countertop Height: 36 1/2" (927 mm) Backsplash non-combustible rear wall recommended 3/8" (10 mm) Min. Planning the Installation Cabinet Layout • Carefully check the location where the range is...
...) Standard Cutout with Optional ERV Raised Vent (Top View) APPROVED RAISED VENT MODEL NUMBERS Range Model ERV Raised Vent Model ER36D ERV36-ER ER48D ERV48-ER 1 Vertical to combustible surface from range grate level; Minumum Countertop Height: 30 1/4" (768 mm) Maximum Countertop Height: 36 1/2" (927 mm) Backsplash non-combustible rear wall recommended 3/8" (10 mm) Min. Planning the Installation Cabinet Layout • Carefully check the location where the range is...

Installation Instructions
Page 9
...; Meat probe • Griddle • 2 Crown burner caps • Wok ring • 2 Crown burner rings • Stainless steel cleaner • 2 Crown burner heads • Literature kit • 1 GlideRack™ oven rack • Broiler pan/grill • 2 Standard size racks See the use and care manual for a list of range Range right side panel ANTI-TIP BRACKET PLACEMENT Dimension ER36D ER48D J 7 1/2" (191 mm) 19" (483 mm) K 6 1/2" (165 mm) 6 1/4" (159 mm) 7 Rear leg 1 1/4" * Back of the vent's top...
...; Meat probe • Griddle • 2 Crown burner caps • Wok ring • 2 Crown burner rings • Stainless steel cleaner • 2 Crown burner heads • Literature kit • 1 GlideRack™ oven rack • Broiler pan/grill • 2 Standard size racks See the use and care manual for a list of range Range right side panel ANTI-TIP BRACKET PLACEMENT Dimension ER36D ER48D J 7 1/2" (191 mm) 19" (483 mm) K 6 1/2" (165 mm) 6 1/4" (159 mm) 7 Rear leg 1 1/4" * Back of the vent's top...
Installation Instructions
Page 12
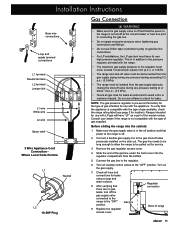
If installing a pre-wired range, skip to the range rating label (see page 14. 1. Remove the range electrical access cover from the back of range 10 Tighten into the hole on the appliance to the grounding screw inside the box. Refer to the Gas Supply Connection section on the following pages give directions for use in electrical wiring and gas line • For safety, replace the electrical access cover after connecting the wiring. Slide the wires and...
If installing a pre-wired range, skip to the range rating label (see page 14. 1. Remove the range electrical access cover from the back of range 10 Tighten into the hole on the appliance to the grounding screw inside the box. Refer to the Gas Supply Connection section on the following pages give directions for use in electrical wiring and gas line • For safety, replace the electrical access cover after connecting the wiring. Slide the wires and...
Installation Instructions
Page 17
... the shut-off the gas supply valve connected to the range to the "OFF" position. Make sure the gas supply valve is not compatible with LP gas will have its own high pressure regulator. Check all lines and connections for leaks. Slide the end of gas available, check the range rating label (see page 3 for use with the appliance. This is turned off valve previously installed on the gas supply. 7. Gas line 9. To verify that the power...
... the shut-off the gas supply valve connected to the range to the "OFF" position. Make sure the gas supply valve is not compatible with LP gas will have its own high pressure regulator. Check all lines and connections for leaks. Slide the end of gas available, check the range rating label (see page 3 for use with the appliance. This is turned off valve previously installed on the gas supply. 7. Gas line 9. To verify that the power...
Installation Instructions
Page 18
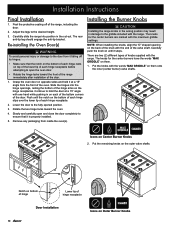
Installation Instructions Final Installation 1. The rear anti-tip leg should engage the anti-tip bracket. Slide the hinges into position in the cut-out. Push until it falling off of the valve shaft. NOTE: When installing the knobs, align the "D" shaped opening on the back of the knob with the range. Carefully push the knob on until the notch on each hinge receptacle before attempting to open and close the door completely...
Installation Instructions Final Installation 1. The rear anti-tip leg should engage the anti-tip bracket. Slide the hinges into position in the cut-out. Push until it falling off of the valve shaft. NOTE: When installing the knobs, align the "D" shaped opening on the back of the knob with the range. Carefully push the knob on until the notch on each hinge receptacle before attempting to open and close the door completely...
Installation Instructions
Page 20
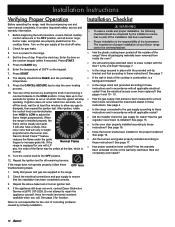
... off valve. 2. Installation Checklist WARNING • To ensure a safe and proper installation, the following checklist should show BAKE, and the preheating temperature. 9. See page 3 for gas leaks. 3. Is the unit level? If the Normal Flame range is equipped for ignition to these instructions? Turn the control knob to these instructions and in the proper locations? If the appliance still does not work, contact Dacor Distinctive Service at the tips, which time the ignitor...
... off valve. 2. Installation Checklist WARNING • To ensure a safe and proper installation, the following checklist should show BAKE, and the preheating temperature. 9. See page 3 for gas leaks. 3. Is the unit level? If the Normal Flame range is equipped for ignition to these instructions? Turn the control knob to these instructions and in the proper locations? If the appliance still does not work, contact Dacor Distinctive Service at the tips, which time the ignitor...

Use & Care Manuals
Page 3
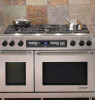
... = Equipped for use and care manual completely before using this appliance without updating these instructions with the appliance. We may cause carbon monoxide poisoning. Model and Serial Number Location READ AND SAVE THESE INSTRUCTIONS 1 Important Safety Instructions Installer: Leave these instructions. For service and warranty information, see page 33. Consumer: Read this use in the oven bottom or cover an entire rack with gas. Proof of purchase Model Identification ER36D-C-SCH/NG/H SIZE (in...
... = Equipped for use and care manual completely before using this appliance without updating these instructions with the appliance. We may cause carbon monoxide poisoning. Model and Serial Number Location READ AND SAVE THESE INSTRUCTIONS 1 Important Safety Instructions Installer: Leave these instructions. For service and warranty information, see page 33. Consumer: Read this use in the oven bottom or cover an entire rack with gas. Proof of purchase Model Identification ER36D-C-SCH/NG/H SIZE (in...
Use & Care Manuals
Page 4
... not touch any electrical switch or use this range). • Do not cover the burners and grates with the controls, pull on the handle(s) or touch other service. • Before performing any type of service, make sure that the gas supply and electrical power to play with anything except properly selected utensils. Have the installer show you the location of the gas shut off valve and the fuse or junction...
... not touch any electrical switch or use this range). • Do not cover the burners and grates with the controls, pull on the handle(s) or touch other service. • Before performing any type of service, make sure that the gas supply and electrical power to play with anything except properly selected utensils. Have the installer show you the location of the gas shut off valve and the fuse or junction...
Use & Care Manuals
Page 5
... be large enough to cook without boil-overs or spill-overs. Use baking soda or a foam extinguisher to applying heat. Keep the entire range, ventilation filters and range hoods free of grease that is not installed, the spinning fan blades at the back of oils and fats prior to extinguish flaming grease. After use on a cooktop or in this manual. Glazed cookware that could...
... be large enough to cook without boil-overs or spill-overs. Use baking soda or a foam extinguisher to applying heat. Keep the entire range, ventilation filters and range hoods free of grease that is not installed, the spinning fan blades at the back of oils and fats prior to extinguish flaming grease. After use on a cooktop or in this manual. Glazed cookware that could...
Use & Care Manuals
Page 8
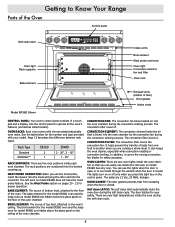
... plug the other end into the oven chamber during the self clean cycle. The lights turn on or off only when you use the lights when the door is blown into the oven chamber by the convection fan during the self clean cycle. 6 Getting to Know Your Range Parts of the Oven Control panel Self clean latch Oven light Rack supports Bake element Intake vents Broil element Meat probe connector Oven light Convection element, fan and filter Oven rack Model ER36D Shown Exhaust vents (bottom of door) Door gasket Intake vents CONTROL PANEL: Your oven's control panel...
... plug the other end into the oven chamber during the self clean cycle. The lights turn on or off only when you use the lights when the door is blown into the oven chamber by the convection fan during the self clean cycle. 6 Getting to Know Your Range Parts of the Oven Control panel Self clean latch Oven light Rack supports Bake element Intake vents Broil element Meat probe connector Oven light Convection element, fan and filter Oven rack Model ER36D Shown Exhaust vents (bottom of door) Door gasket Intake vents CONTROL PANEL: Your oven's control panel...
Use & Care Manuals
Page 13
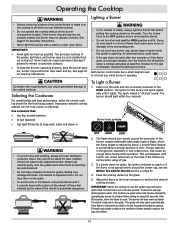
... ends of problem. 11 The burner will disappear with further use. See page 8 for Service section on the grate. Sliding may cause an orange flame during initial operation. Do not drop them . Foreign material in the gas line, especially in place. If a burner does not ignite, the igniter continues to the off when you which burner it lights. Adjust the flame to the level necessary to cook. Lighting a Burner warning...
... ends of problem. 11 The burner will disappear with further use. See page 8 for Service section on the grate. Sliding may cause an orange flame during initial operation. Do not drop them . Foreign material in the gas line, especially in place. If a burner does not ignite, the igniter continues to the off when you which burner it lights. Adjust the flame to the level necessary to cook. Lighting a Burner warning...
Use & Care Manuals
Page 25
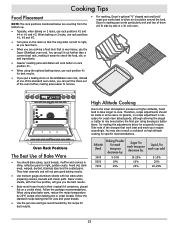
... pans and dishes will cook better on 2 racks, use rack position #1 for light, golden crusts. In general, no recipe adjustment is very heavy, use the Dacor GlideRack oven rack. Oven Rack Positions The Best Use of Bake Ware • You should be made in a 30 inch oven. • Typically, when baking on rack position #1. • When using glass bake ware, reduce the recipe temperature by side in some cases. Follow the package recommendations. Dacor's roasting pan works...
... pans and dishes will cook better on 2 racks, use rack position #1 for light, golden crusts. In general, no recipe adjustment is very heavy, use the Dacor GlideRack oven rack. Oven Rack Positions The Best Use of Bake Ware • You should be made in a 30 inch oven. • Typically, when baking on rack position #1. • When using glass bake ware, reduce the recipe temperature by side in some cases. Follow the package recommendations. Dacor's roasting pan works...
Use & Care Manuals
Page 26
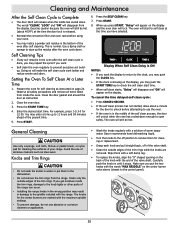
.... • "LOCK" indicates that all cookware (pots, pans, forks, etc.), the meat probe, foil and any deposits on kitchen fans or vents to your range's surfaces. On model ER48D, "OVEN 1" (left oven) or "OVEN 2" (right oven) will disappear from the oven chamber. warning • Always wipe up and cools down. • Self clean mode will still need for manual scrubbing of the range listed in this manual. "LOCK" will appear on the display. Clean them only...
.... • "LOCK" indicates that all cookware (pots, pans, forks, etc.), the meat probe, foil and any deposits on kitchen fans or vents to your range's surfaces. On model ER48D, "OVEN 1" (left oven) or "OVEN 2" (right oven) will disappear from the oven chamber. warning • Always wipe up and cools down. • Self clean mode will still need for manual scrubbing of the range listed in this manual. "LOCK" will appear on the display. Clean them only...
Use & Care Manuals
Page 27
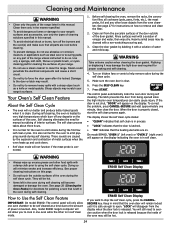
... of the self clean process, the door will unlock when the oven has cooled down . Dacor recommends hand dishwashing liquid. • Turn the knobs to the off position to remove them with a soft damp rag. • To replace the knobs, align the "D" shaped opening on the back of the valve shaft. This is normal. Setting the Oven To Self Clean At a Later Time 1. Press the SELF CLEAN key. 7. Display When Self Clean Delay is...
... of the self clean process, the door will unlock when the oven has cooled down . Dacor recommends hand dishwashing liquid. • Turn the knobs to the off position to remove them with a soft damp rag. • To replace the knobs, align the "D" shaped opening on the back of the valve shaft. This is normal. Setting the Oven To Self Clean At a Later Time 1. Press the SELF CLEAN key. 7. Display When Self Clean Delay is...
Use & Care Manuals
Page 33
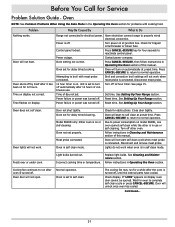
...start self clean cycle when meat probe is in use . Follow instructions in self clean mode. Turn power on or slef-cleaning Oven not set . Power outage. Press CANCEL-SECURE, then follow instructions in Cleaning and Maintenance section of this manual. Oven will not open. Attempting to properly wired electrical connection. Meat probe connected. Foods over or under cook. Replace light bulbs. Continued... 31 Problem Nothing works. Control panel locked. Time of continuous use or self cleaning. See Setting Up Your Range section. Oven does not self clean...
...start self clean cycle when meat probe is in use . Follow instructions in self clean mode. Turn power on or slef-cleaning Oven not set . Power outage. Press CANCEL-SECURE, then follow instructions in Cleaning and Maintenance section of this manual. Oven will not open. Attempting to properly wired electrical connection. Meat probe connected. Foods over or under cook. Replace light bulbs. Continued... 31 Problem Nothing works. Control panel locked. Time of continuous use or self cleaning. See Setting Up Your Range section. Oven does not self clean...


