Planning Guides
Page 1
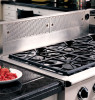
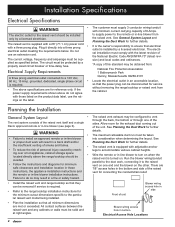
...) Top cap with the accompanying installation instructions. Specifications subject to 120 Vac, 60 Hz, 15 Amp. Contact your local building department for external blower NOTES: 1. grounded, dedicated, circuit * Includes power supply requirements for further information. • This appliance must not exceed the maximum specified countertop height of unit Product data label 28" 3 prong grounded power cord Dimensions Side View Adjustable anchor legs Dimensions Front View Model No...
...) Top cap with the accompanying installation instructions. Specifications subject to 120 Vac, 60 Hz, 15 Amp. Contact your local building department for external blower NOTES: 1. grounded, dedicated, circuit * Includes power supply requirements for further information. • This appliance must not exceed the maximum specified countertop height of unit Product data label 28" 3 prong grounded power cord Dimensions Side View Adjustable anchor legs Dimensions Front View Model No...

Planning Guides
Page 2
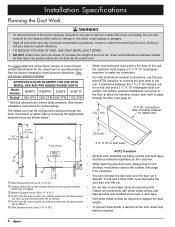
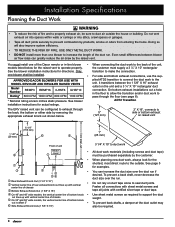
... not use flexible metal duct. The Equivalent Number of Feet for a raised vent system using 3 1/4" X 10" rectangular duct, two (2) 3 1/4" X 10" 90° elbows, a 3 1/4" X 10" rectangular to accompanying installation instructions. To determine the maximum allowable length of the duct work that can be subtracted from the hood exhaust as possible, with model and configuration. Avoid "S" or "back to the blower installation instructions. ERV/PRV30 ERV/PRV36 PRV46 ERV48 Approved Dacor Blowers* Remote blowers...
... not use flexible metal duct. The Equivalent Number of Feet for a raised vent system using 3 1/4" X 10" rectangular duct, two (2) 3 1/4" X 10" 90° elbows, a 3 1/4" X 10" rectangular to accompanying installation instructions. To determine the maximum allowable length of the duct work that can be subtracted from the hood exhaust as possible, with model and configuration. Avoid "S" or "back to the blower installation instructions. ERV/PRV30 ERV/PRV36 PRV46 ERV48 Approved Dacor Blowers* Remote blowers...

Planning Guides
Page 3
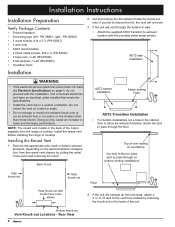
... notice. out is offset 3" Side Exhaust Knock Outs (1 5/8" X 16") 5" (127 mm) 2" X 16", connects to side or bottom exhaust on raised vent 1" (25 mm) 3 1/4" X 10" to duct work ADT2 transition (included) NOTE: See the appliance planning guide page for rEmote/in-line blower Specifications subject to accompanying installation instructions. www.Dacor.com Phone: (800) 793-0093 8.3 Document # PG08-001 ERV30, ERV36, ERV48, PRV30, PRV36, PRV46...
... notice. out is offset 3" Side Exhaust Knock Outs (1 5/8" X 16") 5" (127 mm) 2" X 16", connects to side or bottom exhaust on raised vent 1" (25 mm) 3 1/4" X 10" to duct work ADT2 transition (included) NOTE: See the appliance planning guide page for rEmote/in-line blower Specifications subject to accompanying installation instructions. www.Dacor.com Phone: (800) 793-0093 8.3 Document # PG08-001 ERV30, ERV36, ERV48, PRV30, PRV36, PRV46...
Installation Instructions
Page 2
... Specifications 4 Planning the Installation 4 Planning the Duct Work 6 Installation Instructions 8 Installation Preparation 8 Installation 8 Verifying Proper Operation 12 Installation Checklist 12 Wiring Diagram 13 Before You Begin... to minimize problems, read these installation instructions for future reference and the local electrical inspector's use. ERV36 = 36-inch wide raised vent, ERV style top cap. Leave these installation instructions with the customer. • Customer: Keep these installation instructions completely and carefully before you call the Dacor...
... Specifications 4 Planning the Installation 4 Planning the Duct Work 6 Installation Instructions 8 Installation Preparation 8 Installation 8 Verifying Proper Operation 12 Installation Checklist 12 Wiring Diagram 13 Before You Begin... to minimize problems, read these installation instructions for future reference and the local electrical inspector's use. ERV36 = 36-inch wide raised vent, ERV style top cap. Leave these installation instructions with the customer. • Customer: Keep these installation instructions completely and carefully before you call the Dacor...
Installation Instructions
Page 3
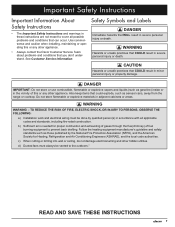
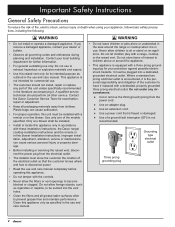
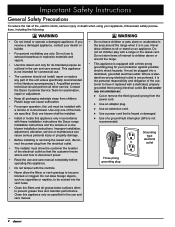
... Air Conditioning Engineers (ASHRAE), and the local code authorities. c) When cutting or drilling into wall or ceiling, do not damage electrical wiring and other appliance. • Always contact the Dacor Customer Service Team about problems and conditions that could explode, such as gasoline) inside or in the vicinity of fuel burning equipment to the outdoors." d) Ducted fans must be vented to prevent back drafting. See Customer Service...
... Air Conditioning Engineers (ASHRAE), and the local code authorities. c) When cutting or drilling into wall or ceiling, do not damage electrical wiring and other appliance. • Always contact the Dacor Customer Service Team about problems and conditions that could explode, such as gasoline) inside or in the vicinity of fuel burning equipment to the outdoors." d) Ducted fans must be vented to prevent back drafting. See Customer Service...
Installation Instructions
Page 4
... the models specified. Contact the Dacor Customer Service Team for examination, repair or adjustment. • Keep all governing codes and ordinances during planning and installation. Do not allow foreign objects, such as cigarettes or napkins, to become blocked or clogged. Never allow the filters or vent openings to be installed with these installation instructions, the Dacor range/ cooktop installation instructions and the remote or in the use and care manual. Plastic...
... the models specified. Contact the Dacor Customer Service Team for examination, repair or adjustment. • Keep all governing codes and ordinances during planning and installation. Do not allow foreign objects, such as cigarettes or napkins, to become blocked or clogged. Never allow the filters or vent openings to be installed with these installation instructions, the Dacor range/ cooktop installation instructions and the remote or in the use and care manual. Plastic...
Installation Instructions
Page 6
... minimum dimensions are for service without removing the range/cooktop or raised vent from the raised vent. Allow room for further details. See Planning the Duct Work for the exhaust duct coming out of the unit. The raised vent is required. • Refer to the range/cooktop installation instructions for the minimum cutout dimensions specific to vent through the back, the bottom or through one end and the blower on the label. Wire the remote...
... minimum dimensions are for service without removing the range/cooktop or raised vent from the raised vent. Allow room for further details. See Planning the Duct Work for the exhaust duct coming out of the unit. The raised vent is required. • Refer to the range/cooktop installation instructions for the minimum cutout dimensions specific to vent through the back, the bottom or through one end and the blower on the label. Wire the remote...

Installation Instructions
Page 7
... Notches required for some raised vent installations, see range installation instructions Notches for self-rimming style installations, see range installation instructions See the range installation instructions for rear exhaust Wiring/conduit from raised vent to remote blower Wiring/conduit from raised vent to round transition and 45° adjustable elbow Wall board Duct work between raised vent and remote blower Backsplash Cooktop Raised vent Range Floor Raised vent configured for exact countertop and cabinet dimensions Cooktop Cabinet/Countertop Cutout - Top View Range Cabinet...
... Notches required for some raised vent installations, see range installation instructions Notches for self-rimming style installations, see range installation instructions See the range installation instructions for rear exhaust Wiring/conduit from raised vent to remote blower Wiring/conduit from raised vent to round transition and 45° adjustable elbow Wall board Duct work between raised vent and remote blower Backsplash Cooktop Raised vent Range Floor Raised vent configured for exact countertop and cabinet dimensions Cooktop Cabinet/Countertop Cutout - Top View Range Cabinet...
Installation Instructions
Page 8
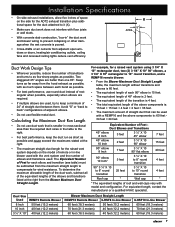
... SERIES RAISED VENTS Model Number REMP3 REMP16 ILHSF8 ILHSF10 Rating* 600 CFM 1000 CFM 600 CFM 1100 CFM • When connecting the duct work to the back of the unit, the customer must supply a 3 ¼" X 10" rectangular transition to make the connection. • For side and bottom exhaust connections, use the supplied ATD2 transition to support the duct On 30" and 36" wide models, the vertical center line of bottom knock- See blower installation instructions for directions...
... SERIES RAISED VENTS Model Number REMP3 REMP16 ILHSF8 ILHSF10 Rating* 600 CFM 1000 CFM 600 CFM 1100 CFM • When connecting the duct work to the back of the unit, the customer must supply a 3 ¼" X 10" rectangular transition to make the connection. • For side and bottom exhaust connections, use the supplied ATD2 transition to support the duct On 30" and 36" wide models, the vertical center line of bottom knock- See blower installation instructions for directions...

Installation Instructions
Page 9
... a qualified HVAC specialist. Calculating the Maximum Duct Run Length • Do not use flexible metal duct. Two staggered 45° angles are used, try to 10" round transition 4 feet Roof cap * Wall cap * * The equivalent lengths of roof and wall caps vary with model and configuration. Installation Specifications • On side exhaust installations, allow five inches of space on the model of remote or in-line blower used with the vent system and the number of elbows and transitions used.
... a qualified HVAC specialist. Calculating the Maximum Duct Run Length • Do not use flexible metal duct. Two staggered 45° angles are used, try to 10" round transition 4 feet Roof cap * Wall cap * * The equivalent lengths of roof and wall caps vary with model and configuration. Installation Specifications • On side exhaust installations, allow five inches of space on the model of remote or in-line blower used with the vent system and the number of elbows and transitions used.
Installation Instructions
Page 10
... the provided sheet metal screws. Install the raised vent before installing the range or cooktop. Top of the unit. If the unit will not work. 3. Bottom knock-out Vent Knock-out Locations - Cut and remove the foil material inside the knock-out hole. ADT2 side installation warning • If the electrical service (electrical outlet) does not meet the Electrical Specifications on bottom venting installations Side knock-out Side knock-out Rear knock...
... the provided sheet metal screws. Install the raised vent before installing the range or cooktop. Top of the unit. If the unit will not work. 3. Bottom knock-out Vent Knock-out Locations - Cut and remove the foil material inside the knock-out hole. ADT2 side installation warning • If the electrical service (electrical outlet) does not meet the Electrical Specifications on bottom venting installations Side knock-out Side knock-out Rear knock...
Installation Instructions
Page 14
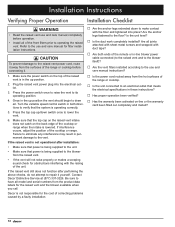
... instructions? □□ Has proper operation been verified? □□ Has the warranty been activated on the back edge of the unit. Failure to eliminate any interference may result in permanent damage to verify that meets the electrical specifications in -line blower power cable connected (to the raised vent and to the blower itself)? □□ Are the vent filters installed according to the use and care manual...
... instructions? □□ Has proper operation been verified? □□ Has the warranty been activated on the back edge of the unit. Failure to eliminate any interference may result in permanent damage to verify that meets the electrical specifications in -line blower power cable connected (to the raised vent and to the blower itself)? □□ Are the vent filters installed according to the use and care manual...

Installation Instructions
Page 2
... Product Dimensions 3 Installation Specifications 4 Electrical Specifications 4 Planning the Installation 4 Planning the Duct Work 6 Installation Instructions 8 Installation Preparation 8 Installation 8 Verifying Proper Operation 12 Installation Checklist 12 Wiring Diagram 13 Before You Begin... and Canada) Monday - Model Identification: ERV36-ER = 36-inch wide raised vent ERV48-ER = 48-inch wide raised vent Tested in accordance with the latest edition of safety and to Dacor appliances under warranty only) Phone: (877) 337-3226 (U.S.A. For repairs to minimize problems, read...
... Product Dimensions 3 Installation Specifications 4 Electrical Specifications 4 Planning the Installation 4 Planning the Duct Work 6 Installation Instructions 8 Installation Preparation 8 Installation 8 Verifying Proper Operation 12 Installation Checklist 12 Wiring Diagram 13 Before You Begin... and Canada) Monday - Model Identification: ERV36-ER = 36-inch wide raised vent ERV48-ER = 48-inch wide raised vent Tested in accordance with the latest edition of safety and to Dacor appliances under warranty only) Phone: (877) 337-3226 (U.S.A. For repairs to minimize problems, read...
Installation Instructions
Page 4
... install, repair or replace any circumstances: ♦♦ Cut or remove the third (ground) prong from the electrical outlet. • The installer must be sucked into a dedicated, grounded electrical outlet. Use only one blower shall be installed with these installation instructions the Dacor range installation instructions and the remote or in the use and care manual. Improper installation, adjustment, alteration, service or maintenance can cause suffocation. • For proper operation, this unit must be installed. • Install...
... install, repair or replace any circumstances: ♦♦ Cut or remove the third (ground) prong from the electrical outlet. • The installer must be sucked into a dedicated, grounded electrical outlet. Use only one blower shall be installed with these installation instructions the Dacor range installation instructions and the remote or in the use and care manual. Improper installation, adjustment, alteration, service or maintenance can cause suffocation. • For proper operation, this unit must be installed. • Install...
Installation Instructions
Page 8
... the customer. On bottom exhaust installations cut a hole in -line blower • When connecting the duct work , always look for actual ratings. When planning new duct work to the back of the unit, models listed below . 5" (127 mm) 2" X 16", connects to increase the length of bottom knock- • out lines up with certified silver tape or duct tape. APPROVED DACOR BLOWERS FOR USE WITH MODEL ERV36-ER AND ERV48-ER RAISED VENTS Model Number...
... the customer. On bottom exhaust installations cut a hole in -line blower • When connecting the duct work , always look for actual ratings. When planning new duct work to the back of the unit, models listed below . 5" (127 mm) 2" X 16", connects to increase the length of bottom knock- • out lines up with certified silver tape or duct tape. APPROVED DACOR BLOWERS FOR USE WITH MODEL ERV36-ER AND ERV48-ER RAISED VENTS Model Number...
Installation Instructions
Page 9
... lengths of roof and wall caps vary with a REMP16 and the above components is: 15 feet + 15 feet + 4 feet + 2 feet = 36 feet. • The maximum amount of straight duct that is poured. • Cross-drafts or air currents from the hood exhaust as possible. • For best performance, use flexible metal duct. Installation Specifications • On side exhaust installations, allow five inches of space on the model of remote...
... lengths of roof and wall caps vary with a REMP16 and the above components is: 15 feet + 15 feet + 4 feet + 2 feet = 36 feet. • The maximum amount of straight duct that is poured. • Cross-drafts or air currents from the hood exhaust as possible. • For best performance, use flexible metal duct. Installation Specifications • On side exhaust installations, allow five inches of space on the model of remote...
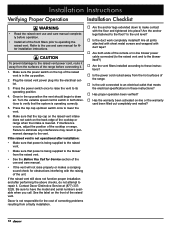
Installation Instructions
Page 14
Installation Instructions Verifying Proper Operation Installation Checklist warning • Read the raised vent use and care manual completely before connecting it . caution To prevent damage to the raised vent power cord, route it away from the hot surfaces of the range. □□ Is the unit connected to repair it . 1. Once in both ends of the remote or in permanent damage to the floor? Turn the variable speed control switch in the...
Installation Instructions Verifying Proper Operation Installation Checklist warning • Read the raised vent use and care manual completely before connecting it . caution To prevent damage to the raised vent power cord, route it away from the hot surfaces of the range. □□ Is the unit connected to repair it . 1. Once in both ends of the remote or in permanent damage to the floor? Turn the variable speed control switch in the...
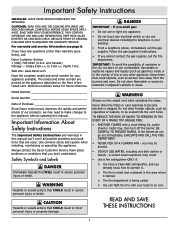
Use & Care Manuals
Page 3
... CAREFUL TO PREVENT BURNS. Pacific Time Web site: www.Dacor.com Have the complete model and serial number for future reference. Use common sense and caution when installing, maintaining or operating this manual can't cover all possible problems and conditions that WILL result in minor personal injury or property damage. Follow the gas supplier's instructions. • If you don't understand. Always contact the Dacor Customer Service...
... CAREFUL TO PREVENT BURNS. Pacific Time Web site: www.Dacor.com Have the complete model and serial number for future reference. Use common sense and caution when installing, maintaining or operating this manual can't cover all possible problems and conditions that WILL result in minor personal injury or property damage. Follow the gas supplier's instructions. • If you don't understand. Always contact the Dacor Customer Service...

Use & Care Manuals
Page 4
... service technician should not be plugged into a dedicated, grounded electrical outlet. Never allow children to accumulate on low or medium settings. ◊ Always turn hood ON when cooking at high settings. Crepes Suzette, Cherries Jubilee, Peppercorn Beef Flambe'). ◊ Clean ventilating fans frequently. Do not use and care manual. Plastic bags can cause suffocation. • Do not install, repair or replace any questions, contact Dacor. • This raised vent...
... service technician should not be plugged into a dedicated, grounded electrical outlet. Never allow children to accumulate on low or medium settings. ◊ Always turn hood ON when cooking at high settings. Crepes Suzette, Cherries Jubilee, Peppercorn Beef Flambe'). ◊ Clean ventilating fans frequently. Do not use and care manual. Plastic bags can cause suffocation. • Do not install, repair or replace any questions, contact Dacor. • This raised vent...

Use & Care Manuals
Page 5
... before operation, turn cookware handles to remove heavy spills with model number 3 The intake must complete a full up " position. • Do not set when the intake was set or rest any way. • Clean liquid spills immediately. The blower speed may be reversed while it will stop the intake motion, then disconnect the power cord. Pressing the switch shuts off the blower. Variable Speed Control Higher...
... before operation, turn cookware handles to remove heavy spills with model number 3 The intake must complete a full up " position. • Do not set when the intake was set or rest any way. • Clean liquid spills immediately. The blower speed may be reversed while it will stop the intake motion, then disconnect the power cord. Pressing the switch shuts off the blower. Variable Speed Control Higher...


