Planning Guides
Page 1
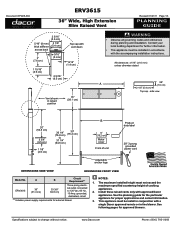
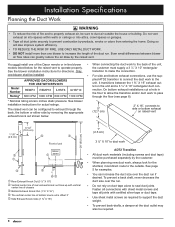
... electrical outlet connected to change without notice. grounded, dedicated, circuit ** Includes power supply requirements for approved blowers. See following pages for external blower NOTES: 1. Specifications subject to 120 Vac, 60 Hz., 15 Amp. side view 20" (50.8 cm) 3 3/4" (9.5 cm) 1 1/8" (2.9 cm) 30 1/4" (76.8 cm) 30" (76.2 cm) to 37 1/4" (94.6 cm) B 6" (15.2 cm) Motor cover Front of cooking appliances. 2. The maximum installed height must be installed in -line blower...
... electrical outlet connected to change without notice. grounded, dedicated, circuit ** Includes power supply requirements for approved blowers. See following pages for external blower NOTES: 1. Specifications subject to 120 Vac, 60 Hz., 15 Amp. side view 20" (50.8 cm) 3 3/4" (9.5 cm) 1 1/8" (2.9 cm) 30 1/4" (76.8 cm) 30" (76.2 cm) to 37 1/4" (94.6 cm) B 6" (15.2 cm) Motor cover Front of cooking appliances. 2. The maximum installed height must be installed in -line blower...
Planning Guides
Page 2
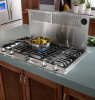
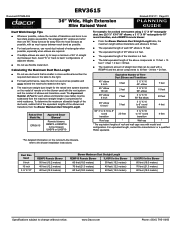
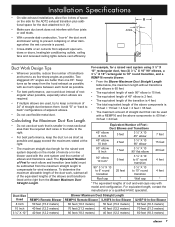
.... ERV3615 Approved Dacor Blowers* Remote blowers: REMP3 or REMP16 In-line blowers: ILHSF8 or ILHSF10 For example, for a raised vent system using 3 ¼" X 10" rectangular duct, two (2) 3 ¼" X 10" 90° elbows, a 3 ¼" X 10" rectangular to 10" round transition 4 feet Roof cap * Wall cap * * The equivalent lengths of roof and wall caps vary with as much space between them. Equivalent Number of Feet Duct Elbows and Transitions 45° elbow 8 Inch 3 feet 3 ¼" X 10 45° elbow...
.... ERV3615 Approved Dacor Blowers* Remote blowers: REMP3 or REMP16 In-line blowers: ILHSF8 or ILHSF10 For example, for a raised vent system using 3 ¼" X 10" rectangular duct, two (2) 3 ¼" X 10" 90° elbows, a 3 ¼" X 10" rectangular to 10" round transition 4 feet Roof cap * Wall cap * * The equivalent lengths of roof and wall caps vary with as much space between them. Equivalent Number of Feet Duct Elbows and Transitions 45° elbow 8 Inch 3 feet 3 ¼" X 10 45° elbow...

Planning Guides
Page 3
...;" X 16") 26" (66.0 cm) 5" (12.7 cm) 2" X 16", connects to side or bottom exhaust on raised vent 1" (2.5 cm) 3 ¼" X 10" to duct work ADT2 transition (included) NOTE: See the appliance planning guide page for cutout dimensions Front of unit Blower wiring access hole in side Blower wiring access hole in bottom Wiring/conduit connections for remote/in-line blower Specifications subject to change without notice. www.Dacor.com Phone: (800) 7938-0.6093
...;" X 16") 26" (66.0 cm) 5" (12.7 cm) 2" X 16", connects to side or bottom exhaust on raised vent 1" (2.5 cm) 3 ¼" X 10" to duct work ADT2 transition (included) NOTE: See the appliance planning guide page for cutout dimensions Front of unit Blower wiring access hole in side Blower wiring access hole in bottom Wiring/conduit connections for remote/in-line blower Specifications subject to change without notice. www.Dacor.com Phone: (800) 7938-0.6093
Installation Instructions
Page 2
... Specifications 4 Electrical Specifications 4 Planning the Installation 4 Planning the Duct Work 6 Installation Instructions 8 Installation Preparation 8 Installation 8 Verifying Proper Operation 12 Installation Checklist 12 Wiring Diagram 13 Before You Begin... The model and serial number are printed on the product data label on approved Dacor appliances. Friday 6:00 a.m. Customer Service Information If You Need Help... For repairs to Dacor appliances under warranty only) Phone: (877) 337-3226 (U.S.A. Whenever you have the model and serial number of the unit...
... Specifications 4 Electrical Specifications 4 Planning the Installation 4 Planning the Duct Work 6 Installation Instructions 8 Installation Preparation 8 Installation 8 Verifying Proper Operation 12 Installation Checklist 12 Wiring Diagram 13 Before You Begin... The model and serial number are printed on the product data label on approved Dacor appliances. Friday 6:00 a.m. Customer Service Information If You Need Help... For repairs to Dacor appliances under warranty only) Phone: (877) 337-3226 (U.S.A. Whenever you have the model and serial number of the unit...
Installation Instructions
Page 3
... Information About Safety Instructions • The Important Safety Instructions and warnings in these instructions are not meant to cover all applicable codes and standards, including fire-rated construction. c) When cutting or drilling into wall or ceiling, do not damage electrical wiring and other appliance. • Always contact the Dacor Customer Service Team about problems and conditions that can occur. b) Sufficient air is needed for Heating, Refrigeration and...
... Information About Safety Instructions • The Important Safety Instructions and warnings in these instructions are not meant to cover all applicable codes and standards, including fire-rated construction. c) When cutting or drilling into wall or ceiling, do not damage electrical wiring and other appliance. • Always contact the Dacor Customer Service Team about problems and conditions that can occur. b) Sufficient air is needed for Heating, Refrigeration and...

Installation Instructions
Page 4
... ventilating use and care manual. A qualified service technician should not install, repair or replace any circumstances: ♦♦ Cut or remove the third (ground) prong from the electrical outlet. • The installer must show the customer the location of the electrical outlet so that is frayed or damaged. ♦♦ Use of a ground fault interrupter (GFI) is equipped with the controls. • Never allow the filters or vent...
... ventilating use and care manual. A qualified service technician should not install, repair or replace any circumstances: ♦♦ Cut or remove the third (ground) prong from the electrical outlet. • The installer must show the customer the location of the electrical outlet so that is frayed or damaged. ♦♦ Use of a ground fault interrupter (GFI) is equipped with the controls. • Never allow the filters or vent...

Installation Instructions
Page 6
... codes and ordinances. Wire the remote or in-line blower to turn on when the raised vent is required. • Refer to the cooking appliance installation instructions for the minimum cutout dimensions specific to the remote or in-line blower from the cabinet. Front of 8 Amps. Plug it to a 120 Vac, 60 Hz, 15 Amp. The electrical installation must comply with those listed on . grounded, dedicated, single phase circuit is installed by a properly sized circuit...
... codes and ordinances. Wire the remote or in-line blower to turn on when the raised vent is required. • Refer to the cooking appliance installation instructions for the minimum cutout dimensions specific to the remote or in-line blower from the cabinet. Front of 8 Amps. Plug it to a 120 Vac, 60 Hz, 15 Amp. The electrical installation must comply with those listed on . grounded, dedicated, single phase circuit is installed by a properly sized circuit...

Installation Instructions
Page 7
... rear wall Notches required for some rasied vent installations, see cooktop installation instructions See the cooktop installation instructions for bottom exhaust 3 ¼" X 10" to round transition Wiring/conduit from raised vent to in-line blower Duct work Floor Wall cap on outside wall Duct work ILHSF series in-line blower Example of Layout with Cooktop and Rear Exhaust Example of Layout with back side of cabinet front Cooktop Cabinet/Countertop Cutout - Top View REMP series remote blower 3 ¼" X 10" to round transition and 45° adjustable elbow Wall board Duct work...
... rear wall Notches required for some rasied vent installations, see cooktop installation instructions See the cooktop installation instructions for bottom exhaust 3 ¼" X 10" to round transition Wiring/conduit from raised vent to in-line blower Duct work Floor Wall cap on outside wall Duct work ILHSF series in-line blower Example of Layout with Cooktop and Rear Exhaust Example of Layout with back side of cabinet front Cooktop Cabinet/Countertop Cutout - Top View REMP series remote blower 3 ¼" X 10" to round transition and 45° adjustable elbow Wall board Duct work...
Installation Instructions
Page 8
... duct connection. Model Number Rating* APPROVED DACOR BLOWERS FOR USE WITH ERV3615 REMP3 REMP16 ILHSF8 ILHSF10 600 CFM 1000 CFM 600 CFM 1100 CFM • When connecting the duct work to the back of the unit, the customer must supply a 3 ¼" X 10" rectangular transition to make the connection. • For side and bottom exhaust connections, use the supplied ATD2 transition to connect the duct work materials (including screws and duct tape) must install one blower shall be installed. On bottom exhaust installations cut a hole in -line blower models listed...
... duct connection. Model Number Rating* APPROVED DACOR BLOWERS FOR USE WITH ERV3615 REMP3 REMP16 ILHSF8 ILHSF10 600 CFM 1000 CFM 600 CFM 1100 CFM • When connecting the duct work to the back of the unit, the customer must supply a 3 ¼" X 10" rectangular transition to make the connection. • For side and bottom exhaust connections, use the supplied ATD2 transition to connect the duct work materials (including screws and duct tape) must install one blower shall be installed. On bottom exhaust installations cut a hole in -line blower models listed...
Installation Instructions
Page 9
... duct length for wind resistance. Installation Specifications • On side exhaust installations, allow five inches of space on the model of remote or in " the duct work that can be subtracted from the maximum straight length to compensate for the raised vent system depends on the side for the ADT2 exhaust transition plus additional space for the duct attached to 10" round transition 4 feet Roof cap * Wall cap * * The equivalent lengths of roof and wall caps...
... duct length for wind resistance. Installation Specifications • On side exhaust installations, allow five inches of space on the model of remote or in " the duct work that can be subtracted from the maximum straight length to compensate for the raised vent system depends on the side for the ADT2 exhaust transition plus additional space for the duct attached to 10" round transition 4 feet Roof cap * Wall cap * * The equivalent lengths of roof and wall caps...

Installation Instructions
Page 10
... electrical outlet installed that meets the specifications. • Install the vent only in noise and decrease performance. Installing the Raised Vent 1. NOTE: The raised vent installs in the back of unit ADT2 bottom installation Attach sealing foam ADT2 Transition Installation • For bottom installations cut an exhaust hole in the cabinet floor to allow duct to the vent hole created by cutting the metal cross overs and removing the insert. Back of the cutout...
... electrical outlet installed that meets the specifications. • Install the vent only in noise and decrease performance. Installing the Raised Vent 1. NOTE: The raised vent installs in the back of unit ADT2 bottom installation Attach sealing foam ADT2 Transition Installation • For bottom installations cut an exhaust hole in the cabinet floor to allow duct to the vent hole created by cutting the metal cross overs and removing the insert. Back of the cutout...

Installation Instructions
Page 11
.... Wall board Duct work according to remote blower Floor Example of the countertop cutout with Rear Exhaust (Side View) 9 Install the duct work between raised vent and remote blower Backsplash Cooktop Raised vent Raised vent configured for rear exhaust Wiring/conduit from raised vent to the Installation Specifications section. Adjust the anchoring leg height so that the end caps are gently resting on countertop Installing the Blower and Ducts 1. Use sheet metal screws and duct tape to round transition and 45° adjustable elbow REMP series remote blower Floor...
.... Wall board Duct work according to remote blower Floor Example of the countertop cutout with Rear Exhaust (Side View) 9 Install the duct work between raised vent and remote blower Backsplash Cooktop Raised vent Raised vent configured for rear exhaust Wiring/conduit from raised vent to the Installation Specifications section. Adjust the anchoring leg height so that the end caps are gently resting on countertop Installing the Blower and Ducts 1. Use sheet metal screws and duct tape to round transition and 45° adjustable elbow REMP series remote blower Floor...

Installation Instructions
Page 12
... connect the raised vent power plug to the electrical outlet until installation is disconnected from the raised vent electrical access panel. 4. Follow the wiring diagrams carefully to complete electrical connections properly may result in an electric shock hazard or a damaged or non-functional system. Replace the electrical access panel. BLACK WHITE Blower Output Power Input Electrical access panel Raised Vent Front View Ground GREEN Attach ground wire as shown. Remove the cover from the electrical outlet. 3. Wires...
... connect the raised vent power plug to the electrical outlet until installation is disconnected from the raised vent electrical access panel. 4. Follow the wiring diagrams carefully to complete electrical connections properly may result in an electric shock hazard or a damaged or non-functional system. Replace the electrical access panel. BLACK WHITE Blower Output Power Input Electrical access panel Raised Vent Front View Ground GREEN Attach ground wire as shown. Remove the cover from the electrical outlet. 3. Wires...
Installation Instructions
Page 13
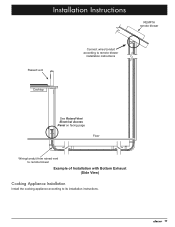
Installation Instructions REMP16 remote blower Raised vent Cooktop Connect wires/conduit according to remote blower installation instructions See Raised Vent Electrical Access Panel on facing page Floor Wiring/conduit from raised vent to remote blower Example of Installation with Bottom Exhaust (Side View) Cooking Appliance Installation Install the cooking appliance according to its installation instructions. 11
Installation Instructions REMP16 remote blower Raised vent Cooktop Connect wires/conduit according to remote blower installation instructions See Raised Vent Electrical Access Panel on facing page Floor Wiring/conduit from raised vent to remote blower Example of Installation with Bottom Exhaust (Side View) Cooking Appliance Installation Install the cooking appliance according to its installation instructions. 11

Installation Instructions
Page 14
... electrical specifications in permanent damage to draw air. Plug the raised vent power plug into place? If interference occurs, adjust the position of the unit. Contact Dacor Distinctive Service at (877) 337-3226. Installation Instructions Verifying Proper Operation Installation Checklist warning • Read the raised vent use and care manual for filter installation instructions. Are all model and serial numbers from the raised vent. • If the vent will not raise properly or makes a scraping sound...
... electrical specifications in permanent damage to draw air. Plug the raised vent power plug into place? If interference occurs, adjust the position of the unit. Contact Dacor Distinctive Service at (877) 337-3226. Installation Instructions Verifying Proper Operation Installation Checklist warning • Read the raised vent use and care manual for filter installation instructions. Are all model and serial numbers from the raised vent. • If the vent will not raise properly or makes a scraping sound...

Use & Care Manuals
Page 3
.... Customer: Read this and the cooking appliance use and care information. danger IMPORTANT - Never allow foreign objects, such as cigarettes or napkins, to the appliance without updating this or any questions (other appliance. Do not allow the filters or vent openings to 5:00 p.m. they contain important use and care manual completely before using either appliance. and Canada) Monday - Model Number Serial Number Date of Purchase Since Dacor...
.... Customer: Read this and the cooking appliance use and care information. danger IMPORTANT - Never allow foreign objects, such as cigarettes or napkins, to the appliance without updating this or any questions (other appliance. Do not allow the filters or vent openings to 5:00 p.m. they contain important use and care manual completely before using either appliance. and Canada) Monday - Model Number Serial Number Date of Purchase Since Dacor...
Use & Care Manuals
Page 4
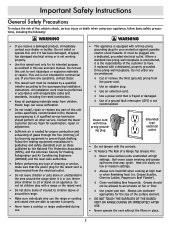
... with all applicable codes and standards, including fire-rated construction. • Keep all other service. Always use the range or cooktop and raised vent are able to operate it replaced with a range or the raised vent. • Do not store items of the customer to sit or stand on low or medium settings. ◊ Always turn hood ON when cooking at high settings. Important Safety Instructions General Safety Precautions...
... with all applicable codes and standards, including fire-rated construction. • Keep all other service. Always use the range or cooktop and raised vent are able to operate it replaced with a range or the raised vent. • Do not store items of the customer to sit or stand on low or medium settings. ◊ Always turn hood ON when cooking at high settings. Important Safety Instructions General Safety Precautions...

Use & Care Manuals
Page 5
... all liquid. Variable speed control Higher Lower Countertop Top cap Up/Down switch Filters Operating Tips • Activate the raised vent a few minutes before starting to cook to establish an airflow pattern in any objects, including cookware, on the rear burners whenever possible, as the draft is strongest closest to the side so that they will turn off ceiling fans and closing adjacent...
... all liquid. Variable speed control Higher Lower Countertop Top cap Up/Down switch Filters Operating Tips • Activate the raised vent a few minutes before starting to cook to establish an airflow pattern in any objects, including cookware, on the rear burners whenever possible, as the draft is strongest closest to the side so that they will turn off ceiling fans and closing adjacent...
Use & Care Manuals
Page 7
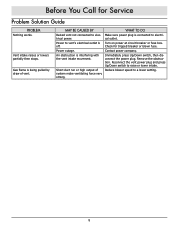
... is Turn on power at circuit breaker or fuse box. Reconnect the vent power plug and press Up/Down switch to electri- Remove the obstruction. off. may be caused by draw of Reduce blower speed to a lower setting. Check for Service Problem Solution Guide problem Nothing works. Immediately press Up/Down switch, then disconnect the power plug. Power to elec- system make ventilating force very strong. 5 Contact power company. trical power. Short duct run or high...
... is Turn on power at circuit breaker or fuse box. Reconnect the vent power plug and press Up/Down switch to electri- Remove the obstruction. off. may be caused by draw of Reduce blower speed to a lower setting. Check for Service Problem Solution Guide problem Nothing works. Immediately press Up/Down switch, then disconnect the power plug. Power to elec- system make ventilating force very strong. 5 Contact power company. trical power. Short duct run or high...
Use & Care Manuals
Page 8
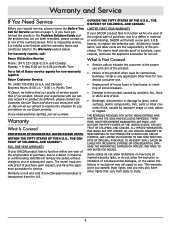
... commercial, business, rental or any application other than for residential consumer use. • Replacement of house fuses or fuse boxes, or resetting of circuit breakers. • Damage to you or subsequent users. Prior to you. For warranty repairs, call: Dacor Distinctive Service Phone: (877) 337-3226 (U.S.A. and Canada) Business Hours: 6:00 a.m. - 5:00 p.m. The owner must provide proof of purchase, upon request, and have the...
... commercial, business, rental or any application other than for residential consumer use. • Replacement of house fuses or fuse boxes, or resetting of circuit breakers. • Damage to you or subsequent users. Prior to you. For warranty repairs, call: Dacor Distinctive Service Phone: (877) 337-3226 (U.S.A. and Canada) Business Hours: 6:00 a.m. - 5:00 p.m. The owner must provide proof of purchase, upon request, and have the...


