
Installation Instructions
Page 1
Installation Instructions Millennia® Electric Cooktop For use with models ETT304-1, ETT365-2, MET304 and METB365-1 Part No. 65170 Rev. J TESTED IN ACCORDANCE WITH THE LATEST EDITION OF ANSI Z21.1 AND U.L. 858 STANDARD FOR HOUSEHOLD COOKING APPLIANCES.
Installation Instructions Millennia® Electric Cooktop For use with models ETT304-1, ETT365-2, MET304 and METB365-1 Part No. 65170 Rev. J TESTED IN ACCORDANCE WITH THE LATEST EDITION OF ANSI Z21.1 AND U.L. 858 STANDARD FOR HOUSEHOLD COOKING APPLIANCES.

Installation Instructions
Page 2
... 6 Verify the Package Contents 6 Electrical Connection 6 Verifying Proper Operation 8 Customer Service Information If You Need Help... Dacor ® assumes no liability for repairs under warranty call , have questions or problems with installation, contact • your...Dacor.com Dacor Distinctive Service (for changes to 4:00 p.m. Friday 6:00 a.m. Friday 6:00 a.m. to specifications. © 2007 Dacor, all rights reserved. It is located on the product data label. When you have the • model and serial number of the appliance ready. Table of the cooktop...
... 6 Verify the Package Contents 6 Electrical Connection 6 Verifying Proper Operation 8 Customer Service Information If You Need Help... Dacor ® assumes no liability for repairs under warranty call , have questions or problems with installation, contact • your...Dacor.com Dacor Distinctive Service (for changes to 4:00 p.m. Friday 6:00 a.m. Friday 6:00 a.m. to specifications. © 2007 Dacor, all rights reserved. It is located on the product data label. When you have the • model and serial number of the appliance ready. Table of the cooktop...
Installation Instructions
Page 3
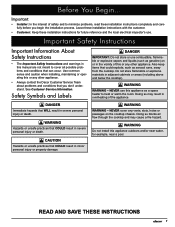
...injury or property damage. Use common sense and caution when installing, maintaining or operating this appliance as aerosol cans, away from the cooktop. Important: • Installer: In the interest of this manual are not meant to minimize problems, read these installation instructions for...near water, for future reference and the local electrical inspector's use this or any other appliance. • Always contact the Dacor Customer Service Team about problems and conditions that WILL result in this or any other appliance. See Customer Service Information. DANGER ...
...injury or property damage. Use common sense and caution when installing, maintaining or operating this appliance as aerosol cans, away from the cooktop. Important: • Installer: In the interest of this manual are not meant to minimize problems, read these installation instructions for...near water, for future reference and the local electrical inspector's use this or any other appliance. • Always contact the Dacor Customer Service Team about problems and conditions that WILL result in this or any other appliance. See Customer Service Information. DANGER ...
Installation Instructions
Page 4
... Precautions To reduce the risk of correcting problems caused by a qualified installer according to these surfaces have had sufficient time to use. Dacor is not responsible for the cost of fire, electric shock, serious injury or death when using your dealer or builder. Children could... not climb on top of the appliance. • Do not leave children or pets alone or unattended in drawers immediately below the cooktop. • Clean the cooktop before touching them. • Do not wear loose or hanging apparel while using it . A qualified service technician must perform all ...
... Precautions To reduce the risk of correcting problems caused by a qualified installer according to these surfaces have had sufficient time to use. Dacor is not responsible for the cost of fire, electric shock, serious injury or death when using your dealer or builder. Children could... not climb on top of the appliance. • Do not leave children or pets alone or unattended in drawers immediately below the cooktop. • Clean the cooktop before touching them. • Do not wear loose or hanging apparel while using it . A qualified service technician must perform all ...
Installation Instructions
Page 5
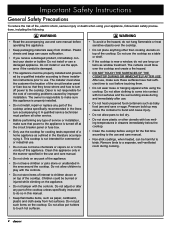
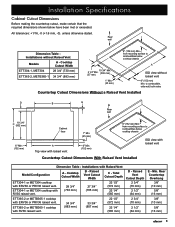
... of the line (L1 and L2). • The junction box and the remote circuit breaker panel or fuse box, must be accessible when the cooktop is 8 AWG. Model ETT304-1 ETT365-2 MET304 METB365-1 Dedicated Circuit Required 240 Vac, 60 Hz. 3 wire* 40 Amp. 240 Vac, 60 Hz. 3 wire* 40 Amp. ...1/4" * (768 mm) 4" (102 mm) Chassis height 19 3/8" 21 1/4" * (495 mm) (540 mm) 28 3/8" (721 mm) 36 1/4" * (921 mm) 4" (102 mm) Chassis height Models ETT304-1, MET304 19 3/8" 21 1/4" * (495 mm) (540 mm) 34 3/8" (873 mm) * For units with stainless steel trim, other units may be up to 1/8" less Models ETT365...
... of the line (L1 and L2). • The junction box and the remote circuit breaker panel or fuse box, must be accessible when the cooktop is 8 AWG. Model ETT304-1 ETT365-2 MET304 METB365-1 Dedicated Circuit Required 240 Vac, 60 Hz. 3 wire* 40 Amp. 240 Vac, 60 Hz. 3 wire* 40 Amp. ...1/4" * (768 mm) 4" (102 mm) Chassis height 19 3/8" 21 1/4" * (495 mm) (540 mm) 28 3/8" (721 mm) 36 1/4" * (921 mm) 4" (102 mm) Chassis height Models ETT304-1, MET304 19 3/8" 21 1/4" * (495 mm) (540 mm) 34 3/8" (873 mm) * For units with stainless steel trim, other units may be up to 1/8" less Models ETT365...

Installation Instructions
Page 6
...of the included 48 inch long (1219 mm) cooktop power conduit attached at the bottom right rear of drawers below it. If installing the cooktop with a raised vent, install only the following approved Dacor model numbers: Cooktop Models ETT304-1 MET304 Approved Raised Vent Models ERV30, PRV30 ... your local building department for further information. • To reduce the risk of personal injury and to combustible A surfaces Cooktop Models ETT304-1, MET304 ETT365-2, METB365-1 A - All Installations Ventilation To reduce the risk of a fire hazard, all governing codes and ordinances during...
...of the included 48 inch long (1219 mm) cooktop power conduit attached at the bottom right rear of drawers below it. If installing the cooktop with a raised vent, install only the following approved Dacor model numbers: Cooktop Models ETT304-1 MET304 Approved Raised Vent Models ERV30, PRV30 ... your local building department for further information. • To reduce the risk of personal injury and to combustible A surfaces Cooktop Models ETT304-1, MET304 ETT365-2, METB365-1 A - All Installations Ventilation To reduce the risk of a fire hazard, all governing codes and ordinances during...
Installation Instructions
Page 7
...Depth 22 1/2" (572 mm) 22 1/4" (565 mm) ETT365-2 or METB365-1 cooktop with RV30 raised vent. 28 3/4" (730 mm) B - Rear Countertop Overhang 3/8" (10 mm) 5/8" (16 mm) 3/8" (10 mm) 5/8" (16 mm) 5 Cooktop Cutout Width ETT304-1, MET304 28 3/4" (730 mm) ETT365-2, METB365-1 34 3/4" (883 mm)... Cabinet Cutout Dimensions Before making the countertop cutout, make certain that the required dimensions shown below cooktop chassis A ISO view without Raised Vent Models A - Cooktop Cutout Width ETT304-1 or MET304 cooktop with RV36 raised vent. 34 3/4" (883 mm) 33 3/4" (857 mm) 22 1/2" ...
...Depth 22 1/2" (572 mm) 22 1/4" (565 mm) ETT365-2 or METB365-1 cooktop with RV30 raised vent. 28 3/4" (730 mm) B - Rear Countertop Overhang 3/8" (10 mm) 5/8" (16 mm) 3/8" (10 mm) 5/8" (16 mm) 5 Cooktop Cutout Width ETT304-1, MET304 28 3/4" (730 mm) ETT365-2, METB365-1 34 3/4" (883 mm)... Cabinet Cutout Dimensions Before making the countertop cutout, make certain that the required dimensions shown below cooktop chassis A ISO view without Raised Vent Models A - Cooktop Cutout Width ETT304-1 or MET304 cooktop with RV36 raised vent. 34 3/4" (883 mm) 33 3/4" (857 mm) 22 1/2" ...
Installation Instructions
Page 8
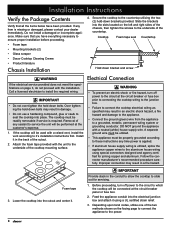
... (2) • Glass scraper • Dacor Cooktop Cleaning Creme • Product literature Chassis Installation 4. Over tightening the hold -down bolts may result in damage. • Do not use a hardening compound, glue or caulk to seal the cooktop into the slots located on the left and...• Connect the ground (green) wire from the appliance to the countertop utilizing the two (2) hold down brackets provided. Secure the cooktop to a grounded, metallic, permanent wiring system or grounding conductor. Removal of any sealant to the aluminum house wiring using a UL certified...
... (2) • Glass scraper • Dacor Cooktop Cleaning Creme • Product literature Chassis Installation 4. Over tightening the hold -down bolts may result in damage. • Do not use a hardening compound, glue or caulk to seal the cooktop into the slots located on the left and...• Connect the ground (green) wire from the appliance to the countertop utilizing the two (2) hold down brackets provided. Secure the cooktop to a grounded, metallic, permanent wiring system or grounding conductor. Removal of any sealant to the aluminum house wiring using a UL certified...
Installation Instructions
Page 9
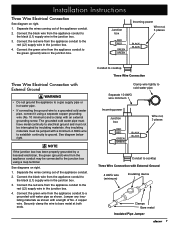
...supply wire in the junction box. See diagrams on right. 1. Connect the green wire from the appliance conduit to ground. Conduit to cooktop Three Wire Connection Clamp wire tightly to cold water pipe Separate 10 AWG wire minimum Incoming power Junction box Wire nut, 3 places ...External Ground 4 AWG wire (minimum) Insulating device Clamps Bare metal Insulated Pipe Jumper 7 Connect the black wire from the appliance conduit to cooktop Three Wire Connection with a length of the appliance conduit. 2. Separate the wires coming out of No. 4 copper wire. Connect the black...
...supply wire in the junction box. See diagrams on right. 1. Connect the green wire from the appliance conduit to ground. Conduit to cooktop Three Wire Connection Clamp wire tightly to cold water pipe Separate 10 AWG wire minimum Incoming power Junction box Wire nut, 3 places ...External Ground 4 AWG wire (minimum) Insulating device Clamps Bare metal Insulated Pipe Jumper 7 Connect the black wire from the appliance conduit to cooktop Three Wire Connection with a length of the appliance conduit. 2. Separate the wires coming out of No. 4 copper wire. Connect the black...
Installation Instructions
Page 10
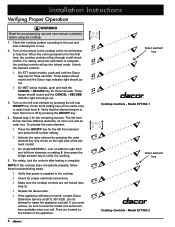
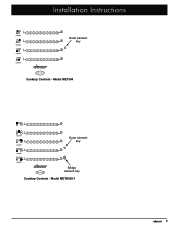
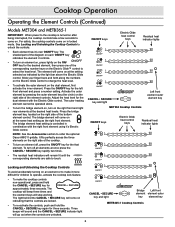
... and the CANCEL • SECURE indicator light should go out. ◊ On MET series models, push and hold the Dacor logo key for the first time, the cooktop controls will go out. 3. Model ETT304-1 ON/OFF ON/OFF ON/OFF ON/OFF ON/OFF 8 9 10 56 7 234 1 8 9 10 67 5 1 2 34 7 8 9 10 56 234... 1 8 9 10 67 5 234 1 7 8 9 10 56 234 1 Outer element key Cooktop Controls - When the unit is supplied to use and care ...
... and the CANCEL • SECURE indicator light should go out. ◊ On MET series models, push and hold the Dacor logo key for the first time, the cooktop controls will go out. 3. Model ETT304-1 ON/OFF ON/OFF ON/OFF ON/OFF ON/OFF 8 9 10 56 7 234 1 8 9 10 67 5 1 2 34 7 8 9 10 56 234... 1 8 9 10 67 5 234 1 7 8 9 10 56 234 1 Outer element key Cooktop Controls - When the unit is supplied to use and care ...
Installation Instructions
Page 11
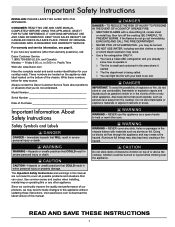
Model METB365-1 9 Model MET304 1 2 3 4 5 6 7 8 9 10 ON/OFF ON/OFF 1 2 3 4 5 6 7 8 9 10 1 2 3 4 5 6 7 8 9 10 Outer element key ON/OFF 1 2 3 4 5 6 7 8 9 10 ON/OFF 1 2 3 4 5 6 7 8 9 10 CANCEL • SECURE Bridge element key Cooktop Controls - Installation Instructions ON/OFF ON/OFF ON/OFF ON/OFF 1 2 3 4 5 6 7 8 9 10 1 2 3 4 5 6 7 8 9 10 1 2 3 4 5 6 7 8 9 10 1 2 3 4 5 6 7 8 9 10 Outer element key CANCEL • SECURE Cooktop Controls -
Model METB365-1 9 Model MET304 1 2 3 4 5 6 7 8 9 10 ON/OFF ON/OFF 1 2 3 4 5 6 7 8 9 10 1 2 3 4 5 6 7 8 9 10 Outer element key ON/OFF 1 2 3 4 5 6 7 8 9 10 ON/OFF 1 2 3 4 5 6 7 8 9 10 CANCEL • SECURE Bridge element key Cooktop Controls - Installation Instructions ON/OFF ON/OFF ON/OFF ON/OFF 1 2 3 4 5 6 7 8 9 10 1 2 3 4 5 6 7 8 9 10 1 2 3 4 5 6 7 8 9 10 1 2 3 4 5 6 7 8 9 10 Outer element key CANCEL • SECURE Cooktop Controls -

Use & Care Manuals
Page 1
Ta b l e o f C o n t e n t s Important Safety Instructions 1 Cooktop Features 4 Cooktop Operation 5 Care and Cleaning 7 Before You Call for Service 7 Parts and Accessories 7 Warranty and Service 8 Warranty Card Back Cover Part No. 65171 Rev. Use and Care Manual Millennia® Electric Cooktop Models: ETT304-1, ETT365-2, MET304 and METB365-1 Style varies. K Model ETT304-1 shown.
Ta b l e o f C o n t e n t s Important Safety Instructions 1 Cooktop Features 4 Cooktop Operation 5 Care and Cleaning 7 Before You Call for Service 7 Parts and Accessories 7 Warranty and Service 8 Warranty Card Back Cover Part No. 65171 Rev. Use and Care Manual Millennia® Electric Cooktop Models: ETT304-1, ETT365-2, MET304 and METB365-1 Style varies. K Model ETT304-1 shown.
Use & Care Manuals
Page 3
...- DANGER DANGER - WARNING WARNING - NEVER use combustible, flammable or explosive vapors and liquids (such as aerosol cans away from the cooktop. Important Safety Instructions Installer: Please leave this or any other appliance. SAVE IT FOR FUTURE REFERENCE. For warranty and service information, ... products, we may result. • Use a fire extinguisher ONLY if: ◊ You have any other than warranty questions), call: Dacor Customer Service 1 (800) 793-0093 (U.S.A. DANGER IMPORTANT: To avoid the possibility of this appliance as aluminum foil. Aluminum foil linings may...
...- DANGER DANGER - WARNING WARNING - NEVER use combustible, flammable or explosive vapors and liquids (such as aerosol cans away from the cooktop. Important Safety Instructions Installer: Please leave this or any other appliance. SAVE IT FOR FUTURE REFERENCE. For warranty and service information, ... products, we may result. • Use a fire extinguisher ONLY if: ◊ You have any other than warranty questions), call: Dacor Customer Service 1 (800) 793-0093 (U.S.A. DANGER IMPORTANT: To avoid the possibility of this appliance as aluminum foil. Aluminum foil linings may...

Use & Care Manuals
Page 4
... the parts specified in this manual. Decorative covers may cause a fire hazard or damage to the range is near a window, do not leave the cooktop unattended when in use. • Keep flammable items, such as paper, cardboard, plastic and cloth away from the range where they may cause a...the chassis and may be easily hit, causing hot food to spill. • Do not allow clothing to contain the desired volume of the cooktop unless specifically recommended in the literature accompanying it. Doing so may cause spattering or spilling of the hot fat. ◊ Heat fat slowly,...
... the parts specified in this manual. Decorative covers may cause a fire hazard or damage to the range is near a window, do not leave the cooktop unattended when in use. • Keep flammable items, such as paper, cardboard, plastic and cloth away from the range where they may cause a...the chassis and may be easily hit, causing hot food to spill. • Do not allow clothing to contain the desired volume of the cooktop unless specifically recommended in the literature accompanying it. Doing so may cause spattering or spilling of the hot fat. ◊ Heat fat slowly,...

Use & Care Manuals
Page 5
...types of cookware. • Select cookware carefully. Bridging across two elements will stay cool while cooking. Check the manufacturer's recommendations before use the cooktop surface as a knife or metal spatula. Utensils need to be harmful to birds. Lift utensils to reposition them. • Do no place...Non-stick coatings, when heated, can be large enough to contain the desired quantity of cooking task. The porcelain finish may result from the cooktop. Sliding may crack or break, causing a spill or burn hazard. CAUTION • Do not set cookware with sharp edges on the ...
...types of cookware. • Select cookware carefully. Bridging across two elements will stay cool while cooking. Check the manufacturer's recommendations before use the cooktop surface as a knife or metal spatula. Utensils need to be harmful to birds. Lift utensils to reposition them. • Do no place...Non-stick coatings, when heated, can be large enough to contain the desired quantity of cooking task. The porcelain finish may result from the cooktop. Sliding may crack or break, causing a spill or burn hazard. CAUTION • Do not set cookware with sharp edges on the ...
Use & Care Manuals
Page 6
...inch 1000 Watts Dual element 9 ¾ inch 2400 Watts (total) 7 inch 1500 Watts ETT304-1 Cooktop Layout Cooktop controls 7 inch 1500 Watts 7 ½ inch 1800 Watts Dual element 9 ¾ inch 2400 Watts (total) Cooktop controls ETT365-2 Cooktop Layout 7 ¾ inch 1800 Watts 6 ½ inch 1200 Watts 7 inch 1500 Watts ...4 As the numeric setting on all models is ideal for providing even heat for improved simmering with • Dacor glass ceramic cooktops contain ribbon type radiant smaller utensils. The bridge element is a dual element. light next to allow •...
...inch 1000 Watts Dual element 9 ¾ inch 2400 Watts (total) 7 inch 1500 Watts ETT304-1 Cooktop Layout Cooktop controls 7 inch 1500 Watts 7 ½ inch 1800 Watts Dual element 9 ¾ inch 2400 Watts (total) Cooktop controls ETT365-2 Cooktop Layout 7 ¾ inch 1800 Watts 6 ½ inch 1200 Watts 7 inch 1500 Watts ...4 As the numeric setting on all models is ideal for providing even heat for improved simmering with • Dacor glass ceramic cooktops contain ribbon type radiant smaller utensils. The bridge element is a dual element. light next to allow •...
Use & Care Manuals
Page 7
...the diagram on each ON/OFF key indicates the element it more operate, activate the cooktop lock feature. 1 • To make the cooktop controls non-operational, press and hold the Dacor logo key for the that element. The residual heat corresponding elements indicator are normal For ... 10 Left front element outer element key 9 10 78 56 1 2 34 8 9 10 67 5 1 2 34 Dacor logo key ON/OFF keys ETT304-1 Cooktop Controls ON/OFF keys ETT365-2 Cooktop Controls 5 IMPORTANT: When power to the cooktop is important to the Care and Cleaning section. The element will come on the ON/OFF ON...
...the diagram on each ON/OFF key indicates the element it more operate, activate the cooktop lock feature. 1 • To make the cooktop controls non-operational, press and hold the Dacor logo key for the that element. The residual heat corresponding elements indicator are normal For ... 10 Left front element outer element key 9 10 78 56 1 2 34 8 9 10 67 5 1 2 34 Dacor logo key ON/OFF keys ETT304-1 Cooktop Controls ON/OFF keys ETT365-2 Cooktop Controls 5 IMPORTANT: When power to the cooktop is important to the Care and Cleaning section. The element will come on the ON/OFF ON...
Use & Care Manuals
Page 8
...indicators will stop working. combination with the Electric Glide control. ON/OFF 1 2 3 4 5 6 7 8 9 10 Locking and Unlocking the Cooktop Controls To avoid accidentally turning on an element or to make it controls. 2 • 3 TOoFtFu4rkneyanfo5erlethmee6dnetsoirne,d7perelesms 8elignht,tltyh9eonn pthr1ees0Os No/ne ON/OFF of...2 3 MET4304 5Cookt6op Co7ntrol8s 9 10 element key, located on the Electric Glide control to order the optional Dacor AMG11 griddle. The cooktop will beep three times and the element keys will remain lit until the ON/OFcoFrresponding elements are locked. ...
...indicators will stop working. combination with the Electric Glide control. ON/OFF 1 2 3 4 5 6 7 8 9 10 Locking and Unlocking the Cooktop Controls To avoid accidentally turning on an element or to make it controls. 2 • 3 TOoFtFu4rkneyanfo5erlethmee6dnetsoirne,d7perelesms 8elignht,tltyh9eonn pthr1ees0Os No/ne ON/OFF of...2 3 MET4304 5Cookt6op Co7ntrol8s 9 10 element key, located on the Electric Glide control to order the optional Dacor AMG11 griddle. The cooktop will beep three times and the element keys will remain lit until the ON/OFcoFrresponding elements are locked. ...
Use & Care Manuals
Page 9
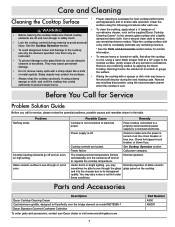
...30° angle to electrical power. Use a second clean cloth to remove • Lock the cooktop controls during the next heating cycle. Use them only as the supplied Dacor Cooktop Cleaning Creme*, to avoid personal injury. Sharp objects may cause permanent damage. • Do not ... quality. and into the chassis due to a properly sized electrical power supply by applying the Dacor Cooktop Cleaning Creme. They may scratch the surfaces. • Always clean the cooktop cautiously. to make sure that will discolor during cleaning to the ceramic glass surface with a...
...30° angle to electrical power. Use a second clean cloth to remove • Lock the cooktop controls during the next heating cycle. Use them only as the supplied Dacor Cooktop Cleaning Creme*, to avoid personal injury. Sharp objects may cause permanent damage. • Do not ... quality. and into the chassis due to a properly sized electrical power supply by applying the Dacor Cooktop Cleaning Creme. They may scratch the surfaces. • Always clean the cooktop cautiously. to make sure that will discolor during cleaning to the ceramic glass surface with a...

Use & Care Manuals
Page 10
... do not allow limitations on how long an implied warranty lasts, or do our utmost to 4:00 p.m. Warranty What Is Covered CERTIFICATE OF WARRANTIES DACOR millennia electric cooktops WITHIN THE FIFTY STATES OF THE U.S.A., THE DISTRICT OF COLUMBIA AND CANADA*: FULL ONE-YEAR WARRANTY What Is Not Covered • Failure of the...
... do not allow limitations on how long an implied warranty lasts, or do our utmost to 4:00 p.m. Warranty What Is Covered CERTIFICATE OF WARRANTIES DACOR millennia electric cooktops WITHIN THE FIFTY STATES OF THE U.S.A., THE DISTRICT OF COLUMBIA AND CANADA*: FULL ONE-YEAR WARRANTY What Is Not Covered • Failure of the...


