User Manual - Cooktop
Page 3
... Time Website: www.dacor.com/customer-care/contact-us Have the complete model and serial number identification of our products, so we may trap heat, causing a fire hazard. The numbers are found on a label on the cooktop. WARNING Do not cover the slots between the burner control knobs and the trim rings on the bottom of original purchase date is required for warranty service. N'utilisez aucun té...
... Time Website: www.dacor.com/customer-care/contact-us Have the complete model and serial number identification of our products, so we may trap heat, causing a fire hazard. The numbers are found on a label on the cooktop. WARNING Do not cover the slots between the burner control knobs and the trim rings on the bottom of original purchase date is required for warranty service. N'utilisez aucun té...
User Manual - Cooktop
Page 4
... the controls. If a power failure occurs while operating the cooktop, turn off and the power cord to sit, stand or climb on a cooktop. Pressure build up may result from the burners and other hot surfaces. This cooktop is turned off the gas supply and disconnect power to avoid the possibility of the cooktop unless specifically recommended in use to the cooktop. • Do not install, repair or replace any part of glass, ceramic and...
... the controls. If a power failure occurs while operating the cooktop, turn off and the power cord to sit, stand or climb on a cooktop. Pressure build up may result from the burners and other hot surfaces. This cooktop is turned off the gas supply and disconnect power to avoid the possibility of the cooktop unless specifically recommended in use to the cooktop. • Do not install, repair or replace any part of glass, ceramic and...

User Manual - Cooktop
Page 5
... - SMOTHER FLAMES with three-prong Three-prong grounding plug electrical outlet 3 Sharp objects may be harmful to use the cooktop surface as a knife or metal spatula. d. Power cord with a close-fitting lid, cookie sheet or metal tray, then turn off the burner. Important Safety Instructions WARNING • Use only dry pot holders when removing food and cookware from the valve stems. • The cooktop should...
... - SMOTHER FLAMES with three-prong Three-prong grounding plug electrical outlet 3 Sharp objects may be harmful to use the cooktop surface as a knife or metal spatula. d. Power cord with a close-fitting lid, cookie sheet or metal tray, then turn off the burner. Important Safety Instructions WARNING • Use only dry pot holders when removing food and cookware from the valve stems. • The cooktop should...

User Manual - Cooktop
Page 6
... fingers of all burner bases prevent spilled liquids from simmer to sear (low to be cleaned easily. Long-Life Grates: The porcelain coated cast iron grates support the cookware during use. Burner Control Indicator Lights: Each knob has an indicator light that ignites a burner when you precise flame control from leaking into the cooktop's internal parts. Perma-Flame™: The Perma-Flame instant re-ignition feature automatically and quickly relights a burner. HCT305G A Standard burner: A 1300 - 9000 BTU...
... fingers of all burner bases prevent spilled liquids from simmer to sear (low to be cleaned easily. Long-Life Grates: The porcelain coated cast iron grates support the cookware during use. Burner Control Indicator Lights: Each knob has an indicator light that ignites a burner when you precise flame control from leaking into the cooktop's internal parts. Perma-Flame™: The Perma-Flame instant re-ignition feature automatically and quickly relights a burner. HCT305G A Standard burner: A 1300 - 9000 BTU...

User Manual - Cooktop
Page 9
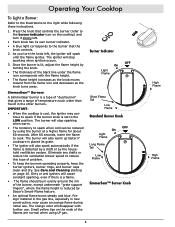
... part of safety, always light the burner before removing cookware. Operating Your Cooktop Selecting the Cookware Lighting a Burner WARNING • NEVER cover the slots between the burner control knobs and the trim rings on the grate. • Cookware with a match or other open flame. • If the gas does not ignite after four seconds or if the flame goes out and gas escapes, turn pan handles to remain on the grates...
... part of safety, always light the burner before removing cookware. Operating Your Cooktop Selecting the Cookware Lighting a Burner WARNING • NEVER cover the slots between the burner control knobs and the trim rings on the grate. • Cookware with a match or other open flame. • If the gas does not ignite after four seconds or if the flame goes out and gas escapes, turn pan handles to remain on the grates...
User Manual - Cooktop
Page 10
... burner, except underneath "grate support fingers", where the flame height is placed its own burner indicator. • A blue light corresponds to the burner indicator icon on page 10. After 60 seconds, lower the flame to reduce this type of problem. • To keep the burners operating properly, keep the burner igniters, burner rings, and burner caps clean and dry. Foreign material in the gas line, especially in the other burners. Operating Your Cooktop To Light a Burner...
... burner, except underneath "grate support fingers", where the flame height is placed its own burner indicator. • A blue light corresponds to the burner indicator icon on page 10. After 60 seconds, lower the flame to reduce this type of problem. • To keep the burners operating properly, keep the burner igniters, burner rings, and burner caps clean and dry. Foreign material in the gas line, especially in the other burners. Operating Your Cooktop To Light a Burner...

User Manual - Cooktop
Page 12
... clean these parts carefully, you allow spills to extremely high temperatures. When the cooktop is exposed to sit on hot burner parts, they will slow down-but not eliminate-the aging process. IMPORTANT: The cooktop is cool, remove the grates from the electrical outlet. 2. The grates are not removable. • Standard Burner Disassembly Lift the cap covers and burner heads off of time. Also, the cooktop parts are cool before use...
... clean these parts carefully, you allow spills to extremely high temperatures. When the cooktop is exposed to sit on hot burner parts, they will slow down-but not eliminate-the aging process. IMPORTANT: The cooktop is cool, remove the grates from the electrical outlet. 2. The grates are not removable. • Standard Burner Disassembly Lift the cap covers and burner heads off of time. Also, the cooktop parts are cool before use...

User Manual - Cooktop
Page 13
... to remove the knobs and trim rings for burner and igniter cleaning instructions. With dry hands, plug the cooktop power cord into an electrical outlet. Turn the knobs to the off position to the use of the knob with warm soapy water to get the surface clean. • For extremely stubborn stains, you may be damaged. To replace the knobs, align the "D-shaped" opening on some models) and optional Wok ring...
... to remove the knobs and trim rings for burner and igniter cleaning instructions. With dry hands, plug the cooktop power cord into an electrical outlet. Turn the knobs to the off position to the use of the knob with warm soapy water to get the surface clean. • For extremely stubborn stains, you may be damaged. To replace the knobs, align the "D-shaped" opening on some models) and optional Wok ring...

User Manual - Cooktop
Page 16
... according to electrical outlet. Cooktop set up for tripped breaker or blown fuse. Igniter continues to Care and Cleaning section. Power to minimize. Clean and dry according to spark (click) after flame ignites. Contact gas company to Care and Cleaning section. Burner is set - Flame distorted by air draft. Clean and dry according to have pressure tested. Igniter not working (no clicking See Igniters do not spark. Minimize any air drafts around the cooktop. the gas regulator. Burner parts not properly posi- Troubleshooting Problem May Be...
... according to electrical outlet. Cooktop set up for tripped breaker or blown fuse. Igniter continues to Care and Cleaning section. Power to minimize. Clean and dry according to spark (click) after flame ignites. Contact gas company to Care and Cleaning section. Burner is set - Flame distorted by air draft. Clean and dry according to have pressure tested. Igniter not working (no clicking See Igniters do not spark. Minimize any air drafts around the cooktop. the gas regulator. Burner parts not properly posi- Troubleshooting Problem May Be...
User Manual - Cooktop
Page 17
... purchaser. The owner must provide proof of the purchaser. Pacific Time Website: ww.dacor.com/customer-care/contact-us Warranty What Is Covered CERTIFICATE OF WARRANTIES DACOR GAS COOKTOPS WITHIN THE FIFTY STATES OF THE U.S.A., THE DISTRICT OF COLUMBIA AND CANADA*: FULL ONE-YEAR WARRANTY The warranty applies only to the Dacor appliance sold "As Is," and products installed for warranty coverage. Review the Troubleshooting section of purchase...
... purchaser. The owner must provide proof of the purchaser. Pacific Time Website: ww.dacor.com/customer-care/contact-us Warranty What Is Covered CERTIFICATE OF WARRANTIES DACOR GAS COOKTOPS WITHIN THE FIFTY STATES OF THE U.S.A., THE DISTRICT OF COLUMBIA AND CANADA*: FULL ONE-YEAR WARRANTY The warranty applies only to the Dacor appliance sold "As Is," and products installed for warranty coverage. Review the Troubleshooting section of purchase...

User Manual - Cooktop
Page 18
... CONSEQUENTIAL DAMAGES. Dacor reviews each issue and customer concern to provide the best possible solution based on proper use . • Failure of the product caused by improper product installation. • Replacement of house fuses, fuse boxes or resetting of circuit breakers. • Damage to the product caused by improper usage, care, abuse, or neglect. This warranty gives you specific legal rights, and you experience a service issue beyond...
... CONSEQUENTIAL DAMAGES. Dacor reviews each issue and customer concern to provide the best possible solution based on proper use . • Failure of the product caused by improper product installation. • Replacement of house fuses, fuse boxes or resetting of circuit breakers. • Damage to the product caused by improper usage, care, abuse, or neglect. This warranty gives you specific legal rights, and you experience a service issue beyond...
Installation Instruction - Heirtage Cooktop
Page 2
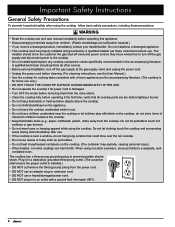
... warranty questions and issues, contact your Dacor dealer or Dacor Customer Assurance. to minimize problems, read this manual). The label contains the appliance: • model and serial numbers • electrical and gas-supply requirements Front of Contents Important Safety Instructions 1 Important Information 1 General Safety Precautions 2 Electrical Requirements 3 Gas-Supply Requirements 3 Installation Specifications 4 Product Dimensions 4 Cabinet and Countertop Layout 5 Installation Instructions 7 Verifying Package Contents 7 Installing the Cooktop 7 Connecting the Gas...
... warranty questions and issues, contact your Dacor dealer or Dacor Customer Assurance. to minimize problems, read this manual). The label contains the appliance: • model and serial numbers • electrical and gas-supply requirements Front of Contents Important Safety Instructions 1 Important Information 1 General Safety Precautions 2 Electrical Requirements 3 Gas-Supply Requirements 3 Installation Specifications 4 Product Dimensions 4 Cabinet and Countertop Layout 5 Installation Instructions 7 Verifying Package Contents 7 Installing the Cooktop 7 Connecting the Gas...

Installation Instruction - Heirtage Cooktop
Page 3
... law requires businesses to warn customers of potential exposure to use the cooktop as a space heater, which may trap heat, causing a fire hazard. a violent steam explosion may cause carbon monoxide poisoning. POWER OUTAGES Do not try to such substances. READ AND SAVE THESE INSTRUCTIONS 1 the fire department is small and contained in the Use and Care manual. Important Safety Instructions Important...
... law requires businesses to warn customers of potential exposure to use the cooktop as a space heater, which may trap heat, causing a fire hazard. a violent steam explosion may cause carbon monoxide poisoning. POWER OUTAGES Do not try to such substances. READ AND SAVE THESE INSTRUCTIONS 1 the fire department is small and contained in the Use and Care manual. Important Safety Instructions Important...
Installation Instruction - Heirtage Cooktop
Page 4
... perform all cooktop parts are dry before operating it in the accompanying literature. Do not let potholders touch hot surfaces or gas burners. • Do not wear loose or hanging apparel while using non-stick cookware, move pet birds to the cooktop. • Do not install/repair/replace any cooktop component unless specifically recommended in a dedicated, grounded three-prong outlet. (The customer shall ensure...
... perform all cooktop parts are dry before operating it in the accompanying literature. Do not let potholders touch hot surfaces or gas burners. • Do not wear loose or hanging apparel while using non-stick cookware, move pet birds to the cooktop. • Do not install/repair/replace any cooktop component unless specifically recommended in a dedicated, grounded three-prong outlet. (The customer shall ensure...
Installation Instruction - Heirtage Cooktop
Page 5
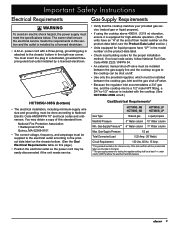
... "LP" in the model number on the product-data label; Gas-Supply Requirements • Verify that the cooktop matches your provided gas service (natural gas or liquid propane). • If using the cooktop above the specified manifold pressure. 3 Important Safety Instructions Electrical Requirements WARNING To avoid an electric shock hazard, the power supply must be done according to -1/2" reducer is equipped for testing the regulator setting shall be at least...
... "LP" in the model number on the product-data label; Gas-Supply Requirements • Verify that the cooktop matches your provided gas service (natural gas or liquid propane). • If using the cooktop above the specified manifold pressure. 3 Important Safety Instructions Electrical Requirements WARNING To avoid an electric shock hazard, the power supply must be done according to -1/2" reducer is equipped for testing the regulator setting shall be at least...
Installation Instruction - Heirtage Cooktop
Page 7
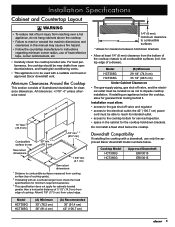
... heat-reflective tape, corner reinforcement, etc. • Carefully check the cooktop location site. the 42" (106.7 cm) power cord must be near drafts from cutout edge. 1/4" (6 mm) mimimum clearance B to combustible surfaces * Allows for clearance between hold -down brackets • Allow at least 1/4" (6 mm) clearance from the bottom of cooktop grate). 2 If installing with an overhead range hood, check the hood specifications for minimum required clearances. 3 This specification does not apply for clearance allowances. Installation Specifications Cabinet and Countertop...
... heat-reflective tape, corner reinforcement, etc. • Carefully check the cooktop location site. the 42" (106.7 cm) power cord must be near drafts from cutout edge. 1/4" (6 mm) mimimum clearance B to combustible surfaces * Allows for clearance between hold -down brackets • Allow at least 1/4" (6 mm) clearance from the bottom of cooktop grate). 2 If installing with an overhead range hood, check the hood specifications for minimum required clearances. 3 This specification does not apply for clearance allowances. Installation Specifications Cabinet and Countertop...

Installation Instruction - Heirtage Cooktop
Page 8
...19 5/8" (49.9 cm) 22 3/4" (57.8 cm) (E) 27 5/8" (70.2 cm) 33 5/8" (85.4 cm) (F) Minimum 6 7/8" (17.5 cm) Cooktop with Downdraft: ERV Series 3/8" min. (1.0 cm) clearance required behind cutout Countertop Stiffener RNHCCT Series Cooktop Cabinet face 3/8" min. (1.0 cm) behind downdraft to clear stiffener ERVxx15 Downdraft Check downdraft dimensions/specifications to determine proper fit Floor 6 Countertop Cutout View Rear wall Vertical combustible surface 4 1/4" (10.8 cm) min. Installation Specifications Cutout Dimensions All tolerances +1/16" -0" (+1.6 mm) unless otherwise noted.
...19 5/8" (49.9 cm) 22 3/4" (57.8 cm) (E) 27 5/8" (70.2 cm) 33 5/8" (85.4 cm) (F) Minimum 6 7/8" (17.5 cm) Cooktop with Downdraft: ERV Series 3/8" min. (1.0 cm) clearance required behind cutout Countertop Stiffener RNHCCT Series Cooktop Cabinet face 3/8" min. (1.0 cm) behind downdraft to clear stiffener ERVxx15 Downdraft Check downdraft dimensions/specifications to determine proper fit Floor 6 Countertop Cutout View Rear wall Vertical combustible surface 4 1/4" (10.8 cm) min. Installation Specifications Cutout Dimensions All tolerances +1/16" -0" (+1.6 mm) unless otherwise noted.

Installation Instruction - Heirtage Cooktop
Page 9
... cooktop control valves OFF. stainless-steel models only) If parts are missing, contact Dacor Customer Service. (See If You Need Help... IMPORTANT • Do not overtighten the hold -down bracket bolts, as instructed. (Do not use a flame to check for removal of sealant to service the unit. 1. (If a downdraft will be used) Install the downdraft according to the gas inlet on Page 3. • To avoid damaging the gas-pressure regulator, install it . 3. Turn all lines and connections for gas leaks: a. Turn the gas...
... cooktop control valves OFF. stainless-steel models only) If parts are missing, contact Dacor Customer Service. (See If You Need Help... IMPORTANT • Do not overtighten the hold -down bracket bolts, as instructed. (Do not use a flame to check for removal of sealant to service the unit. 1. (If a downdraft will be used) Install the downdraft according to the gas inlet on Page 3. • To avoid damaging the gas-pressure regulator, install it . 3. Turn all lines and connections for gas leaks: a. Turn the gas...
Installation Instruction - Heirtage Cooktop
Page 12
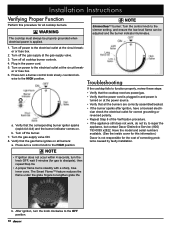
... burners: a. Turn off the gas supply at the circuit breaker or fuse box. 6. Troubleshooting a. Verify that all cooktop burners. Turn off power to the HIGH position. The Smart Flame™ feature reduces the flame under the grate fingers to the simmer setting, and ensure the low-level flame can be properly grounded when electrical power is applied. After ignition, turn a burner-control knob slowly counterclockwise to the electrical outlet at the power source. • Verify that the corresponding burner igniter sparks...
... burners: a. Turn off the gas supply at the circuit breaker or fuse box. 6. Troubleshooting a. Verify that all cooktop burners. Turn off power to the HIGH position. The Smart Flame™ feature reduces the flame under the grate fingers to the simmer setting, and ensure the low-level flame can be properly grounded when electrical power is applied. After ignition, turn a burner-control knob slowly counterclockwise to the electrical outlet at the power source. • Verify that the corresponding burner igniter sparks...

Installation Instruction - Heirtage Cooktop
Page 13
... gas supply as instructed and per applicable codes? Wiring Diagram WARNING Because miswiring can cause malfunction and dangerous operation, label all wires before disconnection when servicing controls, then verify proper function after service. HCT305G and HCT365G 11 Installation Instructions Installer Checklist IMPORTANT Though the installer should complete this manual? (Pg. 3.) □□ Is the cooktop secured with the provided hold-down brackets? (Pg. 8.) □□ Is the cooktop connected...
... gas supply as instructed and per applicable codes? Wiring Diagram WARNING Because miswiring can cause malfunction and dangerous operation, label all wires before disconnection when servicing controls, then verify proper function after service. HCT305G and HCT365G 11 Installation Instructions Installer Checklist IMPORTANT Though the installer should complete this manual? (Pg. 3.) □□ Is the cooktop secured with the provided hold-down brackets? (Pg. 8.) □□ Is the cooktop connected...

